April 2006 Archives

Nikon Digiscope

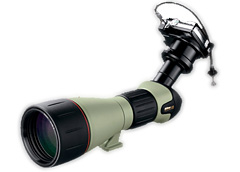
Digiscoping is the ingenious practice of connecting a digital camera to a spotting scope for close-up shots of birds and other wildlife. What began as a bit of a "hack" by serious birders has become adopted by Nikon and other optical companies.

Nikon just announced their Digiscope 8.1 package to complement their existing 5.1 and 7.1 Pro Digiscopes. The package includes a spotting scope, eye piece, bracket, and Nikon camera (as shown in the picture). Prices start around $730 USD.

You can cobble together your own system too. I featured digiscoping in my Digital Photography Hacks book (Hack #94 "Get Close with Digiscoping"). If you don't have the book yet, I have a treat. You can download a PDF of the digiscoping hack (1.3 MB) and build your own system. This hack was contributed to the book by Terrie Miller and is in its original printer's proof format with all of the alignment marks.

Regardless if you build your own system, or buy a slick one such as Nikon's offering, digiscoping is a great way to capture some of Spring's magic.

Technorati Tags: , , ,

Penguin Party - How to Get the Shot

Penguin Party

Lots of great stuff goes on behind glass. I've talked about shooting scenics through hotel windows, but museums and aquariums are also great windows of opportunity. However, lighting in these facilities can make the challenge a bit more daunting.

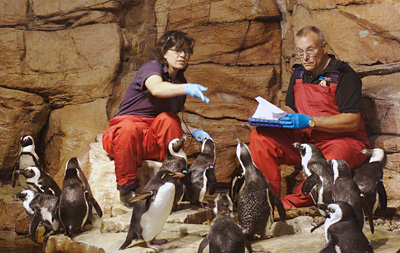
This shot of penguins during feeding hour in an aquarium was captured through thick glass. (She's actually throwing a fish. You can see it in mid air if you look closely.) Here are the steps:

  • Turn off the flash.
  • Increase your ISO to 400 or 800.
  • Set your lens to wide angle or mount your favorite wide angle lens.
  • Use a lens hood if you have one.
  • Put the lens hood directly on the glass to eliminate reflections.
  • You can cup your hand around the lens barrel if you don't have a lens hood.
  • Hold the camera steady and take the shot.

The specs for this penguin shot are: Canon Rebel XT (350) in RAW mode, 17-40mm lens, f-4 @ 1/30th of a second, ISO 400 with white balance set to auto.

If you have the urge to go shoot something interesting, but can't think of a good subject, consider a trip to your local museum or aquarium. You're bound to find something interesting happening behind glass.

Technorati Tags: , ,

Grab Shot 32 - "Cascading Cups"

Cascading Cups

"My cousins and I were 'cup stacking' in the backyard," said Charles Zablan. "I captured this shot of my cousin ripping one of the cups from our massive 15 foot tall stack. I loved the motion effect on the cups and the reaction on my aunt's face as she was startled by the loud crash of about 300 cups."

Charles used a Canon 20D with a 50mm lens set to f-1.8 in Aperture Priority mode -- ISO 400 with the flash on. The shutter speed was set to 1/15th of a second. (This set-up sounds very familiar Charles!)

If you have an interesting candid you'd like to share, take a look at our Submissions page, then send us your Grab Shot. If we publish it, you'll receive an ultra cool custom carabineer keychain.

Technorati Tags: ,

Casio EX Z1000

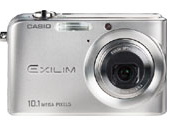
Casio has refueled the megapixel wars with the first 10.1 megapixel compact camera, the EX-Z1000. In addition to lots of resolution, the new compact features a large 2.8" LCD monitor, anti-shake technology, super-life battery, and a release time lag of only 0.002 seconds -- allowing the shot to be captured practically instantaneously with the push of the shutter button.

The EX-Z100 will be available in June for less than $400 USD.

Technorati Tags: , ,

Window Seat

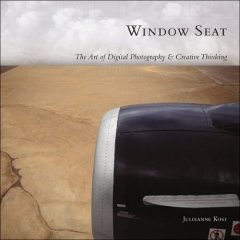
How do you find you photographic vision? I interview Julieanne Kost, the author of Window Seat: The Art of Digital Photography and Creative Thinking, about how her compelling project came to life, and how it's changed her as a photographer.

"I've so enjoyed taking pictures on one subject matter," said Julieanne. "The project just kept growing and growing. Over a course of 5 years I took more than 3,000 pictures." Julianne has included 150 of the best images in her book Window Seat.

The conversation covers the process of choosing your best images, how to evolve as a photographer, and lots of insights from a truly irresistible artist.

Listen to the Podcast

Now that I've piqued your curiosity, it's time to listen to today's audio show titled, "Julieanne Kost on Photo Vision." You can download the podcast here (23 minutes).

Share Your Photo Project

If you have an ongoing photo project, or are considering one, tell us about it in the Comments field. Be sure to include a link if you have samples published.

Technorati Tags: ,

MicroBlast Speakers

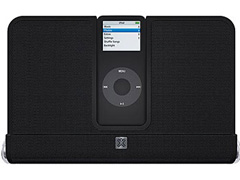
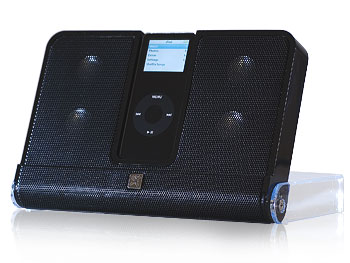
I've always thought that the black iPod nano was one of the best looking music players ever, and XtremeMac's new MicroBlast powered speakers do justice to the nano's stylish design. The black aluminum grill, clear folding cover that ingeniously becomes the base, and tailored protective pouch all perfectly match the nano. And if you have a white iPod, the MicroBlast includes a matching interchangeable frame.

The quad micro speakers are powered by four AA batteries or the included AC adapter. If you use the AC adapter, it also charges the docked nano, even while it plays. I rate the output as above-average for this type of system, especially if you keep the volume setting (on the nano) between 50 and 85 percent. Considering that the MicroBlast is only 1" thick and roughly the dimensions of a standard paperback novel, its big sound surprisingly fills up a small room. I recommend that you play with the nano's EQ setting to customize the output to your ears. Try them all, including the Spoken Word EQ.

I also like that you can leave your nano docked, fold close the clear protective cover, and hit the road without worrying about the safety of your iPod. The included slip cover keeps the clear plastic case free of scratches.

My only nit with the MicroBlast is that it doesn't include an optional audio-in jack enabling me to use it with my 30 GB iPod video. This would be a great sound unit for watching The Daily Show while sipping my morning coffee. The MicroBlast is designed for the nano, and only the nano.

MicroBlast Side View

Is the MicroBlast a good value for its $119.95 price tag? I think so. Based on its quality construction, dashing good looks (I really like the aluminum speaker grill), portability, good sound, and choice of power sources, it's a worthy accessory for the handsome iPod nano.

Technorati Tags: , , ,

Donegal Pub

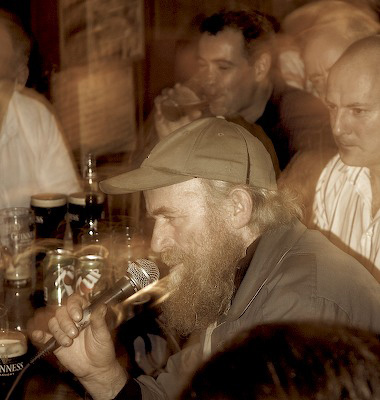
"While on a recent trip to County Donegal, Ireland," said Stuart Murchison. "I took this shot in a tiny local pub in the middle of nowhere with musical instruments for the customers to play. While we were there, there was a family entertaining the punters. The two daughters played fiddle and accordion, while the father (pictured) gave his best rendition of Johnny Cash's Walk the Line. Shot on Nikon D70 F4.5 0.8s ISO 800 with slow sinc flash."

If you have an interesting candid you'd like to share, take a look at our Submissions page, then send us your Grab Shot. If we publish it, you'll receive an ultra cool custom carabineer keychain.

Technorati Tags: ,

Harbor Seal with Pup

Harbor Seal with Pup

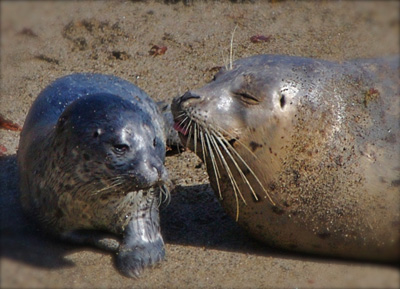
The Harbor Seals in Monterey County pup during April. During my recent explorations, I found a sheltered cove where the pups were learning to swim and hunt with their mothers. There were over a dozen pairs that were taking turns venturing into the water, then returning to the beach to nurse and rest. This pup must have done well after his recent excursion, because if you look closely, he's about to receive a kiss.

This shot was captured from a cliff above the beach where I could observe but not disturb the seals. I used a Canon 75-300 Image Stabilizer on a Digital Rebel XT in RAW mode. The ISO was 400 with a shutter speed of 1/750 @ f-9.5 with image stabilizer turned on. I handheld the shot at 300mm.

Technorati Tags:

Lightzone Drops Price to $149.95

Lightzone

Back in January I posted a short article about Lightzone. I was introduced to this image editor/photo manager at Macworld, and it seemed to be attracting a lot of attention. At the time, the price was $249.

Lots of news on this front since then. LightZone now runs on both Windows and Mac OS X. The new Universal Binary version is compatible with both PowerPC- and Intel-based Mac computers. Version 1.3 is available to all current owners of LightZone as a free software update. The company claims it provides increased performance and camera compatibility. Plus, they've also reduced the price to $149.95.

Seems like high-end photo managers are coming back to earth. With Apple's recent announcement of Aperture 1.1 with better performance and a new price tag of $299 (down from $499), and now Lightzone's reduction to $149.95, I'm curious to see what price Adobe is going to announce for its new product, Lightroom, later this year.

Technorati Tags: ,

Grab Shot 30 - "Lightning"

Lightening

Updated 4-20-06

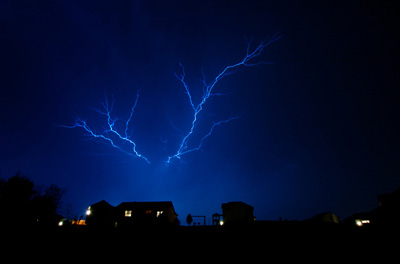
"I shot this photo this past weekend during a thunderstorm," said Dan Polly. The lightning show was awesome, so I took a chance, grabbed my camera, and came away with this shot. The whole storm was very surreal, and this picture seemed to capture that feeling."

Dan used a Nikon D70 in Aperture Priority set to f-8 ("I'm a sucker for this mode!" he says). The ISO was 200, focal length 13mm, and the exposure was a whopping 25 seconds. This is the best way to catch lightning, by leaving the shutter open for a while. You can also go the other way and set the shutter to 30 seconds in Shutter Priority mode.

If you have an interesting candid you'd like to share, take a look at our Submissions page, then send us your Grab Shot. If we publish it, you'll receive an ultra cool custom carabineer keychain.

Technorati Tags: ,

Aperture 1.1

Want to learn more about the tinkering under the hood that Apple did with the latest version of Aperture? Scott Bourne, the photo guru behind the great ApertureTricks website, had delved into Aperture 1.1 and posted his review on Mac DevCenter. If you're a current Aperture user, or tempted to try it now that the price has been reduced from $499 to $299, you should read what Scott has to say.
Technorati Tags: ,

Grab Shot 29 - "Gnome Court"

Gnome Court

"A neighbor of mine, whom I've never met, often sits in this swing and watches the world go by," said Charlie Solomon. "Only when I got a little closer (one day when he wasn't there) did I realize that he's got all these gnomes (and maybe an angel) set up as though they're paying attention to him, maybe as if he's holding court with his advisors, the gnomes."

Charlie used a Canon PowerShot S2 IS set to 1/60 at f-4 to capture this grab shot.

If you have an interesting candid you'd like to share, take a look at our Submissions page, then send us your Grab Shot. If we publish it, you'll receive an ultra cool custom carabineer keychain.

Technorati Tags: ,

Golden Gate Bridge

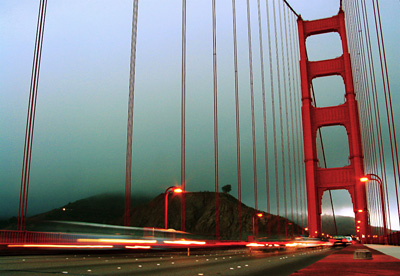
Our photo compositions are just as prone to bad habits as any other regular activity. Every now and then it pays to step back and rethink our approach to taking pictures. This begins the process of creating compelling compositions.

One habit to avoid is always holding the camera the same way, at the same level. By raising your lowering the camera, your angle of view changes and so do your compositions. Another trick is to walk around your subject and not just take the first shot that presents itself. And don't forget to zoom in and out while experimenting with your compositions.

Listen to the Podcast

Now that I've piqued your curiosity, it's time to listen to today's audio show titled, "Compelling Compositions." You can download the podcast here (28 minutes).

Technorati Tags: , ,

Is Your Firmware Up to Date?

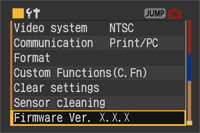
Firmware Menu

Digital cameras are really computers with a lens attached. And just like our desktop computers, their operating systems need an occasional upgrade. These are called firmware updates, and they're designed to fix known problems and sometimes add new functionality. The procedure usually goes something like this: You download the firware update from the camera manufacturer's website, copy it on to a memory card, put the card in your camera, initiate the firmware update, don't touch anything during the updating process, then clean off your memory card and go take pictures.

If you haven't updated your camera since the beginning of time, you might want to check your manufacture's website to find out the current version of firmware available. If you're not comfortable updating your camera yourself, you can always have technicians apply the update for you. Here are a few recent updates that are available:

Technorati Tags: , ,

Canon 30D

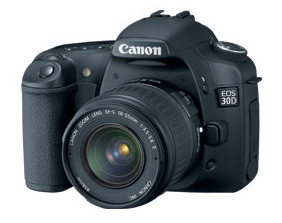
DP Review has published an exhaustive look at the new Canon 30D. Among their "pros," they cite excellent resolution with very good per-pixel sharpness, welcomed spot meter, low noise at high ISOs, great long exposure capability, spacious 2.5" LCD monitor, and excellent construction.

For the "cons," the auto white balance has only average performance, and the ISO sensitivity is not displayed on the top panel. Even though some people have complained that there wasn't a megapixel upgrade with this model, DP Review said there is really little "real world" difference between 8 and 10 megapixels.

You can read the complete report here.

Technorati Tags: , ,

Grab Shot 28 - "Artistic Eggs"

Artistic Easter Eggs

"I was out at the Starnberger See, which is a large lake close to Munich," said Oliver Breidenbach. "And there was a woman selling easter eggs that she had painted herself. I was attracted to the colors in this composition."

Oliver used a Panasonic DMZ-FZ30 in program mode with the ISO set to 80 and the flash turned off.

If you have an interesting candid you'd like to share, take a look at our Submissions page, then send us your Grab Shot. If we publish it, you'll receive an ultra cool custom carabineer keychain.

Technorati Tags: ,

Color Readouts in HUD

If you have Aperture already, version 1.1 is available right now via Software Update. If you haven't purchased it yet, Apple has lowered the price to $299 (down from the original $499).

I've been using Aperture on a PowerBook from the beginning, and have been waiting for the 1.1 release to provide better performance when working with big RAW files. That day is here. I downloaded the update and went to work.

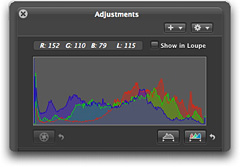
Many people will comment on the new color values readout that's available in the HUD and the Digital Loupe. Nice addition, but the three truly important changes are improved RAW decoding, faster performance on a PowerBook G4, and UB compatibility on the new MacBook Pro. After just a morning of testing, Apple appears to deliver on all three counts.

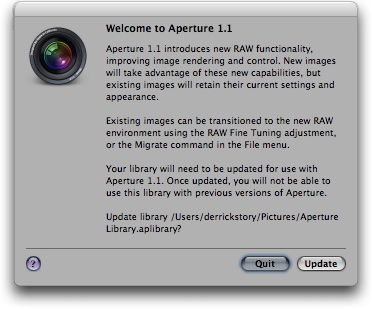
When you first fire up 1.1, you're greeted with this screen (below). The library update went smoothly on one of my smaller libraries, and I'm going to test updating a bigger one later today. The workflow was smoother on the G4 that previously with the 1.0 version, and I'm looking forward to burning through a large project with this update, just so I can get to know how all the different functions perform.

Welcome Screen

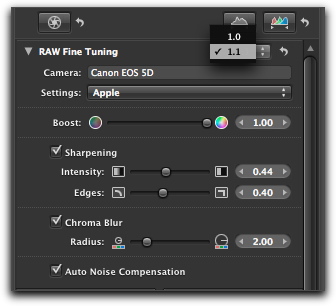
As for RAW decoding... well, that's going to take some side by side testing with 1.0 decodes. I do like the new RAW Fine Tuning control in the HUD. It allows me to stick with my previous 1.0 decode, or switch to the new 1.1 interpretation with added controls. My first impression is that the new rendering of my .CR2 files from a Canon 5D and Digital Rebel XT look good. Very good.

RAW Fine Tune

Of course the real temptation is to get a MacBook Pro now that Aperture is Universal Binary. Alas, if only they had the 17" model ready. Overall, I think this is a fine upgrade, and I'm looking forward to testing all of its nooks and crannies.

Technorati Tags: ,

iPhoto 6

How would you like to own a complete, unaltered chapter from the just-released iPhoto 6: The Missing Manual that covers two of iPhoto's 6 newest features: photocasting and iWeb publishing? For free!

You can right now by visiting the O'Reilly iPhoto 6 catalog page and clicking on the Chapter 9: iWeb, Photocasting, & Network Sharing (PDF Format) link. This PDF download is 35 pages and a 7.4 MB download. You'll learn everything you need to know about sharing your images via RSS (photocasting), building iWeb pages from your iPhoto 6 library, and iPhoto's networking capabilities.

And remember, iPhoto 6 runs on the new Intel Macs too...

Technorati Tags: ,

Canon 30D

There are two types of digital camera disasters: those we bring upon ourselves and those of which we have no control. In this podcast I talk about both.

One of the pitfalls that I warn to stay away from is canned air, and I recommend to use blower bulbs instead. My favorite is the Giottos Rocket Air Blaster. But even with the Rocket, be sure to use it with care since you're inside your digital SLR where all the sensitive components reside.

I also find Ziploc bags very useful for protecting my cameras from humidity and condensation. Always have one with you that's large enough to contain your camera and lens.

Finally, keep an eye out for firmware updates for your camera. Sometimes they add new features to your model, but often they fix problems and are well worth the effort of installing.

Listen to the Podcast

Now that I've piqued your curiosity, it's time to listen to today's audio show titled, "Camera Mayhem - Self-Inflicted and Otherwise." You can download the podcast here (30 minutes).

Technorati Tags: , ,

iPhoto6 TMM

"Don't let the rumors fool you. iPhoto may be simple, but it isn't simplistic," say David Pogue and Derrick Story. "It offers a wide range of tools, shortcuts, and database-like features; a complete arsenal of photo-presentation features; and sophisticated multimedia and Internet hooks. Unfortunately, many of the best techniques aren't covered in the only 'manual' you get with iPhoto--its slow, sparse electronic help screens."

That's where their new iPhoto 6: The Missing Manual (Pogue and Story, O'Reilly) comes in: it's the iPhoto book that should have been in the box and a complete course in digital photography.

Dramatically faster than previous versions, iPhoto 6 can handle 250,000 photos and boasts dozens of new features for storing, searching, editing, publishing, and sharing digital pictures. In full color, this authoritative, witty guide delivers the technical expertise to take advantage of each and every iPhoto detail, as well as the artistic know-how to shoot consistently great photos--including professional tips for composition, lighting, and manual exposure.

Technorati Tags:

Grab Shot 27 - "Orange Hat"

Orange Hat

"I was in Venice Italy earlier this year," said Allen Rockwell. "After taking several hundred photos of canals, gondolas, and Venetian architecture, I was sitting in my hotel room at the Danieli looking out the window at all the interesting people walking by below. I thought maybe I should go down there and take some people pix."

"My partner was taking a nap, so I slapped on the long zoom lens and headed down. I captured these dear old ladies sitting at a sidewalk cafe on the grand canal, and could not help noticing the lady's wild orange hat and tinted sunglasses. Her animated personality was as vibrant as her chapeau. Her friend looked on enjoying the show."

Alan captured this grab shot with a Canon 20D and an EF 100-400 IS telephoto lens. Settings were f5, 1/250th, ISO 400, and 250mm focal length.

If you have an interesting candid you'd like to share, take a look at our Submissions page, then send us your Grab Shot. If we publish it, you'll receive an ultra cool custom carabineer keychain.

Technorati Tags: ,

PhotoFocus Radio

iPhoto 6 continues to impress casual and serious photographers alike. In an recent interview with Scott Bourne on Photofocus Radio, Derrick Story, co-author of iPhoto 6: The Missing Manual discusses with Scott the new features in version 6, including Photocasting. The interview begins about half way through the show.

Scott also covers news in the world of photography and provides a hands-on review of Apple's MacBook Pro. Lots of good stuff to listen to. You can download the show here or visit Photofocus.com and click on the April 8 entry.

Technorati Tags: ,

Grab Shot 26 - "Tacky Sunglasses"

Cormorant

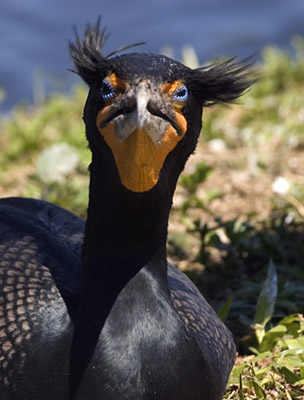
"This cormorant was photographed in Everglades National Park a couple of weeks ago," said Frank Blanco. "I used a 100-300 zoom to blur out the background. The bird was resting on the side of a 'tourist' trial enjoying the South Florida sun and was not phased by the people passing by only inches away. The cormorant reminds me of an elderly, retired lady living on South Beach... you know the one I mean... who always wears those tacky sunglasses."

Frank used a Nikon D100 set to 1/80th of a second at f-9 (Aperture Priority mode), ISO 200.

If you have an interesting candid you'd like to share, take a look at our Submissions page, then send us your Grab Shot. If we publish it, you'll receive an ultra cool custom carabineer keychain.

Technorati Tags: ,

Exposure Plug-In

The folks at Alien Skin Software market their latest Photoshop plug-in, Exposure, as a film simulator. That's right, they've analyzed dozens of film stocks and brought those unique characteristics to your digital photos. So if you're in the mood for the vivid colors of Velvia or those rich Kodachrome blacks, you can have them with just the click of a mouse.

Where Exposure really turned my head though was how effortlessly it handled Black & White emulation. Most of my favorite films were there -- Tri-X, T-Max, Delta 100, Neopan, and HP5 -- and they look great. Never has film grain been such a welcomed sight. And unlike the old days, I can control the grain in the shadow, midtones, and highlights... and even the size of the grain itself. The Alien Skin presets for the different film stocks are all you'll probably ever need, but if you really want to tinker, they can be the starting point for you creating your own film stock (and saving it for future use).

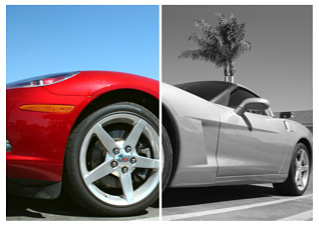
Needless to say, Exposure is a terrific B&W converter for your digital images. Not only will they look like "real" B&W photos, you have an array of "film looks" to choose from. Print one of these conversions on a quality B&W printer, such as the Epson R2400, and you'll never yearn for the stench of Rapid Fixer again.

You have all sorts of additional controls beyond film emulation, such as curves, sharpness, and toning. There are some nice UI features such as a variety of split preview panes to choose from, a toggle button to see the original photo, and a magnifier. All of this functionality and convenience comes at a price however; Exposure will set you back $199. To decide if you think it's worth the money, you can download it and play with a fully functional version for 30 days. I recommend that you give Exposure a try. It works on both Mac and Windows platforms.

Technorati Tags: ,

"The Perfect Print" - Podcast 26

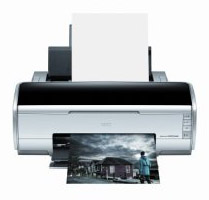
Epson R2400

Making a good print is more science than art. The creative process happens before printing -- capturing and editing the image. When it's time to put it on paper, all we want is to take what we see on the monitor and output it. Why is that often so difficult?

It doesn't have to be. Just remember these three steps: calibrate your screen, image edit your photo, and configure your printer.

If you don't have a colorimeter to calibrate your monitor, such as the Pantone Spyder, go to the Displays preference pane, click the Color tab, then click on the Calibrate button. Mac OS X will walk you through a pretty good calibration process. My tips are, use 2.2 for the Gamma setting and D65 for the White Point. Some folks have asked me about the new huey screen calibrator that costs less than $80 and includes nifty software for the Mac. It's fun to use, but I get better results from the Spyder, or even using the Displays preference pane calibrator.

Now that your screen is displaying photos properly, open the image you want to print and make your basic exposure and white balance adjustments. Don't go crazy here, just tweak enough so the image looks natural and balanced.

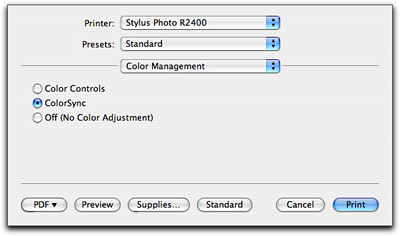
The final tip is to let your Mac control the color management, not the printer. Choose Colorsync in your printer dialog box (from the Color Management dropdown menu) and choose the correct type of paper from the Print Settings dropdown. If you have custom ICC Printer Profiles for your printer, load them and use 'em. This is one of the reasons that I like Epson printers so much. You can download ICC profiles from the Epson site.

Colorsync

Now print. You'll be surprised how much better your output looks by just following these three basic steps. And in case you're curious, my current favorite "serious" printer is the Epson R2400. This is a great fine art unit that produces archival content that lasts for over 100 years. On the simple side of things, I really like the portable Dye Sub units made by Canon. I've been using a CP-300 for some time now for 4"x6" snapshots, and it works great.

Listen to the Podcast

Now that I've piqued your curiosity, it's time to listen to today's audio show titled, "The Perfect Print." You can download the podcast here (26 minutes).

Technorati Tags: , ,

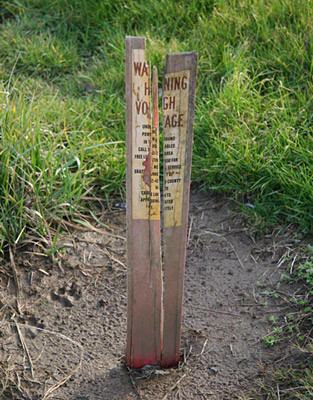
Grab Shot 25 - "High Voltage"

High Voltage

Lori Matthiesen was hiking at a location in Ocean Shores, WA that was supposed to be good for bird watching. But instead of finding fowl, she found this great sign, which cracked her up.

Lori used a Canon 20D, ISO 200, 1/250th @ f-5.6. The flash was turned off.

If you have an interesting candid you'd like to share, take a look at our Submissions page, then send us your Grab Shot. If we publish it, you'll receive an ultra cool custom carabineer keychain.

Technorati Tags: ,

Epson R2400

The Epson R2400 is the new workhorse printer for the Story Photography studio, beating out the latest offerings from Canon and HP. I had a chance to get to know the R2400 during this past rainy weekend, and I thought I pass along my first impressions.

I based my buying decision on a few key factors. First, I was impressed with the new UltraChrome K3 inks. They are beautiful and take archival permanence to a new level... 100 years plus. Second, Epson's downloadable ICC Printer Profiles enable me to get perfect color matching right out of the box. Why every printer manufacturer doesn't provide these is beyond me. Third, Epson's printer software for both Mac and Windows is excellent and easy to use. And finally, the B&W output from the R2400 is gorgeous.

The R2400 comes with a FireWire cable, but since I'm often printing from a PowerBook that only has one FireWire 400 port, I opted to use my own USB cable. The printer works equally well via FireWire or USB 2.0. A full set of K3 cartridges comes with the unit, so you can fully set up and test without having to buy ink. I have an extra set, but after a weekend of printing both B&W and color, I haven't had to replace any of the 9 colors yet.

If you like to print on matte surface, as I do, keep in mind that you have to switch one of the cartridges to do so. I recommend that you batch your printing to reduce the need to swap out cartridges. It only takes a few minutes for the R2400 to go through the reset process when you make a change. That's not forever, but it sure feels like it when you're anxious to make a print.

The paper feed is wonderful, and I was able to easily print on a variety of surfaces without a single jam. The top loading feature, even for 13" x 19" papers, is a true convenience and space-saver.

Finally, the output is outstanding. Accurate color, no smears, true photo quality, and fast printing speed. The R2400 will set you back about $800 plus $14 per cartridge. That's a lot of money for casual printing. But if you like making your own fine art enlargements (up to 13" x 19") and want prints that last for a long, long time, this is a highly recommended printer.

Technorati Tags: , ,

Automate Aperture Presets Backup

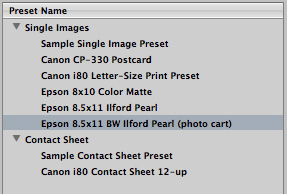
Aperture Print Presets

Aperture enables you to create presets for many of its functions including saving custom print output settings, slideshow transitions, and creating your own file export configurations. Much in the same way that your Photoshop actions become invaluable assets, so will your Aperture presets. In fact, if you were to lose those presets, or move to a new installation of Aperture without them, you'd feel the pain of having to recreate all that work.

I recommend that you automate backing up your Aperture presets so that you always have the latest settings available. Since I have a .Mac account, I can use Backup to automatically store my latest presets online. I can then retrieve them for a new installation or for restoration after a crash.

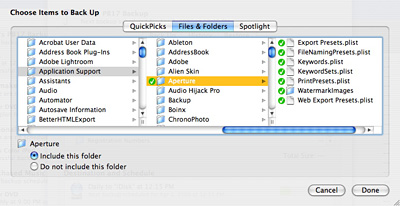
The Aperture presets are located here: Your Home Folder > Library > Application Support > Aperture. Simply navigate Backup to this folder and set up daily backups. That way you'll always have your latest set of presets available... no matter what happens.

Aperture Presets Backup
Setting Up Backup

Technorati Tags:

Friends

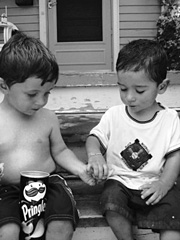
Photographer Geoff Hankerson says, "What signifies friendship more than sharing?" He captured this shot with a Canon PowerShot A70, then converted to B&W using the channel mixer in the GIMP.

Geoff's shot is one of eleven featured in this month's TDS Photo Assignment titled "Friends." You can see all the entries by clicking on the Read More link.

The Photo Assignment for April 2006 is "vertical." If you'd like your shot considered for publication, send it in by April 30. For more information, see our Submissions page.

====================================

Technorati Tags: