"I read about the lunar eclipse just a few hours before it was to start, in an urgent email from a friend," said Marty German. "I had just enough time to Google the local start times for each of the main phases."
How Marty Took the Shots
"I setup my 1980s Leitz Tiltal tripod and mounted my Nikon D200 camera with its 1980's Nikon 80-200 f/2.8 ED AF lens manually focused to infinity, and set it to its maximum 200mm zoom. It was the longest lens that I own. I shot everything in raw so that I could 'tweak it' later. As it turned out, this made all of the difference! To minimize vibrations I used the self timer to trigger the actual shots."
"Because my first shot was of the full moon at 'first contact', it was basically a 'full sunlit' object. So the same exposure to photograph someone on the beach in full sun, is perfect for shooting the full moon."
"I guessed my starting exposure using the f:16 rule. This rule says to use f:16 at the shutter speed nearest to your ISO setting. In this case this was 1/500th of a second (because I was shooting at ISO 500) but after bracketing a few shots, f:11 turned out to be the best exposure. I think this was because the eclipse had already begun."
"As quickly as possible, I made a dozen shots before retreating into my warm house. It was 22 degrees here in CT. This is good for a 'dry' clear sky but challenging for the photographer to endure! When the wind blew, my tears froze to my eye lashes making it difficult to compose the moon in the viewfinder."
"An hour later, I went back outside and repeated the same basic procedures, but this time the luminance of the mostly eclipsed moon had decreased. The best test exposure histogram changed to f:9 at 1/500th of a second with everything else remaining the same."
"After another dozen 'duplicate' CYA shots, I went back in to thaw out, again. Unfortunately, gloves don't work the controls of a DSLR very well so I didn't have any on. Did I say it was really cold out?"
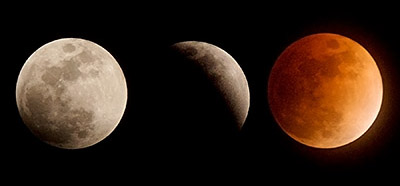
"Another hour later and the moon was dark except for the 'earth shine' created by our atmosphere catching and bending our star's light and acting as a giant filter!"
"The rust color is created by the dust particles and gases in our atmosphere. From the look of the moon, our atmosphere was pretty dirty that night! The same as it looks through the smoke of a campfire at night. Because our atmosphere is so thin, only a small ring of sunlight around the rim of the earth gets bent enough by the atmosphere to illuminate our moon when it is in this totality of our eclipse. For this final shot of the rusty moon, I opened up the lens to it's maximum f:2.8 aperture and the exposure was all the way down to 1/10th of a second."
"All night, I'd been watching high cirrus clouds moving in and in this final shot they softened the moon noticeably. The secret to getting a shot through 'steady' air is to make lots of repeat shots and hope you get a clear one. Patience and persistence is required! That's why I made a dozen duplicate exposures of the first two phases. But for this third shot, with the clouds getting heavier and the exposure much longer, I made two dozen exposures for this last shot of the moon."
"As it turned out, only one out of all of these final shots was good enough to use! This kind of photography often comes down to luck no matter how good your gear and preparedness is."
How Marty Processed the Images
"I used my Aperture 2 trial software to 'process' the three shots. Thanks to Derrick's, "Aperture 2: New Features" tutorial on lynda.com, it took only a couple of minutes for me to adjust each shot, fine tuning exposures, boosting contrast and reducing color noise. Now I have to come up with the money to buy Aperture, and it's all your fault, Derrick ;-) (BTW Great tutorial! Thanks again.)
"Normally I'd have used Capture NX to process my Nikon raw shots, but I found that the new Aperture interface was faster and easier to use, and IMHO, the raw converter in Aperture 2 is as good as NX's and both NX and Aperture produce noticeably better Nikon raw conversions than ACR does."
"Because my longest lens is only a 200 mm lens, the moon shots required a lot of cropping and the final moon image of each ended up being only 500 pixels square. This was also simple to set precisely so that they were all exactly the same size in Aperture 2."
"I took these three images and combined them in Photoshop CS3 to make up the final montage, and then up-sampled the final image to 300 dpi and 4" x 6" which is 1800 pixels by 1200 pixels."
"I made this montage for my 9 year old nephew, Clay. I hope you enjoy my pictures as much as I've enjoyed looking at all of your best shots on the Digital Story Public Pool on Flickr."
Photo of the Lunar Eclipse Phases by Marty German.
More Tips from The Digital Photography Companion
"How I Did It" is a new feature of The Digital Story featured on The Digital Photography Companion mini site. These are techniques from virtual camera club members who have built upon information in The Digital Photography Companion, or have come up with new tips altogether.
We're building a living library of knowledge for everyone to use (and contribute to). If you have a "How I Did It" tip to share, just send it to me with the sample photo, and put "How I Did It" in the email subject.
Technorati Tags: digital photography, Digital Photography Companion, technique, Technology, The Digital Story, How I Did It


123
testing .......
123
testing.............................
Hi Marty, thanks very much for your post! Could you explain a little more in details how you decided on the correct exposure for each shot. You mentioned how you set your initial exposure using the f:16 rule, but then found out than f:9 worked better, after bracketing a few shots.
And for the second shot, you mentioned that you reviewed the exposure histogram to determine that f:9 worked best this time.
Here are my questions:
- Do you review your shots on the LCD screen of the DSLR each time? do you use the automatic "Image Review" after each shot?
- Do you use the histogram all the time? Do you only review the histogram? If so, do you just check the RGB one and look for a somewhat evenly distributed bump, centered in the middle?
I don't regularly use it while shooting, so I'm looking to see what other people do with it.
- What did you use for your exposure metering? average, center-weighted, spot? I assume that given the fact that your zoom only went up to 200, the moon was pretty small in the middle of your frame, so you used spot metering?
Thanks again, and congratulations on the pictures!
Hi Marty,
Very nice pics. The color of the moon during a total lunar eclipse is actually caused by refraction in the atmosphere - the red/orange component of light from the sun is bent enough to give the moon some illumination. Its the same thing that causes sunset & sunrise to be red.
Thanks for your comments and questions. I'll do my best to answer them.
I do use the automatic image review which I have set to show me an over lay of the histogram. I use the combined histogram and like to see the hump slightly to the right but not clipped and shoot raw so that I can fine tune it, later. This lets me record more shadow details than are normally possible. This only works in RAW.
I still bracket in 1/3 stop intervals over and under what appears to be the correct exposure.
I also made several duplicate exposures because the night air was moist enough that it causes distortions. So, the only way to get a clear shot is to shoot many and hope you got a clean one in the bunch!
In this case I didn't use the meter but rather the old reliable f/16 rule as my starting point. The reason it wasn't correct was that the eclipse had already begun when I took the first shot and that's why I had to open up more.
Also, I've found that f/9 is usually as good as it gets on this lens. Smaller or larger apertures aren't quite as sharp.
I'd guess that a 600 mm lens would be needed for a full DX framed shot of the moon so, my 200 required a major crop down to 500 px square!
One thing I forgot to include was that I used Photoshop CS3 to 'up sample' the image as a last step to 300 dpi for printing to 8" x 11".
The Aperture trial was the 'secret sauce' that made these images so striking. I did try to adjust them in iPhoto, Capture NX, and even Photoshop CS3 but was only happy with what I got from the new Aperture 2 software.
Apertures sliders made it possible to fine tune the images in real time and see the results. For some reason that I don't fully understand, these results were visually better than in any of the other software packages that I tried.
I suspect this is because of their RAW conversion improvements.
It will be a while before I can buy a copy of Aperture 2 (and the NIK plugin). I can't wait to see what they will do to all of my favorite archive photos!
NIK software is making a plugin for Aperture that does the UPoint adjustments like CaptureNX. I find this to be the closest to what I used to do in my darkroom to anything else that's available.
So it looks to me like the software is finally catching up to the DSLRs! I just want to make good looking prints.
I was (and still am) a film photographer for many decades and have used digital since 97. It seems that digital has finally caught up to film both in the cameras and now with Aperture 2, in the software that was made for photographers.
I'm glad you've enjoyed my photos. Thanks and good shooting to all of you! I'll see you in the Digital Story group on Flickr.
Please feel free to ask me any other questions.
Best regrads,
Marty German
Nice tutorial, not sure if it was mentioned but what ISO did you use?
Hi, this a great picture and a good informative article.
Regards,
Colin
Hi, this a great picture and a good informative article.
Regards,
Colin
Hi, this a great picture and a good informative article.
Regards,
Colin
Can you please please explain the Solar and Lunar?