May 2009 Archives

It's a colorful world, and this month's photo assignment participants have captured its vibrancy to share with our viewers. This April 09 Photo Assignment Gallery is a delight for the eyes.

The June 2009 assignment is "Splash." Start working on your contribution now. Details can be found on the Submissions page. You can submit photo assignment pictures up to 600 pixels in the widest direction.

Please follow the instructions carefully for labeling the subject line of the email for your submission. It's easy to lose these in the pile of mail if not labeled correctly. For example, the subject line for next month's assignment should be: "Photo Assignment: June 2009." Also, if you can, please don't strip out the metadata. And feel free to add any IPTC data you wish (These fields in particular: Caption, Credit, Copyright, Byline), I use that for the caption info.

Photo by Maria Camillo.

Good luck with your June assignment, and congratulations to all of the fine contributors for April. It's an colorful collection of images.


twitter.jpg Follow me on Twitter

-


Now Available! The Digital Photography Companion. The official guide for The Digital Story Virtual Camera Club.

  • 25 handy and informative tables for quick reference.
  • Metadata listings for every photo in the book
  • Dedicated chapter on making printing easy.
  • Photo management software guide.
  • Many, many inside tips gleaned from years of experience.
  • Comprehensive (214 pages), yet fits easily in camera bag.

Technorati Tags: , ,

The Canon Digital Rebel T1i (500D) is a nimble DSLR that hangs light on the shoulder and responds quickly when you press the shutter. I mounted a Canon 70-200 mm L f/4 zoom on the 15 megapixel body and hit the pavement in San Francisco's Nob Hill district to see how the T1i would hold up on the streets.

The first thing I noticed is that the 70-200mm f/4 is a good lens for the T1i in this enviroment. The rig felt light and balanced, yet substantial enough to steady when shooting. Focusing was very fast. I set the AF pattern to the center point (cross sensor), which is the most sensitive of the nine focusing points. Automatic AF point selection worked well too. I'm just in the habit of telling the camera where I want it to focus.


Buildings on Nob Hill in San Francisco. Photo by Derrick Story with Canon Rebel T1i and 70-200 mm f/4 zoom. Image was captured in Raw and processed in ACR 5.4. Click on picture to zoom to larger size.


I shot in Raw, Jpeg, and Raw+Jpeg. Burst rate was good, hovering right around 3.5 frames per second. I usually had 9 frames available in the buffer for each sequence when shooting Jpeg or Raw. But it went down to 4 when shooting Raw+Jpeg. With a fast card (SDHC Class 6), the buffer empties quickly, and the camera seemed ready to go when I was. So the T1i's burst mode feels fine for street shooting. For fast action sports, you might have to wait on occasion, but the rest of the time, you should be fine.


Workers on Nob Hill in San Francisco. Photo by Derrick Story with Canon Rebel T1i and 70-200 mm f/4 zoom. Auto Lighting Optimizer was set to Standard for this image recorded as a Jpeg. Click on picture to zoom to larger size.


I had the Auto Lighting Optimizer set to Standard. This feature (customizable via the Custom Functions) is helpful in contrasty lighting conditions. It helps you hold detail in the shadows and highlights. You have four "strengths" for the ALO: Low, Standard, Strong, and Disable. I think it's helpful for street shooting because I often encounter strong highlights and shadows, and am usually working quickly. You can see the ALO at work with the Jpeg image of the workers in this article.

Jpeg file size (4752 x 3168) was around 6 MBs per shot at the high quality setting. Raw files weighed in around 21 MBs per shot. I processed the .CR2 files from the T1i in the latest release candidate for Adobe Camera Raw (5.4). I could also use the Digital Photography Professional software that came bundled with the camera. Keep in mind if you're shooting Raw+Jpeg, you're averaging around 27 MBs per shot.

Overall, I think this is a fine camera for street shooting. It's not a quiet picture taker, nor does it have Silent Shooting in Live View as does the Canon 5D Mark II. But with street noise, most people never hear you working anyway. This might be more of an issue, however, at weddings, I'll continue to test the Canon T1i in other situations and let you know. For this type of work, however, it's terrific.


twitter.jpg Follow me on Twitter

-


On June 2, Canon 5D Mark II owners will be able to download a firmware update that unlocks key functions in video mode. Movie makers will then be able to set ISO, aperture, and shutter speed.

This should propel the 5D2 to new filmmaking heights now that artists have the control they've been asking for.

"Make a Custom Photo Gift Bag"

Your photos can be used to make beautiful custom gift bags. And the best part is, you don't even need a photo printer. Stephanie Scheetz shows you how to transform your images, printed on regular white office paper, into personalized gift bags that will impress your friends and family. All you need is a little tape and Stephanie's expert guidance.

Zoom out pictures, instructional video, Flash podcast player, new Creative Output department... welcome to The Digital Story V2 (TDS). In this week's podcast, I introduce you to the new features of our retooled site. We upgraded the hardware, updated the publishing platform, refreshed the look, and added new content. We poised for the next generation of our virtual camera club.

To help you visually compare. Here's how TDS appeared from Oct. 2005 through April 2009 (click on image to zoom to larger size):

After we launched the site refresh in May 2009. Here's how the site looked (click on image to zoom to larger size):

Monthly Photo Assignment

Rim Lighting is the May 2009 Photo Assignment. This portrait technique puts the light source behind the subject (creating the rim light effect) then uses a fill light for the front. You can read more about how to submit on our Submissions page. Deadline for entry is May 31, 2009.

Listen to the Podcast

You can also download the podcast here (24 minutes). Or better yet, subscribe to the podcast in iTunes.

Want to share photos and talk with other members in our virtual camera club? Check out our new Flickr Public Group. It's a blast!


twitter.jpg Follow me on Twitter

-


Podcast Sponsors

SiteGrinder lets you take ownership of your websites. Effortlessly output pages right from Photoshop.

Red River Paper -- Try the $7.99 Sample Kit.

Add Magic to Your Slideshows -- FotoMagico presentations are so amazing that your audience will be asking how you did it.


Technorati Tags: , , , , ,

When I started shooting HD video with the Canon 5D Mark II, and now the Canon Digital Rebel T1i, I wanted a rig for recording on the go so I didn't always have to use a tripod. I investigated commercial steadicams, such as the Redrock micro, but spending $1,000 wasn't in my budget. I also looked into "do it yourself" rigs, such as the $14 Video Camera Stabilizer, but I needed something that looked a bit more professional for client shootings. So, I guess I needed a semi-DIY steadicam: one that I could afford, but also had some style.

Optical stabilization is very important when you're in video mode. The difference between recording with stabilized lenses and non-stabilized is dramatic. But when you're shooting "walk and talks," optical stabilization isn't enough. So I hacked together a stedicam that uses just two components: 1) Stroboframe Quick Flip 350 Flash Bracket ($48), and (2) a $30 monopod, such as the Velbon RUP-40 4-Section Monopod. Total outlay is less than $80, that is, if you don't already have these components laying around the house right now.

Assembly only takes a minute. Screw the collapsed monopod into the end threaded hole on the flash bracket, attach your 5D Mark II, D90, Rebel 500D, etc., and start recording. I hold the grip of the flash bracket in my left hand and monpod grip in my right. This positioning provides the balance I need to record more evenly, even as I walk. You still need a stabilized lens, but this system works great.

For shots where you don't have to walk, try putting the camera strap around your neck and resting the collapsed monopod on your belt. Hold the steadicam so the neckstrap is taunt. It's amazingly solid.

When you're finished shooting video, disassemble the rig and you have a monopod, flash bracket, and hopefully, some great video footage.


twitter.jpg Follow me on Twitter

-


Packing Tape Transparencies


Sure packing tape has many uses, but in photography? And crafting? Certainly! Packing tape transparencies are not only simple to make, but offer countless crafting possiblities.

Print your favorite photo on to copy paper. Since packing tape is narrow (usually 1 1/2" or 2") be sure your printed image is small. Place a piece of clear tape over the printed photo and press firmly. Excess paper should be trimmed away from the edges of the tape. Wet the back of the paper with water and gently wipe the surface with your fingertip until the paper starts to ball up. After the paper is removed, you will discover that the printed ink remains on the tape giving the illusion of a transparency or slide.

To mount your picture, lightly spray the back of the tape with an adhesive and adhere it to the front of a blank notecard. You can decorate the card front with words or other embellishments.

Now it's easy to achieve the look of a vintage photo without having to turn back the hands of time!

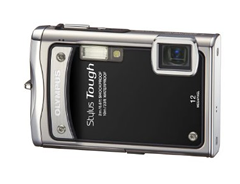
When you hold the Olympus Stylus Tough 8000, you know immediately that this isn't your normal compact camera. Its visible screws, metal armor, and weatherproof gaskets protect a 12 MP sensor, 3.6X optical zoom, and 2.7" LCD monitor. Yes, the specs are good, but the design is what makes the difference here. This camera isn't just dunk-proof, you can take it diving to a depth of 33 feet. The Stylus Tough 8000 can also withstand cold environments (14 degrees f) and survive a drop from a height of 6 feet.

Olympus has had some fun with this theme of durability. They created a series of YouTube videos where the put the Tough 8000 in the hands of kids. You can watch Playground Proof, Ice Cream Proof, Fish Tank Proof, and a host of other "proof" episodes on YouTube. They're for smiles mostly, but they also make the point about how rugged this camera really is.

Shooting with the Olympus

The Tough 8000 zoom lens accommodates a wide 28 mm focal length and extends to 102 mm on the telephoto end, perfect for underwater on the wide end and portraits when zoomed out. To make the controlling the camera easier in extreme conditions, such as working in cold weather or snorkeling, Olympus included a nifty feature called Tap Control for some of the basic settings. When activated, one tap on the right side lets you change the flash mode, a tap on the left for Macro, tap the LCD to switch to Playback, and tap twice on top for OK. Unfortunately, the most obvious use for Tap Control -- to switch among Scene modes while underwater -- isn't included. So if I want to switch from Underwater Snapshot to Underwater Macro, I have to delve into the menu system.

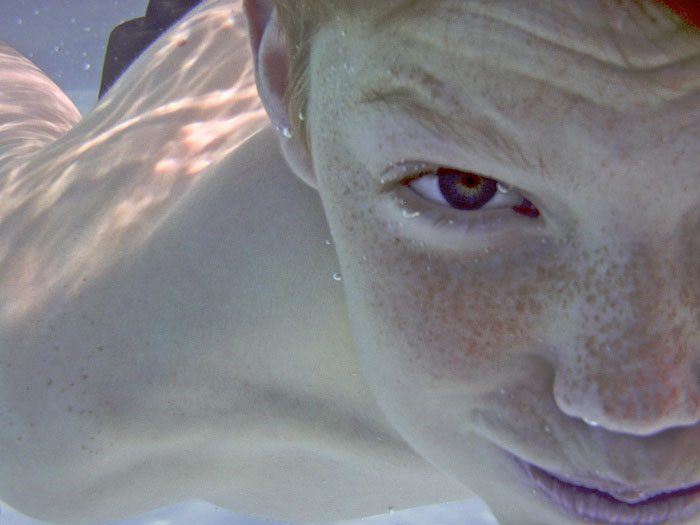
As I mentioned, you can take this camera in the water with you. I took it along to the local pool and snapped away both topside and underwater. The results were fine, but the shots required work on the computer. I was hoping that the underwater scene modes would compensate more for the aqueous environment. For casual snapshooters, I'm sure the results will be fine. But more advanced photographers will probably relegate this camera into the "for fun only" category.

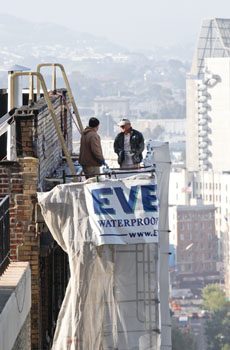
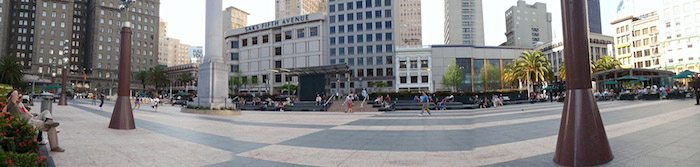
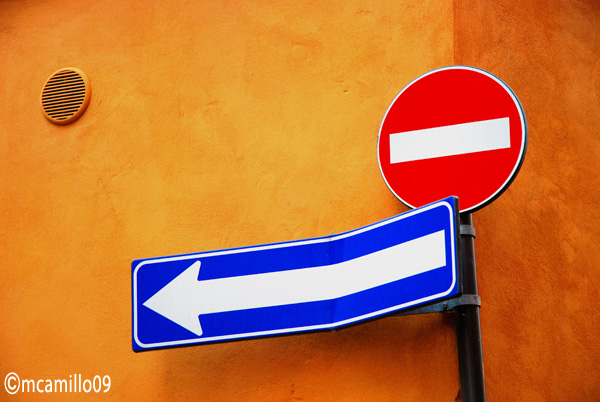
The Stylus 8000 has in-camera panorama stitching that lets you take 3 shots then meld them together into a single, extended-view image. My favorite of the trio of panorama modes is "Combine in Camera 1." You take the first shot, then pan in either direction slowing guiding a diamond shaped pointer to an onscreen target. When you reach the target, the camera takes another shot. Once you've completed the sequence, the Stylus 8000 builds the panorama and plays it for you on the LCD. The results were unpredictable in terms of accurate stitching, but when the Stylus 8000 nailed the sequence, it looked very good. And to tell you the truth, even some of the misfires made interesting compositions. This is one of my favorite features on the camera.

Bottom Line: This Is a Camera for Fun Times

What is remarkable about the Olympus Stylus Tough 8000 is that you really can take anywhere: from freezing ski slopes to the tropical waters of the Hawaii. The Tough 8000 provides the features you'd expect from a $399 camera, such as good resolution, crisp LCD, image stabilization, face detection, scene modes, movie capture, and exposure compensation. You don't have a tremendous amount of direct control over the settings in terms of aperture and shutter speed, but there are 19 scene modes and a host of other controls to help you adapt to just about any situation.

Overall image quality is fine as long as you don't push the camera to produce beyond its design. I made 13" x 19" enlargements from the 12 megapixel files, and they were OK, but I saw corner softness on only average detail. But I liked the 5" x 7" and the 8.5" x 11" prints much better. And I think that's where your expectations should be too.

This is a camera for fun times. You can put it in the hands of your kids without a worry. When you're on the go, grab the Olympus Stylus Tough 8000, and you'll have confidence that you can get the shot regardless of where you land.

Photos of underwater and panorama by Derrick Story with Olumpus Stylus Tough 8000. Click on them to zoom out to larger size.


twitter.jpg Follow me on Twitter

-


"I stoped in a small town in Texas, turned around and here, and I discovered this not-to-modern dential fixing establishment," wrote John Badgerow. "To capture the shot, I used my Nikon D300. I had been spending the day taking photos of wildflowers, but this was the most fun. I wanted to see the inside of the place, but is was closed for the weekend."

John set his Nikon D300 to Aperture Priority mode at f/5 with an ISO of 400. Zoom lens was set to 48mm.

Photo by John Badgerow. Click on image to zoom to larger size.

If you have a candid you'd like to share, take a look at our Submissions page, then send us your Grab Shot. We'll try to get it published for you on The Digital Story.

And you can view more images from our virtual camera club in the Member Photo Gallery.


twitter.jpg Follow me on Twitter

-


Joseph Victor Stefanchik makes pictures for a living. His photography studio, JVS Pictures, brings craftsmanship to the entire photography process, from capture, to processing, through printing, and even to mounting and framing. You would think that such quality would require equipment that's out of reach for most of us. But that's not the case. For example, Joseph shoots with Canon cameras, processes with Photoshop and Canon software, and prints on an Epson 3800 using Red River paper.

Photo by JVS Pictures

In this podcast interview, I glean tons of useful information from Joseph about making great prints. To give you an idea about his experience, here's a little bio information:

"Highlights in JVS' photojournalism career include winning the Robert F. Kennedy Journalism award for International Photojournalism as well as being named a Pulitzer Prize Finalist. Countless photojournalism contest wins date back to 1992. JVS has been furthering the education of other photographers by teaching in-depth lighting workshops with the help of his highly educated and talented wife, Anne Farrar. The two bring 30+ years of combined experience to each Workshop they teach.

Monthly Photo Assignment

Rim Lighting is the May 2009 Photo Assignment. This portrait technique puts the light source behind the subject (creating the rim light effect) then uses a fill light for the front. You can read more about how to submit on our Submissions page. Deadline for entry is May 31, 2009.

Listen to the Podcast

You can also download the podcast here (24 minutes). Or better yet, subscribe to the podcast in iTunes.

Want to share photos and talk with other members in our virtual camera club? Check out our new Flickr Public Group. It's a blast!


twitter.jpg Follow me on Twitter

-


Podcast Sponsors

SiteGrinder lets you take ownership of your websites. Effortlessly output pages right from Photoshop.

Red River Paper -- Try the $7.99 Sample Kit.

Add Magic to Your Slideshows -- FotoMagico presentations are so amazing that your audience will be asking how you did it.


Technorati Tags: , , , , ,

If the release of the Canon Digital Rebel T1i and the Panasonic GH1 are any indication of trends for 2009, HD video capture with our "still" DSLR cameras will soon be commonplace. I've been using the Canon 5D Mark II for a video project for The Digital Story, and am planning some fun tutorials on getting the most out of these types of devices.

But I have one simple reminder right now for those playing with video on their digital cameras (DSLR or compact): Don't forget to grab stills too.

Right after you shoot a video snippet, change modes and grab a few still shots too. If possible, even re-inact a scene or two. You can use these high resolution stills with the video, especially to cover mistakes and things that went wrong during the shoot, such as a misfocused moment or someone walking through the frame when they shouldn't have.

The nice thing thing about having a big high resolution still photo is that all of your options are open. You can animate it using the Ken Burns effect such as slowly zooming in or panning through the image. These effects are easy to achieve in iPhoto, Fotomagico, and iMovie.

So yes, have a great time shooting video with your still camera. Just remember to grab a few stills too. At some point, you'll be glad you did.


twitter.jpg Follow me on Twitter

-


Technorati Tags: , , , , , , ,

Clipboard Frame

It's amazing what can be turned into a frame. During a recent trip to my favorite Salvation Army store in search of a frame, I had what I would call an "Aha" moment. In simplest terms, a frame is a flat surface on which a picture can be secured and displayed. I remember seeing an old office clipboard and thought, "Nice flat surface, clip that can secure a photo... what a perfect frame!"

'The original surface might be o.k., but if you want to make your clipboard frame special, consider covering the surface with a decorative paper or, better yet, a shelving liner with a self-adhesive backing. Place your photo onto the surface and cover it with a piece of glass or plexiglass. Scrap pieces can be found at local hardware stores or salvaged from old frames. A note of caution, if you're using glass, you should cover the sharp edges with an electrical or masking tape. They come in a variety of colors these days, so it will be easy to color coordinate it with your paper. Position the glass under the clip and everything will stay put.

You can display your masterpiece on the wall by hanging it from the hole at the top of the clipboard. Or for a fun look, place it on an easel. Makes a perfect gift for Father's Day or for that favorite teacher or executive in your life.

Meet Stephanie

Meet Stephanie Scheetz. She's a photographer, an artist, and is very handy with do it yourself crafting projects too. In this first of a series of "Creative Output" instructional videos on The Digital Story, Stephanie introduces herself and previews a couple of the projects she'll be showing you in upcoming episodes.

lynda_aperture.png

Ready to make the move from iPhoto to Aperture? If so, I have a great tutorial for you. In iPhoto to Aperture: Going Pro, I show you everything you need to know to make a smooth transition from iPhoto to Aperture.

And if you're not sure that you should even attempt the move, then take a look at the free videos titled, Ten reasons to move to Aperture and Comparing the strengths of Aperture and iPhoto. They are both available on the catalog page.


twitter.jpg Follow me on Twitter

-


Technorati Tags: , , ,

macosx_icon.png

Leopard users receive a nice bump in Raw support with the latest Mac OS X 10.5.7 update. In addition to a slew of security fixes, network performance improvements, printing, and more, the are 14 additions to the supported Raw formats list. This additional Raw support is automatically tapped by Aperture, iPhoto, and Preview.

Additions in 10.5.7 include:

  • Canon EOS 5D Mark II
  • Canon EOS 50D
  • Canon PowerShot G10
  • Epson R-D1x
  • Pentax K2000/K-m
  • Leaf AFi-II 6
  • Leaf AFi-II 7
  • Leaf Aptus-II 6
  • Leaf Aptus-II 7
  • Leica M8.2
  • Nikon D3X
  • Nikon Coolpix P6000
  • Nikon D90
  • Sony DSLR-A900

I was disappointed that Raw support for the Olympus E-30 and some of my other favorite devices was not included in this update. But if you're working with one of the cameras in the list above, then you finally have fine-tuned Raw support in both Aperture and iPhoto.

You can grab Mac OS X 10.5.7 using Software Update on your Mac, or get it on the Apple Download page.


twitter.jpg Follow me on Twitter

-


Technorati Tags: , , ,

dp_school_logo.png

What can you do with a couple of ladders, 8' pole, and bed sheets? Among other things, you can create professional portraits. In this Digital Photography School article titled, Shooting Portraits like a Pro On a Tight Budget, LA photographer Alexis Godschalk describes how she got started in portrait work with a rig just that just about anyone can cobble together. She provides sample portraits that she captured with this set up.


twitter.jpg Follow me on Twitter

-


Now Available! The Digital Photography Companion. The official guide for The Digital Story Virtual Camera Club.

  • 25 handy and informative tables for quick reference.
  • Metadata listings for every photo in the book
  • Dedicated chapter on making printing easy.
  • Photo management software guide.
  • Many, many inside tips gleaned from years of experience.
  • Comprehensive (214 pages), yet fits easily in camera bag.

Technorati Tags: , , ,

eos_utility.png

Canon Blogger features a handy tutorial titled, Shooting Tethered with Canon Gear, where Jason Anderson explains how to use the EOS Utility when your Canon is connected to the computer. This is a particularly handy technique when working in the studio where you want to control the camera and see the results directly on your Mac or PC.


twitter.jpg Follow me on Twitter

-


You can easily amass thousands of digital images, then one day realize that your computer has become more cluttered than the hallway closet. You need to get organized, but you're not sure where to begin.

I designed the photography workshop, "I've Taken Great Pictures, Now What?" to solve that exact problem. In the workshop, I cover the five basic steps for an efficient photography workflow: Acquire, Organize, Edit, Share, and Save. I show how you can take control of your pictures using tools that are on your computer right now. Then I introduce some of the amazing workflow software that's available right now (Aperture, Lightroon, Photoshop CS4), so you can begin to upgrade you post production tools -- all the while keeping in mind your specific needs.

An Organized Pictures Folder

If this scenario sounds like something that can help you, then I suggest you download the class notes (1.3 MB PDF file), then listen to this podcast, I've Taken Great Pictures, Now What?. Soon, you will be on the road to organization, efficiency, and enjoying your pictures more than ever.

If you'd like to attend the 4-hour workshop in person, the next session will be on June 20, 2009 at the Santa Rosa JC in Northern California. For more information, call 707-527-4372. The course fee is $63.

Monthly Photo Assignment

Rim Lighting is the May 2009 Photo Assignment. This portrait technique puts the light source behind the subject (creating the rim light effect) then uses a fill light for the front. You can read more about how to submit on our Submissions page. Deadline for entry is May 31, 2009.

Listen to the Podcast

Now that I've piqued your curiosity, it's time to listen to today's audio show titled, "I've Taken Great Pictures, Now What?" You can download the podcast here (28 minutes). You can also subscribe to the podcast in iTunes

The Digital Story podcasts are available for direct download from Apple iPhones. I've created a special mobile download page here. Just load the page in Safari, browse the podcast line-up, and click on the one you want to listen to.

Want to share photos and talk with other members in our virtual camera club? Check out our new Flickr Public Group. It's a blast!


twitter.jpg Follow me on Twitter

-


Podcast Sponsors

SiteGrinder lets you take ownership of your websites. Effortlessly output pages right from Photoshop.

Red River Paper -- Try the $7.99 Sample Kit.

Add Magic to Your Slideshows -- FotoMagico presentations are so amazing that your audience will be asking how you did it.


Technorati Tags: , , , , ,

santa_fe_workshops_logo.png

You really can take the "work" out of digital workflow. In my upcoming Santa Fe Workshop, Beginning Workflow with Adobe Lightroom (July 19-25, 2009), we explore the entire Lightroom toolbox then create a workflow that is customized for your needs. Since we're working in the stunning Santa Fe environment, we'll go on location go capture images that you will use while designing your post production approach.

santafe_church.jpg

If you've never attended a Santa Fe Workshop before, there are other benefits you might be interested in. First of all, it's a week where you focus only on your photography. No business meetings, household chores, or other daily obligations. Also, the digital lab we work in provides each attendee with his/her workstation with calibrated monitor, powerful computer, software, and printer. During many of the evenings we gather with other photographers for presentations, food, and the exchange of ideas. Santa Fe Workshops provide a total experience for passionate photographers.

During the week, I'm also going to show how to integrate Photoshop CS4 tools into the Lightroom workflow. Bridge and ACR provide some handy on-the-fly alternatives that give you maximum flexibility when working efficiently with your images.

It's a great week. You can register now online, or call call (505) 983-1400, ext. 11 for more information.


twitter.jpg Follow me on Twitter

-


paul_leasure_gs_5-09.jpg

"The weekend of April 18 and 19, the City of Denver 'opened' its doors, allowing public access to selected buildings," writes Paul Leasure. "I had the opportunity to go up in the Daniels & Fisher (D&F) Tower, a distinctive Denver, Colorado landmark. Built as part of the Daniels & Fisher department store in 1910, it was the tallest structure west of the Mississippi at the time, at a height of 325 feet (99 m). Modeled after St. Mark's Bell Tower at the Piazza San Marco in Venice, Italy, the 20-floor clock tower has clock faces on all four sides. This rare shot was taken from the inside of the clock face, with my Nikon D70s at 1/250 at f 8.0."

If you have a candid you'd like to share, take a look at our Submissions page, then send us your Grab Shot. We'll try to get it published for you on The Digital Story.

And you can view more images from our virtual camera club in the Member Photo Gallery.


twitter.jpg Follow me on Twitter

-


Technorati Tags: , , ,

flickr_camera_finder.jpg

Among the thousands of photographs posted in the Flickr community, what are the most popular DSLRs, compacts, even cameraphones used to capture them? If you shoot Canon, for example, how do the Rebels stack up against one another? How do the different brands compare? All of this and more can be discovered on the Flickr Camera Finder page.

As you drill down, you'll be able to compare basic specs, get Flickr stats, view graphs, and see actual images captured with the devices. The Camera Finder provides an informative snapshot about the cameras we're using to make all of these great images.


twitter.jpg Follow me on Twitter

-


screenshot_01.png

"Workflow" is the kind of word that makes most hobbyist photographers cringe. But the fact of the matter is, if you've taken great photos with your digital camera, don't you want to find the easiest way to organize them and share with others?

If this sounds appealing to you, then you might be interested in my workshop this coming weekend titled, I've Taken Great Photos, Now What?. You'll learn about the coolest photo management applications including Adobe Lightroom, Apple iPhoto, Photoshop CS4, Photoshop Elements, and Apple Aperture. We'll build a workflow tailored specifically for your needs. And by the end of the day, you'll see that managing your images can be as fun as taking them in the first place.

The workshop begins at 10 am on Sat. May 9 at Santa Rosa Junior College in Santa Rosa, California. You can sign up for the class online, or call for more information at 707-527-4372. The course fee is $63.


twitter.jpg Follow me on Twitter

-


Flickr excels at both image sharing and exploration. In this podcast, I discuss my 10 favorite Flickr tips.

  1. Spend some time with your account profile. Think about the type of copyright you want to apply, who can see your photos, will geotags show, etc. In part, how you set your account profile reflects how you want to use Flickr and share your work.
  2. Build Flickr into your workflow. Use uploadrs that are friendly to how you operate. If you're an iPhoto user, for example, check out FlickrExport by ConnectedFlow. It's more powerful than the built in uploadr in iPhoto '09.
  3. Make tagging easy. For example, Flickr can read keywords in IPTC metadata. So if you apply keywords during your normal workflow, and export them with the image, Flickr tags will automatically be applied to your images.
  4. You don't always have to image edit your pictures before upload. Flickr's online editing tools are quite decent.
  5. Use the Share link (upper right corner) to share images with non-Flickr members. It's very handy and works great.
  6. Have your Photostream page represent you and your approach to photography. Set your Photostream page layout in Account Preferences (under the Personal Information tab), organize the presentation of your Sets and Collections (in the Organize section), and share information about your photos to visitors.
  7. Spend time in the Explore section. Flickr staff does a great job of highlighting beautiful photography, plus introduces you to new ways to think about imaging through tools such as the World Map, Camera Finder, Calendar, and the Flickr blog. This is a great opportunity to expand your boundries.
  8. Learn about mobile Flickr if you use a smartphone. It is a wonderful site for managing your work as well as adding to it.
  9. Speaking of cameraphones, here's a tip for mobile users. When uploading from your smartphone, set permission to Private. Then change to Public once you've picked your favorites and edited them.
  10. Experiment with the "long photo," Flickr's approach to video. You can create terrific content that is viewable in 90 seconds or less, and then share it in your Flickr photostream.

iPhoto users may want to check out my Lynda.com title: iPhoto '09: 10 Things to Know About Flickr. I'll have a Flickr Essential Training title ready later this Spring, so keep an eye out for that too.

And don't forget about The Digital Story Public Group on Flickr.

mobile_flickr_ds.jpg

A screenshot of my mobile flickr photostream on an iPhone.

Monthly Photo Assignment

Rim Lighting is the May 2009 Photo Assignment. This portrait technique puts the light source behind the subject (creating the rim light effect) then uses a fill light for the front. You can read more about how to submit on our Submissions page. Deadline for entry is May 31, 2009.

Listen to the Podcast

Now that I've piqued your curiosity, it's time to listen to today's audio show titled, "Top 10 Flickr Tips" You can download the podcast here (24 minutes). You can also subscribe to the podcast in iTunes

The Digital Story podcasts are available for direct download from Apple iPhones. I've created a special mobile download page here. Just load the page in Safari, browse the podcast line-up, and click on the one you want to listen to.

Want to share photos and talk with other members in our virtual camera club? Check out our new Flickr Public Group. It's a blast!


twitter.jpg Follow me on Twitter

-


Podcast Sponsors

SiteGrinder lets you take ownership of your websites. Effortlessly output pages right from Photoshop.

Red River Paper -- Try the $7.99 Sample Kit.

Add Magic to Your Slideshows -- FotoMagico presentations are so amazing that your audience will be asking how you did it.


Technorati Tags: , , , , ,

Chase Jarvis Photography

"The best camera is the one that's with you," writes Chase Jarvis (hmmm, where I have heard that before!). He takes photos everyday with his iPhone, processes them on the device, then shares online. Chase maintains a gallery of his favorites on his site.

There is so much good work you can do with these types of devices: iPhone, Nokia, Blackberry, Sony, and on and on. I think mindset has much to do with success. Take a look at Chase's work, and you'll see what I mean.

iPhone App Reviews and Camera Phone Tips

A Look Inside Shutterfly for iPhone

Flickr Tip: Manage Permissions During Mobile Workflow

Cropulater Brings Picture Cropping to the iPhone

Panorama 2.1 for the iPhone

FotoTimer Provides Self-Timer for the iPhone

HP iPrint App Makes Printing Easy from iPhone or iPod touch

True Photo App for iPhone: CameraBag

"Exposure" (Now "Darkslide") Puts Flickr on Your iPhone


twitter.jpg Follow me on Twitter

-


Technorati Tags: , , ,

david_bream_pa_4-09.jpg

"Tomorrow who knows." What a perfect sign of the time. And we have an entire gallery of images from TDS members who have been observing the world around them and capturing those pictures to share right here. This March 09 Photo Assignment Gallery shows just a few of the markers we pass by daily.

The May 2009 assignment is "Rim Lighting." Start working on your contribution now. Details can be found on the Submissions page. You can submit photo assignment pictures up to 600 pixels in the widest direction. Please follow the instructions carefully for labeling the subject line of the email for your submission. It's easy to lose these in the pile of mail if not labeled correctly. For example, the subject line for next month's assignment should be: "Photo Assignment: May 2009." Also, if you can, please don't strip out the metadata. And feel free to add any IPTC data you wish (These fields in particular: Caption, Credit, Copyright, Byline), I use that for the caption info.

Good luck with your May assignment, and congratulations to all of the fine contributors for March. It's an illustrative collection of images.

Photo by David Bream.

More Signs of the Times Stories

Closing of Virgin and Thriving of Apple - Juxtaposition in SF

Redwood Empire Food Bank

The Closing of Gottschalks Department Stores


twitter.jpg Follow me on Twitter

-


Now Available! The Digital Photography Companion. The official guide for The Digital Story Virtual Camera Club.

  • 25 handy and informative tables for quick reference.
  • Metadata listings for every photo in the book
  • Dedicated chapter on making printing easy.
  • Photo management software guide.
  • Many, many inside tips gleaned from years of experience.
  • Comprehensive (214 pages), yet fits easily in camera bag.

Technorati Tags: , ,