May 2011 Archives

Christine McAuley

For the April'11 Photo Assignment, TDS shooters searched for the imperfect to create this gallery titled Broken. Fractured? Yes. But often beautiful too. And which one will be the SizzlPix Pick of the Month?

The June 2011 assignment is "True Grit." Start working on your contribution now. Details can be found on the Member Participation page. Submit your photo assignment picture 800 pixels in the widest direction. Deadline is June 30, 2011.

Please follow the instructions carefully for labeling the subject line of the email for your submission. It's easy to lose these in the pile of mail if not labeled correctly. For example, the subject line for this month's assignment should be: "Photo Assignment: June 2011." Also, if you can, please don't strip out the metadata. And feel free to add any IPTC data you wish (These fields in particular: Caption, Credit, Copyright, Byline), I use that for the caption info.


Photo by Christine McAuley. (Click on it to see enlarged version.) You can read more about how Christine captured this shot, plus see all of the other great images on the April 2011 Gallery page.


Good luck with your June assignment, and congratulations to all of the fine contributors for April.


twitter.jpg Follow me on Twitter

-


Now Available! The Digital Photography Companion. The official guide for The Digital Story Virtual Camera Club.

  • 25 handy and informative tables for quick reference.
  • Metadata listings for every photo in the book
  • Dedicated chapter on making printing easy.
  • Photo management software guide.
  • Many, many inside tips gleaned from years of experience.
  • Comprehensive (214 pages), yet fits easily in camera bag.

Technorati Tags: , ,

Those of us who were photographers in the Analog Age (pre-2000), have an inventory of 4x6 prints, negatives, slides, and enlargements. For months I've been thinking about what to do with all of these boxes I've been lugging around for years.

Finally, this past weekend, I set a course of action. I hadn't really planned on making such dramatic decisions. Actually, it all started with a garage sale. And as often happens in life... one thing led to another.

Listen to the Podcast

You can also download the podcast here (30 minutes). Or better yet, subscribe to the podcast in iTunes. You can support this podcast by purchasing the TDS iPhone App for only $2.99 from the Apple App Store.

Monthly Photo Assignment

Shades of Green is the May 2011 Photo Assignment. You can read more about how to submit on our Member Participation page. Deadline for entry is May 31, 2011.

TDS Oct. Photography Workshop and Nov. Aperture Workshop

We're making plans now for the Fall 2011 TDS Photography Workshop. I'm also considering adding an Aperture Workshop in Nov. or Dec. If you want your name on the reserve list, or just more information, drop me a line.

More Ways to Participate

Want to share photos and talk with other members in our virtual camera club? Check out our Flickr Public Group. And from those images, I choose the TDS Member Photo of the Day.

Podcast Sponsors

Red River Paper -- Try the $7.99 Sample Kit.

Make Your Photos Sizzle with Color! -- SizzlPix is like High Definition TV for your photography.

Need a New Photo Bag? Check out the Lowepro Specialty Store on The Digital Story and use discount code LP20 to saven 20% at check out.


Technorati Tags:
, , , , ,


Tips for Great Graduation Photos

Graduation season is underway, and it's an opportunity to capture memorable shots for sharing with family and friends. As with any photo opp, a little planning goes a long way toward coming away with successful images.

Boys in Tuxes Photos before the event give you a little extra time to have fun and play with camera angles. Fill flash helped balance the contrasty outdoor lighting.

Here are a few tips to make sure you're ready to go.

  • Travel Light - You're not off to shoot the Olympics. Unless you're there on assignment, you want to have a good time, show support, and not be a distraction to others. Plan ahead. Find out about the setting, lighting, and the flow of activities. Choose your lens and know how you're going to set your camera before getting in the car. Once there, try to get a good seat. By being prepared, you'll need less gear and be able to enjoy the event.
  • Get Shots Beforehand - You don't have control over what happens at the event, but before things get started, you can flex your creative muscles. If possible, take a series of images prior to things getting started. They'll most likely be your favorites of the day.
  • Consider Fill Flash Outdoors - Typically, you have to work fast when you get a photo opportunity, so you don't always have control over lighting and positioning. By using fill flash outdoors, you can even-out the lighting and come away with good photos regardless of the environment.
  • Play with Angles - Once you get the basic shots, play with compositions by rasing and lowering the camera. I've noticed that kids, in particular, like dramatic viewpoints.
  • Don't Forget that Your Camera Shoots Video Too - Some moments are perfect for short movies that you can mix in with your stills for a truly professional presentation. Remember to record some video too. You'll thank yourself later.
  • Bring an Extra Battery and Memory Card - Just put them in your pocket.

Once you've organized your images and touched them up, share them with others via online galleries or email. They'll love having such an adept (and organized) photographer in the family.


The Digital Story on Facebook -- discussion, outstanding images from the TDS community, and inside information. Join our celebration of great photography!


We've updated the TDS Podcast App so it now looks great on the iPad, as well as the iPhone and Android devices. The interface is redesigned to take full advantage of the iPad's expanded real estate. So now you can manage all of your TDS activities from within the podcast app.

tds_podcast_app_movie.png Movies now play in the main window of the podcast app. Just click Extras (gift icon) to access the latest video.

Located on the left side of the interface are the podcast episodes that are avaialbe for listening. The Extras icon (gift box) in the upper right corner contains the latest movie and wallpaper image, and there's now a new feature called View All Extras that consolodates all the recent items uploaded.

tds_podcast_app_extras.png Bonus content is located in Extras.

If you want to watch a movie that's loaded in the Extras, it plays in the main browser window of the application. The wallpaper images are now a full 1024 pixels so they look great on the iPad's display.

The icon (@) to the right of Extras is where all the connections to The Digital Story are located. You can email me directly from there, go to the TDS webiste, hop over to my Twitter feed, and visit the new Facebook Fan Page for the show... all easily managed on your iPad from within the podcast app. (When you go to the Facebook page, be sure to "Like" us!)

tds_podcast_app_fan_page.png

You can check-in on our Facebook Fan Page and other TDS sites from within the podcast app.

The podcast is designed to stream shows via a live Internet connection. If you want to download an episode ahead of time, you can. (Great for when you know you're not going to have connectivity.) Just tap on the episode name that you want to download. Then tap the "Download" button that appears. You can also "Star" the episode at this time to store it in your favorites list. I recommend this so you can manage the shows that you've downloaded.

Another new feature is that you can continously play one episode after another with this update. If you don't like that ability, you can turn it off in Settings.

The TDS Podcast App is available for $2.99 in the iTunes App Store. The current update (1.9.2) is free to all existing owners. Just run your "Updates" to get the new version.

After you try this new version, please rate it in the App Store. The TDS Podcast App is your way of helping to support this show.


The Digital Story on Facebook -- discussion, outstanding images from the TDS community, and inside information. Join our celebration of great photography!


SpyderGallery for the iPad

spyder_gallery.jpg

Just when you thought you didn't have to worry about color calibration for your tablet, along comes SpyderGallery for the iPad to make you feel guilty again. It was much easier when you couldn't calibrate your mobile device.

The software is a free download from the iTunes App Store. It works with a Spyder3 device (Express, Pro or Elite). You can learn more about it at Datacolor's web site.


The Digital Story on Facebook -- discussion, outstanding images from the TDS community, and inside information. Join our celebration of great photography!


My default metering setting on all of my cameras is "pattern." Depending on the brand, this setting can be called evaluative, matrix, multi-segment, or some other label. What it means is that the camera is evaluating various parts of a scene, then analyzing the information to create an exposure. And most of the time, this works great.

But there are those scenes that require human intervention. For me, it's usually when there's an illuminated area, such as a band on light reflecting off this bed of nasturtium.

Nasturtium with Spot Meter Spot metering on the bright area allowed me to get the exposure I wanted.

I love it when I find these situations. Unfortunately, most of the time that bright area will be overexposed with pattern metering, as shown below.

Nasturtium with Evaluative Meter Pattern metering overexposed the brightest flowers.

Fortunately, the adjustment is simple. I switched to spot metering on my Canon 5D Mark II, then exposed for the brightest area. These two shots, with no exposure editing, show the differences in this metering approach.

If you like "getting it right" in the camera, keep this technique in your back pocket. It feels good to see the image on the LCD the way you pictured it in your mind.


The Digital Story on Facebook -- discussion, outstanding images from the TDS community, and inside information. Join our celebration of great photography!


Aperture Workshop Recap

On May 21 and 22, I conducted an Aperture Intensive workshop at TDS headquarters in Santa Rosa, CA. Our goal was to sharpen our post production skills to work more efficiently and creatively using Apple's Aperture photo management software.

TDS Spring 2011 Aperture Workshop The May 2011 Aperture Workshop crew after a photo shoot at Schulz Museum.

The first day we focused on library management. Setting up the proper library for each photographer's needs, then how to better organize it. We spent time discussing "managed" vs "referenced," plus explored different ways to set up the Library pane once the images have been uploaded. We then tackled metadata management, rating, stacks, versions, and more.

To make sure we had new images to practice with, I sprinkled-in photo shoots throughout the weekend. Since I have Schulz Museum directly across the street from the studio, there's always something interesting to photograph. On the second day, I brought in a model for a few hours so we could practice some portraiture.

For Sunday the focus was image editing and sharing. As a group, I walked them through the steps to retouch portraits (using the images we had shot), enhance landscapes, and work creatively, such as in B&W.

We also discussed sharing images online via social networks and using Apple's MobileMe service. And finally, we created our own dynamic movies using the Slideshow module, complete with effects and music.

If you're interested in attending an upcoming photography workshop (next open event is Oct. 15-16, 2011) or an Aperture Software Workshop like the one described here, just send me a note for more information and to be put on the reserve list. You can also see upcoming workshops by clicking on the Events icon on The Digital Story Facebook Fan Page.


The Digital Story on Facebook -- discussion, outstanding images from the TDS community, and inside information. Join our celebration of great photography!


I talk a lot about shooting great portraits, and your bag of tricks can include very simple setups as well as complicated ones. This week I tell the story of how our Aperture class shot a series of portraits using the simpliest of setups, yet got terrific shots for our post production work.

Listen to the Podcast

You can also download the podcast here (27 minutes). Or better yet, subscribe to the podcast in iTunes. You can support this podcast by purchasing the TDS iPhone App for only $2.99 from the Apple App Store.

Monthly Photo Assignment

Shades of Green is the May 2011 Photo Assignment. You can read more about how to submit on our Member Participation page. Deadline for entry is May 31, 2011.

TDS Oct. Photography Workshop and Nov. Aperture Workshop

We're making plans now for the Fall 2011 TDS Photography Workshop. I'm also considering adding an Aperture Workshop in Nov. or Dec. If you want your name on the reserve list, or just more information, drop me a line.

More Ways to Participate

Want to share photos and talk with other members in our virtual camera club? Check out our Flickr Public Group. And from those images, I choose the TDS Member Photo of the Day.

Podcast Sponsors

Red River Paper -- Try the $7.99 Sample Kit.

Make Your Photos Sizzle with Color! -- SizzlPix is like High Definition TV for your photography.

Need a New Photo Bag? Check out the Lowepro Specialty Store on The Digital Story and use discount code LP20 to saven 20% at check out.


Technorati Tags:
, , , , ,


In the Dark

The first gallery of TDS Member Photo of the Day images is now complete and ready for viewing. Each photo includes commentary by me discussing why I think the image is inspiring.

Each day, a new shot is featured at our community that gathers around the TDS Facebook Fan page. If you want to learn more about being a part of this terrific photography endeavor, check out the article, Why You'll Like TDS on Facebook.

I'm very impressed with the work I'm seeing, and I think you will be too.

Featured photo, "In the Dark" by TDS Member John Farnan. Click on the image to learn more about John and his work.


The Digital Story on Facebook -- discussion, outstanding images from the TDS community, and inside information. Join our celebration of great photography!


Editor's Note: An account about how good things can happen with your photography by TDS Member and SizzlPix winner Ken Latman. He wrote this piece a few months back while preparing for a gallery show (mentioned in this article). The show is now live at the Millworks Gallery in Akron, Ohio (with SizzlPix on the walls!) If you're in the area, stop by and see these beautiful images for yourself. Now... on to Ken's story about how this all came to pass.


My buddy Matt (another Sizzlpix of the month winner) and I were going on a road trip this past summer to some wonderful places: Monument Valley, Antelope Canyon, Arches National Park, Zion, etc. Before we went, I set up a squarespace website in the attempt to update our travels on the road. I have been an avid listener of The Digital Story podcast, and got Matt hooked on the show during the long drives in the car to all of these places.

Overall, the trip went really well. We stayed at The View hotel at Monument Valley on July 4th. Spent an extra day at Bryce Canyon, which happened to have an Astronomy program going on at that time. Saw the world's largest Easel in Goodland Kansas.

When we got back, I wanted to share my photos with family, but more than just a 12 month calendar. Your suggestion and sponsorship by Blurb seemed the right choice. This way I could make a couple books to show my family back in CT. And if they wanted a copy, it would be available to purchase on the site. I didn't want to be stuck shipping 20 books or more. Blurb makes it pretty easy to also put a link on your site and show every page of your book as a preview if people want to see it.

I got started working on the book. We both had taken so many interesting pictures during the trip. I often commented that we saw more places in two plus weeks than a lot of people see in a lifetime. It would be really cool if we could show them in a gallery or something.

Matt works as a science teacher, and Micah Kraus is an art teacher. They knew a gallery owner. We all got to talking. Micah had gone to Glacier National Park that summer on a motorcycle with his wife and had interesting pictures too. Another friend/teacher, Greg Milo, seemed like would be a great addition to the show too, and would help fill up the gallery space (I also think it brings more confidence to us all going in as a group of four.)

So Micah talked to Akron Millworks (www.millworksgallery.com) and suddenly we are set for a May 7th opening. At the same time, the book was done, and I entered both your Blurb book of the month contest and Sizzlpix of the month as well with a couple of entries for the duality topic. I didn't win, but when the Fall contest came around I made it a new project. I wanted to see something well done of mine printed on metal. We stumbled upon in Moab, Tom Till's gallery (www.tomtill.com), and he had some great pictures on aluminum. I had one piece printed on aluminum by another company, and it was ok, but not as well done as I would have liked. I was trying different companies but the process is expensive for testing your prints.

ken_latman_winner.jpg 
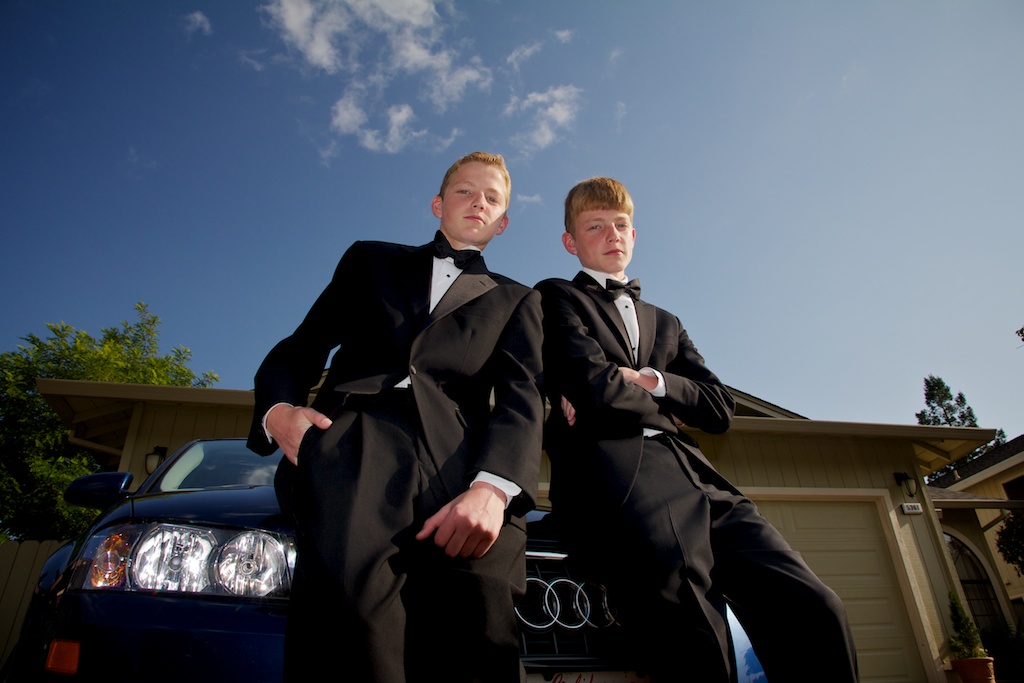
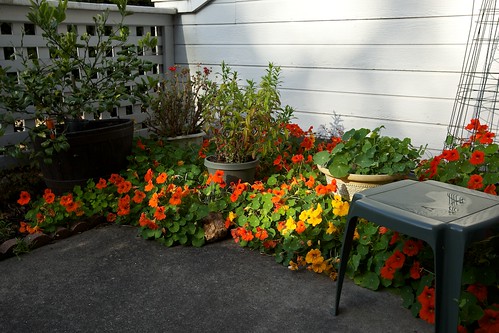
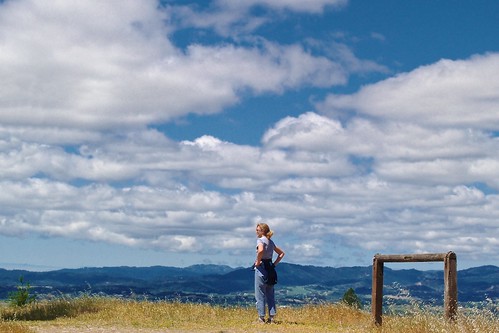
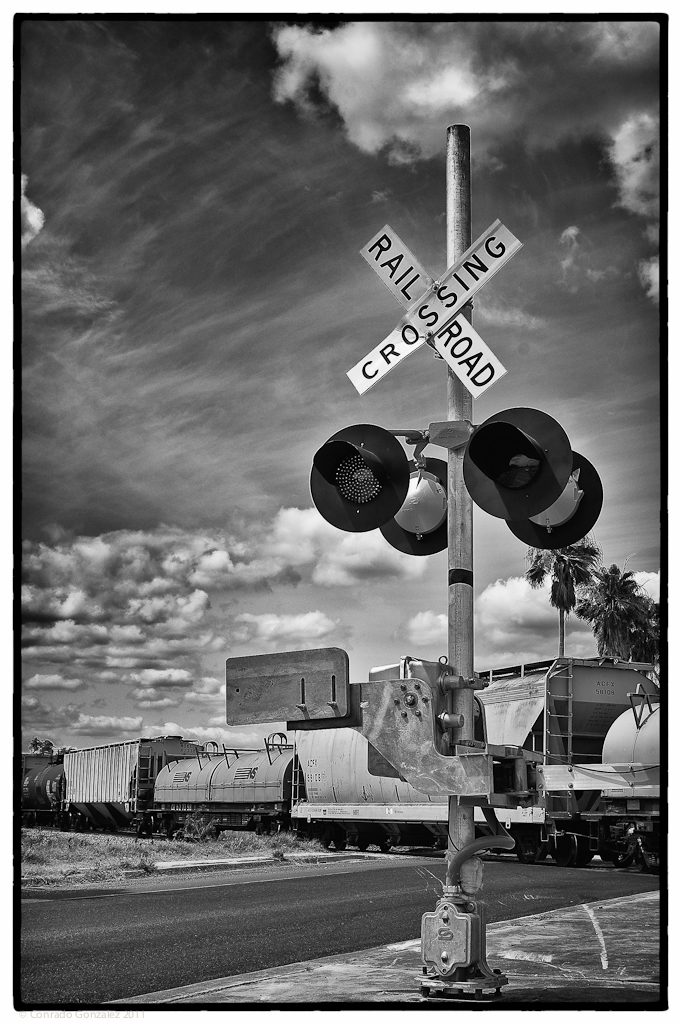
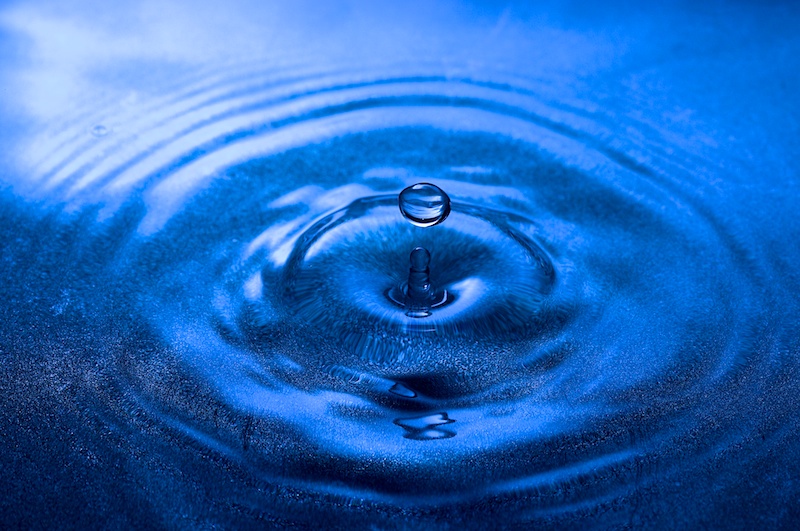
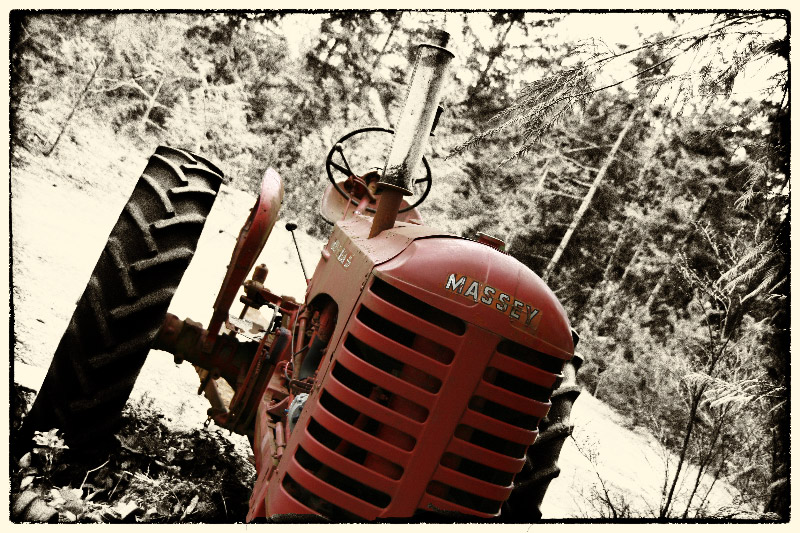
SizzlPix Winner by Ken Latman

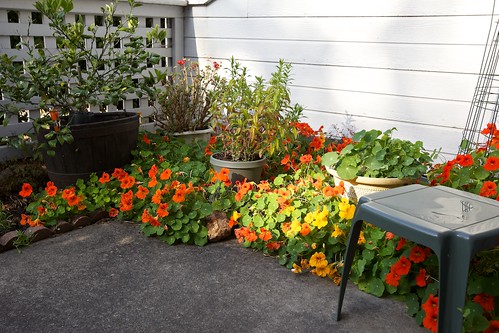
October came, and I won the Sizzlpix of the month. You placed me in contact with Don, and I sent him my image. It had been about a week and I had not received a print. I want to say Don is an extremely nice and very personable guy. Don called me on the phone to explain the delay and was very apologetic. Christmas time can be very busy for them as you can imagine.

I delayed the print to arrive until after the new year, and when it did, I was really impressed on how well they got the detail and the various tones in the print. Of three printers (them included) with images I had made, Sizzlpix was the best. I sent Don a short little thank you email, telling him of the great job they did and asked where I could link my website to the winning image on his site, in case anyone wanted to also have a copy. Don, I assumed, wanted to check to make sure my site was appropriate for his link or he was curious if I had other good stuff (I tend to think the latter.) My squarespace traffic for a couple of days was showing a lot of page hits.

Don and his group went through every gallery I had on my site. They saw the link to my Blurb book and looked at every page of that too. Instead of getting an email with a link Don, both called and emailed me to ask if I wanted to join the Famous Photographer's group of Sizzlpix. I am still floored. He asked me to submit a few more images. I was thinking only five, maybe eight, certainly no more than ten. He called back and asked why didn't I submit this image, and why not this image, etc. So I started putting in and going over more images with Don. I have about 25 images on the site now and few more waiting in the wings.

I am working with Don now to have all my prints in the upcoming show on metal [now live at Millworks Gallery]. Maybe I will sell some. Maybe not. It is just really nice to get some momentum going on my craft that has kind of remained a little dormant since leaving college. To think this all happened from a love of photography and a little podcast that I listen to weekly. Thank you so much again for your willingness to share, and please keep up tips, interviews, and encouragement in your podcast.

You can get more information about the gallery show on Ken Latman's site.

Thumbnail image for canon_60d_18-135.jpg

Auto Lighting Optimizer is one of those features that we have on our newer Canon cameras, but we might not know exactly what it does. In this article on Digital Photography School, Peter West Carey explains, What Is Canon's Auto Lighting Optimizer.

And if you shoot Nikon, you'll find this helpful too, since it's called Adaptive D-Lighting on your camera.


The Digital Story on Facebook -- discussion, outstanding images from the TDS community, and inside information. Join our celebration of great photography!


Unsupported Raw File

When you have a new camera that produces Raw files not immediately supported in Aperture (and iPhoto), how should you approach the situation? Here's the process that I go through.First, I look at Apple's track record with the camera brand. If there's a history of support, then odds are good that an update will come. I shoot primarily Canon and Olympus. I know that the Canon updates will come pretty fast, and those from Olympus will lag behind. But I have confidence that both will be supported.

Case in point: Apple just released Raw Compatibility Update 3.7 that adds support for my XZ-1 and for the E-PL2. The E-PL2 came out in January of this year, so the update didn't follow until 4 months later.

both_as_masters.jpg

While I wait for the update, I'll shoot Raw+Jpeg in the camera, then upload the files in Aperture choosing "Both (Separate Masters)" in the Raw+Jpeg Pairs popup menu (in the Import dialog box). Once imported, the Jpegs will show (as in the illustration above) and the Raws will not. If you find this distracting, you can always stack the pairs with the Jpeg as the select, then collapse the stacks. You can do this quickly with the Auto Stack command, then Close All Stacks.

Once the update arrives, and you've installed it, the Raw file just has to be processed. Usually, you can simply click on the thumbnail with the Adjustments tab open, and Aperture will process it automatically. After that, you can either make the Raw file the "pick" for the stack, or delete the Jpegs from your library.

supported_raw.jpg

If Apple doesn't have a history supporting a particular line of cameras, then you're rolling the dice. You can always shoot Jpeg only. Or you can process the Raw files in Adobe Camera Raw when it's supported there.

What's the biggest difference I notice between the Raw and Jpeg versions? I'm better able to display highlight and shadow detail in the images. And for me, that benefit is worth the trouble.

More Aperture Tips and Techniques

My next Aperture Workshop is May 21, 2011 in Santa Rosa, CA. We'll probably schedule the next for Nov. 2011. write me if you're interested in attending either.

To learn more about Aperture 3, check out my Aperture 3 Essential Training on Lynda.com. Also, take a look at our Aperture 3 Learning Center. Tons of free content about how to get the most out of Aperture.


The Digital Story on Facebook -- discussion, outstanding images from the TDS community, and inside information. Join our celebration of great photography!


You may remember Stephanie Scheetz from our Creative Output Series. She's an artist, photographer, and frequent model for TDS Workshops. We haven't worked together for a while. But when Lowepro wanted me to make a couple short movies on some new stylish bags that are perfect for female shooters, I immediately thought of Stephanie in front of the camera.

Stephanie with Lowepro Camera Bag Stephanie explaining the ins and outs of the Lowepro Compact Courier 70 in this YouTube video.

For those of you who have worked with Stephanie in the past as a model, or enjoyed her Creative Output work, I thought you'd like to see her again. You can watch the movie here.

Video was captured with a Canon 60D with the 15-85mm zoom lens. Audio recorded with the Rode VideoMic Pro Compact Shotgun Microphone.

I also have a set of stills from the movie that are fun all by themselves.


The Digital Story on Facebook -- discussion, outstanding images from the TDS community, and inside information. Join our celebration of great photography!


The first consideration is color temperature. What type of lighting are you working in, and do you need to compensate for it? Then, the use of color in your composition. Often, by working with complementary colors you can add punch to your image. Or, maybe working with a specific color for a specific item. Then there is the lack of color: B&W photography. Sometimes removing color is the answer to the perfect image. I discuss all of these topics, and more, in this week's podcast.

Listen to the Podcast

You can also download the podcast here (31 minutes). Or better yet, subscribe to the podcast in iTunes. You can support this podcast by purchasing the TDS iPhone App for only $2.99 from the Apple App Store.

Monthly Photo Assignment

Shades of Green is the May 2011 Photo Assignment. You can read more about how to submit on our Member Participation page. Deadline for entry is May 31, 2011.

TDS Fall 2011 Photography Workshop

We're making plans now for the Fall 2011 TDS Photography Workshop. If you want your name on the reserve list, just drop me a line.

More Ways to Participate

Want to share photos and talk with other members in our virtual camera club? Check out our Flickr Public Group. And from those images, I choose the TDS Member Photo of the Day.

Podcast Sponsors

Red River Paper -- Try the $7.99 Sample Kit.

Make Your Photos Sizzle with Color! -- SizzlPix is like High Definition TV for your photography.

Need a New Photo Bag? Check out the Lowepro Specialty Store on The Digital Story and use discount code LP20 to saven 20% at check out.


Technorati Tags:
, , , , ,


diy_ring_flash.jpg

I first read about the The DIY Ring Flash Kit on the Strobist blog. And I was intrigued by the possibility of having this portable modifier for producing even light for less than $30.

As part of the bargain, the user does have to do some assembly, as demonstrated on the The DIY Lighting Kits site. But it seems simple enough. And once it's finished, you can use it on a variety of flashes including the Nikon SB28, SB80dx, SB800, SB26 and Canon 430EX, 580EXII.

If you've ever wanted to experiment with ring flash, this might be the ticket for you.


The Digital Story on Facebook -- discussion, outstanding images from the TDS community, and inside information. Join our celebration of great photography!


"Don't Move!"

When Theresa got to the top of the bluff, I said, "Don't move!" because I saw this shot instantly. Even for simple day hikes in my neighborhood, I always pack a camera. (Yes, this spot is walking distance from my front door.) I had the Olympus XZ-1in my pocket this day.

Spring in Sonoma County

It was quite bright during the hike. I had my sunglasses on, which makes it even harder to compose images on the camera's LCD. Fortunately, I had the VF-2 electronic viewfinder on the XZ-1. This improved my odds of getting a good composition.

I sent the photo to Theresa at work the next day. She had it up on her computer screen when a coworker stopped by. "What a great shot!" Then another coworker viewed it, and another after that. It's now Theresa's desktop wallpaper, and she says it brings that good feeling from the hike to her hectic office environment.

I know I've said it a million times, but take your camera with you when you walk out the door. You might capture a moment that makes someone else's day too.


The Digital Story on Facebook -- discussion, outstanding images from the TDS community, and inside information. Join our celebration of great photography!


We need the light for taking our pictures, but it can really work against us when it's time to review them on the camera's LCD. Hoodman to the rescue with the HoodLoupe 3.0 Professional ($79.99).

Hoodman HoodLoupe 3.0 Professional Hoodman HoodLoupe 3.0 Professional comes with a quick release neck strap and case with belt loop. Works on cameras with 3" LCD screens and smaller.

I must admit, I felt a bit like a big time Hollywood director when working with the HoodLoupe around my neck. It has a +/- 3 diopter adjustment for precision viewing. The hard rubber hood feels durable, yet won't scratch the back of your camera. I've used it on my Canon DSLRs, Olympus PENs, and even the new Olympus XZ-1. Here's a brief into video about it.

If you want to use the HoodLoupe for LiveView video recording, there are accessories for attaching to your camera.

You can order the Hoodman HoodLoupe 3.0 Profession from the good folks at Hunt's Photo & Video.


The Digital Story on Facebook -- discussion, outstanding images from the TDS community, and inside information. Join our celebration of great photography!


I've used Canon flashes for a number of years, but none of them have delighted me like the new Speedlite 320EX($275 US). It's a truly useful accessory for the new breed of DSLRs, specifically, the Canon 7D, 60D, and T3i.

canon_320ex_front.jpg Canon 320EX. Notice the LED light in the body.

Feature Highlights

This 1.1 pound strobe fits easily in nearly any camera bag, yet includes:

  • Bounce and swivel head
  • LED light that can be used for video recording, as a modeling light, or just to help with focusing
  • Wireless capability with 4 channels
  • 24mm full-frame equivalent coverage at the wide end with maximum guide no. 79 ft./24m at ISO 100; and at the tele end, 50mm full-frame equivalent, max. guide no. 105 ft./32m at ISO 100
  • Remote release button to fire camera from a distance
  • Easy to operate switches and buttons
  • Up to 4 hours continuous light from LED from a set of fully charged 4 AA batteries

canon_320ex_rear.jpg No LCD on this flash. Easy to operate buttons and switches instead.

Buttons and Switches

I don't know if it was a conscious decision on Canon's behalf, or just that an LCD wouldn't fit in the limited real estate of the 320EX, but all of the controls are handled by buttons and switches on the flash itself, or via the menu on the camera. I love this!

If you're going to work wirelessly, then put the 320EX in Slave mode with the switch in the lower left. Most of the time you'll be working in Group A, Channel 1, but if you need to change those, then use the two switches above the On/Off. If you want to use the LED light, move from Auto to Manual with the switch in the lower right, then press the LED Light button. The remote trigger is a button on the side of the flash above the battery compartment. If you want to move the zoom head out to Tele position, just pull it. The TELE light on the back of the flash will illuminate to let you know.

canon320ex_side.jpg Remote flash trigger button is located above the battery compartment.

Remote Trigger

You can fire you camera remotely with the 320EX. Basically this works with any Canon that accepts the RC-1 remote controller, which is many of them. Set the camera to Self Timer in the Drive mode, then it's ready to accept commands from the 320EX. There's a 2-second delay that allows for last minute adjustments.

This is handy for off-camera flash work. You could use the LCD as a modeling light to position the 320EX just where you want it. Then use the remote trigger to take the shot. On the 60D or T3i, you could have the Vari-Angle LCD turned around so you can see the image from the remote position to decide if you need to make further adjustments. Slick!

canon320ex_led.jpg The LED throws a decent circle of light. The distance here is 28" from the wall. As I stepped back, the circle became larger, but not as bright.

LED Light

The LED light is bright enough for work within 8 feet. When you're close to the subject, the diameter of the circle is tighter, as shown in the illustration above. As you move back the diameter grows larger. This addition fits perfectly with the direction our DSLRs are going. Now, while recording video and stills together, we have a flash that can accommodate both.

Bottom Line

I think the Canon Speedlite 320EX might motivate photographers to consider off-camera flash and creative lighting more often. It's so compact that there isn't really an excuse not to bring it. Plus, it performs triple duty because it is a terrific hot shoe/wireless flash, includes an LED light for video and modeling, and serves as a remote trigger.

Highly recommended, especially for Canon 7D, 60D, and T3i users. Available for about $275from Amazon. Kit includes mini stand and case.


The Digital Story on Facebook -- discussion, outstanding images from the TDS community, and inside information. Join our celebration of great photography!


Adobe released a handful of demonstration apps for the iPad to show off their new set of developer tools. I downloaded Adobe Nav for Photoshop ($1.99 in the App Store) and connected it to Photoshop CS5 12.0.4 on my MacBook Air.

Adobe Nav for Photoshop on the iPad Browse Mode on the iPad

You have two basic modes to work with: Tools, which gives you access to your Photoshop tools on the iPad, and Browse mode that allows you to view all of the images you currently have open in CS5. If you double-tap on an image, you're presented with some basic metadata about it. Double-tap again and you return to the photo. There are three basic viewing sizes: thumbnail, medium image (shown in this illustration), and full screen.

The tools are fun, but you still need to operate them on the computer. I did like hitting the Tab key to hide the tools on my Mac, allowing me a cleaner view of the image, then switching among the tools on the iPad. You can organize the tools on the iPad any way you want, which could turn out to be one of the most alluring features of this app. One of my favorirte Nav functions is the Screen Mode that allows me to switch to full screen mode on the Mac with just a tap on the iPad. Actual Pixels is pretty good too.

But I think the real fun is being able to walk over to a coworker's desk with iPad in hand and discuss an image or two that you have open in Photoshop back at your desk. It's another bit of freedom that isn't going to change the world, but is nonetheless enjoyable.

What Adobe hopes will happen is that developers will start using the SDK to create new iPad apps that no one had previously imagined. In the meantime, Adobe Nav is a tiny peek into the future.


twitter.jpg Follow me on Twitter


I have new way to share the best of your photo contributions with our virtual camera club... and the world. We now have the TDS Member Photo of the Day on The Digital Story Facebook Fan page. Those images are curated from our vast collection on The Digital Story Public Group on Flickr (which has over 1,700 members and 17,000 images.) In this week's podcast, I talk about the role our Facebook page will play in our overall virtual camera club, and how you can particiapte (or at least, just enjoy).

I've also posted more details about this in the article, Why You'll Like TDS on Facebook. Please stop by, "Like," and start enjoying great imagery from our virtual camera club members.

Listen to the Podcast

You can also download the podcast here (29 minutes). Or better yet, subscribe to the podcast in iTunes. You can support this podcast by purchasing the TDS iPhone App for only $2.99 from the Apple App Store.

Monthly Photo Assignment

Shades of Green is the May 2011 Photo Assignment. You can read more about how to submit on our Member Participation page. Deadline for entry is May 31, 2011.

TDS Fall 2011 Photography Workshop

We're making plans now for the Fall 2011 TDS Photography Workshop. If you want your name on the reserve list, just drop me a line.

More Ways to Participate

Want to share photos and talk with other members in our virtual camera club? Check out our Flickr Public Group. And from those images, I choose the TDS Member Photo of the Day.

Podcast Sponsors

Red River Paper -- Try the $7.99 Sample Kit.

Make Your Photos Sizzle with Color! -- SizzlPix is like High Definition TV for your photography.

Need a New Photo Bag? Check out the Lowepro Specialty Store on The Digital Story and use discount code LP20 to saven 20% at check out.


Technorati Tags:
, , , , ,


ipad2_side.jpg

There are some good tablet discussions online about iPad 2 vs Android. My bottom line recommendation is, if you're using a Mac or an iPhone, then go with iPad 2 for your tablet. Those not committed to either iOS or Android have some research to do. To help you get started, I found a good article on cameradojo, My Take on Android Tablets vs iPad. You won't get a definitive answer, but you will have lots of good information to think about.

If you want a definitive answer, then go iPad 2.


The Digital Story on Facebook -- discussion, outstanding images from the TDS community, and inside information. Join our celebration of great photography!


The Digital Story on Facebook

We now have The Digital Story on Facebook, and I think you're going to like it. The heart of this new site is your imagery. And I have lots of amazing stuff to share.

The Back Story

A few years ago, I wanted a place to bring together the images from TDS members. We created the TDS Public Group on Flickr. At the moment, we have more than 1,700 members sharing a catalog of 17,000 photos -- many of them outstanding.

The next step was to find a way to share these pictures with the entire TDS audience. So we created the Member Gallery on the site. It refreshes daily, and is an easy way to see what your fellow photogs are up to.

But there seemed to be a missing element in all of this. And for me, that was the ability to highlight the most interesting work and have it appear before our audience. That's when the TDS Member Photo of the Day idea came to me.

How It Works

The first part works as it always has. If you want to contribute photos to the TDS Public Group, become a member of Flickr and join our community there. I've published instructions on how to do this, although after re-reading them, I do need to make some updates to that post.

To enjoy the TDS Member Photo of the Day, whether you're a contributor or not, just "Like" our new Facebook Fan Page. The Like button is at the top of the page. I'll post a Member Photo of the Day five times a week, highlighting some great photography.

If you simply want to view these great images, sit back and they will appear in your News Feed five times a week. If you want to be featured, join our Flickr community and start sharing your work.

In Podcast 273, I go into more details about this project, and some of the other features. You might want to tune in.

I'm so excited about this. And I have the wonderful job of going through these images and making the selections.


twitter.jpg Follow me on Twitter


"While I Wait" - Grab Shot 214

"While I Wait" Grab Shot 214

"While I wait for the train to pass," writes Conrado Gonzalez, "why not capture a grab shot?"

What a great argument for having your camera with you. Conrado captured this beautiful image with his Nikon D40, then processed the photo in Lightroom 3.4. (Click on image to get its full impact!) Sometimes those short delays work in our favor...

This is our 214th Grab Shot! Wow. If you want to review the collection that began back in 2006, go to our Grab Shots page.

If you have a candid you'd like to share, take a look at our Submissions page, then send us your Grab Shot. We'll try to get it published for you on The Digital Story.

And you can view more images from our virtual camera club in the Member Photo Gallery.


The Digital Story Podcast App is the best way to stream or download weekly TDS podcast episodes. No more syncing your iPhone, iPod Touch, iPad, or even your Android phone just to get a podcast. And the best part is, The Digital Story Podcast App is your way to help support this show. Download it today!


twitter.jpg Follow me on Twitter


I've mounted a Pinwide wide angle pinhole cap on my Olympus E-PL1 micro four thirds camera and have been shooting crazy shots. The first thing I noticed about my behavior when I'm using the Pinwide is that all bets are off. It's like it challenges you to be creative.

Soccer Net

Since we are dealing with a pinhole for our light transmission to the sensor, I found myself using ISO 1600 to get decent handheld shutter speeds. In broad daylight, most of my shots were between 1/15 and 1/60th of a second. You get some image noise at ISO 1600 with the E-PL1, and that seemed to contribute to the overall texture of the shot.

One of the reasons I like using Olympus bodies for this type of work is that the stabilization is built into the body, not the lens. So I still have IS with a pinhole cap.

Mom's Apple Pie

One of the attributes that jumps out at you when looking at these images, is the natural vignetting that comes with pinhole photography. Plus there's substantial depth of field, and, for lack of a better way of saying it, just pure color. It's much easier to understand pinhole photography by looking at it, rather than trying to explain it.

Sr. Marlene Dr.

As for the Pinwide cap itself, I found it well designed and high quality. It snaps securely into place on the camera and seems quite durable. There's a tiny glass element on the backside of the adapter that protects your sensor from dust entering through the pinhole. So you can leave it on the camera without worry. When it's time to put it away, it includes a cute little tin for storage that reads, "Designed in Chicago, manufactured in the USA."

During the shooting process, I found it easier to compose the image with the accessory Olympus VF-2 Electronic Viewfinder rather than on the LCD, especially in bright light.

You can order the Pinwide directly from the Wanderlust site for $39.99. It's a great way to bring out the creative artist in you.


twitter.jpg Follow me on Twitter


Derrick Story -- Sunrise at Crescent Beach, FL "Sunrise at Crescent Beach" Canon 60D with 15-85mm set at 85mm. F/5.6 at 1/125th. ISO 125. Photo by Derrick Story. Click on image for larger version.

California and Florida are two different worlds. And one of the most physical differences on the east coast is that the sun rises over the ocean. Yes, an obvious fact. But the experience is anything but mundane.

Normally I oversleep when I travel to the east. But this morning I was awake with coffee in hand as the first rays of light appeared at Crescent Beach. I grabbed the Canon 60D with the EF-S 15-85mm zoom and waited for the sun to break the horizon.

After enjoying these types of moments first thing in the morning, everything else in the day just seems a little brighter.


twitter.jpg Follow me on Twitter


When I first posted the story about the M.I.C. CF Card Reader for the iPad, I received mail saying that it wouldn't work for a variety of reasons. I now have the card reader connected to my first generation iPad, and I can say that it transferred full sized Jpegs off the CF card from my Canon 5D Mark II without a hitch. Ditto for Raw files.

mic_cf_reader

I then connected the iPhone to its USB port (yes, the reader is dual function), and downloaded shots I had taken on a recent trip to Florida -- again without incident.

I also found M.I.C. easy to work with. I ordered the CF Card Reader from their web site and was kept up to date via email on when the device would ship. And it arrived in my mail box as promised.

The CF Card Reader sells for $29.90, and is advertised to work with both generations of iPad. I can vouch that it lives up to its promise with the original iPad running the latest iOS software.


twitter.jpg Follow me on Twitter


DigiScoping -- putting a camera up to the eyepiece of a spotting scope -- has been around for a while. But after attending the Florida Birding and Photo Festival, I learned that it's at a whole new level now. In this week's show I talk about the state of DigiScoping, wildlife in Florida, and more.

Listen to the Podcast

You can also download the podcast here (25 minutes). Or better yet, subscribe to the podcast in iTunes. You can support this podcast by purchasing the TDS iPhone App for only $2.99 from the Apple App Store.

Monthly Photo Assignment

Shades of Green is the May 2011 Photo Assignment. You can read more about how to submit on our Member Participation page. Deadline for entry is May 31, 2011.

TDS Fall 2011 Photography Workshop

We're making plans now for the Fall 2011 TDS Photography Workshop. If you want your name on the reserve list, just drop me a line.

More Ways to Participate

Want to share photos and talk with other members in our virtual camera club? Check out our Flickr Public Group. It's a blast!

Podcast Sponsors

Red River Paper -- Try the $7.99 Sample Kit.

Make Your Photos Sizzle with Color! -- SizzlPix is like High Definition TV for your photography.

Need a New Photo Bag? Check out the Lowepro Specialty Store on The Digital Story and use discount code LP20 to saven 20% at check out.


Technorati Tags:
, , , , ,


Macworld Magazine has published my full review of the Canon EOS Rebel T3i from a Mac perspective. In terms of base performance, this model is very similar to the excellent Canon T2i. But the few changes that were added are noteworthy.

Canon EF-S 18-135mm IS Zoom Lens Canon EF-S 18-135mm IS Zoom Lens mounted on a EOS Rebel T3i. Click on image for larger size. Photo by Derrick Story.

Here are my pros and cons from the review.

Pros

  • Beautiful and useful Vari Angle 3-inch LCD (new to Rebels)
  • Wireless flash transmitter for multiple flashes (new to Rebels)
  • Robust movie recording options including full HD (Improved)
  • External mic jack
  • Clear, easy to use menu system and onscreen controls
  • Excellent image quality, even at ISO 1600
  • Versatile 18-135mm kit lens option provides all in one solution

Cons

  • Some physical controls (such as Display button) oddly placed
  • Lack of single button movie recording
  • Auto White Balance struggles in most indoor lighting conditions--a traditional Canon weakness

You might also want to note that this camera received 4.5 Mice, a rating that is rarely awarded to digital cameras. As for the Mac side of the equation, the T3i is already supported in Aperture and iPhoto. And its bundled software runs very well on Mac OS X. Plus, the video compression is H.264 for its captured movies, so you can drop them right on to your computer and start enjoying.

If you use a Mac and like shooting Canon, the Rebel T3i is an excellent DSLR for sophisticated consumers.

Related Articles

Canon EF-S 18-135mm IS Zoom Lens: More Reach for Your Kit Lens

"Canon T3i (600D) Review" - Digital Photography Podcast 269

Canon EF-S 15-85mm f/3.5-5.6 IS USM - Upgrade Your Kit Lens


twitter.jpg Follow me on Twitter


Simone Brogini for Blue

For the March'11 Photo Assignment, TDS shooters explored color with this gallery titled Blue. This hue never looked so good. And which one will be the SizzlPix Pick of the Month?

The May 2011 assignment is "Shades of Green." Start working on your contribution now. Details can be found on the Member Participation page. Submit your photo assignment picture 800 pixels in the widest direction. Deadline is May 31, 2011.

Please follow the instructions carefully for labeling the subject line of the email for your submission. It's easy to lose these in the pile of mail if not labeled correctly. For example, the subject line for next month's assignment should be: "Photo Assignment: May 2011." Also, if you can, please don't strip out the metadata. And feel free to add any IPTC data you wish (These fields in particular: Caption, Credit, Copyright, Byline), I use that for the caption info.


Photo by Simone Brogini. (Click on it to see enlarged version.) You can read more about how Simone captured this shot, plus see all of the other great images on the March 2011 Gallery page.


Good luck with your May assignment, and congratulations to all of the fine contributors for March.


twitter.jpg Follow me on Twitter

-


Now Available! The Digital Photography Companion. The official guide for The Digital Story Virtual Camera Club.

  • 25 handy and informative tables for quick reference.
  • Metadata listings for every photo in the book
  • Dedicated chapter on making printing easy.
  • Photo management software guide.
  • Many, many inside tips gleaned from years of experience.
  • Comprehensive (214 pages), yet fits easily in camera bag.

Technorati Tags: , ,