August 2011 Archives

For the July '11 Photo Assignment, TDS shooters captured the elusive in their camera lens for the assignment, Smoke. You might not be able to touch these subjects, but they sure look great. And which one will be the SizzlPix Pick of the Month? (These will look great Sizzled!)

matthew_rampton_pa_07_11.jpg

Participate in This Month's Assignment

The Sept. 2011 assignment is "Hands and Feet." Start working on your contribution now. Details can be found on the Member Participation page. Submit your photo assignment picture 800 pixels in the widest direction. Deadline is Sept 30, 2011.

Please follow the instructions carefully for labeling the subject line of the email for your submission. It's easy to lose these in the pile of mail if not labeled correctly. For example, the subject line for this month's assignment should be: "Photo Assignment: Sept. 2011." Also, if you can, please don't strip out the metadata. And feel free to add any IPTC data you wish (These fields in particular: Caption, Credit, Copyright, Byline), I use that for the caption info.


Photo by Matthew Rampton. (Click on it to see enlarged version.) You can read more about how Matthew captured this shot, plus see all of the other great images on the July 2011 Gallery page.


Good luck with your Sept. assignment, and congratulations to all of the fine contributors for July.


twitter.jpg Follow me on Twitter

-


Now Available! The Digital Photography Companion. The official guide for The Digital Story Virtual Camera Club.

  • 25 handy and informative tables for quick reference.
  • Metadata listings for every photo in the book
  • Dedicated chapter on making printing easy.
  • Photo management software guide.
  • Many, many inside tips gleaned from years of experience.
  • Comprehensive (214 pages), yet fits easily in camera bag.

Technorati Tags: , ,

richard_bulda_winner.jpg

Congratulations to Richard Bulda who is the winner of the Lowepro Fastpack 100 filled with goodies.

Richard, please send me your shipping information (including phone number) and I will get your prize to you asap.

Thanks to all of my Twitter, Facebook, and Google+ friends who participated. I enjoy your comments and contributions to my corner of the world.


The Digital Story on Facebook -- discussion, outstanding images from the TDS community, and inside information. Join our celebration of great photography!


DIY Studio Set Up

It's amazing what you can build with a few pieces of PVC pipe and a handful of shower curtain hooks. This week I talk about assembling your own portrait studio. You can use this rig at home, at your local school, at a friend's house, or just about anywhere you can find a 10' x 12' space to set it up and work. During the show, I walk you through the entire parts list.

A Few of the Resources Mentioned in the Podcast

In addition to PVC pipe, a hack saw, shower curtain rings, a few C-clamps (the kind with orange handles from the hardware store), clothes pins, and gaffers tape, here are some resources to finish off your studio:

Listen to the Podcast

You can also download the podcast here (28 minutes). Or better yet, subscribe to the podcast in iTunes. You can support this podcast by purchasing the TDS iPhone App for only $2.99 from the Apple App Store.

About These Images

The top photo is a self portrait of me in my DIY studio. I'm shooting into the big mirrors that I have against the back wall. Models can use those to help them position themselves during the session. You can click on the photo to see the other details, such as the PVC pipe and backdrop.

Second photo is a portrait captured in this studio. The main light is from the north facing window. Fill light is supplied by a Photoflex 5-in-1 32" reflector disc mounted with the holder attachment. No other lighting was used.

You can see more images from the photo shoot on the TDS Flickr page. Photos by Derrick Story.

Taylor in DIY Studio

Monthly Photo Assignment

Reflection is the August 2011 Photo Assignment. You can read more about how to submit on our Member Participation page. Deadline for entry is August 30, 2011.

TDS Nov. Aperture Workshop

I've an Aperture Workshop on Nov. 12th and 13th. If you want your name on the reserve list, or just more information, drop me a line. BTW: We include a professional model shoot as part of this workshop. Just saying...

More Ways to Participate

Want to share photos and talk with other members in our virtual camera club? Check out our Flickr Public Group. And from those images, I choose the TDS Member Photo of the Day.

Podcast Sponsors

Red River Paper -- The $7.99 Sample Kit is back! And with free shipping.

Make Your Photos Sizzle with Color! -- SizzlPix is like High Definition TV for your photography.

Need a New Photo Bag? Check out the Lowepro Specialty Store on The Digital Story and use discount code LP20 to saven 20% at check out.


Technorati Tags:
, , , , ,


Quick Keywording Tips in Lightroom 3

In Organizing and Archiving Digital Photos, I cover basic organizational techniques in Lightroom, Aperture, iPhoto, and roll-your-own. In this short video, I discuss keywording in Lightroom 3 on a Windows 7 machine. By adding keywords to your images, you make it easier to find them up the road. This is especially true when your library grows to thousands of images.

More on Organizing and Archiving Digital Photos

Organizing and Archiving Overview Movie

Choosing the Right Hard Drive for Your Photo Backup

Roundtripping from Lightroom to Photoshop

"Organizing and Archiving Your Photos" - Digital Photography Podcast 290

Backing Up Aperture 3 Via My Local Network


The Digital Story on Facebook -- discussion, outstanding images from the TDS community, and inside information. Join our celebration of great photography!


Outdoor Portrait Shoot Photo shoot during the TDS Sonoma Coast Workshop.

Portraits indoors and out require a mix of craftsmanship and artistry. After two days of shooting during the TDS Sonoma Coast Workshop, I have a few tips to share that we covered during the sessions.

  • Make sure the eyes are sharp. And if the subject's head is rotated left or right, focus on the eye closest to the camera.
  • Reflectors are just as useful on overcast days as when the skies are clear. They are particularly helpful for brightening up the eyes.
  • Fill flash, when used properly, can help you when you don't have an extra set of hands for reflectors. But practice with your settings before the shoot, or it can become an exercise in frustration.
  • Learn to see the color of light as well as its intensity. Adjusting your white balance during the shoot renders better skin tones on the LCD screen, and back at the computer.
  • Communicate with your subject. Keep talking during the shoot. Be encouraging. Share images from the camera's LCD to build confidence during the session.

And if you've promised to share images with the subject after the shoot, deliver the goods in a timely manner. It's the professional thing to do.


The Digital Story on Facebook -- discussion, outstanding images from the TDS community, and inside information. Join our celebration of great photography!


"Oh My!"

katherine_crosbie_tds_workshop.jpg

I love this photo by Katherine Crosbie of Ashley Tuttle captured at the ongoing TDS Sonoma Coast Workshop in Santa Rosa, CA.

Katherine is one of eight attendees who will be heading to the coast today for our focus on landscape work and environmental portrait. Great shot, Katherine!


The Digital Story on Facebook -- discussion, outstanding images from the TDS community, and inside information. Join our celebration of great photography!


Organizing and Archiving Digital Photos is live in the lynda.com online library. It's about the concepts and techniques behind efficient photo management and backup. This training is Mac and Windows friendly. I worked on a Mac for Aperture stuff, Windows for Lightroom stuff, and there's plenty of roll-your-own tech too. There are also five free movies you can watch right now.

The course begins by showing how to transfer and organize photos "by hand" -- that is, by copying them from a memory card to a hard drive without using software. In the second portion of the course, I explain how to take advantage of the photo-management features provided by programs such as Lightroom and Aperture, by assigning descriptive keywords, by giving photos ratings and color-coded labels, and how smart album features can automatically collect photos that meet certain criteria.

I also get into the new generation of user-friendly RAID hard drives, cloud computing, and lots of other good stuff.

More on Organizing and Archiving Digital Photos

Organizing and Archiving Overview Movie

Choosing the Right Hard Drive for Your Photo Backup

Roundtripping from Lightroom to Photoshop

"Organizing and Archiving Your Photos" - Digital Photography Podcast 290

Quick Keywording Tips in Lightroom 3

Backing Up Aperture 3 Via My Local Network


The Digital Story on Facebook -- discussion, outstanding images from the TDS community, and inside information. Join our celebration of great photography!


Lowepro Fastpack 100

How easy is this? All you have to do is "Like" the TDS Facebook Fan Page, or... follow me on Twitter, or... add me to a circle in Google+, and you could win a Lowepro Fastpack 100 filled with goodies. If you're on more than one of these social networks, then you can have as many as three entries.

What Are the Goodies?

I'm not going to tell you all of them, but how about a few? One item will be an Expo Disc for super accurate white balance (worth $100). Another will be a signed copy of The Digital Photography Companion. And then there's the Lowepro Fastpack 100, perfect for that day outing with your DSLR.

The Rules

Deadline for participation is Tuesday, Aug. 30, 11:00 pm PST. Participation is void where prohibited. The winner will have to provide email address, shipping address, and phone number to receive the prize package. Winner will be announced on The Digital Story on Wed., Aug. 31, 2011.

The Printing Room

The Printing Room

Here's a look inside the Printing Room at the TDS Studio in Santa Rosa, CA. This image was captured after a 3-day marathon session while I was assembling a new portfolio. (If you want to hear the process I use for that, check out the Clever Portfolio podcast.)

For the color work, I'm using the Epson R2000 13" printer ($349) with Epson Premium Luster paper and Red River Arctic Polar Luster 75 lb.. I connect to the R2000 using WiFi from the MacBook Pro located on the right side of the photograph. I always use Epson original ink for all my Epson printers.

B&W images are created with the Epson R2400 13" printer, mainly because I love the way the K3 ink set renders the images. I've been printing the B&W on Red River Aurora Art White stock, and the images look, and feel, fantastic. In fact, the image you see coming out of the R2400 is on that particular paper. For these images, I use the "Advanced B&W" setting on the R2400. It is connected to the MacBook Pro via a USB cable.

I make all of my prints using Aperture 3. I have presets for the different types of output, and that saves me a lot of time. During these marathon sessions, I bring my MacBook Air up to the printing room so I can work while the devices do their thing.


The Digital Story on Facebook -- discussion, outstanding images from the TDS community, and inside information. Join our celebration of great photography!


Creating a portfolio, electronic or print, helps you focus your work and develop a style. The process is almost as important as the final product. In this week's podcast, I discuss options for creating your own "collection of best shots," and discuss tools for displaying on an iPad, for printing, and how to combine the two worlds.

Listen to the Podcast

You can also download the podcast here (27 minutes). Or better yet, subscribe to the podcast in iTunes. You can support this podcast by purchasing the TDS iPhone App for only $2.99 from the Apple App Store.

Monthly Photo Assignment

Reflection is the August 2011 Photo Assignment. You can read more about how to submit on our Member Participation page. Deadline for entry is August 30, 2011.

TDS Nov. Aperture Workshop

I've an Aperture Workshop on Nov. 12th and 13th. If you want your name on the reserve list, or just more information, drop me a line. BTW: We include a professional model shoot as part of this workshop. Just saying...

More Ways to Participate

Want to share photos and talk with other members in our virtual camera club? Check out our Flickr Public Group. And from those images, I choose the TDS Member Photo of the Day.

Podcast Sponsors

Red River Paper -- The $7.99 Sample Kit is back! And with free shipping.

Make Your Photos Sizzle with Color! -- SizzlPix is like High Definition TV for your photography.

Need a New Photo Bag? Check out the Lowepro Specialty Store on The Digital Story and use discount code LP20 to saven 20% at check out.


Technorati Tags:
, , , , ,


minimal_folio_ipad.jpg

How many times have you said, "There's got to be a better way to present my work on the iPad?" I have. Many times.

So I finally got serious and searched for a simple, flexible presentation/portfolio app, and I've decided that Minimal Folio is the best for me. Why?

  • Flexible - I can arrange images, PDFs, and videos in a sequential presentation, or as topic columns. When working in columns, I can follow one column down, but move sideways to related images. It's very simple to set up, but can be very impressive during the presentation.

column_view_setup.jpg

  • App Controls Via "Settings" - Once you get your presentation the way you want, you go to the Settings App for the iPad to lock it down. This allows you to hand your iPad to the client or viewer to let them enjoy the portfolio, but without worrying that they will accidentally alter it.
  • Dropbox Syncing - You can upload images via iTunes to Minimal Folio, but I prefer Dropbox syncing. Point Minimal Folio to your Dropbox, and it creates a new folder in your Dropbox. Within that folder there is another titled "Minimal Folio." Your images have to go inside that nested folder. Once they are there, they are synced with the iPad. Very flexible.

There are a handful of other useful features, such as copy and paste, import from your Photos app, display on an external output device, and share via email.

Minimal Folio is only $2.99 in the App Store. It's a terrific utility for photographers or anyone who wants to make presentations on their iPads.

More App Reviews for the iPad

The Digital Story Podcast App for the iPad

Photographers Contract Maker

PhotoToaster for the iPad

Nik Software Brings Its Magic to the iPad with Snapseed

M.I.C. CF Card Reader for the iPad: Does it Work?


The Digital Story on Facebook -- discussion, outstanding images from the TDS community, and inside information. Join our celebration of great photography!


canon_60d_18-135.jpg

After a recent assignment shoot, I pulled a Lexar 8GB Pro SD card from my Canon 60D and inserted it into the MacBook Air, ready to process the Raw images in Aperture. I waited. I waited some more. No import dialog box.

I check the desktop and the card had not mounted. So I pulled it out and tried again. Still no pictures.

This is when you start to get that awful feeling in the pit of your stomach.

I took a closer look at the card and noticed that a crack had formed up by the gold contacts. The casing was compromised. Now I really began to worry. I was in the field and needed to process and post these images right away.

Since I had just finished reviewing the shots in the camera before ejecting the card, I thought that maybe the 60D could still access those files. I gently inserted the Lexar back into my DSLR and fired it up. I got a warning that the card was locked. The little white tab had fallen out when the casing cracked. But... the camera could still read the pictures that were on it!

I then did something that I had not done in years. I dug around in my Lowepro bag and found the USB cable that came with the 60D. I connected it to the MacBook Air, launched Aperture again, and crossed my fingers.

The thumbnails started rolling across my computer screen. Relief.

Even though I much prefer using card readers, in this case I was so happy that I still had the original USB cable with me. On this day, it saved the job.


The Digital Story on Facebook -- discussion, outstanding images from the TDS community, and inside information. Join our celebration of great photography!


Model Shoot with the Olympus E-P3

We know that the Olympus E-P3 is capable in the field (see the latest DP Review test). That's the first environment that most think of when considering a micro four-thirds system camera. But what about in the studio? Could you use an E-P3 with the kit 14-42mm zoom (f/3.5 - 5.6) for a model shoot? I decided to find out.

ashley_full_portrait.jpg Ashley Tuttle photographed by Derrick Story using an Olympus E-P3 with stock 14-42mm zoom. Click on image for larger size.

The Set Up

I set an appointment with Ashley Tuttle, who will be one of the models for the TDS Sonoma Coast Workshop on Aug. 25th, to test the E-P3. I set a Olympus FL-50R flash in a softbox as the main light, then added an Olympus FL-36R as a fill light using a Rogue FlashBender to help shape the environment. I controlled both flashes wirelessly using the E-P3 - no additional lighting accessories were needed.

I added the Olympus Electronic Viewfinder VF-2 to the E-P3 during the shoot so I wouldn't have to use the LCD to compose. Quite honestly I did this for two reasons: 1) it's easier to compose during live action, and 2) it looks more professional than holding the camera like a regular point and shoot. What I liked about the viewfinder was the ability to really concentrate on the subject. What I didn't like was that the image was artificial looking in terms of exposure and color, especially for review. So I would switch to the wonderful 614,000 dot, 3" LCD to gauge the quality of the shots.

The autofocus was extremely fast during the shoot. The E-P3 had no problem keeping pace with Ashley and me. The flash system also worked quite well, and the FL-50R fired consistently, even when in the softbox.

Camera Settings

I set ISO to 640, and had a typical speed/aperture setting of 1/15th at f/5. I would have liked to push the ISO a bit higher to give me more speed. But since this was a portrait, I wanted to maintain as much image quality as possible. I used Jpeg/Fine mode, mainly because my imaging software doesn't support RAW yet from the E-P3. The picture size was 4032 × 3024 (12.2 MP).

The Image Results

I processed the Jpeg as I normally would in Aperture 3. As expected, the color balance and exposure from the E-P3 was consistently good. At 100 percent (as shown below), I did notice some smearing of detail in the hair and on the skin. There was also some slight ghosting on the finger nails and other edges. I attribute the ghosting to the kit lens, and the detail to having to use Jpeg mode instead of Raw.

ashley_zoom_100.jpg 100 percent enlargement of portrait. Click on image for full view.

The Bottom Line

For a casual portrait, I thought the E-P3 with stock zoom performed OK. The autofocus speed was terrific, off-camera flash system was reliable, and overall exposure and color was quite good.

But this is not a set up that you would want to use for professional portraits, at least without a few modifications. I would switch to one of the prime lenses (12mm, 17mm or 45mm) to give me a faster aperture and more detail. I think RAW would also be essential to retain as much detail and image quality as possible, especially at the higher ISOs.

The Olympus E-P3 is what I carry in my backpack when I'm traveling light, but still need the versatility of a system camera. And it's nice to know that in a pinch I can also use it for portraits with controlled lighting. I want to get my hands on the new 45mm f/1.8 prime. I'm also looking forward to RAW support in both Aperture and Lightroom. There's a lot of potential here.

More on the Olympus E-P3

New 14-42mm Kit Lens

Pricing and Availability Announced for Olympus E-PL3

Touchscreen Photography Moves Beyond iPhone with Olympus E-P3

Olympus PEN E-P3 with 12mm f/2.0 Prime Lens


The Digital Story on Facebook -- discussion, outstanding images from the TDS community, and inside information. Join our celebration of great photography!


epson_r2000_front.jpg

I've been testing the Epson Stylus Photo R2000 inkjet printer, using it for a variety of images from saturated color compositions on glossy stock to B&W on matte surfaces. It's a printer that I like a lot because it combines high quality with convenience. But I've noticed that it has different strengths than the Epson R2400 that I've been using since 2006.

The R2000 uses Epson UltraChrome Hi-Gloss 2 ink ( 8 cartridges: photo black, matte black, cyan, magenta, yellow, red, orange, and gloss optimizer) while the R2400 uses the UltraChrome K3 ink (8 cartridges: cyan, magenta, yellow, light cyan, light magenta, photo (or matte) black, light black, and light light black). It's interesting how these two ink combinations play out when viewing prints over the course of weeks. (You can read more about these Epson inks here.) Since I know the R2400 so well, I became curious about UltraChrome Hi-Gloss as I watched how the R2000 performed in comparison.

In short, the R2000 color output on luster and gloss surfaces is impressive. The gloss optimizer is an excellent finishing touch that appears to increase saturation while helping to protect the image during handling. The R2400 produces better B&W output, and I like how matte prints look emerging from this printer.

Both ink sets have excellent archival rating. The UltraChrome Hi-Gloss 2 color prints should hold up for 80 years if treated well. UltraChrome K3 ink output is rated over 100 years for color, and under the right conditions, up to 200 years for B&W. (I'm using commonly accepted statistics that are based upon Wilhelm Imaging Research.)

Bottom line for me is this: For color printing on gloss or luster surfaces, I like the convenience and appearance of prints from the Epson R2000 that uses the UltraChrome Hi-Gloss 2 Ink set. You might be interested to know that the gloss optimizer is the first cartridge to run dry because it's used on every print. That's probably why Epson puts two of those cartridges in a box while only single cartridges for the color inks. (For extra credit, guess which cartridge ran dry next? It was the cyan, followed by the yellow.)

I'll continue to use the R2400 with the UltraChrome K3 Ink for my B&W work, mostly on matte surfaces. I love the way fine art paper feels, and I really hate changing the photo black/matte black cartridges in the R2400. So I'm sticking with matte for most of my B&W prints.


The Digital Story on Facebook -- discussion, outstanding images from the TDS community, and inside information. Join our celebration of great photography!


There comes a point when photo management software, such as Aperture or Lightroom, just makes sense. In this week's podcast, I share my top 5 reasons for adopting one of these two great applications. I also talk a bit about how they work their magic. In other news, I provide a preview to the upcoming August Sonoma Coast Photography Workshop that 8 lucky members of our community will be participating in. Can you image have your photography workstation in a beautiful library with doors open directly to the beach? That's what we're in store for.

Listen to the Podcast

You can also download the podcast here (30 minutes). Or better yet, subscribe to the podcast in iTunes. You can support this podcast by purchasing the TDS iPhone App for only $2.99 from the Apple App Store.

Monthly Photo Assignment

Reflection is the August 2011 Photo Assignment. You can read more about how to submit on our Member Participation page. Deadline for entry is August 30, 2011.

TDS Nov. Aperture Workshop

I've an Aperture Workshop on Nov. 12th and 13th. If you want your name on the reserve list, or just more information, drop me a line. BTW: We include a professional model shoot as part of this workshop. Just saying...

More Ways to Participate

Want to share photos and talk with other members in our virtual camera club? Check out our Flickr Public Group. And from those images, I choose the TDS Member Photo of the Day.

Podcast Sponsors

Red River Paper -- The $7.99 Sample Kit is back! And with free shipping.

Make Your Photos Sizzle with Color! -- SizzlPix is like High Definition TV for your photography.

Need a New Photo Bag? Check out the Lowepro Specialty Store on The Digital Story and use discount code LP20 to saven 20% at check out.


Technorati Tags:
, , , , ,


Photoshop's Color Replacement Tool

Color Replacement Tool

I just read a helpful tip on Rick Sammon's blog about the Color Replacement Tool in Photoshop. I thought this would be a good opportunity for me to brush up on the technique, so I practiced on a few studio portraits I had recently shot.

You can find it in the Brush Tool options on the left side tool bar. Option-click on a color you want to brush in, and start painting. I usually turn on Find Edges to help me stay within the lines. One additional tip is to create a new layer for your brush work. It's much easier to make adjustments up the road.

Thanks Rick for reminding me of this great Photoshop technique.


The Digital Story on Facebook -- discussion, outstanding images from the TDS community, and inside information. Join our celebration of great photography!


Ever since I can remember, Aperture has had the same five templates for creating web galleries. But thanks to Themes for Aperture by Graphic Node, we have 51 more visual possibilities to choose from when building online galleries.

Themes for Aperture

You download the program from the Mac App Store, then browse the various templates they've designed. You do the browsing in the Themes for Aperture application. Once you find something that catches your eye, mouse over it to reveal the "Save Theme" button. Click on it, and you get a dialog box asking if you want to save the template to the default location in the Aperture container. Click OK, and you're set.

Now, when you choose Web Page from within Aperture, the new template is available right along side the standard offerings from Apple. I tested a handful of them, and they created fresh looking, workable galleries, just as promised. The only difference I noticed was that the Graphic Node themes took a bit longer to export than the standard Apple selections, sometimes up to twice as long. For example, a gallery that began with 37 Raw files took 5 minutes to export on my MacBook Air using the stock black Apple theme, but took 10 minutes when I selected the Precision Camouflage template from Graphic Node. But once the export was complete the theme worked flawlessly.

I was able to remove a theme I didn't want by quitting Aperture, going into the Aperture application container, drilling down to Content > Resources > Web Themes, and dragging the particular web theme to the trash.

Graphic Node is offering an introductory price of $19.99 for Themes for Aperture through August 15th. Some fun stuff in there!

More Aperture Tips and Techniques

My next Aperture Workshop is Nov, 12-13, 2011 in Santa Rosa, CA. Write me if you're interested in attending.

To learn more about Aperture 3, check out my Aperture 3 Essential Training on Lynda.com. Also, take a look at our Aperture 3 Learning Center. Tons of free content about how to get the most out of Aperture.


The Digital Story on Facebook -- discussion, outstanding images from the TDS community, and inside information. Join our celebration of great photography!


Time Saving Lightroom Tips

dp_school_logo.png

Here are 5 Tips That Will Save You Time in Lightroom 3 by Scott Williams. My favorite of the bunch is Copy and Paste Settings, just like one of my favs in Aperture is Lift and Stamp. Love that stuff!


The Digital Story on Facebook -- discussion, outstanding images from the TDS community, and inside information. Join our celebration of great photography!


Tips for Posing Teenage Guys

mcp_actions.jpg

If you shoot senior portraits, then you know there are just as many guys as gals. Yet, most articles focus on posing young women. In this post, photographer Cherie Hogan provides us with 7 easy tips for posing guys. She has some good stuff here. This is one you might want to bookmark.


The Digital Story on Facebook -- discussion, outstanding images from the TDS community, and inside information. Join our celebration of great photography!


Recently I commented in one of my podcasts that I wasn't finding much of interest in the Photography category of the Mac App Store. I must not have been looking close enough. Because hiding there, just waiting to be discovered, is FX Photo Studio ($9.99 US) and FX Photo Studio Pro ($39.99 US). Each brings a ginormous collection of easy to apply photo effects, snappy performance, and an easy to use interface.

fx Photo Studio 
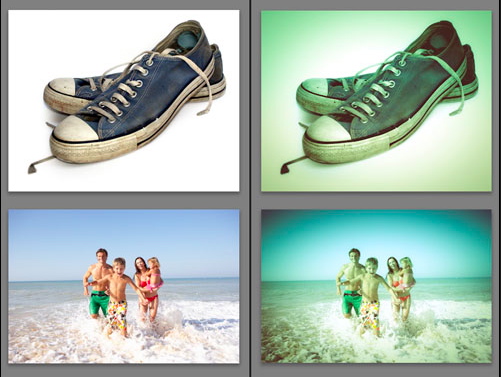
Click on image for larger version.

Import and Export

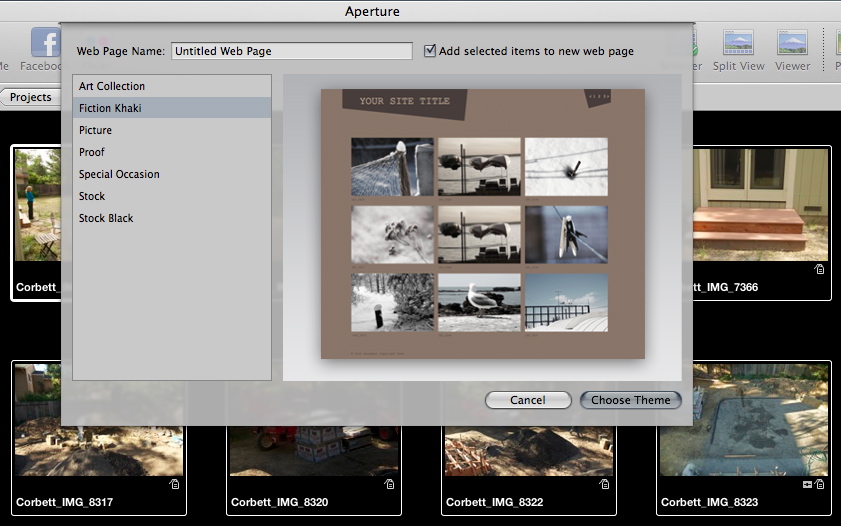
The Import Photo button lets you tap your Aperture, iPhoto, or Lightroom library. It's well implemented, allowing you to browse folders, projects, albums, and collections. The file size that gets handed off to FX Photo Studio is the preview resolution that you establish in your photo management application.

Also, this is not a roundtrip. Once you import the file into FX Photo Studio, you have to save it to a destination, that is, unless you use iPhoto. In that case, you can export directly from FX Photo Studio (either version) back to iPhoto.

With the Pro version, you can import Raw files directly into the app. This is along with the Tiff, Jpeg, PNG, and BMP files that both versions accept. Direct import (of any file type, not just Raw) using the Load Image command also allows you to export larger files out of FX Photo Studio, because you are no longer constrained by the imported preview size from the photo management application that prepared the photo for hand off. In other words, if you want big files to come out of FX Photo Studio, then bring them in directly and not through Aperture or Lightroom. (Unless of course, you have really big previews set for those apps.)

The application also allows you to import directly from a device, such as your digital camera.

Lots of Effects

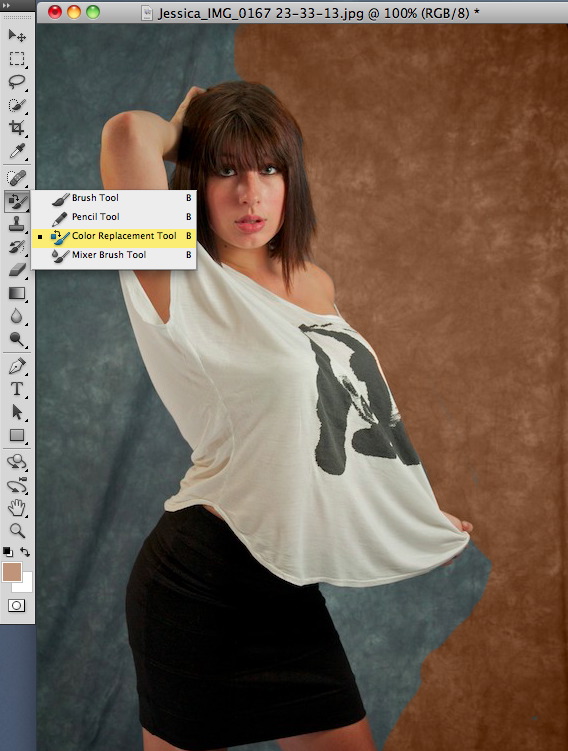
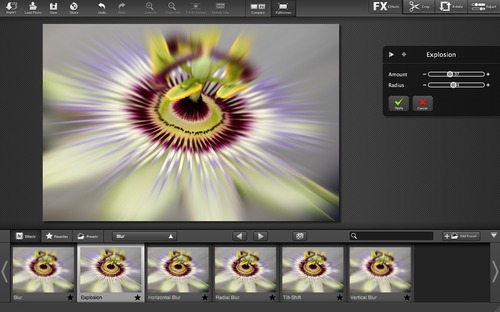
Both versions of FX Photo Studio have 172 effects organized into 21 categories. As you might imagine, this is the strength of the program. It provides thumbnail examples of each effect applied to the image that you're working on. Once you choose one, it renders a larger version fairly quickly. You can then fine tune the look with adjustment sliders that accompany the effect. There were many that I liked a lot.

You can apply multiple effects to a single image. And if you come up with something that you really like, you can save it as a preset for later use, or for sharing with a friend.

Adjustment Sliders

The Pro version includes a number of image adjustment sliders that include the controls that you'd expect such as exposure, temperature, saturation; plus highlights, shadows, sharpening, and more. These work fine on both Jpegs and Raw files, but they are for fine tuning your image rather than replacing your primary image editor. Photoshop and Aperture will still sleep well at night.

Nice Touches

Both versions include some nice touches such as an attractive full screen mode, real time zooming (including trackpad gestures), side by side comparison, and direct sharing to the major social network sites including Flickr, Facebook, and Twitter. You can also email a photo directly from FX Photo Studio using Mail.app.

Bottom Line

Unless you need to process Raw files in FX Photo Studio, the standard version for $9.99 should provide you with all that you need. It interacts with iPhoto, Aperture, and Lightroom (using their previews), has all 172 effects, plus includes the above-mentioned goodies, except for the additional image adjustment sliders. If you want to open Raw files directly in the app, then you will need the the $39.99 Pro version.

I think FX Photo Studio is worth the ten bucks for the effects alone. Plus I very much enjoyed the speed of this application on my MacBook Air, not to mention the handsome, easy to use interface. FX Photo Studio is a gem awaiting your discovery in the Mac App Store.


The Digital Story on Facebook -- discussion, outstanding images from the TDS community, and inside information. Join our celebration of great photography!


Can you tell a story with just one photograph? Yes, indeed. In this week's podcast, I talk about narrative - using your skills and creativity to compose an image that stimulates the viewer's imagination, tells a story. By way of example, I talk about the work of fine art photographer, Lise Sarfati, who I think does an excellent job of creating narrative in her photographs. This is a different form of photographic expression, much less technical than HDR, more controlling that street photography. See what you think after listening to this week's show.

Listen to the Podcast

You can also download the podcast here (26 minutes). Or better yet, subscribe to the podcast in iTunes. You can support this podcast by purchasing the TDS iPhone App for only $2.99 from the Apple App Store.

Monthly Photo Assignment

Reflection is the August 2011 Photo Assignment. You can read more about how to submit on our Member Participation page. Deadline for entry is August 30, 2011.

TDS Nov. Aperture Workshop

I'm considering adding an Aperture Workshop on Nov. 12th and 13th. If you want your name on the reserve list, or just more information, drop me a line.

More Ways to Participate

Want to share photos and talk with other members in our virtual camera club? Check out our Flickr Public Group. And from those images, I choose the TDS Member Photo of the Day.

Podcast Sponsors

Red River Paper -- The $7.99 Sample Kit is back! And with free shipping.

Make Your Photos Sizzle with Color! -- SizzlPix is like High Definition TV for your photography.

Need a New Photo Bag? Check out the Lowepro Specialty Store on The Digital Story and use discount code LP20 to saven 20% at check out.


Technorati Tags:
, , , , ,


Matt Kloskowski has published his Insta-Lightroom Nashville-like Preset for Lightroom as a free download from the Adobe Photoshop Lightroom Killer Tips blog.

 Insta-Lightroom Nashville-like Effect

He writes, "Every time I turn around, I see photos from the Instagram app that have that old vintage look to them. It's kinda funny, because it can throw up a photo of someone's shoes, but it always seems to look good when it has a old-vintage style with a really strong vignette added to it. Anyway, here's a free preset that mimics the style."

It's cool, and it's free. What more could you ask for?


The Digital Story on Facebook -- discussion, outstanding images from the TDS community, and inside information. Join our celebration of great photography!


Off Camera Flash at the Beach

For this shot of Danielle Winkler at San Buenaventura State Beach in Ventura, I set a Canon 320 EX on the ground pointing upward at her, then triggered it with a Canon 60D using the 15-85mm EF-S zoom set to 31mm. The built-in flash trigger on the 60D is very handy when you're traveling light, but still want to experiment with lighting.

I mounted a polarizer over the lens to maintain the tone in the sky. Exposure was 1/250th at f/5.6. The photo was processed in Aperture 3 with the Silver Efex Pro 2 plug-in. The image grain was added during processing. The original picture was captured at ISO 160 and is virtually noise free.

I had a blast during the entire shoot experimenting with different lighting configurations. Don't underestimate the results you can get with a single flash, a great setting, and a talented subject.

More Off Camera Flash Tutorials

If you want to learn more about getting pro results from simple flash units, be sure to check out my Off Camera Flash title on Lynda.com. I show you all sorts of helpful lighting techniques that are especially good for portraits.

Off Camera Flash - Basic Techniques for Pro Results

Light Modifiers for Off Camera Flash

Off Camera Flash - The Single Light Portrait

Control Background and Subject with Off Camera Flash

"More Off Camera Flash" - Digital Photography Podcast 233

twitter.jpg Follow me on Twitter


We're putting the finishing touches today on my latest lynda.com title, "Organizing and Archiving Digital Photos" (you can see my entire library here). We've been working on this title for over a year, and I think there will be concepts in these movies that will help every shooter in our community.

Derrick Story Recording at lynda.com Derrick Story on the set of "Organizing and Archiving Digital Photos" at lynda.com

Unlike other titles that focus on a specific application, I start with basic organizational concepts, then show you how they can be applied to scenarios where you use Lightroom, Aperture, or just stick with the file management system in your operating system. We're both platform and application agnostic in this series. There are workflows for beginners, intermediate, and advanced alike. You choose which approach works best for you.

In general, I recorded the Aperture hands-on pieces on a Mac, and the Lightroom movies on Windows 7. Plus I cover RAID1 hard drives, LAN computing, and personal cloud storage. And... there are a few surprises.

I anticipate that the title will be released this September. If you want to be notified when it's live, just send me an email, and I will keep you posted, plus provide you links to key movies.

I'm passionate about this title because preserving your work, and being able to easily access it, is important for all of us.


The Digital Story on Facebook -- discussion, outstanding images from the TDS community, and inside information. Join our celebration of great photography!


How to Change Your Photography

If I've learned nothing else over the years, I've grasped the concept that photography is an evolving medium. I think this is a good thing because it encourages us, as individuals, to grow too.

I just read 22 Things You Can Do Today to Change Your Photography Forever. There are many good ideas in this article worth considering. Try one or two yourself. It might provide that little kick-start you're looking for to go to the next level.


The Digital Story on Facebook -- discussion, outstanding images from the TDS community, and inside information. Join our celebration of great photography!


Free eBook on Street Photography

Going Candid PDF Book

I learned about Going Candid: An Unorthodox Approach to Street Photography (PDF download, 8.6 MBs) via a post by its author, Thomas Leuthard, on Google+. I downloaded the eBook and have enjoyed both the images and straightforward approach to street photography described by Thomas.

If you're interested in candid photography in general, or street shooting specifically, I think you'll find these nuggets of wisdom useful in this free download... and share it with your friends!


The Digital Story on Facebook -- discussion, outstanding images from the TDS community, and inside information. Join our celebration of great photography!


It's been a while since we've had a visit from the Nimble Photographer, so I thought after being on the road for a couple weeks would be a good time for a check in. I review some of my favorite iPad photography apps, talk about a sweet camera bag that's soon to be released, and chat up the virtues of nimbleosity. Recorded from my hotel room in Ventura, CA.

Listen to the Podcast

You can also download the podcast here (34 minutes). Or better yet, subscribe to the podcast in iTunes. You can support this podcast by purchasing the TDS iPhone App for only $2.99 from the Apple App Store.

Monthly Photo Assignment

Reflection is the August 2011 Photo Assignment. You can read more about how to submit on our Member Participation page. Deadline for entry is August 30, 2011.

TDS Nov. Aperture Workshop

I'm considering adding an Aperture Workshop on Nov. 12th and 13th. If you want your name on the reserve list, or just more information, drop me a line.

More Ways to Participate

Want to share photos and talk with other members in our virtual camera club? Check out our Flickr Public Group. And from those images, I choose the TDS Member Photo of the Day.

Podcast Sponsors

Red River Paper -- The $7.99 Sample Kit is back! And with free shipping.

Make Your Photos Sizzle with Color! -- SizzlPix is like High Definition TV for your photography.

Need a New Photo Bag? Check out the Lowepro Specialty Store on The Digital Story and use discount code LP20 to saven 20% at check out.


Technorati Tags:
, , , , ,


contract_maker.jpg

I always have a few model releases in my camera bag in case I capture a great portrait on the fly. One thing I've learned over the years is that you have to get the signed release on the spot. If you wait to exchange emails at a later date, the odds of you getting the release diminish substantially.

Since I always have my iPad in my camera bag, I can now use Photographers Contract Maker (for iPad and iPhone) instead. It comes with four templates: photo shoot, model release, copyright release, and 2nd shooter work for hire.

After a little practice, I was able to complete a model release in just a couple minutes, then have the PDF emailed to me and the model right on the spot. The model signs the release using the touchscreen.

Photographers Contract Maker is available in the App Store for $2.99. Don't leave home without it!


The Digital Story on Facebook -- discussion, outstanding images from the TDS community, and inside information. Join our celebration of great photography!


Adobe has created a CS5 Hidden Gems channel, hosted by Bryan O'Neil Hughes. Via a series of short videos, Bryan demonstrates helpful, interesting techniques for Photoshop.

Adobe Hidden Gems

You can learn how to straighten images with ease, restore old photographs, remove a wire, and more. Plus, Bryan will be adding more hidden gems to this channel, so you might want to subscribe to it.


The Digital Story on Facebook -- discussion, outstanding images from the TDS community, and inside information. Join our celebration of great photography!