To throw your lens cap in the ring for a chance to win one of these great bags, enter here. It's easy. Takes about 15 seconds.
The Digital Story on Facebook -- discussion, outstanding images from the TDS community, and inside information. Join our celebration of great photography!
A sharp image gives us more detail. And sometimes it's the details that separate a decent shot from a terrific one. So here are a handful of tips to keep in mind to help you sharpen up your shots.
Even a simple shot, such as this sphere, becomes more interesting when you can see the detail in its surface.
Start with the Basics
I read a article at photojojo.com titled, Get Sharp Photos with These Easy Tricks. There's some good stuff there, including bracing yourself against a solid surface during exposure and using various types of tripods. (I didn't agree, however, with their take on post production sharpening. More on that later.) Bottom line here is that good camera technique often leads to crisper images.
Make sure that you're focusing on the most important area of the image, and that it's locked there when you press the shutter button. Pay attention to how you you hold the camera. The one-handed grab shot while leaning out the car window probably won't get you a detailed image. Instead, when possible, use your body as a stable platform for the camera.
Know Your Lens
Practically every DSLR lens on the planet has been lab tested by an independent source. Those are worth looking at for your glass. Pay attention to the aperture settings that provide the sharpest results. Often it's in the middle of the range, such as f/5.6, 8 and 11. Keep those in mind when detail is an important factor for the image.
Don't Depend on Post Production Sharpening
Using sharpening in post production can give the illusion of a better focused image, but it doesn't fix the focusing or camera shake problem itself. Basically, most good sharpening filters increase edge contrast at the pixel level. Sharpening is great as a finishing touch, but the real work happens at capture. So make sure you use good camera technique to record a detailed image, then sharpen to taste in post. And when you do, use a high quality filter such as Unsharp Mask, Smart Sharpen, or Edge Sharpen. General rule of thumb is, if the filter just says, "sharpen," stay away from it.
High Quality Jpegs or Raw
Check your camera settings to make sure you're capturing at the highest quality Jpeg option, or use Raw. You want to hang on to as much image detail as possible when you take the shot.
Invest in Good Glass
The quality of the optics attached to the camera makes a difference. Not every lens in your camera bag has to be top-notch pro glass. But it does pay to have one or two razor sharp lenses in your kit for those images that require lots of detail.
Use Sharp Against Soft Technique
By carefully focusing on the object that you want to render with great detail, then opening up the aperture to limit the depth of field, you can create an image that has a sharp object against a "soft" background. By doing so, your foreground image will really pop.
Sharpness Isn't Everything
When you want a crisp image, you need to know how to capture it. But every shot doesn't have to be razor sharp. Use the right technique for the photo. Elderly subjects, for example, might appreciate a softer approach to their portraits.
The Digital Story on Facebook -- discussion, outstanding images from the TDS community, and inside information. Join our celebration of great photography!
Apple's iPhoto for iOS is a terrific app, but you can easily run aground if you want to move your best shots from the mobile device to a Mac. Photo Stream can get you moving again if you use this simple workflow.
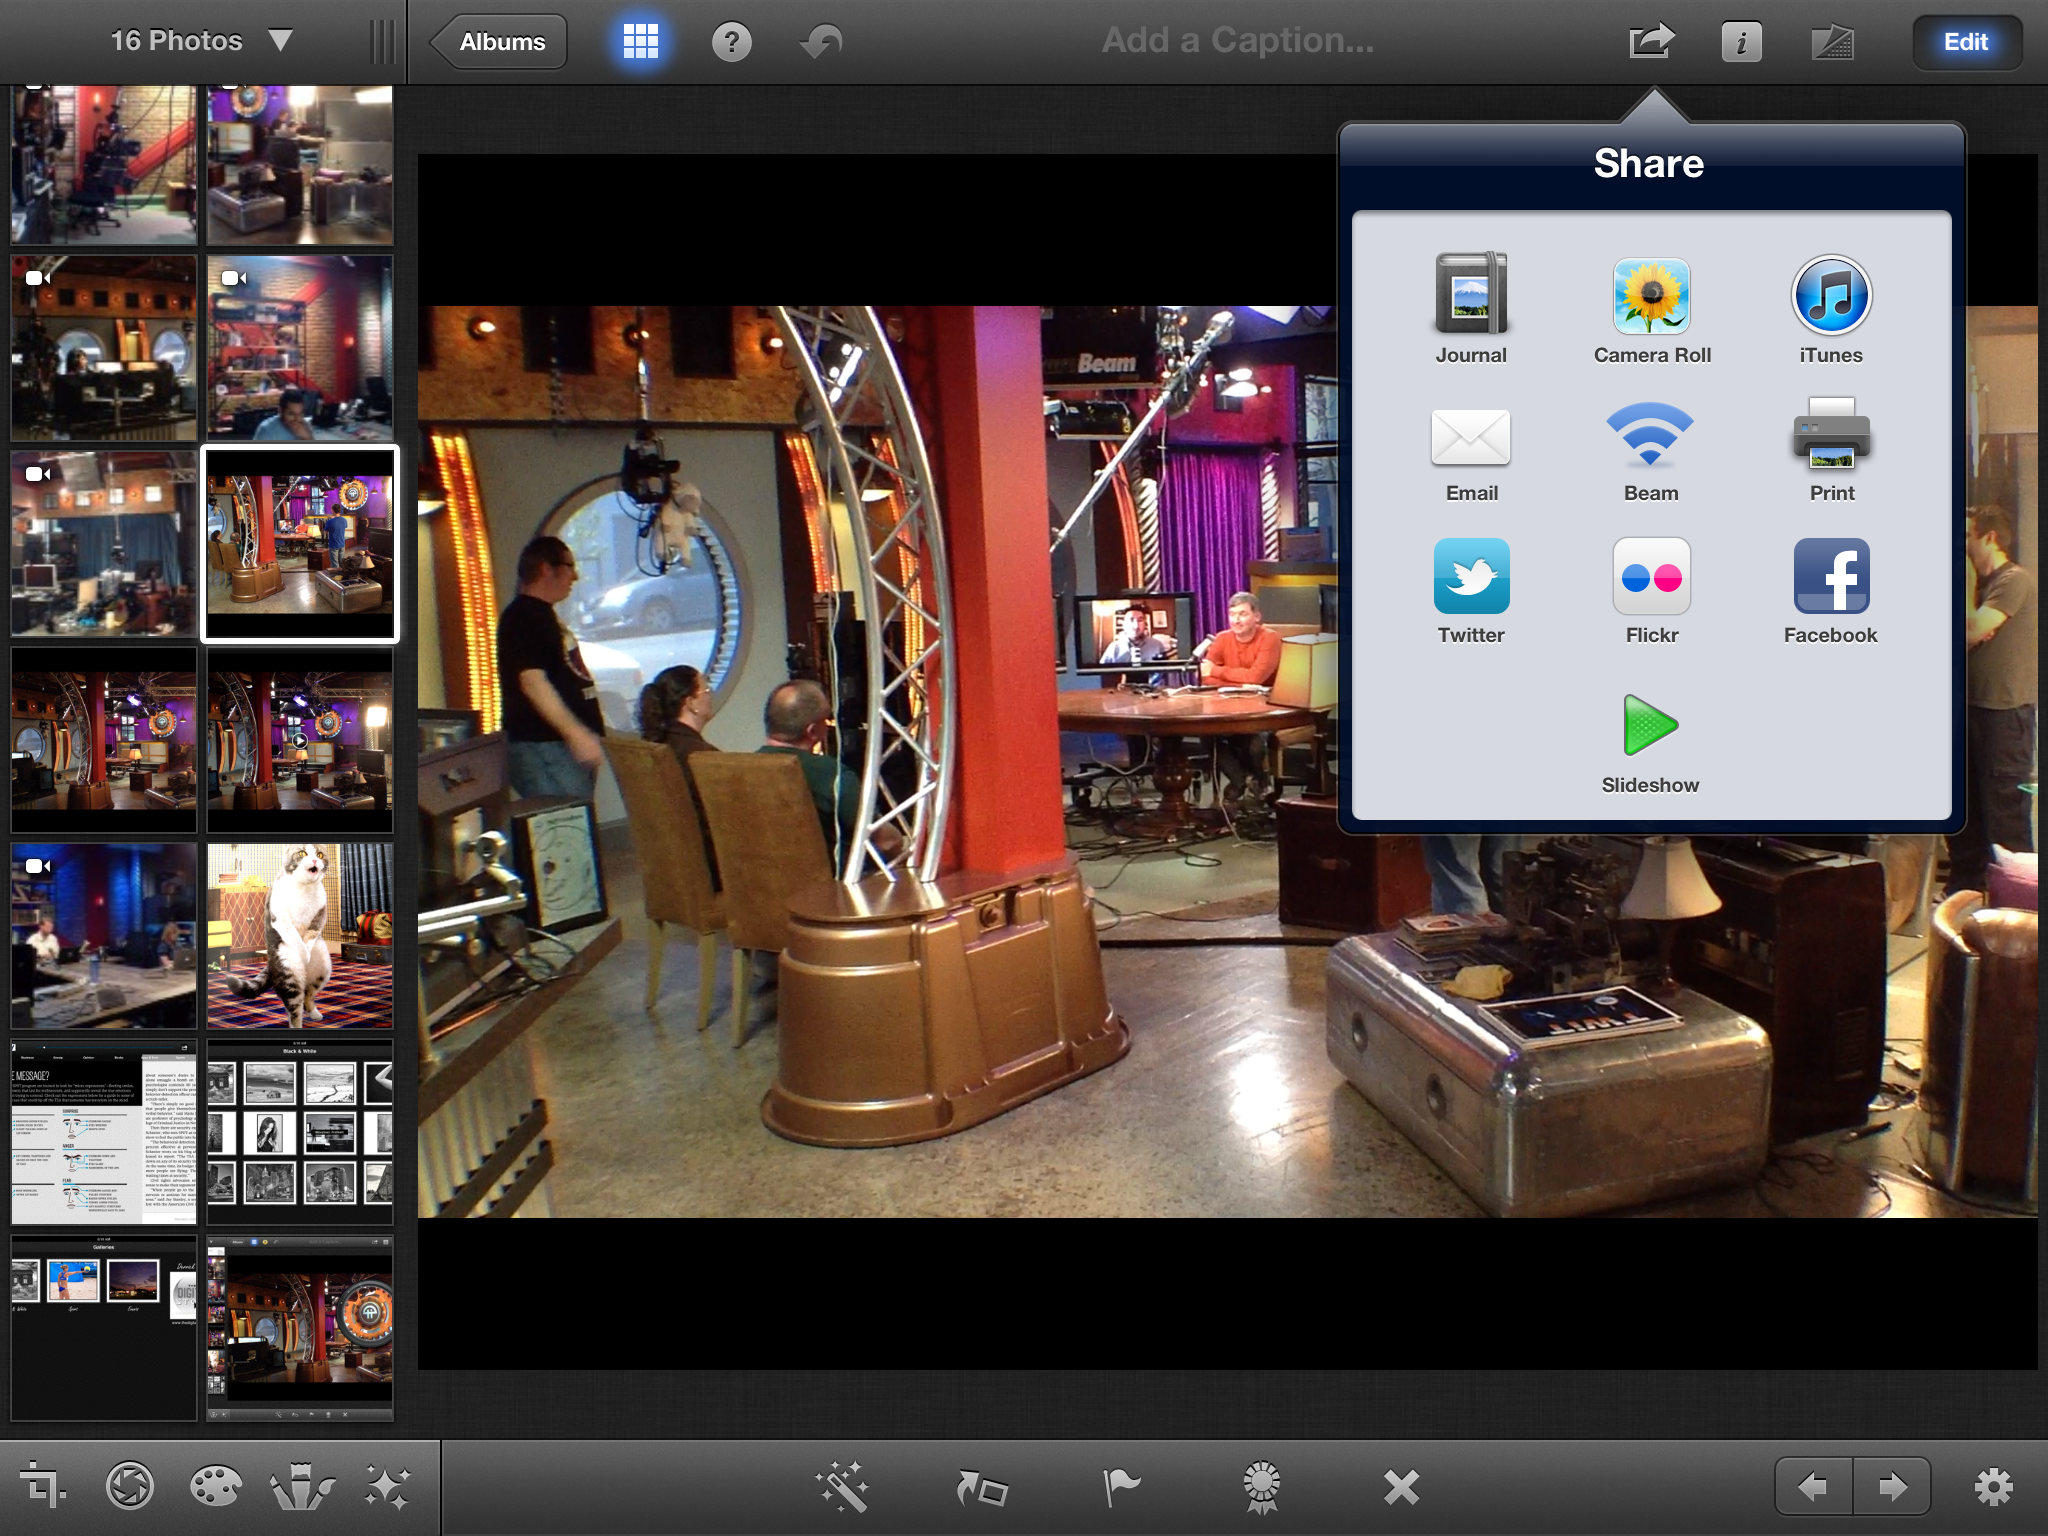
In iPhoto for iOS, copy your best images to the Camera Roll using the Share button.
On my Mac, I use Aperture as my primary photo database. That allows me to let iPhoto manage my Photo Stream. (So, I have Photo Stream *turned off* for Aperture, and have it *turned on* for iPhoto.) Using this setup, any image copied to my Camera Roll on the iPhone or iPad automatically is available on the Mac via iPhoto. It just shows up. That allows me to separate the gems from the failures in an organized photo management environment.
This system can be put to work for a semi-automatic iPhoto for iOS to Mac connection. Once I work on the shot in iPhoto for iOS and decide that I want to move it to my Mac, I tap the share button in iPhoto for iOS and copy the image to my Camera Roll.
Within a minute or so, the picture shows up in iPhoto on my Mac. Now, I can catalog it there, if iPhoto has become my dedicated mobile photography manager, or I can move it to Aperture, Lightroom, or any other system I already have in place.
This integration will improve up the road with new software and operating system releases. But for now, you can manage the images you work on in iPhoto for iOS without making yourself crazy in the process.
The Digital Story on Facebook -- discussion, outstanding images from the TDS community, and inside information. Join our celebration of great photography!
Adobe Photoshop CS6
recently debuted with new features such as non-destructive cropping, Adaptive Wide Angle adjustments, enhanced video tools, and so much more. We thought it would be a great to find out from Bryan Hughes the inside scoop on these features. Why Bryan? Well, he's a photographer and the Photoshop Product Manager -- the perfect guy for our audience.
After the interview, I switch gears and talk a bit about the latest time lapse movie I recorded with iStopMotion for iPad, titled TWiG in 60 Seconds. This time, I also used a Losmandy StarLapse system so I could add panning shots to the video. I explain all during this segment of the show. Plenty of food for thought. I hope you enjoy it.
I've experimented with many apps to display pictures on the iPad. It's a perfect device for showing off your work. But finding the right software can be a challenge. Portfolio Pro for iPad builds a strong case to be that app.
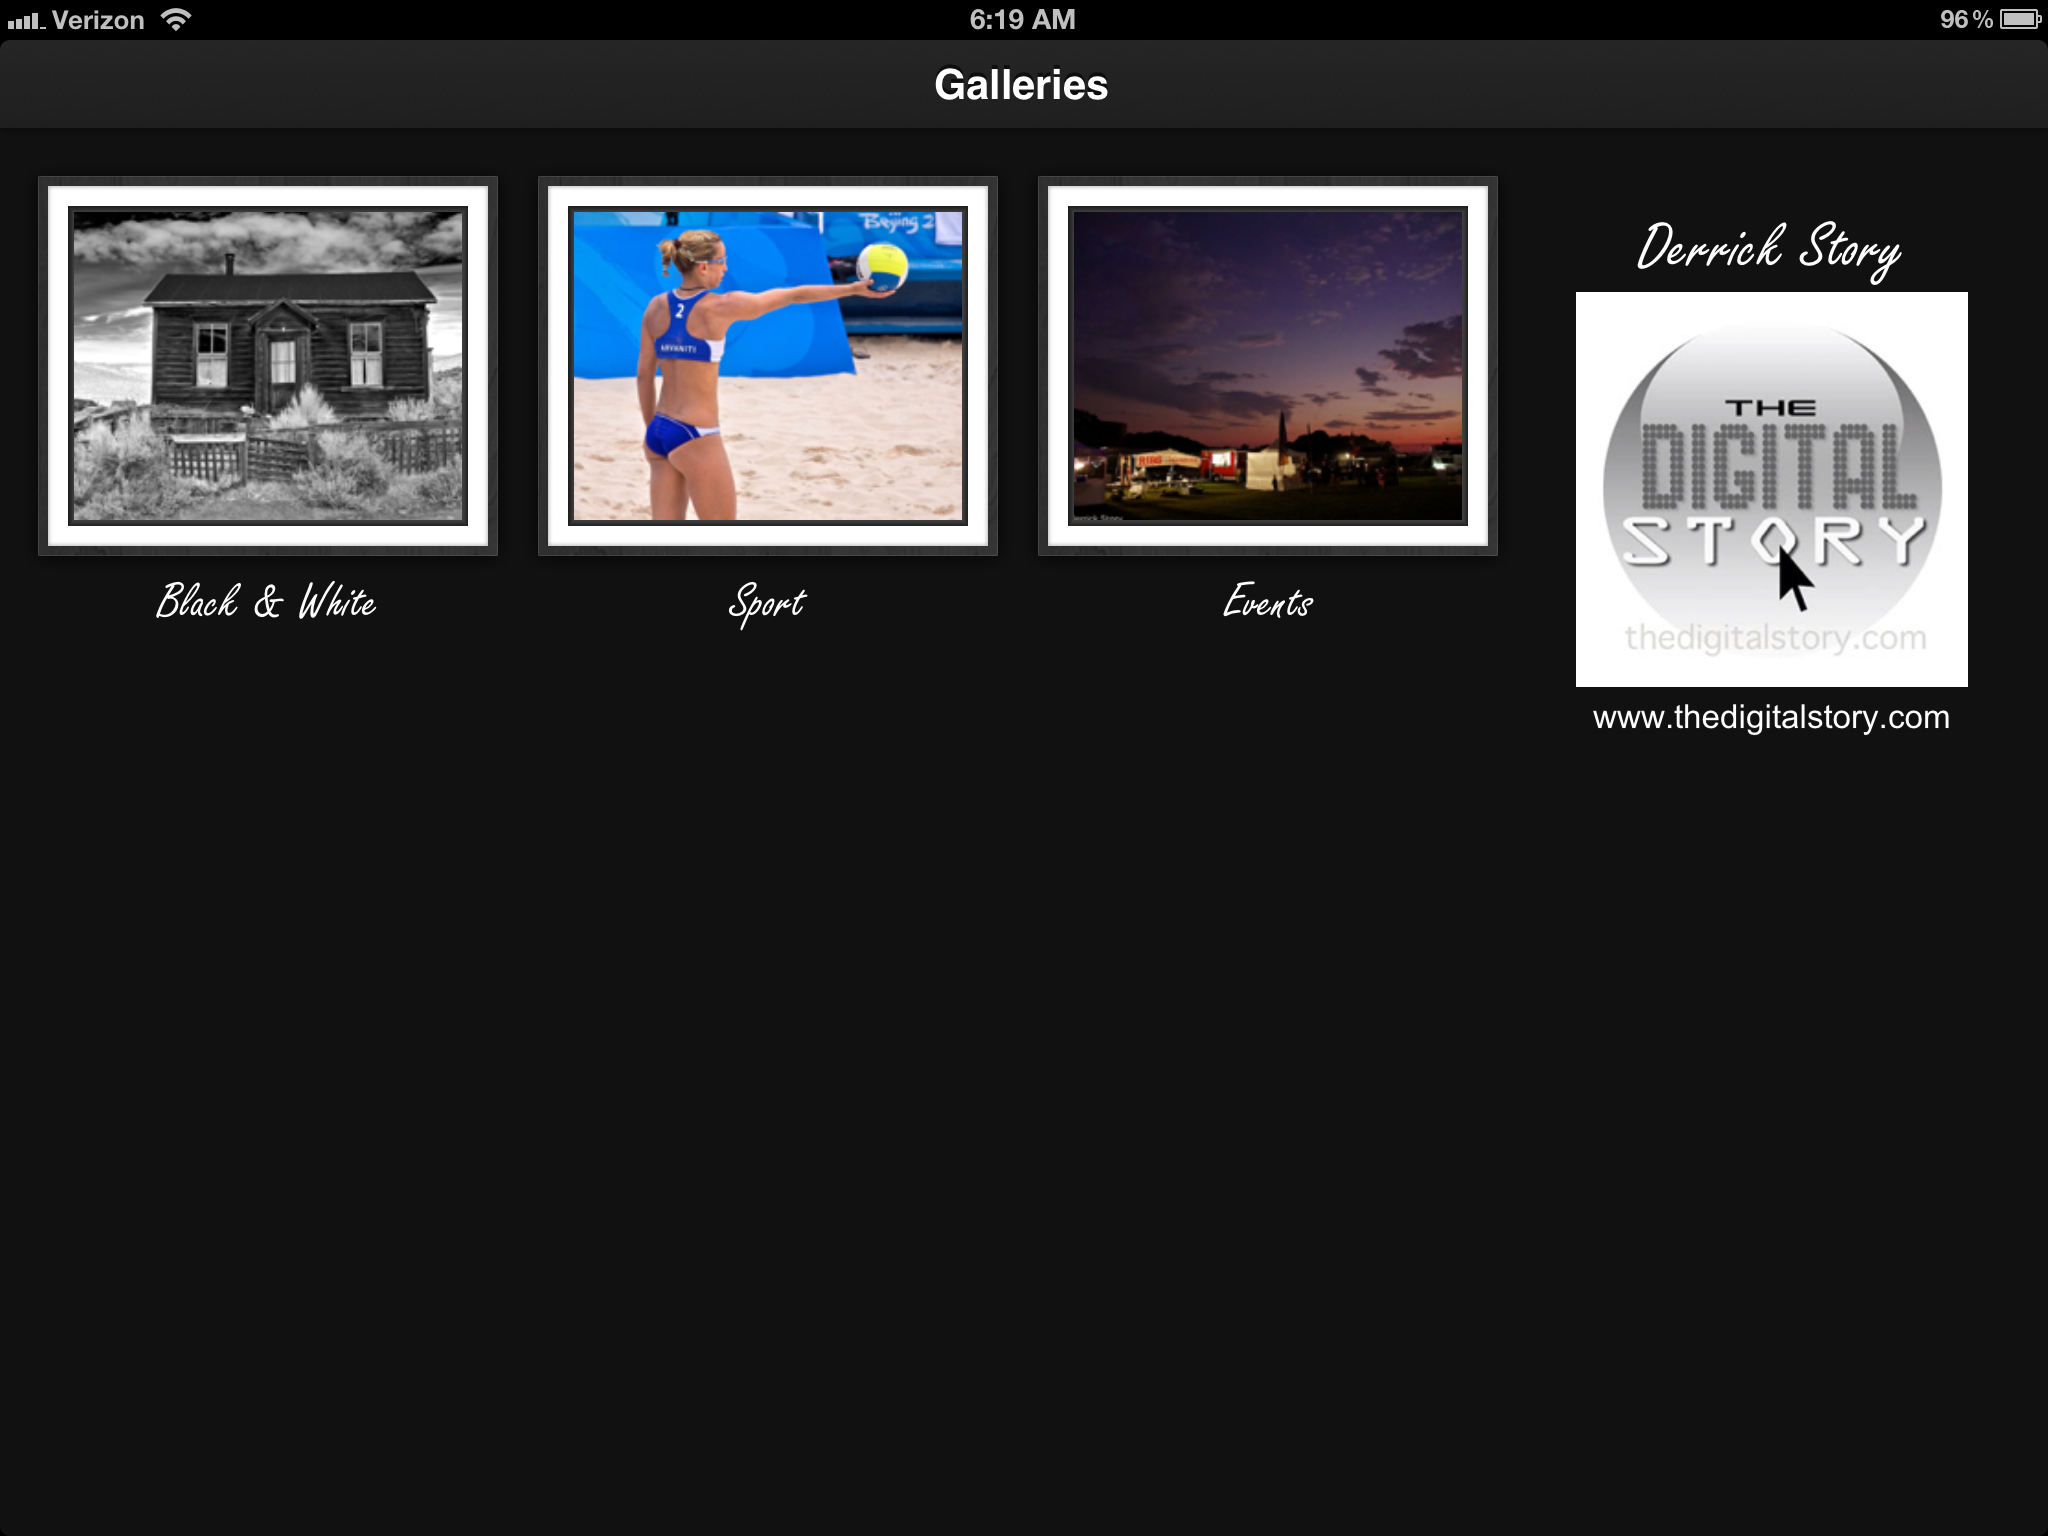
Branded overview page on Portfolio Pro displaying my logo and available galleries.
One of its best features is the ability to create different galleries of my images. I've found this helpful because different clients are interested in different subjects. I've always had a hard time creating just one portfolio for everyone.
You can control which galleries are visible, and for that fact, which images in those galleries can be viewed, by going into edit mode (triple tap) and clicking on the "eye" icon. This allows you to quickly customize the experience for the viewer without having to delete and add photographs.
As you'd expect, you can move pictures around to display in the order you want. The viewer can swipe to go from image to image, or play a slideshow. Portfolio Pro also accommodates video allowing you to stay in the same app for both stills and movies.
Thumbnail view inside a gallery.
You can populate your portfolio from the iPad's camera roll, Flickr, or Dropbox. If you have a lot of images on Flickr, you'll be able to build a variety of galleries quickly. The Dropbox connectivity is good too.
Despite claims for "ease of use," on the site, give yourself some time to learn how to work the application. The creators provide some helpful movies to get you started. I recommend watching them.
The current price for Portfolio for iPad is $9.99, expensive by iOS standards. But you'd pay more for a binder to house your prints, and this app is far more flexible. If you want to get serious about a digital portfolio, then I would consider this software.
The Digital Story on Facebook -- discussion, outstanding images from the TDS community, and inside information. Join our celebration of great photography!
This recorded version of last week's webinar, sponsored by Nik Software and Lowepro, has two main parts. I begin by demonstrating how B&W can sometimes tell a story better than color images. I then move into Silver Efex Pro 2 itself and show my workflow.
If you missed the live event, but are interested in seeing the presentation, you can watch it now on Vimeo.
The Digital Story on Facebook -- discussion, outstanding images from the TDS community, and inside information. Join our celebration of great photography!
Updates to the Flickr interface seem to be gaining momentum with the latest being justified view for groups. To experience this, click on the "more photos" link on any public group home page.
In addition to the improved presentation for the thumbnails, you can click on the magnifying glass icon in the lower right corner of each image to get a lightbox view. When you close the lightbox, you're returned to the justified view interface.
To get to a photographer's photostream, click on the thumbnail itself. The image will be opened on the photographer's page. Hit the browser back button to return to the justified view of the group thumbnails.
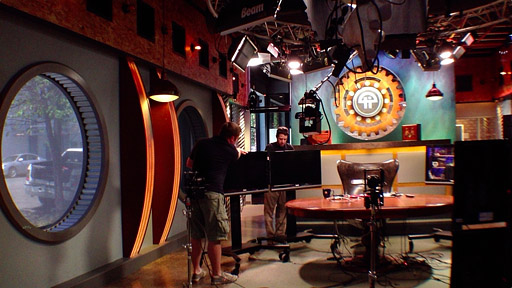
What goes on behind the scenes at Leo Laporte's TWiT studio in Petaluma, CA? I recently spent an afternoon there recording scenes with a 3rd generation iPad to create the time lapse movie, TWiG in 60 Seconds. The process was as interesting as the activity I recorded.
Screen grab from the time lapse movie "TWiG in 60 Seconds" (This Week in Google) recorded at the TWiT Brick House Studio with a 3rd generation iPad.
Why iPad?
The latest iPad features a 5-megapixel iSight camera that records 1080p video at 30fps. Its low light performance is much improved over the 2nd generation model. Combine that hardware with iStopMotion for iPad, and I have a complete solution in a very portable package.
TWiG in 60 Seconds, the movie
How Did You Record the Panning Scenes?
One of the impressive features of the TWiT Brick House Studio is how big the facility is. In order to convey that sense of space, I wanted to pan during the movie. To accomplish this, I used the StarLapse camera motion system made by Losmandy. The basic system sells for $575, and it includes camera mounting plates, battery-powered controller, interconnecting cable, and a 12-volt cigarette lighter power cord.
How Did You Mount the iPad to the Rig?
Makayama makes a clever accessory called the Movie Mount for iPad. Not only can you attach your iPad to a tripod or motion system, but the mount also accommodates accessory lenses and includes a shoe mount (for microphones, etc.). By using the Makayama, I was able to attach a wide angle lens to the iPad so I could capture more of the Brick House Studio environment.
The Workflow
Once I had all of the hardware in place, I launched iStopMotion and set it to record a frame every 3 seconds. I captured a variety of scenes, some with panning, and others without.
I then used the DropBox feature in iStopMotion to upload the raw footage to my online storage. By doing so, I could access the files from my MacBook Air, and assemble the movie using Final Cut X. I uploaded the finished file directly to YouTube from Final Cut.
In the past, I've also done the editing right there on the iPad using iMovie, such as in this title, The Overlook.
Final Thoughts
When Oliver from Boinx Software came to me with the idea for this movie, I wanted to do it right away. What a great opportunity! And thanks to the support from Leo and his crew, plus the great guys at Losmandy and Makayama, we were able to take you behind the scenes at the TWiT studio for a glimpse of how Leo Laporte informs and entertains us on a daily basis.
For those who attended my online talk, here are some of the featured photos. All of the processing was handled by Aperture 3 and Nik Silver Efex Pro 2for the B&W conversion.
My next open Aperture Workshop is scheduled for Nov. 2012, in Santa Rosa, CA. You can get on the pre-registration list, plus learn about all the other photography workshops offered this season by visiting the TDS Workshops page.
The Digital Story on Facebook -- discussion, outstanding images from the TDS community, and inside information. Join our celebration of great photography!
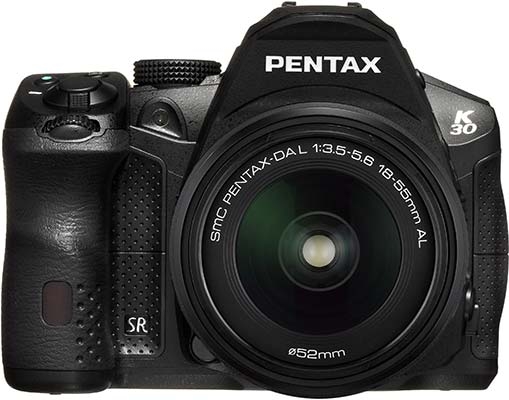
I became a Pentax fan (again!) when I reviewed the Pentax K-5 for Macworld Magazine. In addition to its outstanding image quality, the K-5 felt like a camera designed by photographers. I now use it as my "hiking camera" because it's compact, weather resistant, and accepts affordable zoom lenses that are designed for the outdoors.
Now, we have more goodness coming our way with the just-announced K-30 and the 50mm f/1.8 prime. Both have reasonable price tags of $899 (K-30 with kit zoom) and $299 (50mm) respectively.
In addition to being great image making machines, I like the value that Pentax offers. For example, for $900 you'll be able to buy the K-30 with 18-55mm zoom (which is excellent). You can expand your capability by adding the Pentax DA 50-200mm zoomthat's also weather resistant for $215. Then, for your prime lens, get the new 50mm f/1.8 for (my guess) around $250. You have an excellent all weather kit with 3 lenses for a total investment of $1,365.
And if you're worried that because Pentax isn't part of the big 2, your investment might be at risk. Forget that. On the business side they have been making smart moves too.
So if you're a photographer that enjoys taking pictures in the great outdoors, I would definitely keep an eye on Pentax. They certainly have their eye on the ball.
The Digital Story on Facebook -- discussion, outstanding images from the TDS community, and inside information. Join our celebration of great photography!
LED lighting for photographers has evolved from exotic to affordable. No better case in point than the Neewer Ring Light for $30. I talk about the joys of using LEDs, and how we're never going back.
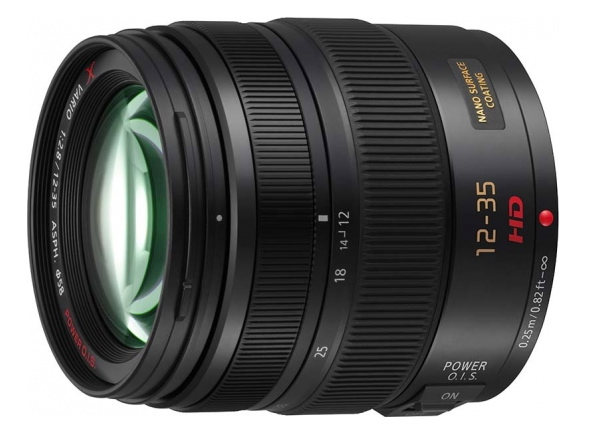
Then we take a look at the new Panasonic 12-35mm f/2.8 pro zoom for micro four-thirds. One report says it's tack sharp wide open, then another says it's soft. Which is it?
After sharing a favorite image editing tip, I wrap up with an inside peek at the upcoming Sonoma Coast workshop in August. Yes, we're returning to the Bodega Bay Lodge, (yaay!) but this year we'll have the VW Vanagon parked at the beach as a field station. It's going to be so cool! All this and more on the TDS podcast.
Would you like to improve your B&W photography? I have a webinar coming up on May 23, "A Fresh Look at Familiar Subjects in B&W." It's free, but you have to reserve your seat in advance.
I just read a review of the Panasonic LUMIX G X VARIO 12-35mm F2.8 ASPH zoom lens on PhotographyBLOG that helped me understand more about this promising fast aperture zoom lens. As continue to depend on micro four thirds cameras for some of my work, I'm looking for a zoom I can use for existing light assignments.
Based on the review, this looks like a finely constructed lens with excellent mechanical performance. I could use it on my Olympus bodies by simply turning off the optical stabilization on the Panasonic lens (Olympus builds IS into the body).
But the problem is that the center sharpness at all focal lengths is soft with the aperture wide open. PhotographyBLOG writes, "It is a little soft at F2.8 though, so it's best used stopped down to F4 for the best results..." And their test images clearly bear that out.
I don't want to spend good money ($999 in this case) for a fast lens, just to stop it down. If I have a f/2.8 zoom, chances are that I'm shooting wide open most of the time.
So, for the time being, looks like I have to stick to prime lenses in low light situations. Too bad. That Panasonic zoom looks like a great lens at f/4 and beyond.
I've been fascinated with B&W photos from the moment I saw my first Life Magazine. Even today I have prints by Eisenstaedt and Bresson hanging in my studio. And currently I'm working with Nik Silver Efex Pro 2to explore subjects that we commonly think of in color, to see how they might appear otherwise.
If you too are interested in seeing the world in black and white, join me for this week's webinar titled, A Fresh Look at Familiar Subjects in B&W, Wednesday, May 23, 2012, 10am PDT/1pm EDT.
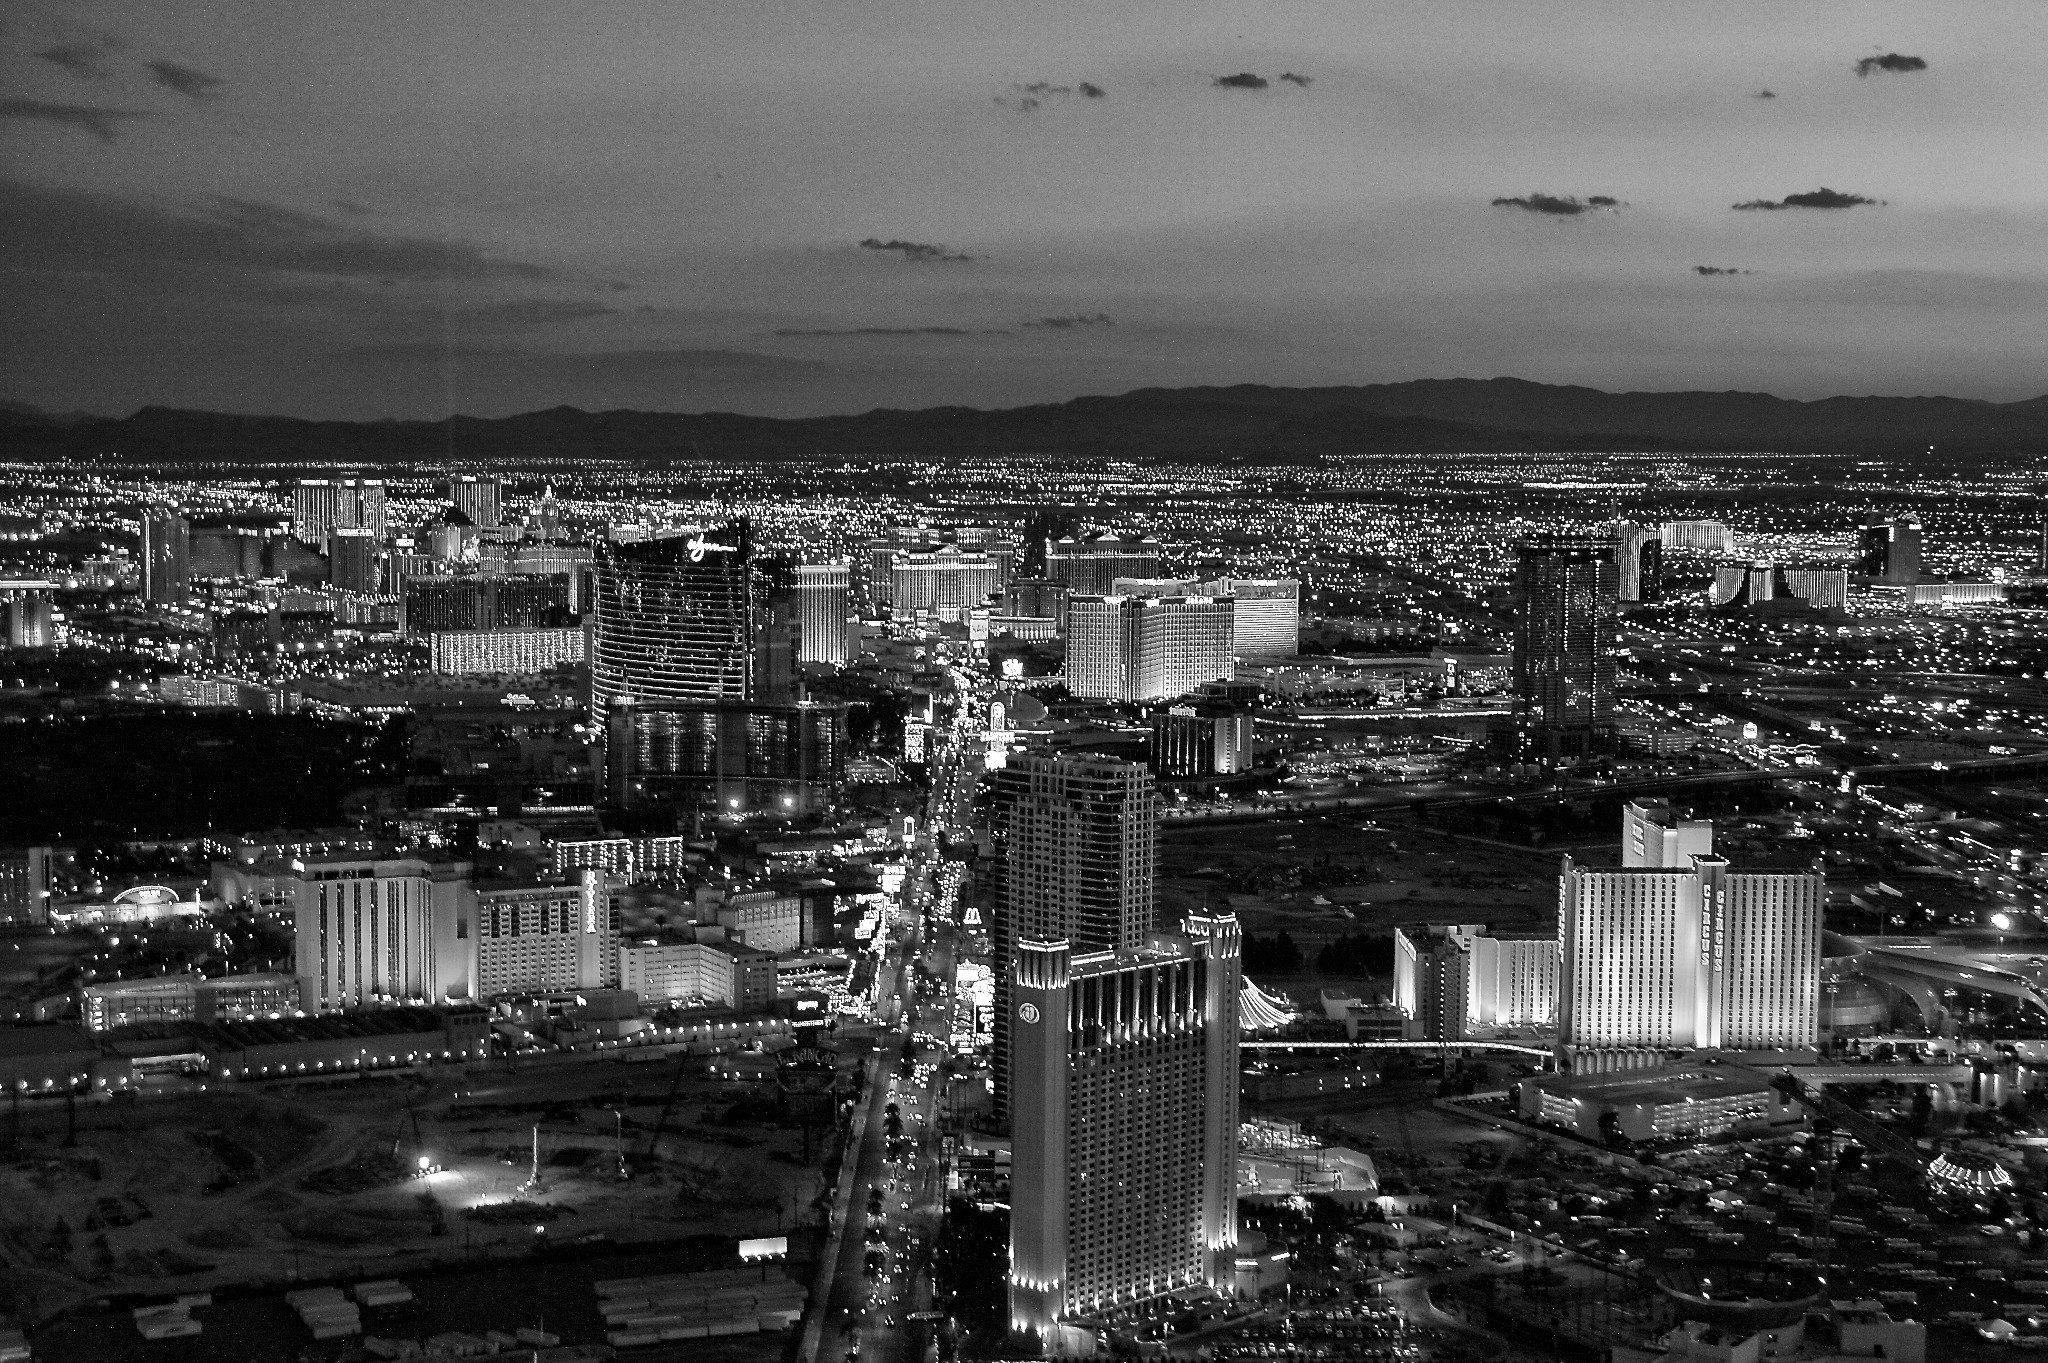
Night scene from my series "Las Vegas in B&W." This will be one of the images I discuss during the webinar.
Together, we'll examine a series of photos and see how the experience changes when we take away the color. I'll then show you my easy, but effective workflow using Nik Silver Efex Pro 2in conjunction with Aperture. This same approach works with Lightroom too.
The webinar is free, but you do have to reserve a spot. Hope you can join me Wednesday.
The Digital Story on Facebook -- discussion, outstanding images from the TDS community, and inside information. Join our celebration of great photography!
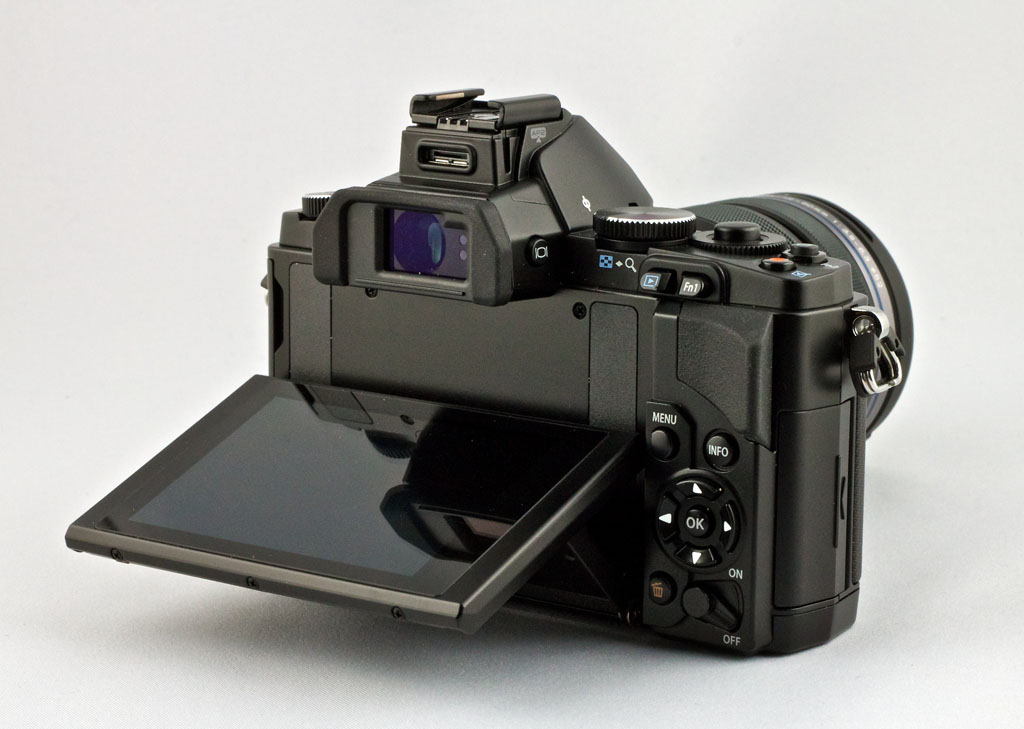
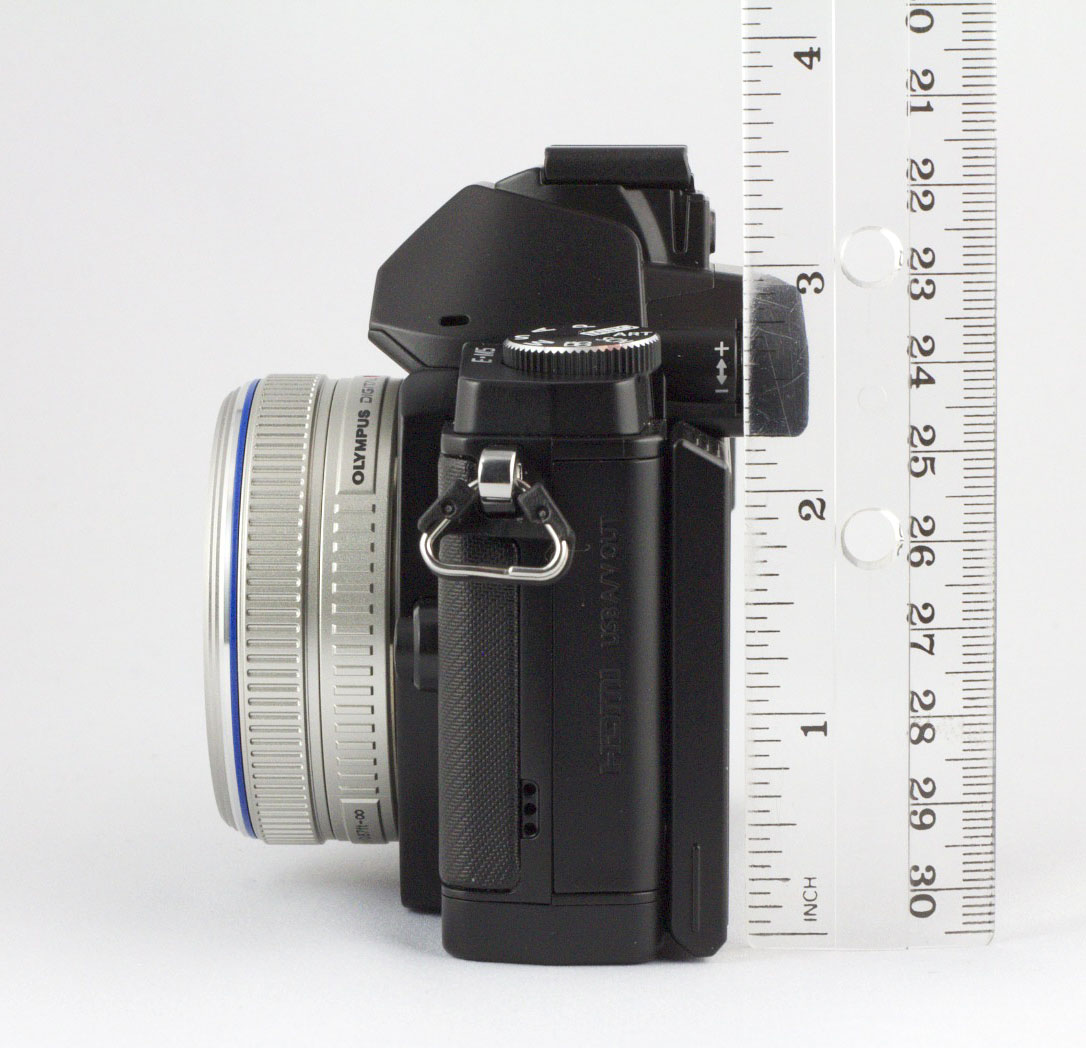
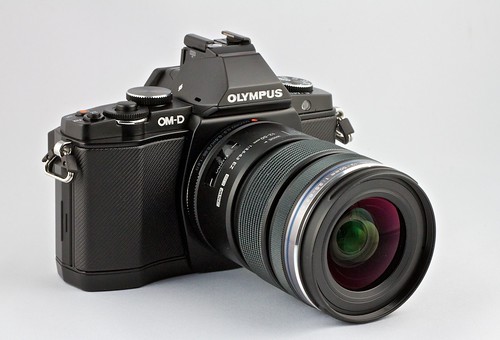
Macworld Magazine has published my full review of the Olympus OM-D E-M5, including lab test scores from the PC Mag lab. The camera earned 4.5 mice, the highest rating for a camera I've personally reviewed.
In short, my pros and cons are:
Pros
Outstanding image quality
Highly customizable feature set
Compact design
Wide selection of accessories and lenses
Weather resistant body
Art Filters add fun factor
Good macro mode on 12-50mm zoom
Fast autofocus and burst mode
Cons
Menu system can be daunting
No built-in mic adapter
Small buttons can be difficult for large fingers
Soft humming noise when powered up
Price when rated: $1000 (body only); $1300 with 12-50mm 1:3.5-6.3 zoom lens
Now, if I could only get my hands on one for personal use...
The Digital Story on Facebook -- discussion, outstanding images from the TDS community, and inside information. Join our celebration of great photography!
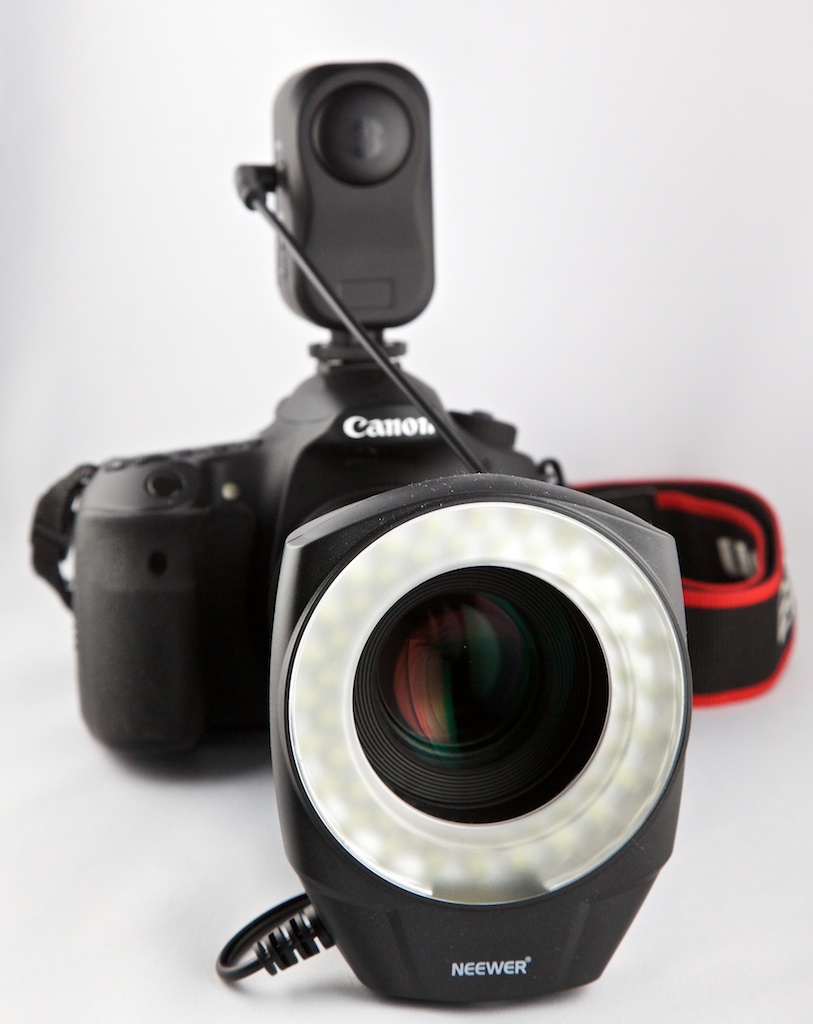
I've been having a blast with the $30 NEEWER 48 LED Ring Lightthat mounts directly to my macro lens and is powered by 2 AA batteries. Sound too good to be true? It isn't.
You don't have to worry about flash sync or TTL communication since the NEEWER lighting is continuous. There are 3 lighting options: full, left side only, or right side only. The output is approximately 15GN (both lights on), which is plenty bright for macro photography, and helpful for portrait shooting in good ambient light.
I've found the light so useful, and easy to use, that I just leave it mounted on my Canon 100mm f/2.8 macro lens. The kit includes mounting rings in the following diameters: 49mm, 52mm, 55mm, 58mm, 62mm, and 67mm. You also get a plug-in wall adapter if you don't want to use batteries, although I've been getting more than an hour of use from two rechargeable AAs.
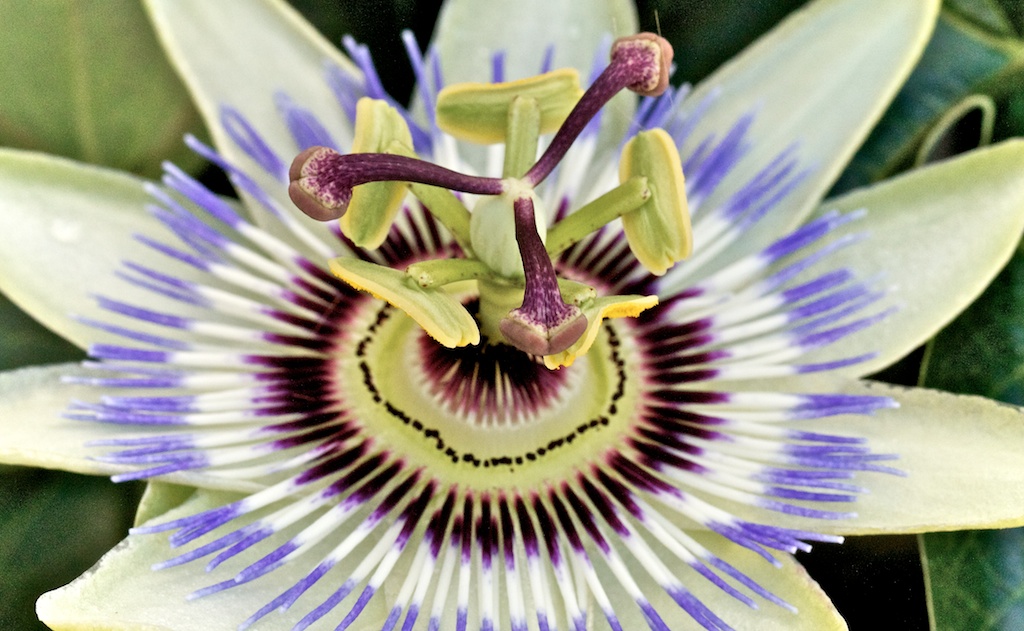
Passion Flower in the shade illuminated with the NEEWER 48 Ring Light.
On the downside, this isn't the most rugged unit. So it probably won't take extended abuse. Also, the ring light does swivel on the adapter. I've found that by moving the power cord under the lens then bringing it up to the hot shoe from the opposite side helps stabilize the ring light. You could also use a bit of gaffer's tape.
Aside from that, however, this light is fun... and a bargain. If you've wanted to experiment with ring lighting for your close-up photography, I would give this unita try.
The Digital Story on Facebook -- discussion, outstanding images from the TDS community, and inside information. Join our celebration of great photography!
I'm thrilled to be leading the Sonoma Coast Photography Workshop for a second year. I have an amazing weekend planed.
The Sonoma Coast Photography Workshop begins Saturday morning, August 24, 2012 and runs through Sunday evening August 25th. Our headquarters during the day will be the lovely Library Conference Room at the Bodega Bay Lodge, in Bodega Bay, CA. We also have a campsite reserved at Doran Regional State Park, a 10-minute walk from the Lodge. We will use the campsite as our field headquarters during the weekend. Paid workshop attendees are welcome to come out and visit the Field HQ on Friday afternoon.
During the weekend, we will work on environmental portraiture with a professional model, landscape shooting at Ft. Ross State Historical Park, and nature photography at Goat Rock... and plenty more.
When there's a dark area in your photograph that you want to lighten, the common inclination is to reach for the Dodge tool. I don't know about you, but I find the Dodge tool one of the most difficult to use for getting natural looking results. On my images, it always looks like someone spilled bleach on the photo.
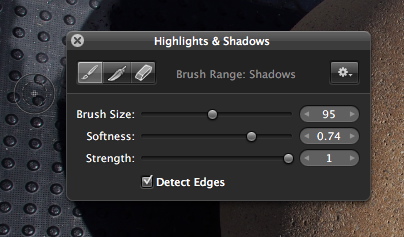
A more elegant approach to lightening a dark area is to use the brushing tool in the Shadows & Highlights brick. It's nearly foolproof in use, an the results are fantastic.
The Shadows & Highlights brick in Aperture's Adjustments panel.
Here are the steps for using the Shadows & Highlights brush
Click on the gear icon in the Shadows & Highlights brick (as shown in the illustration).
Choose Brush Shadows & Highlights In
Don't click on the check box on the left side. That will happen automatically.
In the adjustment brick, move the Shadows slider to about 25 for a starting point.
In the floating palette (that will appear over your photo), move the Strength slider to 1.
Choose your brush size and softness (in the floating palette).
Start painting in the dark area you want to lighten.
Once you've painted an area, you can adjust the strength of its effect by moving the Shadows slider in the adjustment brick.
If you need to clean up an overpaint, click on the eraser icon in the floating palette.
The floating palette
You can always reset the adjustment and start over by clicking on the gear icon in the floating palette and selecting "Clear from entire photo." But I don't think you'll have to do that often, because this is such a beautiful method for lightening dark areas.
More Aperture Tips and Techniques
To learn more about Aperture 3, (especially brushing techniques) check out my Aperture 3 Essential Training on Lynda.com. Also, take a look at our Aperture 3 Learning Center. Tons of free content about how to get the most out of Aperture.
My next open Aperture Workshop is scheduled for Nov. 2012, in Santa Rosa, CA. You can get on the pre-registration list, plus learn about all the other photography workshops offered this season by visiting the TDS Workshops page.
The Digital Story on Facebook -- discussion, outstanding images from the TDS community, and inside information. Join our celebration of great photography!
Your iPhone captures terrific pictures. And now, so does the iPad. So when you want to give a print to someone, what do you do?
There are actually quite a few options available for printing directly from your iPhone or iPad. In the Macworld Magazine article, Mobile printing gets easier with or without AirPrint, I cover a number of options that don't include your Mac. Just send the file from your iOS device directly to a printer.
This works for photos and documents alike. While working on this article, I printed from a web browser, Pages word processing app, Keynote, and more.
Printing from your iOS device isn't something that you do every day. But when you need to, you usually have to do it quickly. So setting up your workflow now will save you anxiety later. Take a look at the article and see what you think.
The Digital Story on Facebook -- discussion, outstanding images from the TDS community, and inside information. Join our celebration of great photography!
Back-button focusing allows you to separate the auto-focusing function from the shutter release button. I talk more about how to do this, and why you might want to consider it for your shooting. I also discuss a unique opportunity where you can help me cover the Wine Country Big-Q Competition as part of the Event Photography Workshop that begins on July 13. I then gripe about the lack of availability of the Olympus OM-D E-M5 and touch on a great new technical backpack, the Lowepro Flipside Sport 10L. Enjoy the show!
Would you like to improve your B&W photography? I have a webinar coming up on May 23, "A Fresh Look at Familiar Subjects in B&W." It's free, but you have to reserve your seat in advance.
Typically, most DSLR shooters lock their focus by pressing the shutter half way, recomposing, then pressing further to record the image. It's a tried and true technique that I still use to this day.
But there are situations, such as portrait shoots and action photography, where you might want to move focus activation to a different button. This technique is often called "back-button focusing" because the most common repositioning is the button on the back of the camera.
We'll be practicing back-button focusing at the upcoming TDS Action Photography Workshop, and also at following events later on this season. It's worth having in your bag of tricks.
The Digital Story on Facebook -- discussion, outstanding images from the TDS community, and inside information. Join our celebration of great photography!
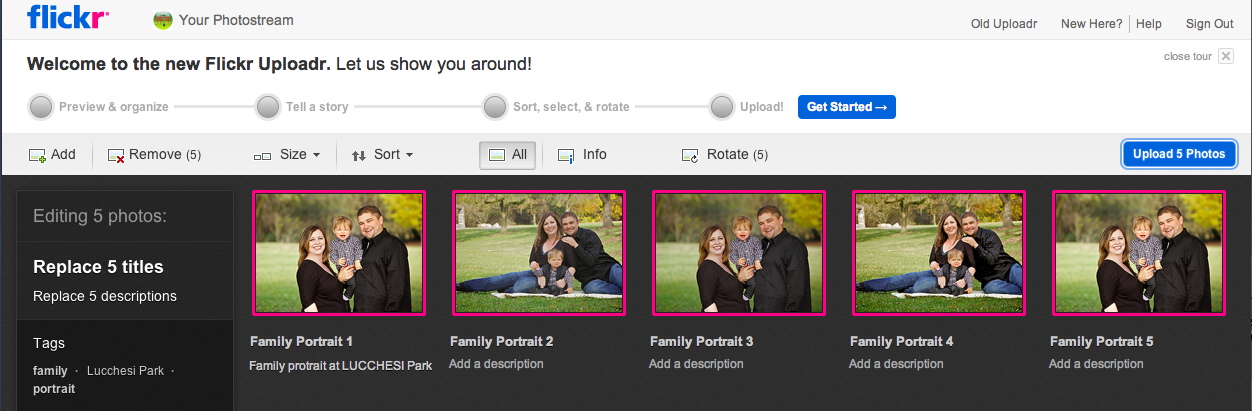
Popular photo sharing site Flickr has retooled its uploader interface. The new version features both improved functionality and is easier on the eyes.
The first think you'll notice is that the previous stark white thumbnail background has been replaced by charcoal gray. Not only does this make the photos look better, it's more attractive overall.
You can grab thumbnails and reposition them so they appear in the order you want in the photostream. There are also presets for the sorting order if you want newest first or oldest first.
Changing titles, adding captions, and working with tags is also easy for individual photos as well as the entire set.
Overall, this is a welcome feature change. I'd like to see this look and feel spread throughout the entire Flickr interface. To use the new uploader, look for the "Upload" link in the top toolbar of the Flickr interface. For the moment, it has a "new" flag next to it.
The Digital Story on Facebook -- discussion, outstanding images from the TDS community, and inside information. Join our celebration of great photography!
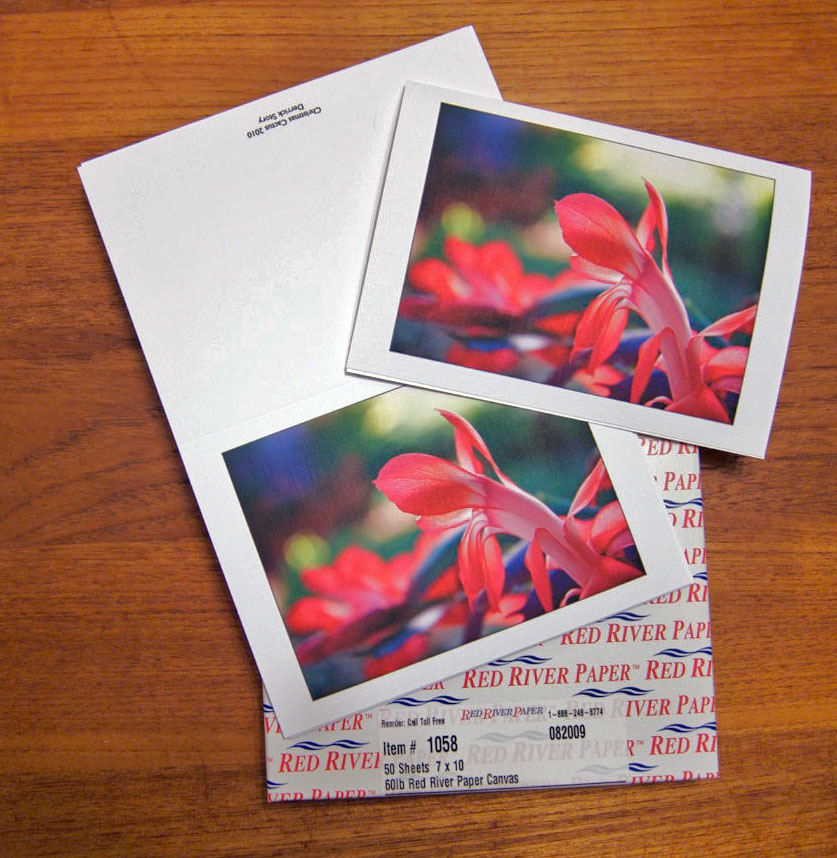
I keep a box of prints handy for reference. It consists of a few images printed on 3 or 4 different surfaces. When I'm thinking about which stock to use for a photo that I want to run through my Epson, I pull out my box of sample images. It helps me decide where to start by actually looking at the same photographs on different papers.
Being able to touch the prints is an important part of the process. It's easier to hold them at different angles and feel the texture of the paper.
I also use this sample kit when clients are asking about output. It's much easier for them to decide when they can examine the various options in person.
The Digital Story on Facebook -- discussion, outstanding images from the TDS community, and inside information. Join our celebration of great photography!
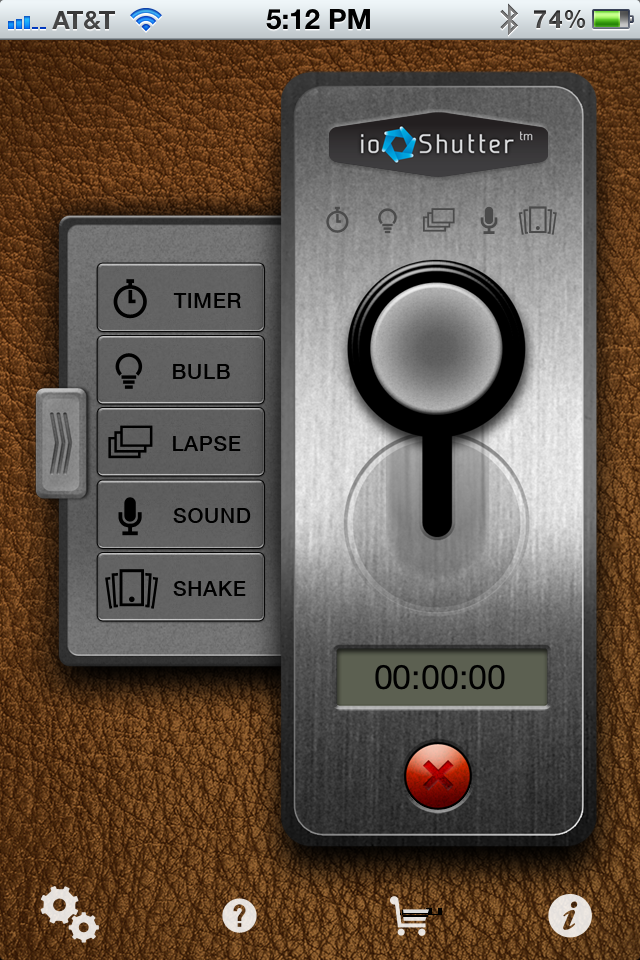
The iPhone display is so beautiful. Wouldn't it be great to use it as a control panel for your DSLR? Now, thanks to enlight photo, you can.
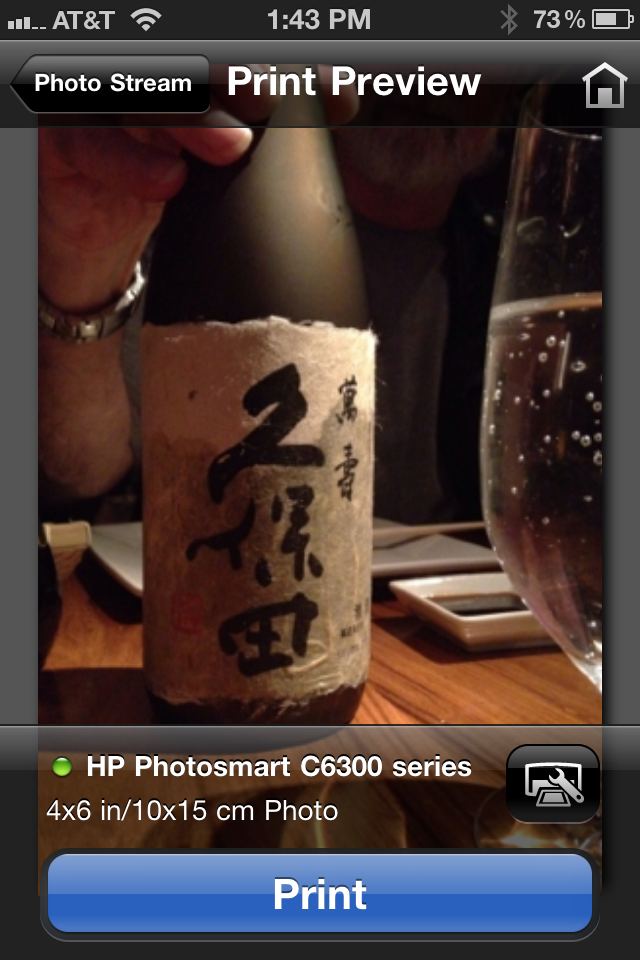
The ioShutter Release Cable ($69.99) with accompanying iOS apps (free "lite" version, or the "pro" that costs $9.99, shown in the illustration to the right ) enables you to shoot with your DSLR in a variety of ways:
Standard remote release. Press the button on the iPhone screen and the camera takes a picture.
Timer mode. With the free lite app you have countdown of 20 or 60 seconds. In the pro version, the timer is completely programmable.
Bulb mode. In the lite version, you can set exposure for 60, 90, or 120 seconds. In the pro version, it is completely programmable.
Time lapse. In the light version you have options of "every 5 seconds for 5 minutes," "every 5 seconds for 10 minutes," or "every 30 seconds for 10 minutes." In the pro version this is programmable.
Sound trigger. In the lite version you clap you hands to fire the camera. In the pro version you can set the decibel level.
Shake. In the light version you have "shake to take." In the pro version you have much more control.
How it Works
The system works like this. You buy either the E3 shutter release cable that fits Canon Digital Rebels, Canon 60D, Pentax K-5, and other cameras that use the mini-jack type socket. Or you can purchase the N3 shutter release cable that works with the Canon 5D series and pro Canons that use the larger socket connector for remote releases. Plug one end of the cable into your camera and the other end into the headphone jack of the iPhone. Fire up either of the iOS apps, turn on the camera, and start shooting.
I tested the E3 release with a Canon T1i and a Pentax K-5, using both the lite and pro iOS apps. All of the functions worked as advertised. There were no glitches at all with the Canon, and only one with the Pentax -- it would sometimes automatically go to burst mode when using the sound trigger. Aside from that nit, performance was solid.
If you get a phone call while using the ioShutter, you have to disconnect it from the headphone jack to communicate with the caller. I learned this one the hard way.
Time Lapse Test with Canon T1i
All of the functions of the ioShutter are useful, but the one that most will be interested in is the time lapse control. I tested this with the pro version of the app connected to the T1i. I programmed an exposure for every 4 seconds.
Lowepro Flipside Sport 10 Liter.
Keep in mind that if you want full programmability for your time lapse work, you have to pony up the additional $9.99 for the pro version.
Bottom Line
The ioShutter works as advertised. If you have a compatible camera, and an iPhone in your pocket, then all you have to carry is this light cable. By doing so, you have access to a variety of handy controls.
The $69.99 price tag is inline with cable releases that provide similar functionality. I do think, however, that the $9.99 price tag for the pro version of the iOS app is steep, especially after just shelling out $70 for the cable itself. You can use the free app, but if you want to use the time lapse function, you really need the pro version for maximum control. I think a fairer price tag for the pro version would be $2.99 or even $4.99.
That being said, I like the flexibility of packing just this light cable, yet having a variety of triggering functions available, that I can control via the lovely iPhone interface.
Nimbleosity Rating: 3.5 (out of 5). Rating move to 4 if pro app price was reduced.
The Digital Story on Facebook -- discussion, outstanding images from the TDS community, and inside information. Join our celebration of great photography!
Another point that I want to add focuses on the lights. I've been using the Lowel Ego lights for my table top work. They're affordable and work great.
To support the entire project, I use a 60" folding table.There's just enough room for my lights and portable light box kit. When I need to clear the area for other types of shooting, everything folds up and stores out of the way.
Table top photography can be both creative and productive. Something to consider.
The Digital Story on Facebook -- discussion, outstanding images from the TDS community, and inside information. Join our celebration of great photography!
Adobe just released ACR 6.7 that includes RAW support for 9 new cameras plus 30 new lens profiles. Heavy hitters are included such as the Canon 5D Mark III, Nikon D800, and Olympus OM-D. Plus Creative Suite 6 is now available.
Would you like to improve your B&W photography? I have a webinar coming up on May 23, "A Fresh Look at Familiar Subjects in B&W." It's free, but you have to reserve your seat in advance.
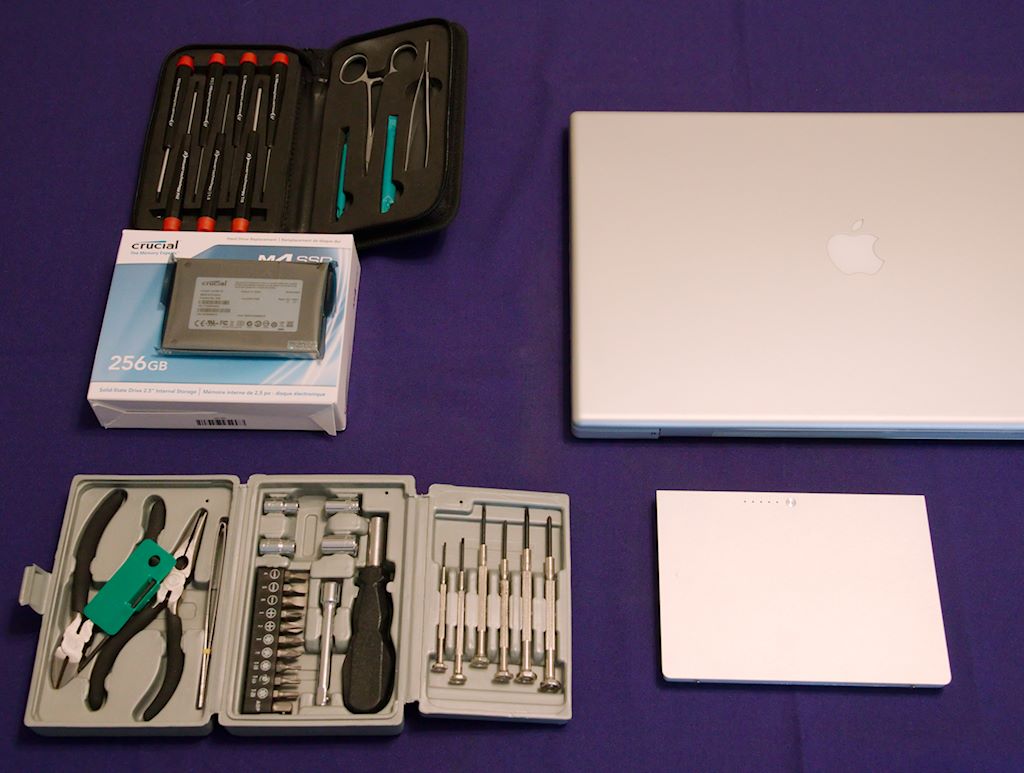
I like my vintage 2008 17" MacBook Pro (MBP). But it had become too tired to run Aperture and manage my extensive photo library. Rather than give up on this otherwise beautiful machine, I decided to replace the traditional hard drive with a new Crucial Solid State Drive (SSD). Now that the project is completed, I have to say, the results have exceeded my expectations.
Preparing for the hard drive replacement.
Basic Specs for the Mac
Even by today's standards, the MBP 17" has decent specs. At its heart beats a 2.5 GHz Intel Core 2 Duo processor. I have 4 GBs of DDR2 SDRAM for memory, and a NIVIDIA GeForce 8600 GT graphics card with 512 MBs of memory onboard to process the images. Plus this MBP has a beautiful matte finish LCD display that was one of the first LED models that Apple shipped. I love editing photos on this screen. (It's worth keeping for the monitor alone.)
Other goodies include a SuperDrive for both CD and DVDs, 3 USB ports, FireWire 800 and 400 ports, plus an excellent sound system. Like I said earlier, way too good of a machine to give up on quite yet.
But its Achilles heel was the 200 GB Hitachi internal hard drive. It was slowing down my entire system. Aperture in particular was painful. I could barely perform the simplest image edit without a spinning beach ball.
The Upgrade to Solid State
Since Aperture is constantly hitting the hard drive, I thought moving to Solid State might help. In part, this belief stems from my excellent experience using the current MacBook Air. I thought that if I "air-i-fied" my MBP, I might be more satisfied with its performance.
After I received the Crucial SSD, I watched "How to replace your 17" Mac Book Pro hard drive:"
Then I retrieved my Newer Tech 11-Piece Computer Tool Kit and spread everything out on a covered table. Once all the screws were removed, I was careful when lifting the keyboard. There's a ribbon cable that connects it to the mother board that I didn't want to damage.
I keep all the various sets of screws separate and labeled. This makes reassembly much easier (without any extra parts). The entire operation lasts about 30 minutes. I take my time when taking apart computers...
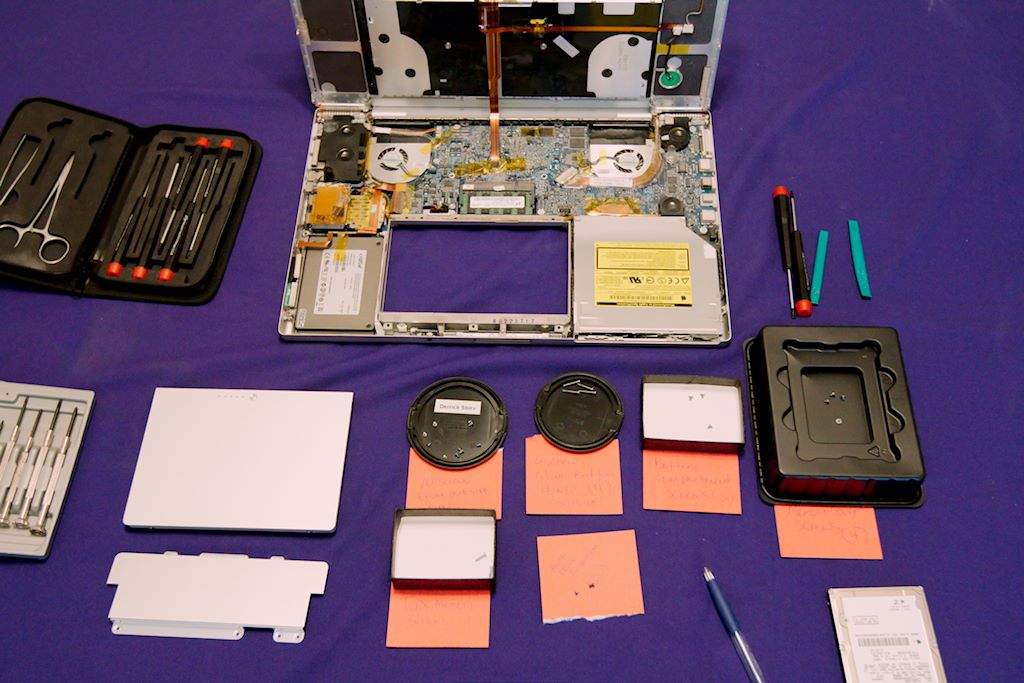
New SSD in place. Now all I have to do is put everything back together.
Adding Software
Fortunately I have a copy of Snow Leopard on DVD, so I held down the "C" key and booted the laptop from it. I used Disk Utility to format the Crucial SSD for Mac OS X Journaled. Then I installed the operating system itself.
Once I had Snow Leopard on the SSD, it was just a matter of running updates so I could eventually access the Mac App Store to download Lion and install it. After that, I used the App Store to redownload Aperture, and the rest of my software. (I have a few hints about bringing Aperture up to speed that I will cover in another article later this week.)
And That Old Toshiba Hard Drive I Removed...
Even though I had backed up my files on an external hard drive before installing the SSD, I still wanted that old Toshiba available in case I had forgotten something. So I pried open an LaCie Rugged portable unit that had a failed hard drive in it, pulled out the bad hard drive, and replaced it with the unit I had removed from the laptop. I now have all of my previous files available.
Beter Performance, Indeed
The 2008 MacBook Pro is like a new computer. It's currently handling an Aperture library containing 50,000 referenced images with very little effort. I can now edit RAW files from my 5D Mark II without those long delays I was previously experiencing. I love working on this big boy again.
The entire project cost me less than $275. (You can't get an iPad for that amount, let along a big 17" matte screen workhorse.) And performance is so much snappier than before. I'm definitely enjoying this ride.
The Digital Story on Facebook -- discussion, outstanding images from the TDS community, and inside information. Join our celebration of great photography!
On Saturday, May 19, I'll be in San Jose, CA speaking for TWiP and SmugMug on How to Pack a KILLER Camera Bag, then on Tuesday, May 23 at 10am PDT, I'm conducting an online webinar titled, A Fresh Look at Familiar Subjects in B&W. Both events are free, but you do have to reserve your spot for the webinar (do that right now!)
The engagements are also listed on the Events tab of The Digital Story Facebook Fan page, the best place to stay in touch with upcoming activities. Here's a brief look at the two talks for May.
How to Pack a KILLER Camera Bag - May 17
Ever wondered how exactly to pack a perfectly prepared camera bag for that next trip?
Photography and travel seem to go together like Starbucks and mobile devices. You can enhance your adventures by following a handful of basic tips for packing your gear.
Professional photographer Derrick Story will show you the things he's learned while covering assignments in Asia, North America, and Europe. He'll show you why he believes that the "nimble photographer" is a happy photographer.
And the best part is, following his advice, you'll travel smarter and have all the equipment you need to get the shot.
The second best part, our friends at Lowepro are donating a couple pro bags to raffle off that evening.
A Fresh Look at Familiar Subjects in B&W - Webinar -May 23
There are those subjects that we expect to see in black and white: landscapes, street shots, and editorial portraits. And then those we don't - such as the blaring lights of Las Vegas.
In this webinar sponsored by Nik Software and Lowepro, Derrick Story will show you how he uses Silver Efex Pro 2 to present a fresh look at familiar subjects. Derrick will explain how he uses Silver Efex Pro 2 in his overall photo management workflow, and present a few tips from his experience that you might apply to your own work. He will also share some of his favorite Lowepro bags and why they make working out of them in the field easier and more efficient.
I'm hoping that you can join me for one or both of these events, and be sure to say "hi!"
The Digital Story on Facebook -- discussion, outstanding images from the TDS community, and inside information. Join our celebration of great photography!
Nimble photographers who like sling bags and want to carry their iPad with them, might want to investigate the new Lowepro Urban Photo Sling.
This street camera bag has two loading options, three wearing options, and a dedicated tablet computer sleeve. It comes in two sizes: Urban Photo Sling 250 (Pro DSLR without grip with attached 70-200mm lens plus accessories) or the smaller 150 (DSLR with attached 55-200mm lens plus accessories).
The Digital Story on Facebook -- discussion, outstanding images from the TDS community, and inside information. Join our celebration of great photography!
One of the reasons that I had to get my hands on The new iPad was for a time-lapse movie project I'm working on. Yesterday, while at the TWiT Brick House shooting some test video, I decided to record sequences with both the iPad 2 and The new iPad to see how much difference there really was.
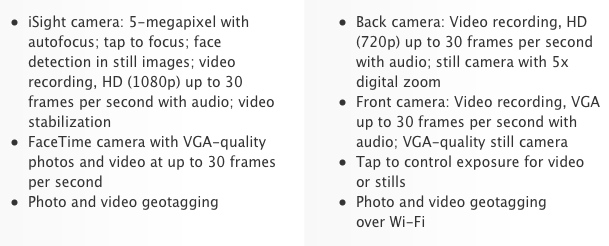
Screen capture from recorded video using the iSight camera on The new iPad. Click on image for full resolution version.
Screen capture from recorded video using the built-in camera for the iPad 2. Click on image for full resolution version.
I mounted each tablet to a sturdy tripod using the Makayama Movie Mount and recorded existing-light sequences. I then made a screen grab from each movie and posted them here without any editing.
Between the improved camera and denser screen resolution of The new iPad, you can see a noticeable difference in detail between the two images. Here are the camera specs for the two iPads, with the iPad 2 specs on the right.
So in low-light situations where you need to milk as much quality as possible out of the video capture, there is definitely a difference between the iPad 2 and The new iPad. Is it worth the upgrade price? That depends on the projects you have at hand.
The Digital Story on Facebook -- discussion, outstanding images from the TDS community, and inside information. Join our celebration of great photography!
For the March 2012 Photo Assignment, TDS shooters focused their lenses on the "windows of the soul"...or a twist on that concept. See for yourself in our gallery, Eyes. And which one will be the SizzlPix Pick of the Month?
Photo by Brian Reynolds. "This is the GOMZ/LOMO Sputnik that I use to make Medium Format stereo slides. This was taken with a Pentax K-5 and a smc PENTAX-D FA 100mm F2.8 Macro lens. It was processed with LightZone to adjust the exposure, color balance, and sharpness." To see all of the other terrific shots from March, visit the Eyes gallery page.
Participate in This Month's Assignment
The May 2012 assignment is "Action." Details can be found on the Member Participation page. Deadline is May 31, 2012.
Please follow the instructions carefully for labeling the subject line of the email for your submission. It's easy to lose these in the pile of mail if not labeled correctly. For example, the subject line for this month's assignment should be: "Photo Assignment: May 2012." Also, if you can, please don't strip out the metadata. And feel free to add any IPTC data you wish (These fields in particular: Caption, Credit, Copyright, Byline), I use that for the caption info.
Good luck with your May assignment, and congratulations to all of the fine contributors for March.
SizzlPix Pick of the Month for the Feb. Photo Assignment
Congratulations to Carl Shortt, Jr. for his Rule of Thirds image of an outdoor portrait. Carl will receive a SizzlPix for his winning image, selected by the good folks at SizzlPix.
The Olympus OM-D E-M5is about ready for its North American release. I've spent a few weeks with this beautiful micro four thirds system camera, and walk you through its highlights and a few of my nits. Then I switch gears to a handful of photo accessories that I've enjoyed using lately. Plus, there's a new photo assignment this month! All this and more with TDS Podcast Episode 323.