October 2014 Archives

fotodiox-edge-light.jpg

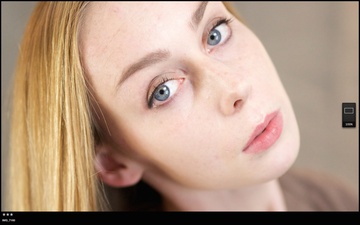
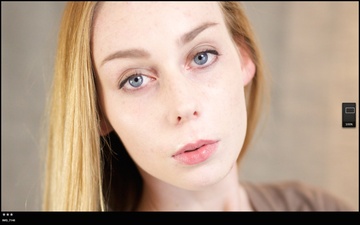
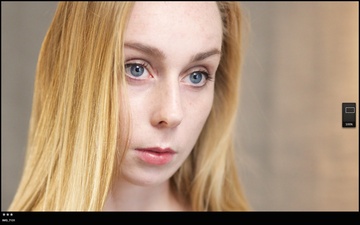
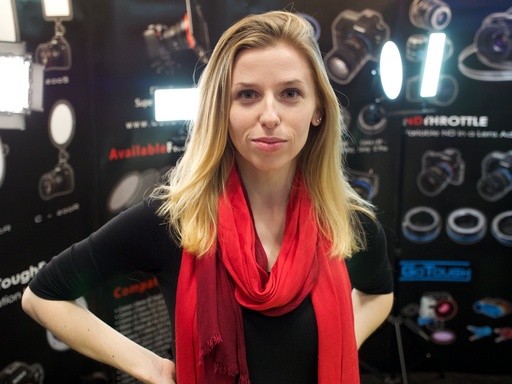
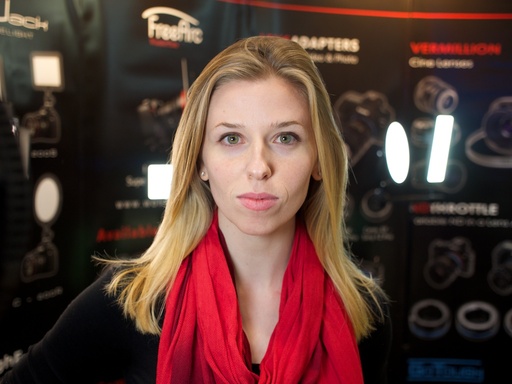
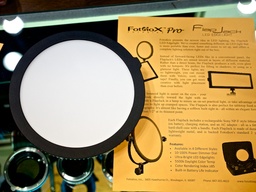
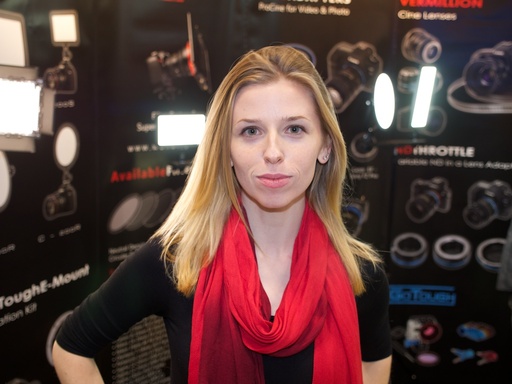
I ran a test today in the Fotodiox booth at PhotoPlus Expo. I asked Vanessa if I could take 3 pictures of her. The first with ambient expo hall lighting. Next, with a hotshoe flash mounted on the Olympus OM-D E-M1. And the third with me holding a Fotodiox Pro FlapJack LED Edge Light C-200R - 7-Inch Round light for illumination.

The Flapjacks have a glow that's excellent for portraiture, and I wanted to see how they compare to typical journalism lighting. Instead of forward-facing LEDs like in a conventional panel, the FlapJack's LEDs are mounted around the outer edge, aimed inward at layers of diffusion material. The FlapJack's bounced light produces a soft, even glow with no hotspots. All of this within a portable unit that's less than 1/2" at its thinnest point.

Thanks to its 5500k daylight color temperature rating, skin tones look great, even using auto white balance on the camera. The dimmer control provides adjustment from 10 percent to full power. The kit comes with everything you need including rechargeable battery, power supply cable, light stand mounting bracket with ball joint - all fitted neatly within a custom case. And since the battery is a standard Sony model, additional units are readily available.

So, let's take a look at that test shoot I mentioned. These shots have not been adjusted.

Existing light portrait with ambient illumination only. existing-light-vanessa.jpg

Fill flash. fill-flash-vanessa.jpg

Fotodiox Pro Flapjack 7-inch round handheld fotodiox-led-vanessa.jpg

In addition to not needing any light modifiers for the flattering glow, I'm also impressed with the excellent color balance. Portrait photographers on-the-go will appreciate the fast setup and ease of use.

The 7" Fotodiox Pro FlapJack LED Edge Light C-200R kit sells for $299.95 and the 10" model is $399.95. By using coupon code FJOL18 at checkout, you can save a whopping 18% (through the end of October.)


Nimble Photographer Logo

This Fotodiox LED Flapjack has a high Nimbleosity Rating. What does that mean? You can learn about Nimbleosity and more by visiting TheNimblePhotographer.com.

Want to Comment on this Post?

You can share your thoughts at the TDS Facebook page, where I'll post this story for discussion.

Ramin-Hamedani-sept-2014-pa.jpg

For the September 2014 Photo Assignment, TDS shooters opened a rear window to the world. See for yourself in our gallery, Shot from Behind. And which one will be the SizzlPix Pick of the Month?


Photo by Ramin Hamedani. Ramin writes, "On a nice summer day, I decided to sit by the lake on a dock. Using my iPhone, I took this image of myself staring into the peaceful surroundings. It was quiet except with the sound of water gently hitting the rocks beneath me. I did have my DSLR as well, but the wide angle of view on iPhone was tempting, and I did not want to change the lens on the DSLR anyway." See all of the great images from this month's assignment by visiting the Shot from Behind.


Participate in This Month's Assignment

The November 2014 assignment is "Layers." Details can be found on the Member Participation page. Deadline is November 30, 2014. No limit on image size submitted.

Please follow the instructions carefully for labeling the subject line of the email for your submission. It's easy to lose these in the pile of mail if not labeled correctly. For example, the subject line for this month's assignment should be: "Photo Assignment: Nov. 2014." Also, if you can, please don't strip out the metadata. And feel free to add any IPTC data you wish (These fields in particular: Caption, Credit, Copyright, Byline), I use that for the caption info.

Gallery posting is one month behind the deadline. So I'm posting September 2014 gallery at the end of October, the October gallery will be posted at the end of November, and on and on.

Good luck with your November assignment, and congratulations to all of the fine contributors for September.


Want to Comment on this Post?

You can share your thoughts at the TDS Facebook page, where I'll post this story for discussion.

This week on The Digital Story Photography Podcast: 5 Landscape Photography Tips, Speed Sorting Your Images, Photo Plus Expo Week - All of this and more on today's show with Derrick Story.

Story #1 - Budget Mitakon 42.5mm f/1.2 offered by ZY optics for M43, Sony E and Fuji X systems - Priced $359, and available initially in the Micro Four Thirds mount, the Mitakon 42.5mm f/1.2 appears to be aimed squarely at competing with Panasonic's Leica DG Nocticron 42.5mm f/1.2 for its Lumix G bodies, which delivers a similar angle of view to an 85mm focal length on full frame cameras. It's manual focus. (Source: DP Review).

In other news, Photo Plus Expo begins this week on Thursday in NYC.

And finally, Canon 6D and Sony RX1 Listed as Discontinued by Some Online Retailers. Preview of things to come? (Source: Petapixel).

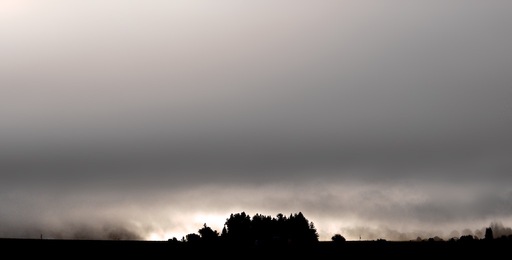
Sunrise in Fog

Story #2 - 5 Landscape Tips from Our Fall Photography Workshop:

  • Be Daring with the Sun - Having it at your back is safe, but often boring.
  • Fight Lens Flare - When shooting backlit subjects, remember to shield your lens from the sun.
  • Find a Main Subject - A bucolic hillside is lovely, but find a starting point for the viewer's eye. Often a foreground element will do the trick.
  • Look for Layers of Light and Dark - This is composition style perfected by Ansel Adams, and it creates visual interest.
  • Don't Forget to Reset Your Settings to Default - Adjusting exposure compensation, ISO and white balance is great, but set it back to default after getting shot.

Story #3 - Speed Sorting: How to Rate a Large Batch of Photos Quickly. Nothing like coming home with 1,500 exposures. Here's how to prevent them from languishing on your hard drive.

Virtual Camera Club News

Photo Assignment for October 2014 is "Water".

New Paper from Red River

This new stock looks great: 66lb. Palo Duro Satin features a subtle surface texture and elegant warm tone, because it contains minimal optical brighteners in the base stock and none in the coating. The warmth of this product is great for portraits, naturescapes, and black & white prints with just a hint of sepia. If you want that fine art pro lab photo finisher look, check out this new stock.

A Note from SizzlPix

They've ramped up their capacity, so we can go for volume for the holidays.

Special for TDS listeners, a 20% discount on all SizzlPix ordered, now through end of November! For orders placed by October 31, there should still be time for free mini-samples prior to production.

Using the comment space on the newly streamlined SizzlPix order page, write "TDS 20 percent discount," and if a free mini-proof is wanted prior to production, "free proof first," and your mailing address.

And Finally...

If you haven't done so already, please post a review for The Digital Story Podcast in iTunes.

BTW: If you're ordering through B&H or Amazon, please click on the respective ad tile under the Products header in the box half way down the 2nd column on thedigitalstory.com. That helps support the site.

Download the Show

In addition to subscribing in iTunes, you can also download the podcast file here (31 minutes). You can support this podcast by purchasing the TDS iPhone App for only $2.99 from the Apple App Store.

More Ways to Participate

Want to share photos and talk with other members in our virtual camera club? Check out our Flickr Public Group. And from those images, I choose the TDS Member Photo of the Day.

Podcast Sponsors

Red River Paper -- Keep up with the world of inkjet printing, and win free paper, by liking Red River Paper on Facebook.

SizzlPix! - High resolution output for your photography. You've never seen your imagery look so good. SizzlPix.com. SizzlPix! now is qualified for PayPal "Bill Me Later," No payments, No interest for up to 6 months, which means, have your SizzlPix! now, and pay nothing until January!

Want to Comment on this Post?

You can share your thoughts at the TDS Facebook page, where I'll post this story for discussion.

I've been to Safari West many times, and always with a DSLR and 300mm lens. But for my most recent visit, I decided to shoot with an Olympus OM-D E-M5 ($799) and the super compact Olympus 75-300mm zoom lens ($549) that provided a reach up to 600mm compared to my Canon 5D Mark II.

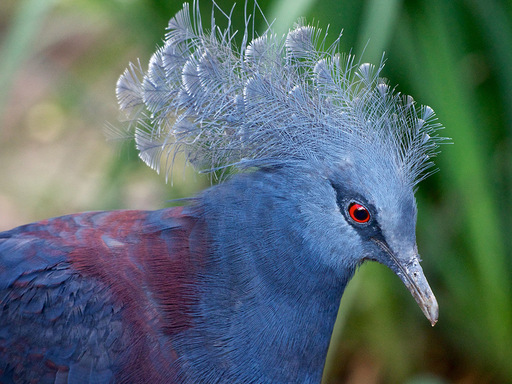
Blue-Crowned-Pigeon Blue Crowned Pigeon - 150mm, f/5.6, 1/125th, ISO 1600, handheld. Photos by Derrick Story.

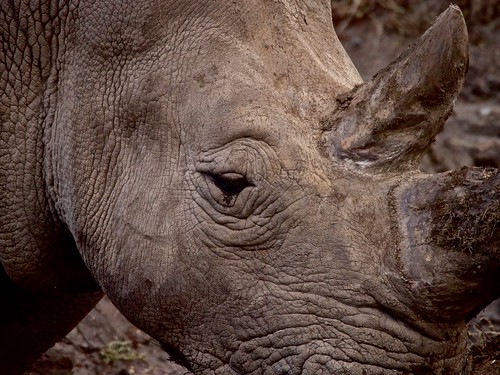
How did it go? I had a blast and loved the photos I came home with. I've never had this much reach before (600mm essentially), and it allowed me to compose tighter than ever before. Here's a portrait of a Southern White Rhinoceros at 300mm (600mm essentially) at f/7.1, 1/500th, ISO 1600, handheld.

Southern White Rhinoceros

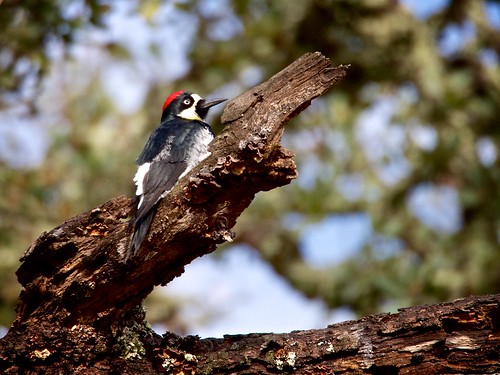
I could even reach this Acorn Woodpecker high in a tree.

Acorn Woodpecker

And my rig was a fraction of the weight and size (and cost) of my counterparts in our Safari truck. If you mixed my images in with theirs, you's have a hard time distinguishing a quality difference, especially around 150mm with the Micro Four Thirds rig. Bottom line: yes, you can shoot wildlife with mirrorless.


Nimble Photographer Logo

The Olympus 75-300mm zoom lens has a high Nimbleosity Rating. What does that mean? You can learn about Nimbleosity and more by visiting TheNimblePhotographer.com.

Want to Comment on this Post?

You can share your thoughts at the TDS Facebook page, where I'll post this story for discussion.

Mac OS X Yosemite builds upon photo browsing improvements we saw in earlier versions, creating a terrific working environment for photographers. And the best part is, you never have to leave the Finder.

Here are a few basic buttons to click to supercharge your photo browsing experience in Yosemite.

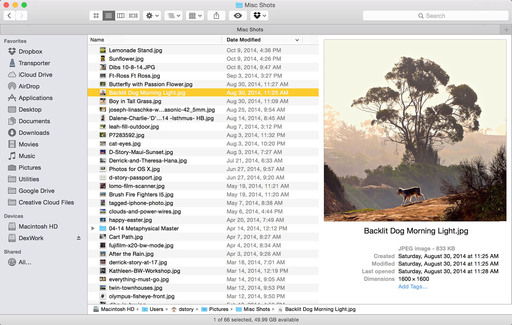
Turn On Finder Preview

finder-preview-list.jpg Finder Preview on in Yosemite

With Finder Preview turned on, you can work in List View and still get a good look at your images. It's easy to activate. In the Finder, go to View > Show Preview. Most photographers will want to use the shortcut: Shift-Command-P.

Bonus Tip: You can add Tags directly from the Finder Preview window by clicking on the blue "Add Tags" link.

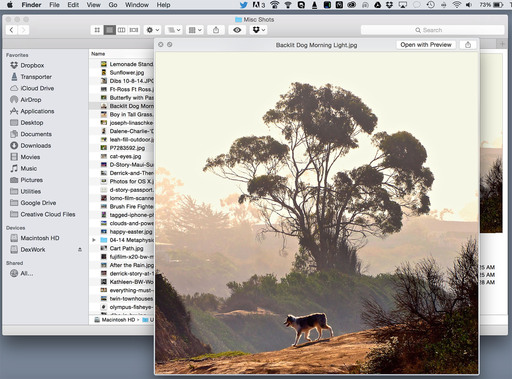
Even a Bigger View with Quick Look

quick-preview-yosemite.jpg Quick Look for even a better view.

We had Quick Look in Mac OS X Mavericks, but it seems more useable now in concert with Finder Preview. With a file highlighted, click on the "eye" icon in the Finder Toolbar to open a larger version of the photo. If you like keyboard shortcuts, Command-Y will enable Quick Look, or even faster, just tap the spacebar (thanks Scott Stuart).

Bonus Tip: You can "pinch to zoom" on a trackpad for a more detailed look at your photo.

Share from Quick Look

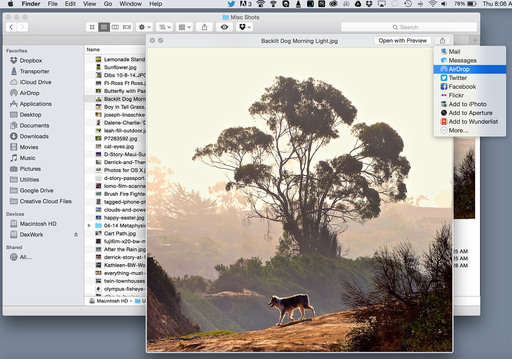
share-from-quick-look copy.jpg It's easy to share the image directly from Quick Look.

Once you're in Quick Look, you have a variety of sharing options. We had a more basic version of this in Mavericks, but Yosemite adds "Share Extensions," which enable you to customize this menu. You can build a sweet workflow, starting with the Finder.

More to Come

I have more Yosemite gems for photographers coming in future posts. Try these out, and see what you think.


Join me on my Instagram site as I explore the world of mobile photography. And now Instagram features 15-second movies too.

Want to Comment on this Post?

You can share your thoughts at the TDS Facebook page, where I'll post this story for discussion.

PhotoPlus Expo

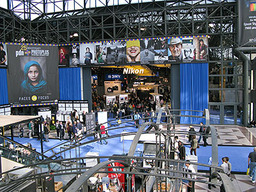
PhotoPlus is right around the corner with the Expo opening on Oct. 30 at the Javits Convention Center in New York. If you're attending, I'd like to meet you. Here's my schedule.

I'm in the c't Digital Photography/Rocky Nook booth every day for 2 hours. Visit me there, then, and mention "The Nimble Photographer" or "The Digital Story Podcast," and I'll have a gift for you from The Nimble Photographer Store.

Speaking Itinerary for Derrick Story

Thursday, Oct. 30

  • 1:00 to 3:00 PM - "Mirrorless Cameras" - c't Digital Photography Magazine Booth 6.
  • Friday, Oct. 31

  • 12:00 to 12:20 PM - "The Nimble Photographer" - lynda.com Booth 267.
  • 12:30 to 12:50 PM - "Portrait Tips" - lynda.com Booth 267.
  • 1:00 to 3:00 PM - "What's in My Bag" - c't Digital Photography Magazine Booth 6.
  • Saturday, Nov. 1

  • 11:30 to 11:50 AM - "Social Media for Photographers" - lynda.com Booth 267.
  • 2:00 to 2:30 PM - "The Nimble Photographer" - Panasonic Booth 837.
  • 3:00 to 3:20 PM - "Lightweight Backup and Storage for Traveling Photographers" - lynda.com Booth 267.

I hope you have a chance to stop by and say hello.

Want to Comment on this Post?

You can share your thoughts at the TDS Facebook page, where I'll post this story for discussion.


Join me on my Instagram site as I explore the world of mobile photography. And now Instagram features 15-second movies too.

Long Telephoto for Landscape Work

I don't photograph much wildlife, but I always pack a long zoom lens for my outdoor work. Why? Because it affords me higher angles on subjects that often require my positioning a bit farther from them.

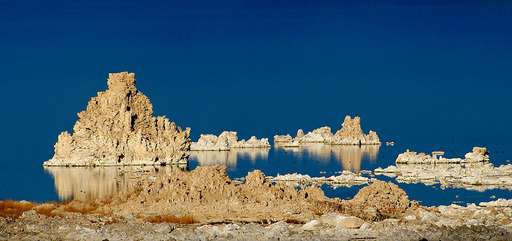
Mono Lake - North Shote Mono Lake, North Shore - photo by Derrick Story.

I photographed this image on the North Shore of Mono Lake with an Olympus ED-M 75 to 300mm II f4.8-6.7 zoom lens at an distance up the hill. I didn't like the angle from the water's edge, so I went back up the road for a higher perspective.

The other advantage of a telephoto for landscape work is that it compresses the scene. This is often flattering to the subject. Plus, it allows me to group together the elements that I think are important in the composition.

Image captured with an Olympus 75-300mm zoom lens mounted on an Olympus OM-D E-M10. ISO 250, f/8, -1/3 EV, hand held.

Want to Comment on this Post?

You can share your thoughts at the TDS Facebook page, where I'll post this story for discussion.

This week on The Digital Story Photography Podcast: Mac OS X Yosemite for Photographers, Shooting Fall Color in the Eastern Sierra, iPhone Digital Back for Older Hasselblads - All of this and more on today's show with Derrick Story.

Story #1 - Adobe Provides Detailed Instructions for Migrating from Aperture to Lightroom. Yes, your get star ratings and most metadata. No, you don't get image adjustments. (Source: F-Stoppers).

In other news, iMac with Retina 5K display. Here's how I would configure it: 3.5GHz Quad-core Intel Core i5, 8GBs RAM, 3TB Fusion Drive (Upgrade), AMD Radeon R9 M295X 4GB GDDR5 (Upgrade) Price: $2,899 (Source: Apple.com).

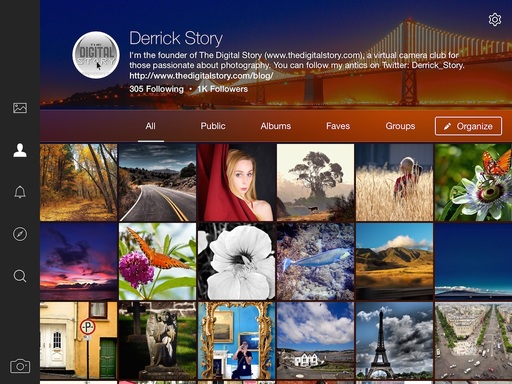
And finally, Flickr version 3.2 with upgrade for iPad viewing is terrific. (Source: TheDigitalStory.com).

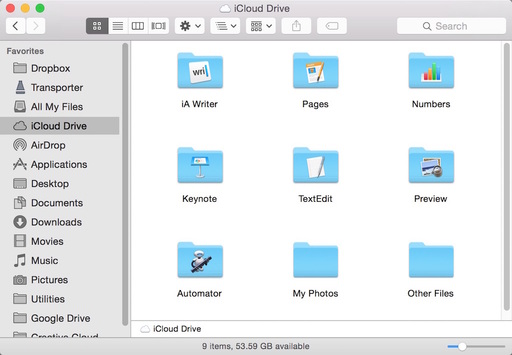
iCloud Drive on Yosemite

Story #2 - Mac OS X Yosemite for Photographers - Here are a few items you should be aware of:

  • AirDrop between iOS device and your Mac - Make sure you're both on the same network, enable AirDrop on both devices, and files can be shared between them.
  • Drag and drop to iCloud Drive - I created a My Photos folder on iCloud Drive where I can backup photos by dragging and dropping in the Finder.
  • Aperture and iPhoto Updates - After updating both applications, they run wonderfully in Yosemite.
  • Photos.app - Coming in early 2015, we'll see the next generation photo management software from Apple for the Mac.

June Lake Loop

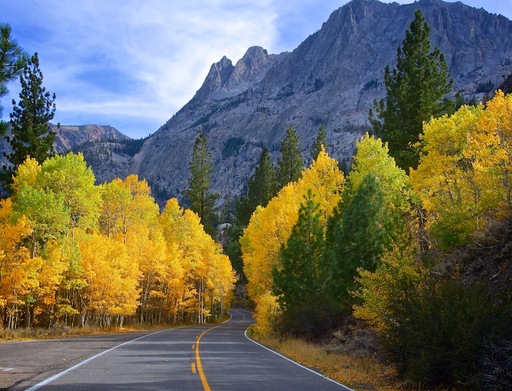
Story #3 - Fall Color in the Eastern Sierra - Spent a few glorious days in Mono Lake County last week. The color around Bridgeport, Lee Vining, and June Lake was impressive. Here's a report with a few Fall color photography tips. Plus, I include a field report on the Western Digital My Passport Wireless hard drive. To see some of the pictures, take a look at my article, A Drive Through Eastern Sierra Fall Color.

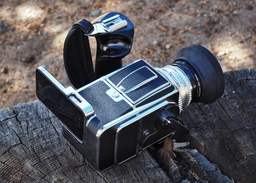
Story #4 - Hasselnuts iPhone Adapter for Older Hasselblads - This is a crazy device that I tested on my last road trip. Essentially, I can attach a handsome adapter that looks just like a film magazine for my Hasselblad 500C, but it allows me to use an iPhone as a digitizer. In my opinion, the resulting images are half Holga, half Polaroid transfer. I talk more about it in the fourth segment of today's show.

Virtual Camera Club News

Photo Assignment for October 2014 is "Water".

New Paper from Red River

This new stock looks great: 66lb. Palo Duro Satin features a subtle surface texture and elegant warm tone, because it contains minimal optical brighteners in the base stock and none in the coating. The warmth of this product is great for portraits, naturescapes, and black & white prints with just a hint of sepia. If you want that fine art pro lab photo finisher look, check out this new stock.

A Note from SizzlPix

They've ramped up their capacity, so we can go for volume for the holidays.

Special for TDS listeners, a 20% discount on all SizzlPix ordered, now through end of November! For orders placed by October 31, there should still be time for free mini-samples prior to production.

Using the comment space on the newly streamlined SizzlPix order page, write "TDS 20 percent discount," and if a free mini-proof is wanted prior to production, "free proof first," and your mailing address.

And Finally...

If you haven't done so already, please post a review for The Digital Story Podcast in iTunes.

BTW: If you're ordering through B&H or Amazon, please click on the respective ad tile under the Products header in the box half way down the 2nd column on thedigitalstory.com. That helps support the site.

Download the Show

In addition to subscribing in iTunes, you can also download the podcast file here (35 minutes). You can support this podcast by purchasing the TDS iPhone App for only $2.99 from the Apple App Store.

More Ways to Participate

Want to share photos and talk with other members in our virtual camera club? Check out our Flickr Public Group. And from those images, I choose the TDS Member Photo of the Day.

Podcast Sponsors

Red River Paper -- Keep up with the world of inkjet printing, and win free paper, by liking Red River Paper on Facebook.

SizzlPix! - High resolution output for your photography. You've never seen your imagery look so good. SizzlPix.com. SizzlPix! now is qualified for PayPal "Bill Me Later," No payments, No interest for up to 6 months, which means, have your SizzlPix! now, and pay nothing until April!

Want to Comment on this Post?

You can share your thoughts at the TDS Facebook page, where I'll post this story for discussion.

Flickr Ups Its Game on the iPad

The updated Flickr iOS app for the iPad looks so nice that you could almost say it was worth the wait. But what a wait it's been.

Like many other users of the online photo sharing service, I wasn't enjoying the beautiful work by those I followed often enough. In large part, it was because Flickr for iOS just wasn't compelling on my iPad mini.

new-flickr-on-ipad.jpg Flickr 3.2 on an iPad mini.

That's changed now. Both the presentation of my photos, and browsing those of others, is greatly improved. In short, Flickr on an iPad now looks like an iPad app, not an iPhone program stretched 2X for a tablet.

Other goodies include improved organization tools, integration with iOS 8 Share Extension capability, and a bump in performance.

If you already have Flickr on your iPad, the app will automatically update. If you've held off on using Flickr on your tablet, you should give this a look.

Better late than never.

Flickr 3.2 requires iOS8 and is available for free in the iTunes App Store. Compatible with iPhone, iPad, and iPod touch. This app is optimized for iPhone 5, iPhone 6, and iPhone 6 Plus.


Flickr Essential Training 2013 - I explore the entire Flickr universe, mobile and computer, in my lynda.com title, Flickr Essential Training. Stop by and take a look.

Want to Comment on this Post?

You can share your thoughts at the TDS Facebook page, where I'll post this story for discussion.

hassnuts-on-500c.jpg

My 30-year-old Hasselblad hasn't seen much action over the last decade. That's changing now thanks to the Hasselnuts iPhone Digital Back that I received recently as part of my support for their Kickstarter project.

With the adapter, I can attach an iPhone 4S, 5, or 5S to the handsome "film back" (that's really the adapter) and capture images that I call, "half Holga/half Polaroid transfer." I talk about the setup process in my latest article for c't Digital Photography Magazine, Hasselnuts iPhone Digital Back for Older Hasselblads. I've also included a gallery of images captured with my 500C, Zeiss 80mm lens, and an iPhone 4S.

Here's a couple shots from that gallery to whet your appetite...

Bed in Boarding House Bed in Boarding House - This existing light shot was captured at f/2.8 using the waist-level finder for a low angle. Photos by Derrick Story


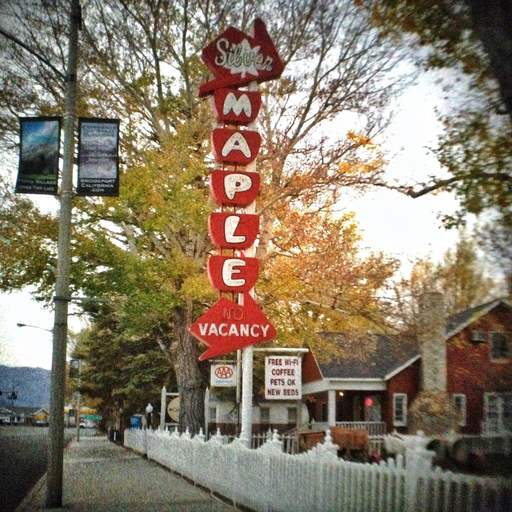
Silver Maple Motel - Bridgeport I took the Hasselblad out for a late afternoon walk around Bridgeport, CA. I noticed that I was working at a more relaxed pace than normally.

These types of images are not for everyone, for sure. But I'm going to make some prints on Red River Polar Matte paper. I think they'll have that Polaroid transfer feel that I enjoy.

If you want to learn more about the Hasselnuts adapter, take a look at my article. In the meantime, I'm going to keep experimenting with it.

Want to Comment on this Post?

You can share your thoughts at the TDS Facebook page, where I'll post this story for discussion.

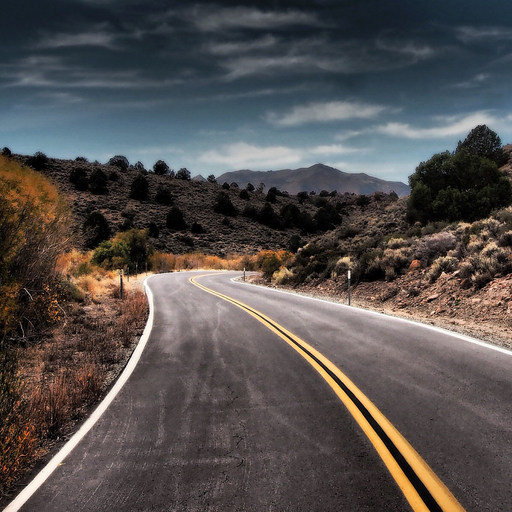
The Road to Bodie

After spending time here in the Eastern Sierra, I'm more excited than ever about our upcoming 2015 workshop, featuring the abandoned silver mining town of Bodie.

The Road to Bodie

I've found a wonderful place for our accommodations and workroom, the Silver Maple Inn, in Bridgeport. From that location wer'e only 20 miles from Bodie itself. Our workroom will be in an 1800s house that has been converted into a B&B. It will be very comfortable and accommodating while we process our images and share them with each other.

Today, I'm heading down to Lee Vining and onto Mono Lake. I'm thinking that we will do this trip on the second day of the workshop.

Stay tuned for more updates from the road.

Most photographers think a lot about their camera gear. But once the bodies and lenses are packed, there are a few additional items that should be included.

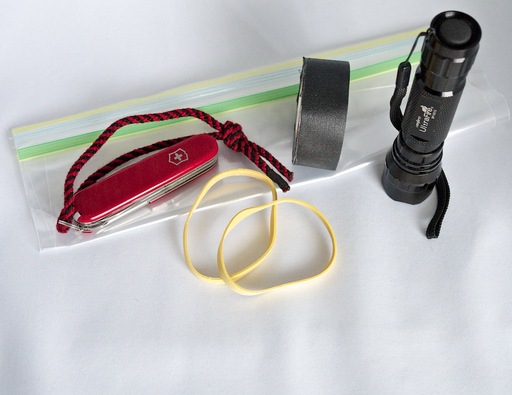
Here are five non-photo accessories that I carry for every trip.

5-non-photo-accessories.jpg

  • Flashlight - Yes, my iPhone has a handy light for digging around in the bag, but I don't want to use that for working my way down a trail after sunset. And it's not very good for light painting. So I bring an additional light, such as the Ultrafire LED flashlight torch ($15).
  • Swiss Army Knife - I've lost count of the number of times my Victorinox has saved the day. I like the lighter models, such as the Climber II Pocket Knife ($20).
  • Ziploc Bag - Everyone knows to bring one, but they are often forgotten. In addition to everything else they do, put your camera in the Ziploc before you come indoors after a cold weather shoot. The condensation will accumulate on the bag and not your camera.
  • Rubber Bands - They can hold DIY bounce cards to flash heads, stabilize daring camera set-ups, serve as hanging loops, and a host of other MacGyver solutions.
  • Gaffer's Tape - If a rubber band doesn't work, gaffer's tape probably will. You don't need an entire roll, a few strips on the inside of your camera bag should work just fine.

One final thought, if you're flying to your destination, remember to move your Swiss Army Knife from your camera bag to your checked suitcase. I hate having mine confiscated by the TSA.


Nimble Photographer Logo

These items have a high Nimbleosity Rating. What does that mean? You can learn about Nimbleosity and more by visiting TheNimblePhotographer.com.

Want to Comment on this Post?

You can share your thoughts at the TDS Facebook page, where I'll post this story for discussion.

This week on The Digital Story Photography Podcast: Apple's iPhoto Switcheroo in iOS 8, Ten Quiet Cameras, Lithium-ion Batteries of the Future - All of this and more on today's show with Derrick Story.

Story #1 - Drobo has announced a new configuration for its Mini robotic storage, leveraging four 2-TB HDDs and selling the complete package for $999. The Mini features 2x Thunderbolt & 1x USB 3.0 ports, power fail protection with battery backup, and Drobo BeyondRaid for advanced data protection. (Source: Drobo).

In other news, New lithium-ion battery tech could charge in minutes, keep working for decades - A research team at Singapore's Nanyang Technological University is proposing a replacement for the anode of a typical lithium-ion battery that they say could be cheaply and easily manufactured, and yet provide significant benefits such as 20 year life and super fast recharging. (Source: Imaging-Resource.com).

And finally, Canon's Upcoming 11-24mm f/4L Will Reportedly Cost a Hefty $3,000. (Source: PetaPixel.com).
leica-vs-nikon.jpg

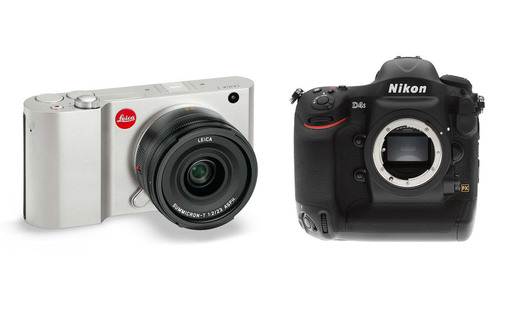
Story #2 - 10 Quiet Cameras (and 5 Very Noisy Ones) - Sascha Steinhoff published Keeping it Quiet in the latest issue (#17) of c't Digital Photography Magazine (page 90). She shares a through examination of what causes camera noise, then tests 30 popular models for their sound levels. Here are the 10 quietest cameras in normal shooting mode.

The Quietest Cameras

(Number 1 producing the least amount of noise in normal shooting mode.)

  1. Pentax Q7
  2. Pentax Q
  3. Leica T
  4. Olympus PEN E-P5
  5. Fujifilm X-E2
  6. Olympus OM-D E-M1
  7. Canon EOS M
  8. Pentax K-5 II
  9. Nikon 1 V3
  10. Leica M

Mirrorless cameras dominated the Top 10. Plus, seven of these models have a "Quiet Mode" that emits virtually no sound during capture. The three models that still produced noise in Quiet Mode (Pentax Q7, Pentax Q, and Nikon 1 V3), were able to substantially reduce sound, up to 40 percent quieter.

The Noisiest Cameras

The bottom of the list was dominated by professional grade DSLRs. Here are the five noisiest models.

(Number 1 producing the most noise in normal shooting mode.)

  1. Nikon D4s
  2. Canon EOS-1D X
  3. Nikon D800
  4. Nikon D300
  5. Nikon Df

Even in Quiet Mode or Live View, theses cameras created more sound than any of the Top 10 models in normal mode.

Story #3 - Workshop Dates for 2015 Season - On the TDS Workshops page, I've added the dates for next year's events. Here's how they shake out: Moving from Aperture to Photos or Lightroom - Feb. 6-7, 2015, San Francisco Street Photography - April 24-26, Bodie and the Eastern Sierra - June 11-13, and Fall Color with Safari West: October 23-25. Plus I talk about this week's scouting trip to the Eastern Sierra.

Story #4 - Did Apple Short Change Us with Photos.app in iOS 8? I've been getting lots of comments about the discontinuation of iPhoto for iOS and the shortcomings of the new Photos app that replaced it. I discuss in the fourth segment of today's show.

Virtual Camera Club News

Photo Assignment for October 2014 is "Water".

Order Your SizzlPix Early

Order your SizzlPix early to get holiday shopping out of the way. You'll give the double whammy of your own great image that has special meaning to your recipient, combined with the delightful surprise they'll have, seeing the back of the SizzlPix, wondering, "what the heck is this?", then lifting it out of the box, flipping it over, and there it is, a spectacular SizzlPix -- like Retina Display for the wall -- all ready with hanger attached!

If you haven't done so already, please post a review for The Digital Story Podcast in iTunes.

BTW: If you're ordering through B&H or Amazon, please click on the respective ad tile under the Products header in the box half way down the 2nd column on thedigitalstory.com. That helps support the site.

Download the Show

In addition to subscribing in iTunes, you can also download the podcast file here (30 minutes). You can support this podcast by purchasing the TDS iPhone App for only $2.99 from the Apple App Store.

More Ways to Participate

Want to share photos and talk with other members in our virtual camera club? Check out our Flickr Public Group. And from those images, I choose the TDS Member Photo of the Day.

Podcast Sponsors

Red River Paper -- Keep up with the world of inkjet printing, and win free paper, by liking Red River Paper on Facebook.

SizzlPix! - High resolution output for your photography. You've never seen your imagery look so good. SizzlPix.com. SizzlPix! now is qualified for PayPal "Bill Me Later," No payments, No interest for up to 6 months, which means, have your SizzlPix! now, and pay nothing until January!

Want to Comment on this Post?

You can share your thoughts at the TDS Facebook page, where I'll post this story for discussion.
editing-in-photos-app.jpg

One of the exciting enhancements in iOS 8 for photographers is "Photo Extensions." What that means is that 3rd party developers, such as the creators of Camera+, can enable their editing tools to be accessed within Apple's Photos App.

Photo Extentions opens up a whole new experience for photographers. Here's how to use them.

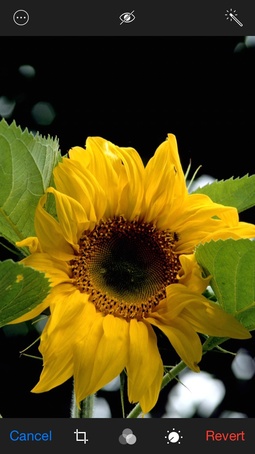
  • Open an image in Photos App, then tap Edit in the upper right corner.
  • Tap on the "more" icon in the upper left corner of the app. It's a circle around 3 dots (as shown in the top illustration).
  • In the screen that appears at the bottom of the screen, tap on More, then enable the app that includes the Photo Extensions that you want to use. In my case, it was Camera+.
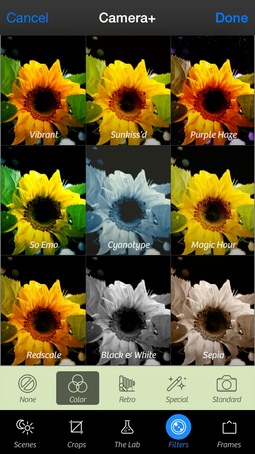
  • Camera+ will now reside in the bottom popup screen. Tap on its icon to access its editing tools.
  • editing-in-camera-plus.jpg

  • Edit your photo using the tools in the set of extensions you've selected (as shown in the bottom photo). The changes you make to the image will be saved automatically to the camera roll.

Your edits are non-destructive. So regardless what you do with these new tools, you can always revert to original if needed.

This functionality is a preview of things to come on the Mac with the release of Yosemite. The new desktop Photos App will also have extensibility. It will be interesting to see how this changes desktop editing for Mac users.


More Help Managing Your Mobile Photos

In my lynda.com title, Managing Your Mobile Photos, I cover a variety of backup solutions for both iOS and Android users. These tutorials will help you build the perfect backup solution for you, so that you never lose a single memory.

Want to Comment on this Post?

You can share your thoughts at the TDS Facebook page, where I'll post this story for discussion.
devon-100-percent.jpg

Most of my paid work is in the field. But I have a small dedicated studio for portraiture. The biggest challenge in there is softening the background that's only a few feet behind the subject.

I've been testing the Sigma 50mm f/1.4 DG HSM Art lens on my Canon 5D Mark II, and this optic has solved many of my small studio problems.

I decided to push this notion to its limits by shooting an entire portrait session at f/1.4. I knew I would have to be careful with the focus. But when I succeeded, the results could be beautiful.

devon-100-percent-2.jpg

My portrait room measures 14' long by 12' wide. I have a backdrop system against the back wall that takes up a few feet, then moving the subject forward from the backdrop costs me another 3' to 4'. The Sigma 50mm Art lens on a Canon 5D Mark II allowed me to shoot full length portraits when I backed-up against the other wall, yet provided enough magnification for head-and-shoulder portraits as needed.

Shooting at f/1.4 was exciting. I had fast shutter speeds regardless of my lighting scheme. Sometimes I used window illumination only. Other times I added a pair of Lowel Ego Lights, as I did for these images.

devon-100-percent-3.jpg

I loved the results. Generally speaking, I focused on the eye closest to the camera, and let everything else trail off. The backgrounds were creamy soft, even though they were just a few feet behind the subject. I set the color by using Custom White Balance on the Canon, and then let the Sigma deliver the results from there.

These images are not retouched. I've made no exposure, white balance, sharpening, or brushing adjustments. They were captured off the screen of my MacBook Pro 15" with Retina Display at 100 percent so you could see how the Sigma 50mm Art lens handled the details.

For photographers with small studios, this is a lens to consider. The Sigma 50mm f/1.4 DG HSM Art lens is available in Canon, Nikon, Sony, and Sigma mounts. The build and design are top notch. For me, it's a bit heavy for field work. I'd rather shoot with my Micro Four Thirds cameras for events. But in the studio and for commercial work, this premium optic delivers the goods... even wide open.

Learn More About the Art and Business of Portraiture

In my lynda.com title, Photographing High School Senior Portraits, I'll show you how to organize, photograph, and deliver great images for fun or profit. Take a look at the free movies and see for yourself.

Want to Comment on this Post?

You can share your thoughts at the TDS Facebook page, where I'll post this story for discussion.
Torn: Panasonic LX100 or GM5?

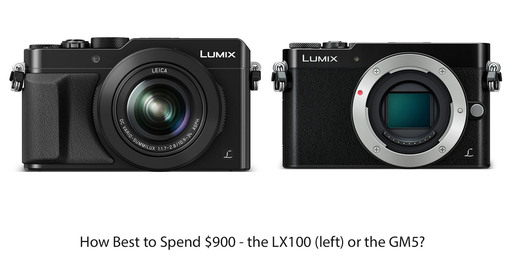
In one fell swoop, Panasonic managed to release two cameras simultaneously that drive me nuts: the Lumix LX100 and the Lumix GM5.

panasonic-tempting-duo.jpg

Both are compact and essentially the same price ($899). They ship with the same sensor size (Micro Four Thirds), and both feature built-in electronic viewfinders. After that, the two paths part widely.

The LX100 is a fixed lens camera, but what a lens it is: a 24-75mm Leica DC lens f/1.7-2.8. You could argue that the price for the LX100 is justified by the optic alone. And then there's the 4K video capture, which includes the ability to grab 3840 x 2160 resolution stills from the movie footage. Talk about fast burst mode.

The GM5, on the other hand, is a system camera that can accommodate my collection of Micro Four Thirds lenses. So I could switch from the 17mm f/1.8 with snap-focus to the 75mm f/1.8, depending on the situation at hand. And thanks to its "silent mode," the GM5 would be an outstanding street shooting camera. Add to this its Low Light AF, making it possible to focus on subjects in -4 EV conditions.

Thank goodness that PhotoPlus Expo is right around the corner. Maybe getting my hands on both of these cameras will help me decide. And if you have an opinion, please share it on our TDS Facebook page.


Nimble Photographer Logo

Both of these cameras have high Nimbleosity Ratings. What does that mean? You can learn about Nimbleosity and more by visiting TheNimblePhotographer.com.

transporter-versioning-update.jpg

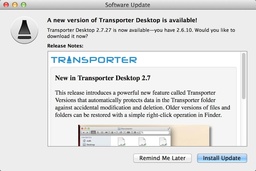
If you've set up personal cloud storage with a Transporter, then you should make sure you're running the Desktop 2.7 software that supports versions.

I decided to test this function with an image that was automatically backed up from my iPhone to my Transporter Sync ($99). I opened a color image, converted it to B&W in Photoshop, saved it, then looked to see if the original color version was still available on my Transporter.

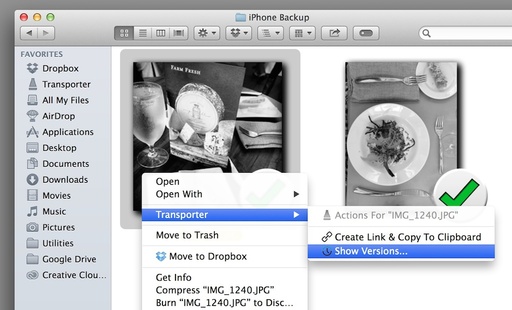
show-versions-transporter.jpg

Once the file had synced, I right-clicked on it on my Mac to reveal the Show Versions option. To my delight, the original color image was available.

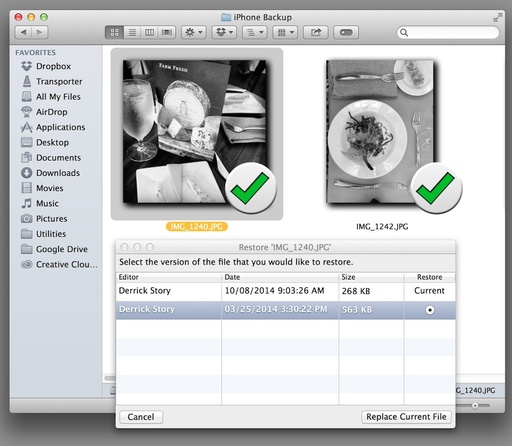
replace-current-file.jpg

I selected the color version and then Transporter "took my back in time" and made the original available. Interestingly enough, when I edited a photo in Preview instead of Photoshop, versioning did not work. So you'll need to test with your specific software.

Cool Little Workflow

For quick-turnaround publishing online, I can capture a photo with my iPhone, edit it in Photoshop on my Mac, and post on a blog, knowing that the original version is still available if I need to revert. Plus, every photo I take is automatically backed up to my own personal cloud. Pretty slick.

You can learn more about versioning with Desktop 2.7 by reading the article, How to revert or undelete a file on your Transporter.

Want to Comment on this Post?

You can share your thoughts at the TDS Facebook page, where I'll post this story for discussion.
This week on The Digital Story Photography Podcast: Free Surface Pro 3s at Adobe Max, PhotoPlus Expo Preview, Tethered Photography, 2015 TDS Photography Workshop Season - All of this and more on today's show with Derrick Story.

Story #1 - Adobe rolls out CC update with new desktop and mobile tools - Adobe has announced updates to several of its mobile and desktop software applications, just in time to kick off the company's Adobe Max conference. But Microsoft stole the spotlight giving out free Surface Pro 3s to the audience. What's going on here? I talk about it in the Weekly Update. (Source: DP Review).

In other news, Rent, love, keep: LensRentals launches try-before-you-buy program - Starting immediately, most of the lenses that LensRentals provides can be purchased outright if you decide you like them. (Only hard-to-source optics which the company couldn't easily replace in time for delivery to subsequent renters are excluded.) and better still, the rental fee you paid to try the lens in the first place can be put towards the cost of the lens, which will vary depending on the age of the individual item. (Source: Imaging-Resource.com).

And finally, Mark Your Calendars: The Next Blood Moon Will Take Place Wednesday, October 8th - For North American viewers, the lunar eclipse will begin shortly after midnight between October 7th and 8th; those in Australia and most of Eastern Asia will see it after sunset on the evening of October 8th. Unfortunately, those living in Europe and Africa will be missing out on this particular astronomical phenomenon. (Source: PetaPixel.com).

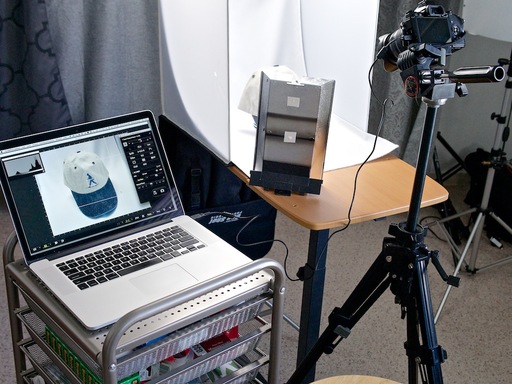
tethered-shoot.jpg

Story #2 - Tethered Photography - If you've never tried it, essentially you connect your camera to a computer, enabling you to fine tune the composition on a large HD screen instead of a tiny LCD. You can adjust settings, focus, and trip the shutter with controls on the laptop. The big advantage is that there are no surprises when it comes time to edit the photos. You can read more about tethered shooting here.

Story #3 - PhotoPlus Preview - One of the best US photography shows is right around the corner. PhotoPlus Expo at Javits Convention Center in New York opens its doors for conference sessions on Oct. 29, with the Expo kicking in the next day, Oct. 30th.

I'm going to be there, reporting for c't Digital Photography Magazine and speaking in their booth (#6 across from Epson and Nikon) on Thursday and Friday at 1pm, and Saturday at 12pm. Come by the booth for a visit, and I'll have a gift for you from Nimble Photographer Store. More about PhotoPlus in the third segment of today's show.

Story #4 - I've just announced the events for the 2015 TDS Workshop Season. Four enticing opportunities including stops in Bodie, San Francisco, and Sonoma County.

Virtual Camera Club News

Photo Assignment for October 2014 is "Water".

Order Your SizzlPix Early

Order your SizzlPix early to get holiday shopping out of the way. You'll give the double whammy of your own great image that has special meaning to your recipient, combined with the delightful surprise they'll have, seeing the back of the SizzlPix, wondering, "what the heck is this?", then lifting it out of the box, flipping it over, and there it is, a spectacular SizzlPix -- like Retina Display for the wall -- all ready with hanger attached!

Just a Couple More Things

If you haven't done so already, please post a review for The Digital Story Podcast in iTunes.

BTW: If you're ordering through B&H or Amazon, please click on the respective ad tile under the Products header in the box half way down the 2nd column on thedigitalstory.com. That helps support the site.

Download the Show

In addition to subscribing in iTunes, you can also download the podcast file here (31 minutes). You can support this podcast by purchasing the TDS iPhone App for only $2.99 from the Apple App Store.

More Ways to Participate

Want to share photos and talk with other members in our virtual camera club? Check out our Flickr Public Group. And from those images, I choose the TDS Member Photo of the Day.

Podcast Sponsors

Red River Paper -- Keep up with the world of inkjet printing, and win free paper, by liking Red River Paper on Facebook.

SizzlPix! - High resolution output for your photography. You've never seen your imagery look so good. SizzlPix.com. SizzlPix! now is qualified for PayPal "Bill Me Later," No payments, No interest for up to 6 months, which means, have your SizzlPix! now, and pay nothing until January!

Want to Comment on this Post?

You can share your thoughts at the TDS Facebook page, where I'll post this story for discussion.
covered-photo-bag.jpg

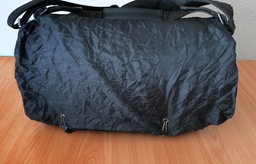
As we roll into Fall and Winter, it's a good idea to have a little extra protection for your camera bag. If yours doesn't include an All Weather cover, you can easily convert a Reusable Shopping Tote into an emergency rain cover.

I prefer the reusable totes to other solutions for a few reasons:

  • They look good. Yes, I could tie a plastic grocery bag over my gear, but that's not really the way I want to walk around the city.
  • chico-bag.jpg

  • They stuff into a compact pouch that's easily stored in my camera bag, or hook to the outside with a D-ring.
  • They're multifunctional. Yes, if I find myself in a store and need a good looking shopping bag, I have one.
  • They're affordable. I can buy a 4-pack for $20 and have spares for more photo gear or bigger shopping trips. (Or in the case of the one shown, a free give-away at a conference.)

I carry a few office clips (also handy for other uses) and stretch the reusable tote over the top of the camera bag, clipping it at the bottom on both sides. This protects the main compartment of the bag from the top, front, and back. I can attach it quickly, then stuff it back into its pouch when no longer needed.


Nimble Photographer Logo

The reusable tote has a high Nimbleosity Rating. What does that mean? You can learn about Nimbleosity and more by visiting TheNimblePhotographer.com.

Want to Comment on this Post?

You can share your thoughts at the TDS Facebook page, where I'll post this story for discussion.

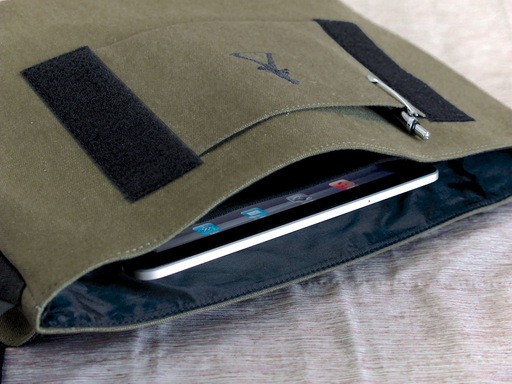
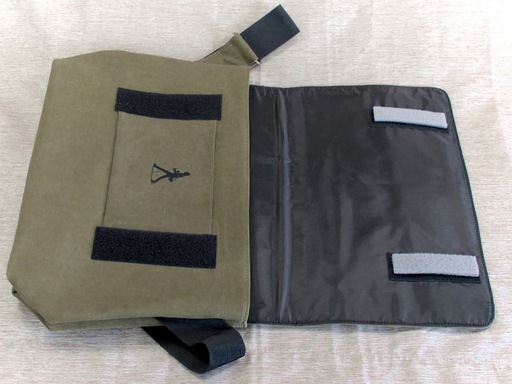
It feels like refined canvas, but wears better. The Nimble Messenger Bag is fully lined with a zippered flap pocket that accommodates an iPad mini and incidentals, as well as an interior pocket that can secure a full-size iPad. And if you want, you can also carry a sleeved 15" MacBook Pro inside.

iPad Pocket Inside the Nimble Messenger Bag The iPad pocket inside the Nimble Messenger Bag.

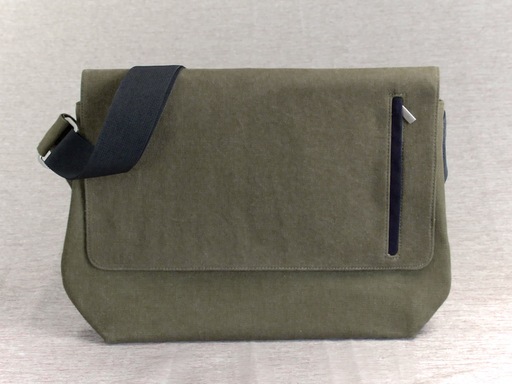
We've been working on a larger urban bag to complement the smaller Walking Man Shoulder Bag, and what we created was a refined, canvas-textured carrying solution that will make an impression at business meetings, but won't attract too much attention on urban streets.

Closed Nimble Messenger Bag Stylish design, yes. But the Nimble Messenger Bag won't attract too much attention outside the board room.

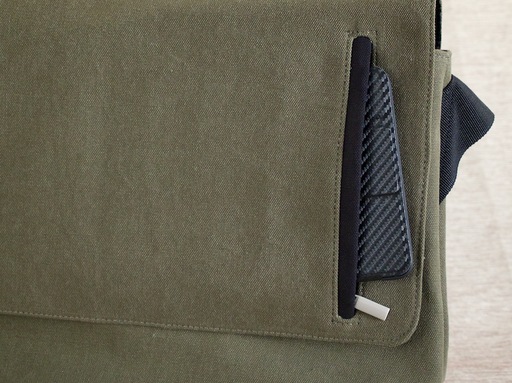
Included with the Nimble Messenger is a set of Whisper Strips. They allow you to control access to the interior of the bag. Put the Whisper Strips on the top flap, and you have perfectly silent operation - ideal for weddings and meetings. Apply the Whisper Strips to the Walking Man Pocket, and the bag is partially secured, making a bit of sound when opened. Remove the Whisper Strips all-together, and go for the full velcro-on-velcro experience with high security.

Whisper Strips on Top Flap of Bag Whisper Strips applied to the top flap of the bag for perfectly silent access.

During the testing phase, the Nimble Messenger Bag accompanied me on three business meetings. At each meeting, I received an unsolicited complement on the bag. I couldn't believe it.

iPad mini in flap pocket An iPad mini stashed in the flap pocket for quick access.

To learn more about the Nimble Messenger Bag ($69.95), visit the Nimble Photographer Store.


Nimble Photographer Logo

The Nimble Messenger Bag has a high Nimbleosity Rating. What does that mean? You can learn about Nimbleosity and more by visiting TheNimblePhotographer.com.

Want to Comment on this Post?

You can share your thoughts at the TDS Facebook page, where I'll post this story for discussion.
The 2015 TDS Photography Workshop Lineup features an Eastern Sierra adventure to Bodie silver mining town, street shooting in San Francisco, and Fall Color in Sonoma County.

bodie-eastern-sierra.jpg A new 3-day adventure workshop to the Eastern Sierra has been added to the 2015 schedule.

Plus, a software workshop will be offered in February for Aperture users who want to explore migration to the new Photos App or to Lightroom.

All of the events feature TDS hospitality: small groups of 8 or less, hands-on instruction, photography lab, class presentation, swag, food, and total immersion in your craft.

You can learn more about these events and place your name on the reserve list (putting you at the front of the line) by visiting the 2015 TDS Photography Workshop page.


Join me on my Instagram site as I explore the world of mobile photography. And now Instagram features 15-second movies too.

Schedule of Events for 2019

What an exciting 2019 is in store for us. We'll begin in the Spring with a high desert adventure in Joshua Tree National Monument. With a little luck, we'll be there for the wildflowers as well. Then, in July, we head west for the Sonoma Coast workshop where we'll explore long water exposures and interesting locations such as where Hitchcock filmed "The Birds." And finally, in September, we head north for the majestic Humboldt Redwoods and the picturesque Eel River. Each event a unique and satisfying photographic adventure.

Street-Photogs-1024.jpg San Francisco Workshop, Class of 2018.

Take a look at this overview. If you see something that you're interested in, jump over to our 2019 Workshops Signup Page and place a $100 deposit to secure your place. Only participants who place a deposit will be eligible to register for a workshop. If you have questions or need more information, fill out the "Send Me Info!" request form. I'll get back to you asap.

  • Joshua Tree National Park - March 13-15, 2019 SOLD OUT! - This will be our first workshop visit to Joshua Tree. This fascinating environment is perfect for landscape work by day and night photography once the sun sets. We'll also visit the Salton Sea to capture migratory birds and to explore this unusual body of water. During our lab sessions, there will be instruction on maximizing your results with Aurora HDR, Lightroom CC, and Luminar. Add a little aerial photography, and we're set for photographically satisfying adventure. Three days, $725
  • San Francisco Street Photography - April 26-28, 2019 CANCELLED! - We'll work entirely on location in San Francisco. We'll book a hotel in picturesque Union Square that will serve as our headquarters during the event. No rental car will be necessary. We'll explore the City's hidden treasures and capture them through our lenses. And we're adding new shooting locations again this year, including twilight assignments. This is San Francisco like you've never seen it before. And as a bonus, Olympus Visionary Mike Boening will be joining the teaching staff and leading sessions on street shooting and night photography. Two instructors, three days, small group, and all for just $725. (That's right, it's 3 full days in one of the most photogenic cities in the U.S.)
  • The Sonoma Coast Exploration - July 17-19, 2019 - Northern California's rugged coastline is the perfect setting to fine-tune our landscape and long-exposure water images. Plus, we'll visit a former Russian fort, movie locations, and interesting fishing villages. This workshop is the perfect escape from summer heat and humidity while adding hundreds of beautiful images to your photo library. During our lab sessions, there will be instruction on maximizing your results with Aurora HDR, Lightroom CC, and Luminar. If a workshop could be relaxing and stimulating all at the same time, this is it. 3 days - $725.
  • Humboldt Redwoods Photography Workshop - September 18-20, 2019 - There is magic in the forest. If you've never experienced the magnificent redwoods of Humboldt County, you are in for a treat. Every detail of this vibrant ecosystem presents a photographic opportunity. The fern-covered floor with Dogwoods and azaleas, the towering Redwoods, fallen logs across bubbling streams... so much to work with. Additionally, we'll explore the fascinating Eel River and its wildlife. During our lab sessions, there will be instruction on maximizing your results with Aurora HDR, Lightroom CC, and Luminar. This workshop will delight your eyes and satisfy your soul. 3 days - $725

To reserve your spot, visit the 2019 Workshops Signup Page and place a $100 deposit to secure your place. If you have questions about any of the events, use the handy Send Me Info on this page.

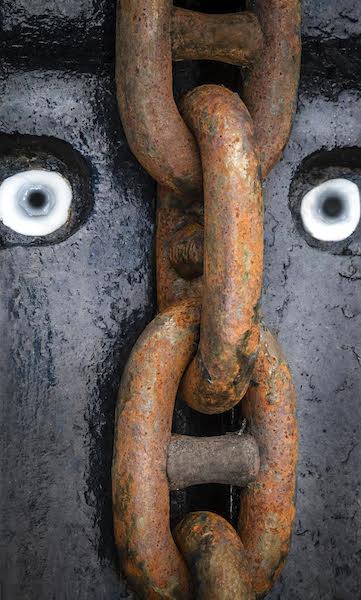
For the August 2014 Photo Assignment, TDS shooters got up close and personal with their subjects. See for yourself in our gallery, My Favorite Close Up. And which one will be the SizzlPix Pick of the Month?

gerry-legere-aug2014-pa.jpg

Photo by Gerry Legere. Gerry writes, "This is a ship anchor chain closeup." See all of the great images from this month's assignment by visiting the My Favorite Close Up.


Participate in This Month's Assignment

The October 2014 assignment is "Water." Details can be found on the Member Participation page. Deadline is October 31, 2014. No limit on image size submitted.

Please follow the instructions carefully for labeling the subject line of the email for your submission. It's easy to lose these in the pile of mail if not labeled correctly. For example, the subject line for this month's assignment should be: "Photo Assignment: Oct. 2014." Also, if you can, please don't strip out the metadata. And feel free to add any IPTC data you wish (These fields in particular: Caption, Credit, Copyright, Byline), I use that for the caption info.

Gallery posting is one month behind the deadline. So I'm posting August 2014 gallery at the end of September, the September gallery will be posted at the end of October, and on and on.

Good luck with your October assignment, and congratulations to all of the fine contributors for August.


Want to Comment on this Post?

You can share your thoughts at the TDS Facebook page, where I'll post this story for discussion.
Setting Up Your Locking Lens Safe

safe-closed.jpg

As we travel lighter, we're leaving more gear at home. Spare camera bodies and extra lenses that may not be needed for the work at hand, may be essential for next week's assignment. So it's not a bad idea to keep them safe... in a safe.
The plan is simple. Purchase a moderately priced, ample storage container, such as the Exacme Steel Digital Electronic Safe ($109), secure it in a cabinet, or to the floor or a shelf in a closet, and store your gear inside.

I like the Exacme model because it measures 20"x14"x12", has an easy-to-use electronic lock passcode, and includes an override key (just in case) plus bolting hardware.

I use old camera bags to organize my equipment inside the safe. One kit includes spare mirrorless gear, and the othe other is for DSLRs. When I'm preparing for a shoot, I open the safe, grab the lenses I need, lock up, and hit the road.

There are plenty of other safes on the market that also provide fire protection and more advanced locking systems. But the way I look at it, any safe is an improvement over having my lenses displayed on the office desk.

Want to Comment on this Post?

You can share your thoughts at the TDS Facebook page, where I'll post this story for discussion.