Recently in Audio

  Page 1 of 3 in Audio  

One of the best deals in audio right now are the Status Audio BT One Wireless On-Ear Headphones at $59 to $79, depending on where your purchase them. They are stylish, easy to use, and sound fantastic.

IMG_6823.jpeg

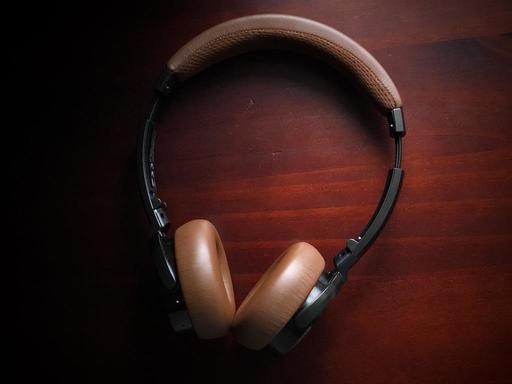
The over-the-ear design is great for those who don't always want to use earbuds, and the reward is longer battery life (up to 30 hours), better sound, especially compared to AirPods, cleaner mic, and excellent compatibility with all of your devices thanks to Bluetooth 5.0.

I'll start with the wireless capability because it's really impressive, noting the 25-meter range and multi-point pairing support (connect two phones, computers, or tablets at the same time). The BT One is compatible with virtually any smartphone, tablet, or computer. Support for the aptX codec makes listening on compatible devices (PC, MacBook, Android Devices, Personal Media Players Pixel) even clearer.

I connected the headphones to my iPhone X, iPad mini, and MacBook Pro without any difficulty. Pairing mode is enabled by holding down the + - volume buttons simultaneously. Once pairing is achieved, the BT One will appear in the Batteries display so you can monitor its (very long) charge capacity.

IMG_0167.jpeg 
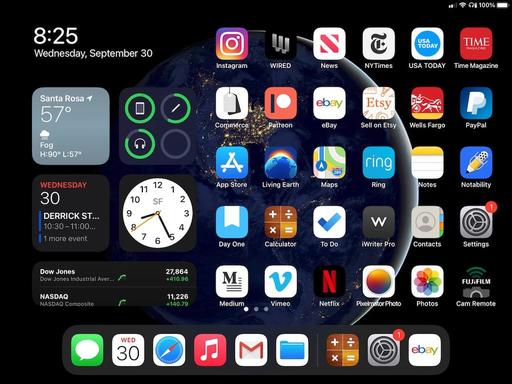
Once the headphones were paired with the iPad mini, they appeared in the Battery Widget along with readouts for the Apple Pencil and the iPad itself.

But the real beauty of the BT One is its sound - clear highs, good midtones, and bass that isn't muddy. Channel separation is excellent, and I was able to enjoy arrangements in a way that I hadn't experienced before with the AirPods.

It seems like the good audio combined with long battery life and excellent mic would also make the BT One headphones the preferred choice for long phone calls. No more running out of juice after 45 minutes of talking. And that part, the battery, is true. But in terms of audio quality, I have had reports of echo effect for the other person when I'm using the headphones. My audio sounded fine, but they reported unsatisfactory sound on their end. I haven't been able to track this down. But for the moment, it is an issue.

IMG_6826.jpeg

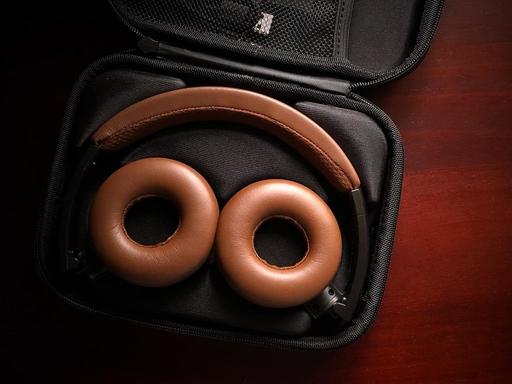
The Status Audio BT One Wireless On-Ear Headphones include a handsome carry case, USB-C charging cable, and a stereo cable to connect to devices without Bluetooth. The headphones are relatively compact and quite light. Ample padding ensures comfort for extended listening sessions. And when you really want to enjoy your music, they are an outstanding choice. If your primary goal is using them for phone calls, however, I would consider other options.

Pros - Easy connectivity, excellent sound, stylish design, carry case included, good value for the money. Cons - Fit is slightly tight, buttons are smallish and take a little practice for easy use, and mysterious echo reported occasionally for phone calls.

Update 10/02/2020 - I've exchanged emails with Status Audio Customer Support. They were quite responsive to the echo issue and provided me with some troubleshooting steps that I think would work for Android devices. But since I'm using an iPhone, none of the suggestions solved the problem.

Here's the final note from them: "Thanks for going through the troubleshooting process with me here; truly sorry about the echo issue on your BT One's again. The microphone sensitivity that we've programmed into the BT One headphones is consistent across all units. That said, I don't think a replacement unit is going to solve the problem. I'm not trying to disregard the issue you are experiencing. A small number of customers have experienced this same issue. So I'm happy to process a return if that's the direction you would like to go here. We are truly sorry again for this inconvenience. Please let me know how you would like to proceed."

I asked them to keep me posted if there were any new developments. In the meantime I've decided to keep the headphones. Aside from the phone call issue, I really like them. And my primary use is still listening to music.

How to Get Started with Vinyl Records

Take a hands-on journey with Derrick Story as he shows you how to set up a HiFi stereo system, add vinyl records to your music library, care for them, and finally, how to digitize the albums for personal listening.

Join him for the online course, How to Get Started with Vinyl Records.

Everything you need to know to get started with records, or to rekindle your love for vinyl LPs. Plus, you'll get 30-percent discount codes for digitizing software from Rogue Amoeba. The money you will save is more than you'll spend for the price of this training. What a great value!

Over the course of an hour, Derrick will show you:

  • All of the gear that you need to set up a HiFi system.
  • How to wire up and configure your kit.
  • Where to find records and what to look for.
  • How to take care of your vinyl so that it lasts a lifetime.
  • How to digitize your albums and add them to your digital music catalog.
  • Tips and tricks to enhance your enjoyment.

You can get started today by downloading this online course for $14.95. Included is the 1-hour video instruction movie with a PDF class notes that includes links to all of the hardware and software discussed in the training, plus the discount codes.

Discover the joy of vinyl music today!

Product Links and Comments

There are product links in this article that contain affiliate tags. In some cases, depending on the product, The Digital Story may receive compensation if you purchase a product via one of those links. There is no additional cost to you.

You can share your thoughts at the TDS Facebook page, where I'll post this story for discussion.

Even though there isn't a dedicated headphone port on the Fujifilm X100V, you can use its USB-C... that is, if you get the correct connector (more on that in a moment). Once you do so, the audio sounds great, and you have controls for the output volume.

headphones-1024.jpeg Sony headphones connected to the X100V via the USB-C port. Photos by Derrick Story.

The biggest challenge is finding an adapter that will work. I finally succeeded on the third try. And I learned a few things along the way. Take a look at the illustration below. Even though everything looks relatively similar, only one of those connectors will work with the camera.

P8054224.jpeg Three attempts at finding an adapter that will work. Fortunately, the third time was a charm.

The adapter that worked, and the only one that I recommend right now, is the Nylon Braided 2 in 1 USB C Type C to 3.5mm Headphone Audio Aux Jack & Charge Adapter Cable Converter for Motorola Moto Z, Letv Le Pro 3 and Other Mobile Phone That Without 3.5mm Audio Jack for $8.88. A close up view is shown below.

P8054222.jpeg This headphone adapter works with the Fujifilm X100V.

One of the problems with the other connectors that did not work was that they were digital. So, for example, if they work with the Google Pixel, Samsung Note, and Apple iPad Pro, they are probably useless with the X100V. On the other hand, this analog model that works with Moto phones sounds great! Plus, it has a second USB-C female port, that in theory, would allow you to charge the camera at the same time. I have not tested that function yet.

Once you get everything connected, go to MENU > MOVIE SETTING > AUDIO SETTING > HEADPHONES VOLUME and start at Level 7. You can adjust for taste from there. Using headphones in the field is critical for reviewing the audio of your recorded movies. With this configuration, you can hear the sound both live and during playback. That way, when you call it a day, you know that your video is good.

Product Links and Comments

There are product links in this article that contain affiliate tags. In some cases, depending on the product, The Digital Story may receive compensation if you purchase a product via one of those links. There is no additional cost to you.

You can share your thoughts at the TDS Facebook page, where I'll post this story for discussion.

There are certain features that I absolutely have to have in an everyday camera that's going to meet my photography and video needs. One of those requirements is a port to connect an external mic. Microphones are to audio what lenses are to photography. And you need to have your options available.

I use three different types of microphones for video work: general purpose condenser, lavalier, and shotgun. Like lenses, each has its own characteristics and excels in specific situations.

Condenser Mic

audio-technica-condenser-mic.jpg Audio-Technica Pro-24CM - Compact Stereo Condenser Mic for recording ambient sound and voice.

I use a condenser for general purpose work. Currently, I keep a Audio-Technica Pro-24CM compact stereo condenser ($99) in my backpack for capturing ambient sounds, music, and voice. This is not a device that I would mount on the camera for interviews. It works great when the mic is close to the mouth, but not from a distance.

When used properly, the audio quality is quite good. You can hear for yourself via an unedited sound check with the Pro-24 plugged into a Fujifilm X100V using an 3.5mm mini female to 2.5mm sub-mini male adapter. Here is a 4K video with audio sound check recorded with this gear. Footage is right out of the camera. No editing. The audio is quite decent. Note: My mic is an older model that shipped with a long cord. You may need an extender cable depending on what you have planned.

Pro Tip: When working with wired mics, wear dark clothing to make the line less visible. Check out the video to see how effective this can be.

Lavalier Mic

at-lav-mic.jpg Audio-Technica Consumer ATR3350XiS Omnidirectional Condenser Lavalier Mic for recording voice in noisy environments and when I need my hands free.

Lavalier mics are very handy when you need to talk in noisy environments. Just clip one to your shirt and go. Professional videographers typically use wireless models. These can get quite expensive, and there are more technical variables to deal with. I use a wired model for my more infrequent use. The cord is quite long, and I can usually tuck it out of the way so it isn't a distraction.

If you're using lavs for interviews, you'll need two. And you'll need to devise a system to run them both through the camera. One trick that is use for interviews is for me to stand off-camera with the handheld condenser mic and have the interviewee on-camera with the lav. This works well and is easy to setup.

Pro Tip: Run the wire from the lavalier inside the shirt and out the side or back obscured from view. Doing so will draw less attention to the mic itself.

Shotgun Mic

rode-shotgun.jpg Rode VideoMic Pro+ Camera-Mount Shotgun Mic for interviews and general recording when the mic needs to remain on the camera.

For me, shotgun mics are the most difficult to work with, but when you need one, you need one. They are particularly handy in "run 'n gun" situations when you might be talking to one person one moment, and another the next. For example, if I were recording candid interviews during a wedding reception, I would use the shotgun mounted on the camera.

They are called shotguns because they have a tighter pattern of sensitivity compared to omni-directional mics. So, wherever you point the shotgun, that will be its sweet spot for capture. And that's why they work so well atop cameras above the lens.

Under ideal circumstances, they can sound quite good. But videographers tend to push the envelope with them, and the audio quality can suffer a bit. I would recommend testing the mic in a comparable environment before use. Experiment with gain settings and distance to subject. Once you have a feel for the mic's sweet spot, you can attempt to stay within those parameters during the live shoot.

Pro Tip - A good accessory for shotguns is a fur windshield that allows you to capture cleaner audio in breezy conditions. Mics are very sensitive to air movement (right?), and one of these can really save the day for outdoor events.

Final Thoughts

All of these mic options are superior to using the onboard pickups in your camera. With an external mic, you're free to make camera adjustments without those sounds being recorded, and you can choose the best type of mic for the job at hand.

Product Links and Comments

There are product links in this article that contain affiliate tags. In some cases, depending on the product, The Digital Story may receive compensation if you purchase a product via one of those links. There is no additional cost to you.

You can share your thoughts at the TDS Facebook page, where I'll post this story for discussion.

This is The Digital Story Podcast #740, May 26, 2020. Today's theme is "5 Ways to Improve Your Videoconference Presence." I'm Derrick Story.

Opening Monologue

One way or another, you're going to find yourself sitting in front of a webcam. It could be for work, for family, for class or even for a job interview. But unlike a lot of other modern day situations we find ourselves in, no one has really told us how to do this. That is, until today. I hope you enjoy the show.

5 Ways to Improve Your Videoconference Presence

Needless to say, I've had some interesting online conversations over the last couple months. I have seen parts of people's houses that I really wasn't prepared for. And then, there's been the mix of interesting lighting and tin can audio.

videoconference-setup-1024.jpeg

So, I've decided to take the microphone by the horns and do two things for my contribution to the greater video conferencing world. First, I have some tips today that are easy to enable and that you can do right now. Then second, later this week, I'm releasing "The Essential Steps to Impressive Video Conferencing," a 1-hour movie that covers audio, video, and environment. I'll talk more about it later this show. But I'm going to mention now that it will be free to our Inner Circle Members who support this podcast on Patreon.

But for the moment, let's get to those 5 tips.

5 Tips

  • Get Thee to Ikea - Your conference call lighting should be diffused and from the front. A good rule of thumb is that the light shining on your face should be brighter than the background. Go to Ikea.com and search on diffused lighting. You have choices among a number of lamps that would make perfect light sources for your online persona. And if you have a north facing window, that will work as well. Just put it in front of you, not behind. And finally, think Daylight Balance for your bulbs. Tungsten bulbs will render you orange and fluorescent tubes will make you green. Whatever light source you ultimately settle on, try to get it as close to daylight balance as you can.
  • Darling You Look Marvelous! - Unfortunately, the built-in 720p webcam for many laptops and desktop isn't a flattering camera. Plus, you can't really adjust it. But, if you can get your hands on a a digital interface, such as Cam Link, then you can connect your wonderful mirrorless camera. The difference is striking. I'm using an Olympus PEN-F with 17mm f/1.8 lens. Oh, and don't forget to look into the lens when talking!
  • What the Hell Is that Behind You?! - We don't want to see your bed, your laundry, nor your aluminum recycling bin - too much information of the wrong kind. Just like in photography, the background is almost as important as the subject. Keep it clean and don't show us anything that we don't want to see.
  • Sound as Good as You Look - Audio can also be a challenge. Some built-in computer mics are quite decent, but others leave much to be desired. If you have a set of AirPods, those can improve your sound for both computer conferencing or while on the phone. For details on how to set them up, check out my article, How to Connect AirPods to Your Mac for Videoconferencing.
  • Bandwidth, Bandwidth, Bandwidth! - If you've been cheaping out on your Internet service, you an endangered of becoming the zebra at the back of the pack in the new world. Video conferencing relies on data packets flying back and forth in real time, and that requires at least 1.5 Mbps (Megabits per second for both directions (download and upload). You can check your bandwidth here.

You can watch a BTS video of me using my rig. I have a USB mic with the PEN-F. More to come on this topic in the next story.

The Essential Steps to Impressive Video Conferencing

If you want to learn more about looking and sounding great for your next online interaction, then I think you'll very much enjoy my latest online workshop, The Essential Steps to Impressive Video Conferencing.

This 1-hour deep dive focuses on the 3 major areas of successful online interaction: Audio, Video, and Environment. During the course, I walk you through a variety of techniques that range from simple using gear that you already have, to improving your chops through a few inexpensive purchases.

The course will be available free to our Inner Circle Members on Patreon on Sunday, May 31. Just go to our Patreon site, and all the information will be there. If you're not already an Inner Circle Member, you can join us for $5 a month.

I will also make the course available on June 2 at our Nimble Photographer Workshop Page for $14.95.

I have tons of great tips and techniques waiting for you there. If you want to get serious about how you come across during online meetings, classes, interviews, and family interactions, then you definitely will want to watch this course.

A Shout Out to Members Who Have Sent Film Cameras

It's been wonderful interacting with the recent contributors to TheFilmCameraShop. Here's a shout out to: Greg, Sergio, Bill, Tim, Nonnie, David, Paul, and Dave. All of you rock!

If you found a film camera that you're no longer using, our new Donation Kit makes it easy to pack and ship. Just visit the Contact Form on thenimblephotographer.com, click the box next to Donating a Film Camera, and let me know what you have. In your note, be sure to include your shipping address.

If it's a camera we can use for the shop, I'll send you a Donation Kit that includes a USPS Priority Mail shipping box and prepaid label. All you have to do is tape it up, insert the camera, and add the label. USPS will pick up your shipment from the front door of your house during their regular mail delivery. It's that simple!

Your donation help get analog gear in the hands of aspiring fine art photographers, and the proceeds help support this podcast.

Digitizing Family Memories Course Now Available Online

Each of the four classes will outline a specific set of steps for you to accomplish. By the end of the course, you will have an organized digital archive of your most valuable family images.

You can sign up for the course by visiting the Workshops page on The Nimble Photographer. The course fee is a reasonable $39 (on sale right now). It includes the 4 class videos, class notes, and access to the class forums that are a part of each movie.

Updates and Such

Inner Circle Members: A big thanks to those who support our podcast and our efforts!

Due to the coronavirus pandemic, we've had to postpone our July photography workshop at Lassen Volcanic Park. We so still have on the schedule, however, our Eastern Sierra event in October.

How to Watch Photos for macOS Catalina and iPadOS - Learn everything you need to know about Photos for the Mac and iPad by checking out my latest course on LinkedIn Learning and on lynda.com. This course is perfect for Mac and iPad based photographers who shoot with iPhone, Mirrorless, and DSLR cameras. It covers both photography and movies. And if I say so myself, it's a lot of fun.

B&H and Amazon tiles on www.thedigitalstory. If you click on them first, you're helping to support this podcast. (The Digital Story is supported by its audience. When you purchase through links on our site, we may earn an affiliate commission.) And speaking of supporting this show, and big thanks to our Patreon Inner Circle members:

Affiliate Links - The links to some products in this podcast contain an affiliate code that credits The Digital Story for any purchases made from B&H Photo and Amazon via that click-through. Depending on the purchase, we may receive some financial compensation.

And finally, be sure to visit our friends at Red River Paper for all of your inkjet supply needs.

See you next week!

More Ways to Participate

Want to share photos and talk with other members in our virtual camera club? Check out our Flickr Public Group. And from those images, I choose the TDS Member Photo of the Day.

Podcast Sponsors

Red River Paper - Keep up with the world of inkjet printing, and win free paper, by liking Red River Paper on Facebook.

The Nimbleosity Report

Do you want to keep up with the best content from The Digital Story and The Nimble Photographer? Sign up for The Nimbleosity Report, and receive highlights twice-a-month in a single page newsletter. Be a part of our community!

Want to Comment on this Post?

You can share your thoughts at the TDS Facebook page, where I'll post this story for discussion.

Apple's AirPods are handy for more than listening to your favorite podcast on your iPhone. They can be useful tools when connecting with others on your Mac via Zoom, Skype, and other video conferencing platforms.

airpods.jpg

When using your AirPods instead of the built-in mic on your computer, you can improve sound quality of your voice while at the same time providing more mobility for moving around. They can be particularly handy when you don't want to be constrained by headphone wires or don't want to mess with finding an audio interface for your computer to use a regular mic.

If this sounds appealing to you, here are some tips for configuring and getting the most from your AirPods.

Connecting to Your Mac

Start by putting the AirPods in your ears, then going to System Preferences > Bluetooth on your Mac. If you haven't done so already, check the box "Show Bluetooth in the menu bar." This will make things easier in everyday use.

Now click on the Bluetooth icon in the menu bar and tap on Connect for the AirPods. Your Mac should respond fairly quickly with the pairing. If there is a hangup, I would recommend going to the device that you last used the AirPods with, most likely your phone, and disconnecting from it. Then return to your Mac, and the pairing should go smoothly.

connect-airpods.jpeg Connecting AirPods to your Mac.

Once the pairing has been made, tap on the Option button and refer to the illustration below. Then click Done.

configure-airpods.jpeg Configure your AirPods like this.

You can test your configuration using a simple app such as Voice Memos that's included with your Mac. Then, before you use your AirPods on your next video conference call, be sure to check the settings for that platform to make sure they are the audio device being used. For example, here are the settings for Skype.

check-your-setting.jpg Checking the settings on Skype (or whatever platform that you are using).

Doubling Your Performance

One of the few downsides to using AirPods for video conferencing is their battery life. If you're on a particularly long call, you may hear the familiar battery warning beep. You can check the battery level by clicking on the Bluetooth icon in the menu bar.

But keep in mind that you only really need one AirPod at a time. So I recommend starting with one, using it for a while, then putting the other one in your other ear, remove the first AirPod and return it to the case for charging.

You can do this in realtime during the call without ever missing a beat. And unless you're working a telethon, you should have plenty of juice to complete the meeting, even a long one.

Once you're finished with the session, I would go back to the Bluetooth icon and Disconnect your AirPods from your Mac. This leaves them ready to connect to another device.

disconnect-airpods.jpeg Disconnecting your AirPods.

Final Thoughts

Wireless Bluetooth earbuds are incredibly handy devices for remote work and connecting with others online. They bypass the need for a separate audio interface, they are portable, and in most cases, they sound better than the built-in mic on you Mac.

Pair them up and take them for an online spin. I think you'll like what you hear.

There are product links in this article that contain affiliate tags. In some cases, depending on the product, The Digital Story may receive compensation if you purchase a product via one of those links. There is no additional cost to you.

You can share your thoughts at the TDS Facebook page, where I'll post this story for discussion.

Monster Y Splitter

Airplane entertainment systems are certainly welcome on long flights, but I like to watch my own selection of content too. For example, currently I'm hooked on Breaking Bad and am working my way through past seasons.

This is even more fun when shared with a travel partner. It's just like going to the movies: You can watch it together, then discuss the show over a cup of coffee afterwards.

For these occasions, I keep a Monster iSplitter 1000 Y-Splitter with Volume Control/Mute ($9.99) in my carry-on bag. With it, I can share music, TV shows, and movies with another. It even has separate volume controls.

The iPad is a terrific travel companion in many ways, and entertainment is definitely one of them. Sharing that content with another makes it even more fun.


Nimble Photographer Logo

This Monster Y Splitter has a high Nimbleosity Rating. What does that mean? You can learn about Nimbleosity and more by visiting TheNimblePhotographer.com.

When you want to take a break from taking pictures and texting friends with your iPhone, consider using it to control the iHome iD50 App-enhanced Bluetooth Dual Alarm Stereo Clock Radio. I've been testing one, and I don't think I've ever had this much fun with a clock radio before.

iHome iD50 Clock Radio

The truth is, I generally despise these devices. What I mean is, I like the idea of a clock radio. But the user interface is usually so awful that I give up trying to configure the unit after a few minutes. iHome solved this problem by creating the iHome Set app for iOS devices. Despite some user reviews on the App Store saying it doesn't work for their particular model (which I don't know since I haven't tested it with other versions), it works great with the iD50.

iHome Set Top Screen

You can use the app by docking the iPhone to the clock radio via the connector atop the unit. But it's far more fun to use Bluetooth for communication. Make sure Bluetooth is enabled on the iPhone, then hold down the "EQ/Pairing" button on top of the iD50. Choose "add new Bluetooth device" on your iPhone, and they should pair without incident. From this point on, you're in remote control mode.

If I want to listen to Internet radio, then all I have to do is launch Pandora, and choose "iHome iD50" from the share menu. I can stay in the same Bluetooth mode and play selections from my Music App. Radio functions are also easy to enable from the iOS Set App. And the best part is that the station presets are much more fun to set via the iPhone than on the device itself.

iHome Set Screen 2

Music isn't the only thing you can control. These functions are also available via iHome Set for the iD50:

  • Power On/Off
  • Mode (iPod, FM, AM, Bluetooth, AUX)
  • Radio Tuner (including setting and controlling up to 6 presets each for AM and FM)
  • Volume
  • Alarm 1 and Alarm 2
  • Snooze Duration
  • Nap Alarm
  • Sleep Timer
  • Treble, Bass, and SRS WOW
  • Clock Brightness
  • 24 Hour On/Off
  • Time Set
  • Calendar Set
  • Time Sync
  • Search for Updates

Sound Quality

Clearly the functionality and geek factor is outstanding with the iD50, but how does it sound? Well, iHome included Reson8 speaker chambers, SRS WOW digital processing, and treble and bass controls into the iD50. These are features that you usually don't see on a clock radio. And if you play it like you would your old Sony single speaker unit, you'll miss out. I pushed the treble up to 3 out of 5, bass to 4 out of 5, volume up to 80 percent with SRS WOW on, and the iD50 sounded pretty darn good. This is definitely a "play it loud" clock radio. At lower volume levels it sounds like many other portable units. So kick everyone out of the bedroom and crank it up.

Gotchas

As much as I like the Bluetooth connectivity, it can be finicky at times. I found the best solution is to turn off Bluetooth on the iPhone, then turn it back on. This seemed to solve the problem.

On top of the iD50 itself are a number of physical buttons that can be used to set alarms, choose station presets, etc. I recommend that you don't use most of them. The basic buttons are fine (power, volume, pairing), but for much else, use your iOS device, or that old clock radio feeling may return.

If you're connected via Bluetooth, the unit may beep a few times when you walk out of range. Others left behind in the area may wonder what's going on. You can prevent this by turning off Bluetooth on your iPhone before departing.

Also, since this is a geek-friendly unit, it would have been nice if iHome had made this an RDS-capable receiver so the artist and song title would display on the LCD for stations that are transmitting that information. Seems like a missed opportunity there.

Bottom Line

$169 is a lot to pay for a clock radio. But the iD50 is more than that. Practically speaking, it's a charger for the iPhone and iPad, an alarm clock, AM/FM radio, stereo player for your iTunes music, speaker phone... and it looks pretty good too. But in use, the iD50 feels like more than the sum of its parts. It's one device that can change a room. And the iPhone app certainly elevates this unit to geek toy level.

If it turns out to be a bit too much machine for the bedroom, possibly failing spousal approval, then take it to the office, or nearest man cave, close the door, and crank it up.

I like it.

More Audio on The Digital Story

Bongiovi DPS for iOS - Audio Magic

iHome iW1 Wireless AirPlay Speaker System Review

Review of the Rode VideoMic Pro Compact Shotgun Microphone

"Sound as Good as You Look" - Digital Photography Podcast 261


The Digital Story on Facebook -- discussion, outstanding images from the TDS community, and inside information. Join our celebration of great photography!


Bongiovi DPS for iOS - Audio Magic

Bongiovi DPS

I first learned about Bongiovi Digital Power Station when I reviewed the iHome iW1 AirPlay speaker system, which incorporates this technology. I loved how the real time audio remastering dramatically improved the output of the iW1 speakers. I then discovered that Bongiovi Acoustics is also offering an iOS App that I'm using for my iPhone 4S. It's simply called, Bongiovi DPS, and it is impressive.

You access your music by launching Bongiovi DPS instead of your Music app. By doing so, you're able to take advantage of the improved output that comes with the on-the-fly audio remastering. The interface is quite good, providing the usual shortcuts to artists, albums, playlists, etc. You don't have access to DRM music in your iTunes library, which is one of its limitations. I hit this wall with some of my older music.

But, the songs that are available sound amazing. You can configure your audio environment by choosing a profile for each type of output: headphones, speaker, line out, AirPlay, and Bluetooth. You have many free profiles available, and with a 99 cent in-app purchase, you can unlock more. Once you find the sound you like for your headphones or speakers, the app remembers the profile until you change it.

I'm using it for my JBL earbuds and small speaker systems. The clarity and dynamic range are noticeably improved. You can turn off and on the digital processing by tapping the blue "B" icon. Smart move by the engineers. What a difference.

With Bongiovi DPS on, I can listen to music at lower levels and enjoy it more. I'm hearing subtleties in songs that I've missed previously. Using the free iOS app has reenergized by passion for music on the go. I highly recommend trying it.


The Digital Story on Facebook -- discussion, outstanding images from the TDS community, and inside information. Join our celebration of great photography!


iHome iW1 with Remote Control

Music is important to me in the photography studio. Not only do I enjoy listening while working, it often helps my subjects relax or get inspired during a photo shoot. My audio system has to be hassle free, however. I'm already spending plenty time adjusting lighting and interacting with clients. I can't be fooling around with my sound system too.

When I read about the iHome iW1 AirPlay Stereo Speaker System,I thought it might be a good fit for the studio. It has enough sound to fill a room, it's portable thanks to a rechargeable battery, and it interacts well with my AirPlay music library.

Fits on a Bookshelf

The iW1 weighs 6 pounds and measures 317mm" W x 186mm" H x 94mm" D. It fits on most bookshelves and can be transported easily via its built-in handle. The rechargeable battery powers the unit for a full afternoon of music. The charging dock is easy to use -- you just set the iW1 on it, and charging begins.

iHome iW1 on  Bookshelf The iHome iW1 fits nicely on most bookshelves.

Inside the unit are twin 1" tweeters and 3" woofers. Controls are located on the top of the unit, with others in back. But the included remote control gives you access to just about everything you need so you don't have to fool with the unit itself. You can also connect devices directly using the dock connector for iPhones and iPods, or the mini-stereo input jack.

Great Companion for Old iPhone

I recently upgraded to the iPhone 4S. I still have my 16 GB iPhone 3GS. I cleaned everything off it but my music library, and now use the 3GS as a controller for the iHome iW1. The 3GS fits easily in my pocket while working, and the Apple Remote app provides excellent control of the iW1 output regardless of where I am in the studio.(This is one of the things I like about iPhones. They are still useful even after being replaced by a newer model.)

The iHome Connect App for the iPhone also makes set-up easy for the iW1. Just download the free app, connect the iPhone to the iW1 via the included dock connector cable, configure the unit, and disconnect the iPhone. You're now wireless.

Good Sound

The iHome iW1 incorporates the Bongiovi Acoustics Digital Power Station. According to iHome, this "real-time digital signal processing that extends audio bandwidth and adds missing harmonics without adding peak output to the signal. It effectively improves brightness, clarity and presence and delivers deeper, more resonant bass and crystal clear highs." The Bongiovi system is on by default. Leave it on. When turned off the output is flat and not appealing.

With the Bongiovi Acoustics system on, however, I like the output from the iW1. At medium sound levels I rate it as very good. If you crank it up all the way, you'll probably hear some distortion with the bass and the overall sound degrades a bit. This isn't a problem for me in the studio since I'm usually playing music at low to medium levels where the iW1 sounds terrific.

Final Word

At $299, iHome iW1 AirPlay Stereo Speaker System,is a hardware investment. Much of what you're paying for is the convenience of built-in WiFi, AirPlay compatibility, easy app configuration, and portability with the rechargeable battery and easy grip handle. The physical design is also appealing. It looks great in the studio or at home.

Discriminating ears might be disappointed with the sound when played at full volume. But for those who want a handsome, out of the box audio solution, with a good dose of technology fun, the iHome iW1 should be a satisfying investment.


Find great deals at the TDS Photography Store on Amazon.


The iHome iD9is a rechargeable speaker system for iOS devices including the iPad. Unlike the iHome iDM12 that I reviewed earlier, the iD9 requires direct connection via dock or mini stereo jack. Like the iDM12 however, this is a rechargeable device that's easy to take with you on the go.

iHome iD9

The iD9 is large enough to dock an iPad in the portrait position. The docking area is designed so that you can leave many of the "skinny" cases on and still use the iD9. Where this unit really shines, however, is its output.

iHome employs its SRS TruBass and Reson8 sound technology for rather impressive audio quality from a portable system. The speakers are positioned on the ends of the iHome, slightly angled toward the listener. I found that I could position the unit in various spots throughout the house to get just the type of sound I wanted. Audio wise, the iD9 is a very satisfying portable device.

When plugged into the wall, it also serves as a charger for your iOS device. The iD9 also works with the iHome+Sleep app for custom alarm settings, social alerts and more; and with iHome+Radio app for global internet radio.

While on the road, I still prefer the iHome iDM12 because of its very compact size and wireless connectivity. But around the house or studio, it's hard to beat the iD9 for beautiful output and stylish design.

You can learn more about the iHome iD9 at the iHome web site. It sells for $99 at Amazonand other retailers.


twitter.jpg Follow me on Twitter