Recent Tutorials

Black and White Portrait Tutorial

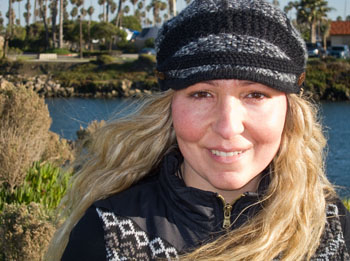
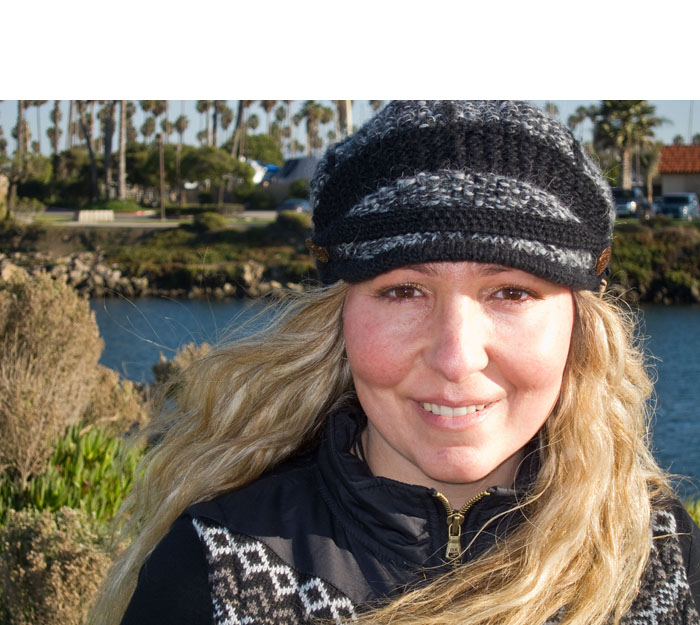
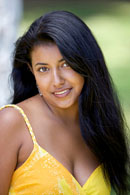
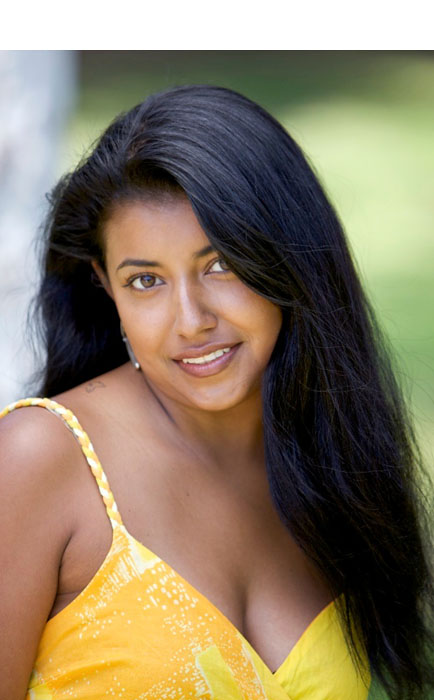
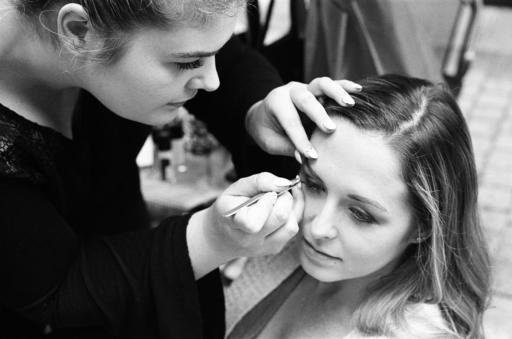
Black and white portraits seem to reveal the very essence of our subjects.

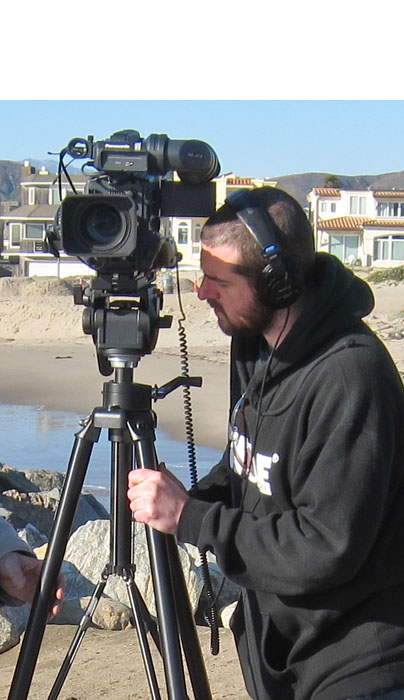
During capture, try to create, clean, uncluttered compositions. Let the subject and the tones carry the image. Strong lighting can add drama to the image. And even though you have more latitude with dark areas in B&W photography, you will still want to have some fill on the weak side, or be prepared to open up those dark areas a bit in post production.

TFP005-32220005-scan.jpeg

I prefer front lighting for women and side lighting with fill for men. But this is not a rule, just a personal preference. I recommend shooting in monochrome mode on your camera to help you visualize the tonality and composition. Capturing in RAW+Jpeg will give you both a monochrome and full color RAW file. So all of your options will be open.

Wide aperture settings with a 50mm - 135mm lens can give you more control of the depth of field and help flatten the subject's features just a bit. Of course, many great portraits have been captured with a 35mm lens at f/8. So it really depends on your style.

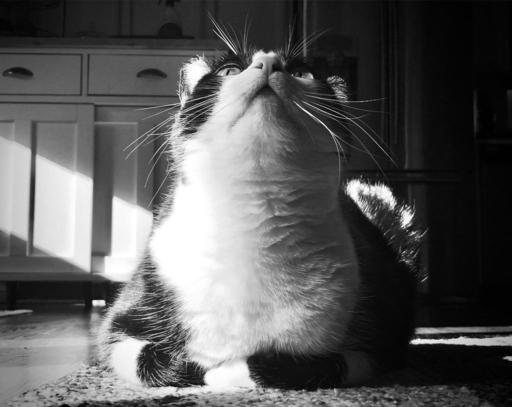
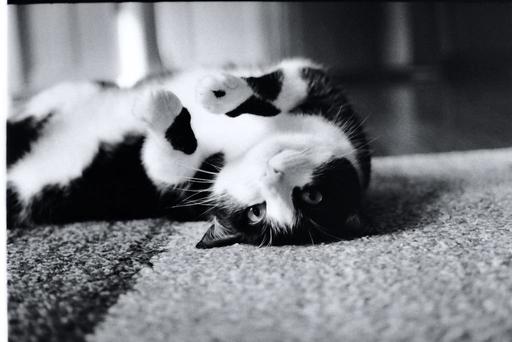
Pets make excellent portrait subjects as well. Their unique features often lend themselves well to Black & White photography. Plus, you can really push the tones since you don't have to worry about skin texture.

IMG_5977.jpeg

IMG00214.jpeg

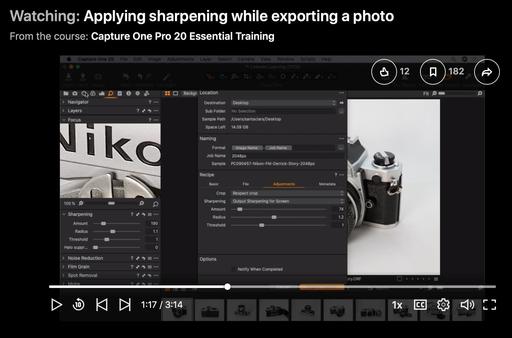
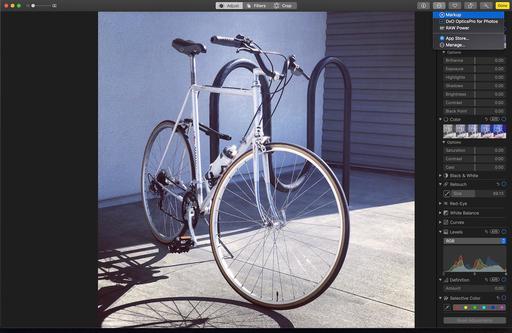
For post production, you can use the Black & White conversion tools in Photos for macOS, Lightroom, and Capture One Pro, if you want to start with a Raw file. If you're working with a monochrome Jpeg, just about anything will work.

Most of these Jpegs are still RGB files. So one cool trick for getting the tonal contrast you want is to play with the White Balance sliders for monochrome Jpegs. I know this doesn't make sense at first, but try it. This is a wonderful technique that works very well.

The Vignette tool is also helpful for B&W portraits. Move the sliders to the point where you first begin to notice the effect, then back them off just a bit. This gives you the benefit of a vignette without the tell-tale trace of one.

If you like to use brush tools, then sharpening the eyes while softening the skin and hair can be quite effective, depending on the composition.

3107_03A.jpeg

And finally, at both capture and during post, don't be afraid of a little drama. You can get away with much more in Black and White than in color. Highlights can be pushed to little or no detail, and blacks can go nearly solid if you wish. Experiment and have fun.

Photos by Derrick Story.

As photographers, much of our image publishing is via the Web, which usually means that we reduce the size of the original image before posting.

In Capture One Pro, as we simultaneously export and reduce size (sample down), we can also compensate for any loss of detail that happens as we prepare the file for publishing. In the export dialog box we can go to the Adjustments tab and set up Output Sharpening. Here's a look at that process.

Applying sharpening while exporting a photo from Capture One Pro 20 Essential Training by Derrick Story

I like that there are options for both screen and print. For example, if I know I'm going to print this image on matte paper, the output settings would be much different than those for gloss, or for a Web page for that matter.

If you're curious about how easy output sharpening can be in Capture One Pro, watch the movie at the top of this article. It's a solid introduction to this pro feature.

C1P-Output-Sharpening.jpg

It's from my latest online class, Capture One Pro 20 Essential Training on LinkedIn Learning, or, if you're a lynda.com subscriber, you can watch it there as well.

If you don't have Capture One Pro yet, you can download the 30-day free trial (Mac/Win). No credit card is required, and it's a fully functioning version.

Some applications have some form of output sharpening, but very few provide the control that's available to you in Capture One Pro.

You can share your thoughts at the TDS Facebook page, where I'll post this story for discussion.

I was curious to see if my iPad mini 5 could be useful in Sidecar mode when working with Photos for macOS Catalina. What I was looking for here is an out-of-the-box experience. I didn't want to buy additional software or learn how to become an illustrator. What I did want to see is if this new Catalina feature would be useful in my existing workflow.

The answer is a qualified "yes."

01-ENABLE-MARKUP.jpg Enabling Markup in the editing mode of Photos.

The positive qualification is for those who use Markup in Photos (which I love!). Beyond using the Retouch brush in editing mode, there isn't much to do yet in Photos when using your iPad as a tablet with the Apple Pencil. But if you go to Markup, everything changes for the better.

02-Enabling-the-iPad-from-within-Markup.jpg Enabling your Apple Pencil from within Markup.

And the cool thing is, it's super easy to do. First, you have to make sure that your hardware is Sidecar enabled. Basically that means you have an iPad that uses an Apple Pencil. (In my case, that's an iPad mini 5.) And you also need a Mac that's essentially 2016 or later. If you have any questions about compatibility, I recommend this "Sidecar" white paper from Apple for reference. Once you have your gear in order, just follow these steps.

  • Launch Photos for macOS Catalina on your Mac, open a picture and go to Edit mode.
  • Turn on your iPad and have your Apple Pencil ready.
  • On your Mac, in Edit mode, click on the Options button (3 dots in a circle) and choose Markup from the list.
  • In Markup on the Mac, look for the little tablet icon in the toolbar, and click on it. Your iPad should show up in the list.
  • Choose your iPad from the popup, and start using your Apple Pencil on the iPad to illustrate your picture.

It's that easy!

03-Choose-Pen-and-Color.jpg Once your Apple Pencil is enabled in Markup, choose the right tip and color, and start having fun.

If anything goes wrong, just refer to the "Sidecar" instructions to get your tablet up and running.

I've always liked Markup in Photos. It's so powerful and fun. But using it with an Apple Pencil and my iPad takes it to a whole new level. Give it a try.

And stay tuned for my upcoming training on LinkedIn Learning and lynda.com titled, Photos for macOS Catalina and iPadOS that shows you all the amazing things you can do with this new software. Hope to release this title in November. Stay tuned! In the meantime, you can watch Photos for macOS Mojave right now.

You can share your thoughts at the TDS Facebook page, where I'll post this story for discussion.

Creating Smart Albums in iPhoto '11

Smart folders are intelligent ways to pull together virtual collections of your images. The great thing is that smart folders are living creatures that continue to populate automatically as the images you add to your library meet the conditions you've set up.

Here's a short video on how to set up smart folders in your iPhoto library.


More Training Available

There are now two ways to learn and have more fun with iPhoto '11: my iPhoto '11 Essential Training ONLINE at Lynda.com, and the new iPhoto '11 Essential Training DVD that you can purchase from the Lynda.com Store for $49.95 US.


twitter.jpg Follow me on Twitter


Many photographers believe that they need an entire suitcase full of lights to create a professional looking portrait. In this video, I show you how to use one light, a stand, and an umbrella to capture a portrait that looks absolutely great.

This movie is from my Lynda.com training series, Off Camera Flash. By spending just an hour with this course, you can dramatically improve your indoor portrait photography, whether you're on location or in your own environment.


twitter.jpg Follow me on Twitter


The magnification loupe in Aperture is more versatile than you may realize. In this short video, I show you a few of its tricks.

This video tutorial is from my Aperture 3 Essential Training on Lynda.com. There are more than 8 hours of hands on training there. Go check it out!

More Aperture Tips and Techniques

To learn more about Aperture 3, check out my Aperture 3 Essential Training on Lynda.com. Also, take a look at our Aperture 3 Learning Center. Tons of free content about how to get the most out of Aperture.


twitter.jpg Follow me on Twitter

Working in full screen mode enables you to dedicate every pixel of display resolution to your photography. Aperture 3 includes many major improvements to this functionality, so many in fact, that you may not be taking full advantage of its capabilities.

In this free 5-minute video tutorial from my Aperture 3 Essential Training on Lynda.com, I show you how to quickly master full screen mode to work more efficiently, and, more enjoyable.

More Aperture Tips and Techniques

To learn more about Aperture 3, check out my Aperture 3 Essential Training on Lynda.com. Also, take a look at our Aperture 3 Focus Section. Tons of free content about how to get the most out of Aperture.


twitter.jpg Follow me on Twitter

There is a fast and easy way to add captions to your images in Aperture 3. And I show you how in this video tutorial that's also part of my Aperture 3 Essential Training on Lynda.com.

I think the best time to add captions is right after you upload the images. That way the information that accompanies the images is still fresh in your mind.

More Aperture Tips and Techniques

To learn more about Aperture 3, check out my Aperture 3 Essential Training on Lynda.com. Also, take a look at our Aperture 3 Focus Section. Tons of free content about how to get the most out of Aperture.


twitter.jpg Follow me on Twitter

Aperture 3 not only lets you integrate your still images and movies into professional looking presentations, it also allows you to export your work to a variety of video formats. In this video tutorial from my Aperture 3 Essential Training on Lynda.com, I show you how powerful slideshow authoring is in Aperture.

More Aperture Tips and Techniques

To learn more about Aperture 3, check out my Aperture 3 Essential Training on Lynda.com. Also, take a look at our Aperture 3 Focus Section. Tons of free content about how to get the most out of Aperture.


twitter.jpg Follow me on Twitter

One of the few times I once had to leave Aperture for Photoshop was to retouch portraits. Well, no more! Thanks to the new Skin Smoothing Quick Brush (along with the existing Retouch brush), I can take care of simple retouching right here in Aperture 3. And I show you how in this video tutorial that's also part of my Aperture 3 Essential Training on Lynda.com.

The big advantage to not having to roundtrip to Photoshop from Aperture is file size management. All of the adjustments you saw in the video are just kilobytes of metadata. If I were to roundtrip, then the file that comes back from Photoshop is many times bigger than the original Raw file we worked on.

More Aperture Tips and Techniques

To learn more about Aperture 3, check out my Aperture 3 Essential Training on Lynda.com. Also, take a look at our Aperture 3 Focus Section. Tons of free content about how to get the most out of Aperture.


twitter.jpg Follow me on Twitter


The new HDR Toning feature in Adobe Photoshop CS5 allows you to apply HDR-like tone mapping to a single image. This means you can go back through your picture library, open a shot in CS5, and start playing with HDR Toning. No more having to shoot a series of images to play with HDR!

Before and After with HDR Toning in Photoshop CS5

As cool as this technique can be, I think it's most effective as a layer to the image document instead of a standalone adjustment. But CS5 doesn't allow you to perform HDR toning to a layer. Fortunately, I learned a great workaround by watching this Chris Orwig video from his latest title, Photoshop and Bridge CS5 for Photographers New Features. The technique he recommends is to first duplicate your image in Photoshop (Image > Duplicate), then apply the HDR Toning to that picture. Once you have the effect you like, hold down the Shift key and drag the toned image on top of the original shot making it a layer. Now you have Opacity controls plus all of the other layer goodies giving you complete artistic freedom. He shows you how here:

I love the wild effects I can create with HDR Toning. And now, applying them as a layer allows me to revisit just about every image in my library.

More About Photoshop CS5

"Photoshop CS5" - Digital Photography Podcast 221


twitter.jpg Follow me on Twitter

-


The addition of Curves adjustment to Aperture 3 gives us powerful tonal and color correction. In this 9:00 minute video that's part of my Aperture 3 Essential Training on Lynda.com, I show you how to get started with Curves in Aperture 3.

More Aperture Tips and Techniques

To learn more about Aperture 3, check out my Aperture 3 Essential Training on Lynda.com. Also, take a look at our Aperture 3 Focus Section. Tons of free content about how to get the most out of Aperture.


twitter.jpg Follow me on Twitter


As we use more fast publishing tools, such as Eye-Fi, to quickly push images up to Flickr, there's a greater need to adjust them once they've been posted. In this video, from my training title Flickr Essential Training, I introduce you to Flickr's online editing tools.

If you haven't tried online editing, give it a whirl. You'll be surprised at how a few simple touch ups can jazz up your photos.

And if you want to see the quick intro to the Flickr Essential Training title on Lynda.com, here's me standing in front of the camera.

More Free Training Videos

Extend the Reach of Your Compact Camera's Zoom Lens

Compact Camera Scene Modes

Sunglasses Polarizer and other Compact Camera Tricks

Introducing and Analyzing Natural Light Portraits


twitter.jpg Follow me on Twitter

-


Compact camera zoom lenses often don't have the "reach" we'd like at the telephoto end. If you shoot at your camera's highest resolution, you can actually extend its reach without compromising quality. Here's how. This video is from my Lynda.com training titled, Getting Pro Results from a Compact Camera. You may also want to watch these free tutorials. More Free Photography Tutorials Compact Camera Scene Modes - A tour of the most important scene modes on a compact camera and how to use them. Sunglasses Polarizer - How to use your sunglasses as a polarizing filter for your compact camera.
twitter.jpg Follow me on Twitter -

Scene modes on your compact camera are useful shortcuts for dealing with difficult lighting conditions. In this free, 4-minute video tutorial from my Lynda.com title: Getting Pro Results from a Compact Camera, I show you the most important scene modes and how to use them.

If you haven't seen my course, Getting Pro Results from a Compact Camera , it's a combination of studio live action (as seen here), live action in the field showing actual shooting techniques, and screencasting where we review the results on a computer and discuss how the techniques worked. I think it's one of my most effective training titles. I hope you check it out.


twitter.jpg Follow me on Twitter

-


Canon T1i Video Edited in Aperture 3

When Apple enabled video trimming in Aperture 3, my guess is they wanted to enhance the Slideshow module. And that they did. You can now combine still images, video, and separate audio tracks to create beautiful productions.

After playing with this module for a few hours, however, my message to Apple is that I would prefer even more video functionality (yeah, I know). But quite honestly, the task I often have at hand is to shoot video, cut it, then upload to YouTube -- as quickly as possible. Incorporating still images and soundtracks are fun, but not the normal project.

This short movie, "Mission St., SF" was captured with a Canon T1i, then imported directly into Aperture 3 for production and export. Click through to YouTube for the HD version.

So if you have your hopes up that there's a mini Final Cut Pro inside of Aperture, you might want to lower your expectations. The video tools are extremely basic. What you can do, however, is useful.

  • Add and manage DSLR video clips in the Aperture library. And thanks to the improved Import dialog box, you can choose which types of files you want to upload.
  • Select the video clips you want to work with, then go to New > Slideshow where you can organize their sequence, add a soundtrack, add title slides, and choose some basic parameters for your presentation.
  • Trim video clips by double clicking on them. This is very important because the one thing that all videos need is editing.
  • Export your production using one of the 5 presets or custom export settings. I used the HD 720 preset for this short movie.

I know it seems odd to use the Slideshow module for your video editing. But I think that's due to Apple's original concept for video management in Aperture. I wouldn't be surprised if up the road we see a dedicated module for handling movies. In the meantime, however, this is a huge addition to Aperture 3. And it will make my life more efficient and productive.

More Aperture Tips and Techniques

To learn more about Aperture 3, check out my Aperture 3 Essential Training on Lynda.com. Also, take a look at our Aperture 3 Focus Section. Tons of free content about how to get the most out of Aperture.


twitter.jpg Follow me on Twitter


photo_box_tricks.png

Dig around in your dresser drawer, and chances are that you'll find old gift boxes that are too nice to throw away, but you're not exactly sure what to do with them either. Well, Stephanie can help. In her latest Creative Output video tutorial, she shows you, step by step, how to use your photographs to transform old gift boxes into functional works of art.

This is the first in a two-part series. In part 2 she'll show you how easy it is to make your own box.


twitter.jpg Follow me on Twitter

-


When I first started recording training titles with Lynda.com, everything was screencasting. I'd sit in a recording booth with a producer on the other side of the glass, and explain into a mic what I was demonstrating on the computer. The audio and screen capture would then be combined into a QuickTime movie and published.

I still do a lot of screencasting, but in 2009 we decided that many of my upcoming titles would benefit by including live action video too. As you can image, this adds a whole new level of complexity to the project. After some trial and error, our first success was the Natural Light Portraits Photo Assignment where I combined live action demonstration of photo technique with screencasts that analyzed the results. We followed this approach with two more photo assignments, that are also doing well.

This led to a more ambitious project that we're currently shooting in Ventura, CA. I can't release the title yet, but I can say that it involves getting stunning photos from cameras such as the Canon S90. This project combines live action in the studio and on location, plus screencasting in the booth. I have a few shots from the live action shoot outside that we recorded on Tuesday, and I thought you might like a sneak peek.

Generally, we work with a 4-person crew, which is highly efficient in movie making. Our filmmaker, Jacob Cunningham, shown here working the camera, directs the shoot in coordination with the producer, Samara Iodice. Along with me, we are the decision makers on the spot. And there are many decisions to be made. Jacob, by the way, also shoots documentaries, and is a local celebrity. We also have a lighting expert, Loren Hillebrand (holding the reflector in the top shot), and a grip, Andrew. Loren has years of filmmaking experience, and I've yet to encounter a lighting problem that he could not solve. This is the kind of experience you need when working with a small crew.

We script out my lines beforehand, then in the field I have to work from memory. This is a bit of a challenge, but we do it this way because we like having the takes complete. Yes, the editors are fantastic, but they already have a long list of things to do. Fixing one of my brain freezes isn't really time efficient in this scenario. So when I botch a take, we shoot it again until I get it right.

This is where my preparation is so important. I need to know the content cold. Because when you're standing in front of the camera, there are a dozen things racing through your mind. And if you don't know exactly what you're going to say, you won't nail the take. I usually take a couple weeks to prepare my content before heading to Ventura for the shoot.

Even with all of this planning, things never go the way you think. For example, at the last minute, our model backed out. So our producer, Samara, had to stand in and model in addition to her other duties. This image of her is one that I captured with the Canon S90 while discussing portraits.

These unplanned challenges always cause a chain reaction. In this case, Loren had to run the slate, then once we were rolling, go back, grab the reflector, and manage the lighting. It's a constant exercise in problem solving. This is part of the excitement, and it's also the reason why I'm dog tired by the time I return to the hotel room.

After the shooting is completed, all of the content is logged and handed over to the editors. These folks are great, and they improve the work we did in the field. Once the edited rushes have gone through testing, we finalize the footage and release the title into the Online Training Library for our viewers to use and learn from.

I'm hoping that the project we're working on this week will be released in early Feb. 2010. Once it's out, I'll have more anecdotes to share. But for now, I've got to head to the studio, because I have a full day of screencasting ahead of me.


twitter.jpg Follow me on Twitter

-


Tutorial for Creating Your Own 3D Images

3d_glasses.png

I just read a short, but informative tutorial titled, How to Create 3D Images, where Mark Evans encourages you to hang on to those 3D glasses you used at the movie theater. Why? Well, you can quickly create your own 3D pictures in Photoshop and put those wonky glasses to use. Take a peek... it's easy.


twitter.jpg Follow me on Twitter

-


Using only natural light for your portraits, you can produce absolutely stunning results. Or the pictures can be extremely unflattering. I have two videos, right here, that you can watch to help you prepare for this type of shoot.

The first movie is an introduction to my Natural Light Portrait Assignment on Lynda.com. Here I set up how this, and subsequent photo assignments, are structured.

Then in this second video, we go on the computer and analyze natural light for portraiture. Here I show you the difference between "good lighting" and "bad lighting," and the effects they have on your final images. This is a very instructional movie that I think you'll find useful.

These are the first two movies in the Natural Light Portrait Assignment. In the third movie, we go out into the field for the actual model shoot using a variety of techniques. Then, in the fourth video, I go back to the studio and analyze those images. Finally, I do the "call to action" where I encourage you to go shoot your own natural light portrait and share the results on our Flickr Natural Light Portrait public group page.

I have more photo assignments coming up. I'll keep you posted.


twitter.jpg Follow me on Twitter

-


As I described in a recent podcast, The Simple Photo Shoot, I love grabbing my camera, going to the park, and shooting portraits. You'd be surprised at how well these images can look if you apply a few easy techniques.

In my new Lynda.com training, Photo Assignment: Natural Light Portraits, I take you on a photo shoot with me (and a lovely model) to illustrate some of my favorite natural light techniques. Once the shoot is over, we go back to the computer to analyze our images. Some techniques work better than others, but you get to see them all.

Photo by Derrick Story for the Natural Light Training Video. Canon 5D Mark II and 70-200mm f/2.8 IS L lens.

natural_light_portriats.png

Then here's the part I'm really excited about. I'm facilitating a Flickr Public Group page dedicated to sharing all of our images and ideas connected to natural light portraiture. The page just went live yesterday, and already we have lots of great stuff to look at, think about, and possible incorporate into our own bag of tricks.

This is the first of many photo assignment trainings that I'm doing for Lynda. If you want an easy way to learn new techniques, practice them, then share with others, I highly recommend both the Lynda.com training, and the participation on the Flickr page.


twitter.jpg Follow me on Twitter

-


Face detection and recognition are two of the killer technologies incorporated into iPhoto '09. I've spent a lot of time working with these technologies, and I have some great resources to help you quickly become a power user.

faces_corkboard.jpg

7 tips for using Faces in iPhoto '09 provides a nice overview of how Faces works, then gives you a handful of power user techniques. This is a must-read for iPhoto '09 fans.

Back up iPhoto's Faces database tells you a bit about the Faces database in iPhoto '09, and how you can back it up to protect the work you've done.

iPhoto '09: 10 Things to Know About Faces is a 46-minute online training published by Lynda.com. The training is divided into 10 short QuickTime movies, two of which are absolutely free and you can watch right now. This is a terrific way to learn and master Faces technology in iPhoto '09.

"Face Recognition All Around You" - Digital Photography Podcast 169 -- In this podcast, I discuss face detection both on the capture side of the fence with digital cameras, and on the software side. I cover how this technology is being used, and some things to keep in mind if you decide to take advantage of it for your work.

More Articles About iPhoto '09

5 Semi Secret Editing Tips in iPhoto '09

"Faces and Places in iPhoto '09" - Digital Photography Podcast 166

Loss of Sharpness When Straightening in iPhoto '09

iPhoto '09 as Your Geotagging Tool?


twitter.jpg Follow me on Twitter

-


Technorati Tags: , , , , ,

lynda_aperture.png

Moving from iPhoto to Aperture can be a smooth transition. That is, if you make the right choices during the upgrade. In my Lynda.com training, iPhoto to Aperture: Going Pro, I show you in detail how to customize your Aperture environment for a successful "reloaction."

Think of this transition as you would moving into a new house. It's an opportunity to clear out junk, reorganize, and start fresh. Use these tips to get a clean start on your photography life.

  • Don't move everything from iPhoto to Aperture -- only your best stuff. Remember, you don't have to get rid of iPhoto. It can serve as your archive that is there whenever you need to look back into the past.
  • First, take some time to organize the images you want to move in iPhoto. Since Aperture can "see" iPhoto albums and import them intact, find your best work and put them in iPhoto albums.
  • Don't move your entire iPhoto library using the "Import > iPhoto Library" command. Aperture brings everything in, and you're just moving the mess from one application to another. Instead, click on the "Import" icon (down arrow), navigate to your iPhoto Library in your Pictures folder, then choose the iPhoto album you want to bring in. Aperture sees iPhoto albums and lets you import them.
  • Spend some time thinking about how you want to organize your new Aperture library. Learn about folders, projects, and albums.
  • Be patient. You can bring in a few iPhoto albums, play around with organizing them in Aperture, learn what works best for you, then bring in a few more albums.

As I mentioned at the top of this post, you can get more detail about all of these tips, and more, in iPhoto to Aperture: Going Pro. And if you're curious as to why you would want to consider the move in the first place, take a look at the free movie on the catalog page titled, "Ten Reasons to Move to Aperture."


twitter.jpg Follow me on Twitter

-


Technorati Tags: , , ,

OTLonly.gif

Facebook is a popular social network that many people use to share photos with friends and family. iPhoto shines at organizing and editing pictures. With its latest release, iPhoto '09, Apple built Facebook connectivity right into their consumer photography application. Now you can organize your images in iPhoto, then click a button and publish them on Facebook.

As you would imagine, there more to this partnership than initially meets the eye. In my latest Lynda.com title, iPhoto '09: 10 Things to Know About Facebook, I show you the 10 things you need to know to publish efficiently on Facebook with iPhoto. You'll learn:

  1. Connecting iPhoto with your Facebook account
  2. Making iPhoto Faces work with Facebook
  3. Choosing and uploading iPhoto images
  4. Learning more about Facebook photo albums
  5. Making image edits to Facebook pictures via iPhoto
  6. Making metadata changes to Facebook pictures via iPhoto
  7. Downloading Facebook changes to your iPhoto library
  8. Downloading existing Facebook photo albums to iPhoto
  9. Searching for photos on Facebook
  10. Things to be wary of on Facebook

You can learn more by visiting the iPhoto '09: 10 Things to Know About Facebook home page.


twitter.jpg Follow me on Twitter

-


Technorati Tags: , , , , ,

aperture_beyond_basics.jpg

Hot off the press with over 3 hours of tips and tricks, Aperture 1.5 Beyond the Basics is now available from lynda.com. I team up with Scott Bourne to cover Aperture workflow, importing images, using image previews, wrangling with metadata, output, and plenty of new features including edge sharpening, centered loupe, and referenced libraries.

Lynda has made a couple of the chapters available for free so you can see if they're your cup of tea. If you find them helpful, you can subscribe to the service for as little as $25 a month (for unlimited access to all titles), or you can purchase the Aperture title on DVD for $99.95.

We had a lot of fun recording Beyond the Basics, and I hope it proves helpful for all levels of Aperture users.

Technorati Tags: ,


Sponsor Note...

You're Not Ken Burns -- But FotoMagico slideshows are so good that people will believe that he helped you.