Recently in Video

  Page 2 of 5 in Video  

Creating Smart Albums in iPhoto '11

Smart folders are intelligent ways to pull together virtual collections of your images. The great thing is that smart folders are living creatures that continue to populate automatically as the images you add to your library meet the conditions you've set up.

Here's a short video on how to set up smart folders in your iPhoto library.


More Training Available

There are now two ways to learn and have more fun with iPhoto '11: my iPhoto '11 Essential Training ONLINE at Lynda.com, and the new iPhoto '11 Essential Training DVD that you can purchase from the Lynda.com Store for $49.95 US.


twitter.jpg Follow me on Twitter


If you've just bought a Mac or upgraded iLife, and are ready to master the new features in iPhoto '11, then I think you'll enjoy iPhoto '11 Essential Training on Lynda.com. Here's a short introduction.

There's more than four hours of training presented in a series of short movies that you can watch as many times as you want until you feel comfortable with each particular technique. It's truly learning at your own pace. Even if you've never used Lynda.com before, there are three free movies that you can view right now: Working in Full Screen Mode, Hiding Photos, and Creating Smart Albums.

Your source for software training.

I receive lots of mail about how much people like learning software via my titles on Lynda.com. If you're ready to dig into iPhoto, or want to give a loved one the gift of knowledge, then take a look at iPhoto '11 Essential Training.


twitter.jpg Follow me on Twitter


Many photographers believe that they need an entire suitcase full of lights to create a professional looking portrait. In this video, I show you how to use one light, a stand, and an umbrella to capture a portrait that looks absolutely great.

This movie is from my Lynda.com training series, Off Camera Flash. By spending just an hour with this course, you can dramatically improve your indoor portrait photography, whether you're on location or in your own environment.


twitter.jpg Follow me on Twitter


Once you move the flash off the camera, you might want to soften the quality of its output. Here's a brief tour of light modifiers to consider for your off camera flash work.

This movie is from my Lynda.com training series, Off Camera Flash. By spending just an hour with this course, you can dramatically improve your indoor portrait photography, whether you're on location or in your own environment.


twitter.jpg Follow me on Twitter


As part of a movie project I'm working on called "Home Brew," I wanted to do a little test shooting to get a feel for the environment. So I took my portable Olympus PEN E-PL1 rig on location to record the making of a batch of home-brew beer. I had to work fast, stay out of the way, yet capture some good footage. Here's a short trailer that features the home brewing of an Imperial IPA.

This super-light recording rig features an Olympus E-PL1, 14-150mm zoom, mic adapter with stereo mic taped to the bracket, and a Litepanels micro LED light for fill. If you want to know more about this set-up, tune in to the podcast, Lights, Camera, Audio: 2.8 lbs of HD Recording Power.


twitter.jpg Follow me on Twitter

The Heads Up Displays, often referred to as the HUDs, are some of the application's most distinctive features. By taking just a few minutes to learn their essential keystrokes and capabilities, you can speed up your workflow considerably.

In this 2:34 movie, I cover the Inspector, Keywords, and Lift and Stamp Heads Up Displays.


More Aperture Tips and Techniques

To learn more about Aperture 3, check out my Aperture 3 Essential Training on Lynda.com. Also, take a look at our Aperture 3 Learning Center. Tons of free content about how to get the most out of Aperture.


twitter.jpg Follow me on Twitter


Essential gear for photographers is lighter and more powerful than ever. But how light can you go and still have everything you need? How does 5.5 pounds sound? Yes, that's total weight that includes camera, computer (with full keyboard), tripod, bag, extra battery, extra memory, glasses, cables, iPod, and a few personal items. All of this for less than 6 pounds.

nimble_photographer_still.jpg

With this set up, I can shoot Raw+Jpeg, transfer photos from camera to computer, upload them to my website, answer email, write notes, edit my pictures, and just about any other task I need. I can use a local WiFi network or tap a cellular connection.

In this week's podcast, I list every item in my Nimble Photographer kit. Plus I include links to these items here in the show notes. You can certainly substitute items as needed, but this lineup will get you headed in the right direction.

Listen to the Podcast

Watch the Movie

In this video, I show you all of the gear that I use for the Nimble Photographer kit.

Parts List for Nimble Photographer

You can also download the podcast here (33 minutes). Or better yet, subscribe to the podcast in iTunes. You can support this podcast by purchasing the TDS iPhone App from the Apple App Store.

Monthly Photo Assignment

Fire is the May 2010 Photo Assignment. You can read more about how to submit on our Member Participation page. Deadline for entry is May 31, 2010.

Simone Brogini was the "Sizzlpix Pick of the Month" for Photo Assignment 49. The prize is an 11"x14" Sizzlpix of the winning photograph. Congratulations Simone! (BTW: it's pronounced "Si Mon Ne" regardless of how badly I pronounce it on the show.)

More Ways to Participate

Want to share photos and talk with other members in our virtual camera club? Check out our Flickr Public Group. It's a blast!


twitter.jpg Follow me on Twitter

-


Podcast Sponsors

Red River Paper -- Try the $7.99 Sample Kit.

Make Your Photos Sizzle with Color! -- SizzlPix is like High Definition TV for your photography.


Technorati Tags: , , , , ,

The magnification loupe in Aperture is more versatile than you may realize. In this short video, I show you a few of its tricks.

This video tutorial is from my Aperture 3 Essential Training on Lynda.com. There are more than 8 hours of hands on training there. Go check it out!

More Aperture Tips and Techniques

To learn more about Aperture 3, check out my Aperture 3 Essential Training on Lynda.com. Also, take a look at our Aperture 3 Learning Center. Tons of free content about how to get the most out of Aperture.


twitter.jpg Follow me on Twitter

Aperture 3 not only lets you integrate your still images and movies into professional looking presentations, it also allows you to export your work to a variety of video formats. In this video tutorial from my Aperture 3 Essential Training on Lynda.com, I show you how powerful slideshow authoring is in Aperture.

More Aperture Tips and Techniques

To learn more about Aperture 3, check out my Aperture 3 Essential Training on Lynda.com. Also, take a look at our Aperture 3 Focus Section. Tons of free content about how to get the most out of Aperture.


twitter.jpg Follow me on Twitter

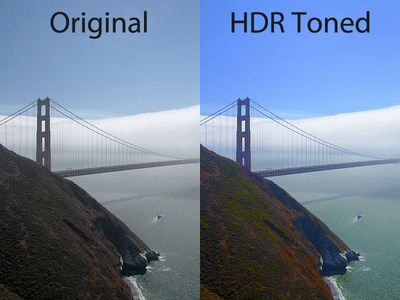
The new HDR Toning feature in Adobe Photoshop CS5 allows you to apply HDR-like tone mapping to a single image. This means you can go back through your picture library, open a shot in CS5, and start playing with HDR Toning. No more having to shoot a series of images to play with HDR!

Before and After with HDR Toning in Photoshop CS5

As cool as this technique can be, I think it's most effective as a layer to the image document instead of a standalone adjustment. But CS5 doesn't allow you to perform HDR toning to a layer. Fortunately, I learned a great workaround by watching this Chris Orwig video from his latest title, Photoshop and Bridge CS5 for Photographers New Features. The technique he recommends is to first duplicate your image in Photoshop (Image > Duplicate), then apply the HDR Toning to that picture. Once you have the effect you like, hold down the Shift key and drag the toned image on top of the original shot making it a layer. Now you have Opacity controls plus all of the other layer goodies giving you complete artistic freedom. He shows you how here:

I love the wild effects I can create with HDR Toning. And now, applying them as a layer allows me to revisit just about every image in my library.

More About Photoshop CS5

"Photoshop CS5" - Digital Photography Podcast 221


twitter.jpg Follow me on Twitter

-