One of the problems with sharpening in Adobe Camera Raw and Lightroom could be that you're not controlling what gets sharpened and what doesn't. For example, you may want to sharpen the buildings in a scene, but not the sky above them. Sharpening sky is a waste of time that only increases image noise. Same for portraits, you want to sharpen the eyelashes but not the skin pores.
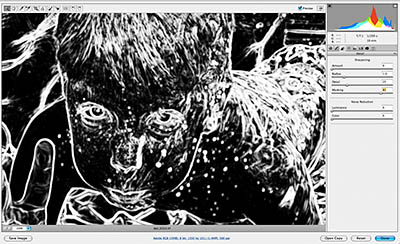
You may have more control than you realize if you use this simple technique in either Adobe Camera Raw or Lightroom. Display your photo at 100 percent (this technique won't work unless you're working at full view). Go to the Sharpen menu. Hold down the Option or Alt key (Mac or Windows) and click on the Masking slider. You be treated with an instant edges mask that shows you exactly what will be sharpened. The white areas will be affected and the black areas will be left untouched. Move the slider to the right until you have a mask that works for your photo.
Now all you have to do is set the Radius (usually 1.0 or less), then slide the Amount until you have the sharpening you want.
This provides you excellent control and will improve your sharpening greatly.
Technorati Tags: Adobe Camera Raw, Adobe Lightroom, digital photography, Technology, The Digital Story, tips


