Most folks who follow Skylum have known that Luminar 4 has been in the works for some time. We've seen teasers for the new AI-powered tools and probably even seen posts about pre-order offers.
But only when you download the real thing and begin to work on a picture do you realize that this is a much different animal. And depending on how you felt about Luminar 3 (personally, I liked it a lot), will color your opinion about version 4, especially in Edit mode.
Redesign of the Editing Side Panel
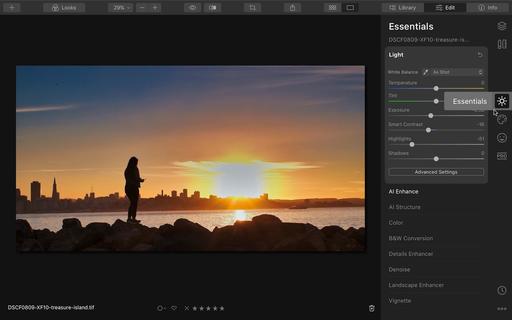 Edit Mode in Luminar 4. Photo by Derrick Story.
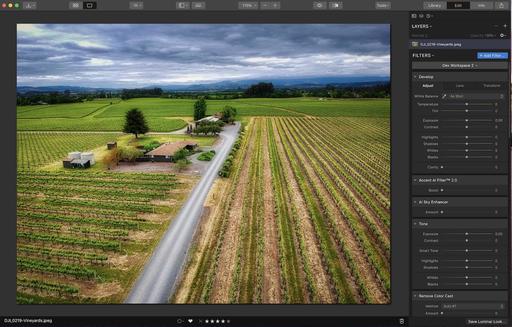 Editing Mode in Luminar 3.4.1, which is compatible with macOS Catalina. Photo by Derrick Story.
Other than the addition of new adjustment sliders that Skylum calls Filters, the redesigned Editing Side Panel is the thing that really jumps out at you. All of the Filters are now permanently seated within 5 categories: Essentials, Creative, Portrait, Pro, and Legacy.
When I write "permanently seated," I'm not kidding. You will need to memorize where your favorite filters are in order to keep a smooth workflow. For example, one of my favorite filters is the Orton Effect. I use it for many different types of images. It's now located in the Portrait category. I can't move it to Essentials or Pro, and I can't create my own workspace with just the filters that I like. (Workspaces are gone, BTW.)
Newcomers to Luminar probably won't give this much thought. But those who have been using it regularly are in for an adjustment. I'll be curious to see what the reaction is from existing users. Generally speaking, software companies want to avoid radical UI changes from version to version. Just ask Adobe about that.
The Tools (Crop, Erase, Clone) have been moved from the top Editing Toolbar to the Editing Side Panel. This makes sense to me, and I like the placement of each in the Sidebar. All of the major editing functions are now in one location. A simplified Crop button does still reside in the top Toolbar, but I'm guessing that Skylum did that so you could access it in Library mode as well.
Interesting New AI Filters
AI SKY REPLACEMENT
Whether or not you're a fan of artificial intelligence for image editing, some of these new filters are worth experimenting with just to see what can be done these days. A good place to start is with the AI Sky Replacement filter found in the Creative category.
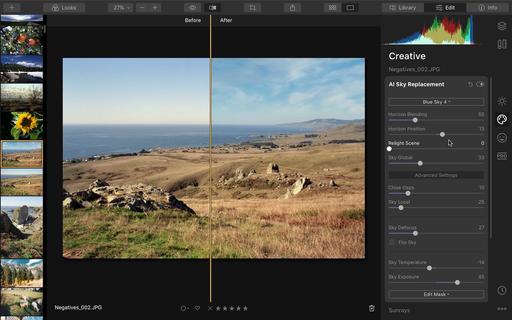 AI Sky Replacement Filter - The original sky is on the left and the AI new sky is on the right. Photo by Derrick Story.
This filter couldn't be easier to use. And that's saying something for how powerful it is. Open an image with a bland sky, go to the creative category and click on the AL Sky Replacement title. The panel will open to a "sky selection" menu and a handful of sliders. I recommend clicking on Advanced Settings to reveal even more sliders. They're all useful.
You can choose from the abundance of sky images that are preloaded in the app, or you can point Luminar to your own sky shots. (This might be a good reason to start collecting more of those as opportunities present themselves.) Once you make your selection, Luminar knows where to put it. You can then play with the various sliders to get the enhancement exactly the way you want.
One word of caution: make sure the direction of lighting in the sky matches the lighting on the ground. There are a lot of sharp-eyed photographers out there who will call out a mismatch. Avoid that, and you can have a lot of fun with this creative filter.
AI STRUCTURE
This is potentially a very useful filter because you can not only increase the structure in an image, but you can decrease it as well.
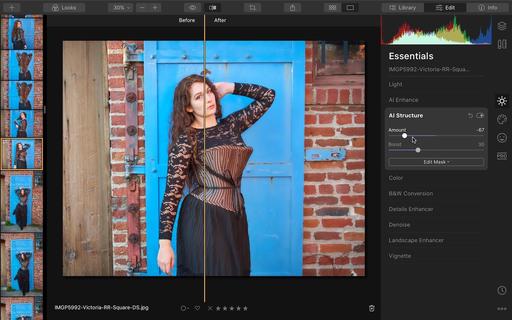 AI Stucture is found in the Essentials category. Photo by Derrick Story.
A natural use is for portraits because the artificial intelligence helps protect skin detail while giving you the ability to enhance the environment. In my testing, the skin tones were protected when you increased structure. But if you decreased structure, the skin tones were softened as well.
I think I'm fine with this programming decision. But I think it would be best if the skin were not affected at all, and let the photographer address that with the other tools in the app. That being said, it's a very useful adjustment, especially if applied with restraint. I like it a lot.
New Portrait Tools
A common request from Luminar users was for better portrait adjustment tools. Luminar 4 should check that box. It contains an entire panel of interesting stuff for our people pictures.
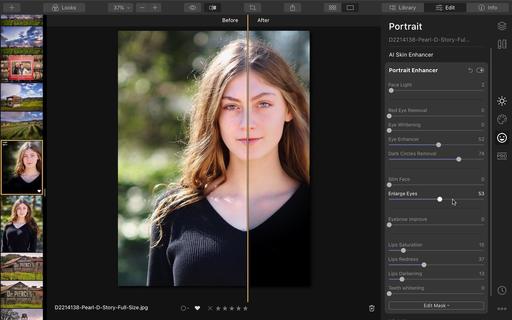 The Portrait Enhancer panel contains a dozen tools for adjusting your people shots. Photo by Derrick Story.
The Portrait category leads off with AI Skin enhancer that does precisely what you would expect. Move a slider and the skin looks better. Check the box next to AI Skin Defects Removal (I may have selected a different name for this), and blemishes are whisked away as well.
Next in line is Portrait Enhancer. Here you have a collection of a dozen sliders that range from enhancing eyes, to adding more color to lips, to brightening teeth. Everything worked as advertised. Again, I advise showing restraint, however.
And finally, there's High Key and Orton Effect, which aren't new, but now reside here.
The Library and Stuff
With all the changes in Luminar 4, I was surprised to see that the Library was virtually untouched.
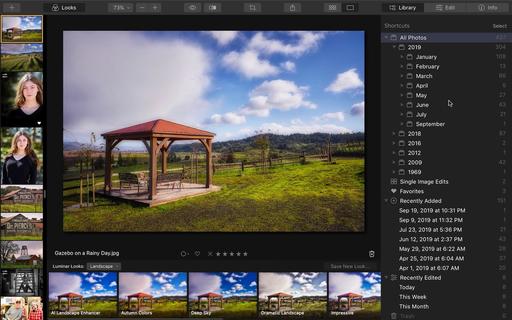 The Library view in Luminar 4. Photo by Derrick Story.
The Skylum team seems to be placing all their bets on the AI technology for image adjustment and hoping the existing library doesn't get in the way. Since many Lightroom and Photos for macOS photographers use Luminar as a plugin/editing extension (where there library is a non-issue), then focusing on AI-powered tools seems like a good call.
However, if Luminar wants to gain ground as a standalone photo management/enhancement application, Skylum at some point will have to improve the functionality of the Library.
On a positive note (that I believe is related to this), Luminar 4 still supplies plugins for Photoshop, Lightroom, and Aperture, and an Editing Extension for Photos for macOS. That's a great call! I'm not sure what this means for the future of Luminar Flex, however.
Performance
On my 2014 MacBook Pro running Mojave, Luminar 4 had reasonable performance. In Preferences, I set aside 10 GB for caching, and I allowed Luminar to tap the graphics processor (a new preference option). There were some hiccups, but for the most part, the application was steady. It also ran well on my 2017 iMac.
There's still room for improvement on the performance front. But I feel like Luminar 4 is going in the right direction.
Side Notes
One of my favorite filters, Image Radiance, is no longer available. However, the Mystical Filter, in the Creative Group, feels a lot like Image Radiance. Golden Hour, Denoise, and the Adjustable Gradient filters have all been reworked and improved.
After I upgraded my Luminar 3 library to Luminar 4, I was able to open it again in Luminar 3. Not surprisingly, the edits I made in Luminar 4 weren't visible in Luminar 3, but all of the images were there.
Bottom Line
Photographers new to Luminar will most likely be impressed with its cornucopia of intelligent adjustments and its ease of use. And for a relatively modest investment of $89 for first-time customers, it's a good value.
Those who like Luminar 3, either as a standalone app or a plugin, might want to keep an open mind when considering investing $69 for an upgrade to Luminar 4. On one hand, some of the new tools such as AI Sky Replacement and AI Structure could be worth the price of the upgrade alone. On the other, however, those fundamental changes to the editing interface might be frustrating, while the Library module received no love at all.
The good news is, there's a 7-day trial version available, so you can decide for yourself.
There are product links in this article that contain affiliate tags for Skylum products. The Digital Story may receive compensation if you purchase a product via one of those links. There is no additional cost to you.
You can share your thoughts at the TDS Facebook page, where I'll post this story for discussion.


