Very few of my cameras have built-in geotagging. And the ones that do, are sometimes inconsistent in their application of the data.
The good news is that it's easy enough to apply location information in post production with Aperture. It's not a regular part of my workflow. But for certain shots, such as this image of the Transamerica Pyramid in San Francisco, I like to do it.
Since I've added the GPS data, file sharing apps like Flickr with display it. Photo by Derrick Story.
The steps in Aperture are easy.
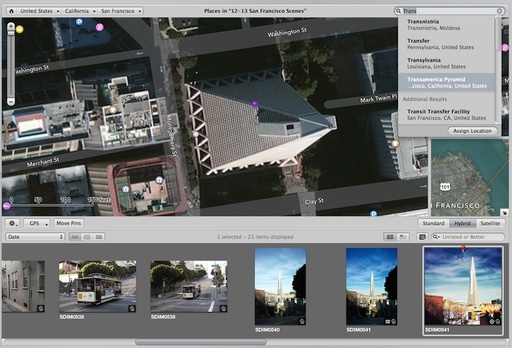
- After you've finished editing the image, go to View > Places.
- In the "Search the Map" box in the upper right, begin typing the location. Aperture will provide you with location options based on what you enter.
- Click on the best option to choose it, then click on the Assign Location button. A red pin will be added to your photo to indicate that it's been geotagged.
- Go to Preferences > Export and make sure that the box next to "Include location info in exported photos" is checked.
- Close Preferences and export your photo.
 Adding location data using Places in Aperture 3.
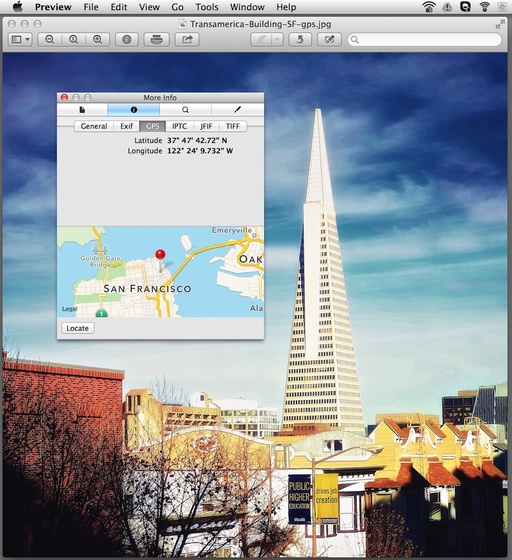
After you've exported your image from Aperture, you can check your work by opening it in Preview. Go to Tools > Show Inspector. Click on the "i" tab, and you should see a GPS option. Click on it. The location information will be displayed.
You have now successfully geotagged your image. When it's shared on Flickr and elsewhere, viewers can see exactly where the subject is located. They might want to go there themselves.
Aperture Tips and Techniques
To learn more about Aperture, check out my Aperture 3.3 Essential Training (2012) on lynda.com. Also, take a look at our Aperture 3 Learning Center. Tons of free content about how to get the most out of Aperture.
The Digital Story on Facebook -- discussion, outstanding images from the TDS community, and inside information. Join our celebration of great photography!


