Adobe incorporated its Aperture/iPhoto Import Utility into Lightroom 5.7. And it works well. But a little preparation in Aperture will provide you with the best results possible.
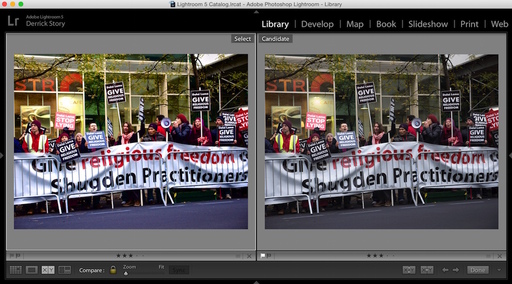 Imported Aperture files in Lightroom 5.7 - The edited RAW file is now a Jpeg displayed on the left. The unedited RAW file is on the right. Both images were imported into Lightroom using the Adobe utility. The size and quality of the image on the left was determined by the Preview Settings in Aperture prior to import into Lightroom.
Since Lightroom can't imported the adjustments to RAW files (only the RAWs themselves), it provides you with the option to import Jpeg versions of your edited RAW files, along with the master RAWs themselves. I cover how to set this up in the article, How to Import Aperture Libraries into Lightroom 5.7 published on ct-digiphoto.com.
The real key for Aperture users is to regenerate their Jpegs that are being prepared for import into Lightroom. Most of us are using Aperture previews set to a constrained size, such as 1920x1920 or 1440x1440. This makes sense in terms of managing disk space on our computers.
The problem is, if we don't regenerate these Jpegs to "Don't Limit Size" and to a higher quality setting, such as "10," then the edited files that are imported into Lightroom won't be maximum quality or resolution.
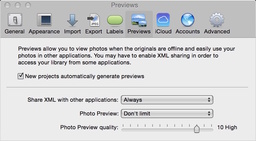
You can correct this by regenerating your previews using these settings in Aperture's Preferences (Aperture > Preferences), Photo Preview: Don't Limit, and Photo Preview Quality: 10 (High). Click on the image on the right to see how this looks.
To generate new previews using these parameters, hold down the Option key and go to Photos > Generate Previews. Depending on how many previews you're regenerating, this can take a while. Monitor your progress via the Activity window in Aperture (Window > Show Activity).
An easy test to make sure this worked is to drag a thumbnail out of Aperture to the Desktop. Open it in Preview, and use CMD-i to bring up the General Info box. There you can see the dimensions of the current preview in Aperture.
By regenerating full size previews, the pictures you so carefully edited in Aperture will be imported into Lightroom as Jpegs at their maximum dimensions with high quality. The edited preview receives an augmented file name, such as "PB020248_Aperture_preview.jpg" to help you identify it. Plus you'll get the original RAW, if there was one.
I highly recommend that you do a test run with a small Aperture library to ensure that you've prepared properly. Once everything passes muster, you're ready for the big import.
Keep in mind, that you only have to go through this laborious task if you were planning on moving to Lightroom anyway. A much easier transition to Apple's Photos app is on the horizon. And that move will keep all of our adjusted RAW files intact, plus library structure and metadata. Stay tuned for news about that right here on The Digital Story.
Aperture Tips and Techniques
To learn more about Aperture, check out my Aperture 3.3 Essential Training (2012) on lynda.com. Also, take a look at our Aperture 3 Learning Center. Tons of free content about how to get the most out of Aperture.
Want to Comment on this Post?
You can share your thoughts at the TDS Facebook page, where I'll post this story for discussion.


