Thanks to the dynamic range of RAW files, we don't have to rely on auto bracketing these days for perfect exposures. But this function is still vital for compositing HDR images.
To save myself the trouble of digging through the menu system every time I want to capture a sequence for merging later, I've programmed the Fn2 button on my Olympus OM-D E-M10 to quickly turn on and off this feature.
I've noticed that I'm using auto bracketing more recently thanks to the excellent image stabilization system that allows me to capture HDR sequences by hand without a tripod. If I see something I want, I press the Fn2 button to enable the setting, capture the series, then press the button again to turn it off. Simple.
You can program many cameras to do this. I'll show you how on the OM-D E-M10 because that's what I carry with me. But Panasonic, Samsung, Sony, Fujifilm, and others also provide similar capability. Here are the steps.
- Turn on the camera and press the Menu button.
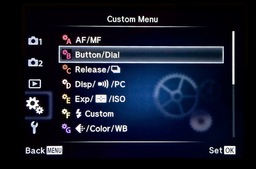
- Navigate down to the Gear menu and select GearB: Button/Dial (top illustration).
- Choose Button function.
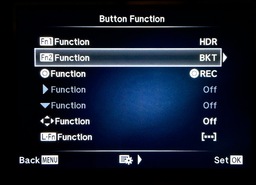
- Navigate down to Fn2 Function and open (middle illustration).
- Choose BKT from the menu options, press OK, press Menu twice to back out.
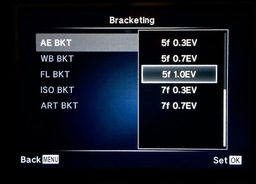
- Back at the Main screen, navigate up to Camera2 and choose Bracketing.
- Turn Bracketing on, then navigate to the right to set the number of frames and EV. I recommend "5f 1.0EV" (bottom illustration).
- Press OK, then press the Menu button twice to exit.
Test your setting by pressing the Fn2 button and checking the LCD screen. You should see a white square at the top of the screen that reads "BKT." And at the bottom of the LCD, there should be a series of green dots showing the number of frames for the bracket on the exposure compensation scale. Press Fn2 again, and they will go away.
You're now set to capture an HDR sequence whenever presented with the opportunity.
Want to Comment on this Post?
You can share your thoughts at the TDS Facebook page, where I'll post this story for discussion.


