After publishing today's TDS podcast titled, Nimble HQ Video, I received some requests for the actual settings that I use on my Olympus OM-D E-M5 Mark II. I'll share those here, keeping in mind that these will work on most other cameras too.
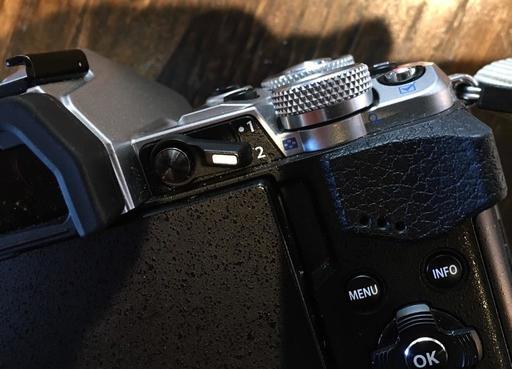
The Fn1 Button and 1-2 Lever
The first thing I recommend it programming the lever that's next to the Fn1 button and positioned just to the right of the viewfinder. By setting up "1" for your still photography and "2" for video work, you can quickly go from one mode to the other knowing that you have the right settings for each.
To program this lever, go to Menu > Gear Submenu > Gear B > Button/Dial/Lever > Lever Function and choose mode 6. With Mode 6 selected, you've programmed the lever to use position 1 for still photography and position 2 for video.
The Movie Menu
Everyone is a bit different when it comes to specific camera settings, but I'll give you an overview of what I use, and you can take it from there. Start by going to Menu > Gear Submenu > Gear I, then follow along.
- Mode: Manual ("M") - In my opinion, unless you're in run and gun mode, why would you use anything else. Set the shutter speed to 30 and the aperture for the look you want.
- Movie Mic - "On"
- Recording Volume - I use an external mic, and with my rig the gain is set to +2. Test for your particular mic.
- Volume Limiter - I go back and forth on this. Currently I have it on to protect against clipping the highs.
- Wind Noise Reduction - I keep it off unless I'm in breezy conditions. Even then, I'll use a dead cat over the mic, because it's more effective.
- Plug-in Power - Off. My mic doesn't require it. Hopefully yours won't either.
- PCM Recorder Link - I don't use it.
- Headphone Volume - I'm usually around 7. My headphones are plugged into the Olympus HLD-8G External Grip.
- Time Code Settings - Non-DF (Does not adjust for time difference vs. actual recording time.)
- Movie Specification Settings - I use FHD-F and FHD-SF. For shorter pieces I'll switch to SuperFine. For longer recordings Fine is great.
- Movie+Photo Mode - Mode 1 - Movie is given priority.
- Shutter Function - Mode 1 - Shutter button is for photos, and movie button is for recording.
- Noise Filter - Standard
- Picture Mode - Off
My recording format is FHD Fine 30fps MOV 1920x1080. ISO can be anything I need, usually between 400 and 1600. I use S-AF for focusing mode because I don't want the camera hunting for focus while I'm recording.
Once you have these set to your liking, the camera will remember them. Now, when shooting still photos, have the lever in position 1. When it's time for movies, go to position 2, and make some magic!
The Nimbleosity Report
Do you want to keep up with the best content from The Digital Story and The Nimble Photographer? Sign up for The Nimbleosity Report, and receive highlights twice-a-month in a single page newsletter. Be a part of our community!
Want to Comment on this Post?
You can share your thoughts at the TDS Facebook page, where I'll post this story for discussion.


