I love classic architecture, and it's a big part of my street shooting. Fortunately, one of the best cameras for urban environments, the Olympus OM-D E-M10 Mark II, includes Keystone Compensation. You may have heard of this feature, but I want you to see side-by-side images using it.
 Downtown Oakland, CA by Derrick Story. Olympus OM-D E-M10 Mark II with the 14-42mm EZ zoom.
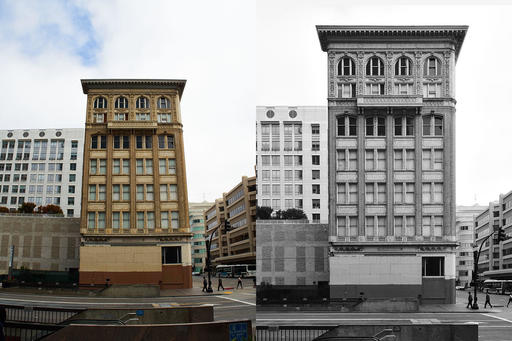
I generally shoot RAW+Jpeg on the streets. I have a monotone recipe that I use for the Jpegs. So I get a B&W superfine Jpeg and the original RAW with every shot I take. Keystone compensation is applied only to the Jpeg. That's fine with me, because that's the file that I typically want to share quickly (usually in a coffee shop via my iPhone). If needed, I can correct the RAWs later in Capture One Pro or Lightroom.
The above pairing is a single shot captured in both formats. The RAW file on the left is without keystone compensation, and the Jpeg on the right has it applied. I captured the image with a standard Olympus 14-42mm Digital ED 14-42mm f/3.5-5.6 EZ lens.
If you want to know more about the actual operation of keystone compensation, I wrote an article about it for the EM-1. It's very easy to use, and as you can see, the results are nearly magical.
We're on Apple News!
Find us now on the Apple News App for iOS! Just open this link on your iOS device, then add The Digital Story to your Favorites.
Want to Comment on this Post?
You can share your thoughts at the TDS Facebook page, where I'll post this story for discussion.


