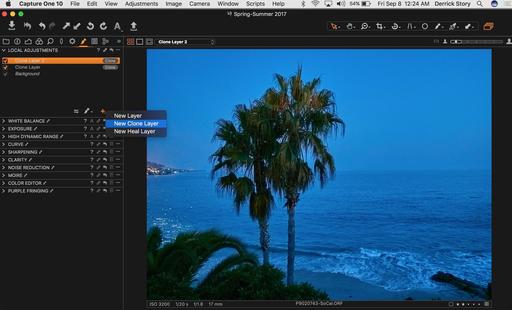
Many photographers try to use Spot Removal instead of cloning in Capture One for a very simple reason: they can't find the cloning tool.
That's because it's tucked away in the Local Adjustments panel. Then, someone could tell you that, and you still might not find it. You'll see adjustments for just about everything else - white balance, exposure, etc. - but not cloning.
The trick is to long-click on the new layer icon (+) until a popup menu is revealed displaying: New Layer, New Clone Layer, New Healing Layer. Choose New Clone Layer, and now when you select the Brush, it will transform into a cloning tool that works pretty much like everyone else's.
Give your layer a name. Then make sure the brush icon is highlighted or press the B key. Use the bracket keys to control the size of the brush, and Shift-bracket keys to control feathering. Option-click on the area that you want to sample. Then paint over the area that you want to clone. When you're finished, tap the V key to disable the brush.
(Another nifty way to go about this is to create a regular Adjustment layer, then change it to a Clone layer by click on the "Adjustment Bubble" that reveals the popup menu.)
There are a variety of options in the brushing tool itself that allow you to control the appearance of the mask. And since all of this work is created on a layer, you can turn it off and on by simply unchecking its box in the Adjustments panel.
After a little trial and error, you should get comfortable with Capture One's cloning tool. And now you can save Spot Removal for what it was designed for... removing sensor dust and other specks.
Master Capture One Pro
Start with Capture One Pro 10 Essential Training that will quickly get you up to speed with this pro level imaging application.
Then drill down into mastering the editing tools with Capture One Pro 10: Retouching and get supremely organized with Advanced Capture One Pro: Catalog Management.
You can share your thoughts at the TDS Facebook page, where I'll post this story for discussion.


