The scanner mode in the iPhone/Mac tandem goes beyond merely taking pictures with your smartphone to using them much in the same way you would with a dedicated flatbed device. There's a lot of functionality here, and these tools can be a real timesaver, especially when you're on the go with your laptop. Here's how it works.
 Turn on your iPhone then enable the scanning function in Preview.

How to Scan with Your iPhone
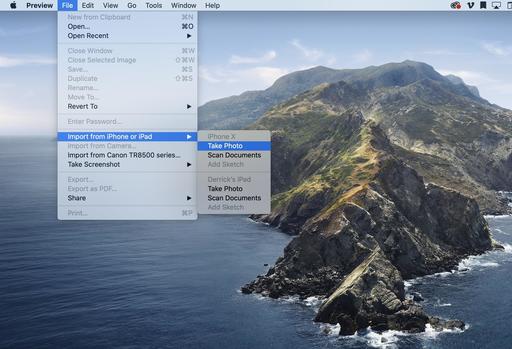
Start by turning on your phone. Then open Preview on your Mac and enable the scanner capability (File > Import from iPhone or iPad). You have the option to take a picture, such as a quick product shot, or go to scanner mode.
Taking a photo is pretty straightforward. The familiar camera interface appears, you tap the button, then have the option to "Retake" or "Use Photo." If you tap on "Use Photo," the image appears in Preview ready to edit or use as is.
The scanning function is even cooler. Once you capture the image, you have the opportunity to crop it before sending it over to the Mac. Move the four corners of the frame until the scan meets your approval. Then tap "Keep Scan." You can continue scanning items until you have everything you need. Once you're done, tap the "Save" button, and all of the scans in that group will all appear on your Mac in a single document. Very nice!
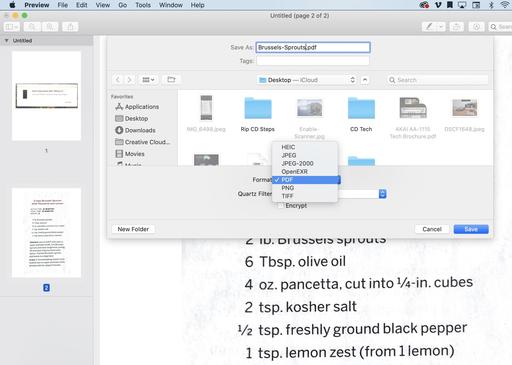
Once the Document is on Your Mac
Now that you have an open Preview document, you can treat in the usual ways. Generally speaking, photos will be saved as Jpegs, and scans as PDF documents. But the choices are entirely yours.
After a few practice runs, you should be quite efficient capturing high quality scans with the iPhone/Mac tandem. You can use your iPad as well. This is a particularly good workflow for mobile business types with a MacBook Pro.
Give it a try and see what your think.
You can share your thoughts at the TDS Facebook page, where I'll post this story for discussion.


