After you've converted a camera for infrared photography, you need to think about how you're going to creatively work with the images you copy to your computer.
 "Picket Fence" - Olympus E-M10 III converted by Kolari Vision with K590 nm IR filter. Processed in Photos plus editing extensions. Photo by Derrick Story.
The most common workflows rely on Photoshop to handle the basic duties of blue/red channel swap and basic processing of IR images. But you don't have to go this route. I've been using Photos for macOS with a handful of editing extensions: RAW Power, Pixelmator Pro, and Luminar 4. These extensions allow you to base your workflow in Photos, but still tap the functions of those powerful apps.
In this post, I'll show you one example of this approach using RAW Power.
RAW Power to the Rescue
Begin by downloading and launching RAW Power. (You can purchase this software at the Mac App Store for $29.99.) Then go to System Preferences > Extensions > Photos Editing and enable RAW Power. You're now set to go. You only have to do this step once. From now on, you can access RAW Power from within Photos.
Next, open your RAW IR image in Photos and go to Edit mode. (We're working with a color picture captured on a full-spectrum camera with a 590 nm IR filter.) Don't make any adjustments at this point with the native tools in Photos. We'll save those for finishing touches. Instead, go to the "three dots" at the top of the editing panel and choose RAW Power.
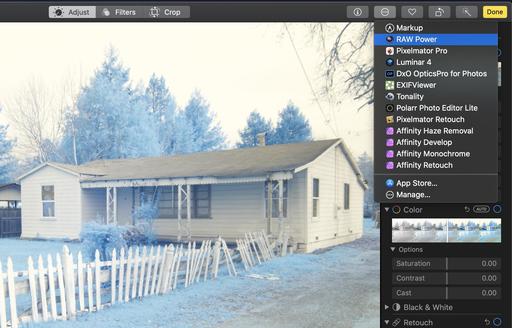 The unedited RAW infrared image in Photos. Don't be tempted to make any adjustments yet with the sliders in Photos. Instead, go directly to your Editing Extension. In this case, RAW Power.
In RAW Power, start by making any basic exposure adjustments to get the image to a good starting point. Then, add the Channel Mixer to your Adjustments panel by selecting it from the Add Adjustments dropdown menu. Now you can perform the Red/Blue channel swap that is often desired with color IR images. Go to the Red channel and set Red to 0 and Blue to 100. Then go to the Blue channel and set Red to 100 and Blue to 0. You can play with the Constant slider to fine tune your conversion.
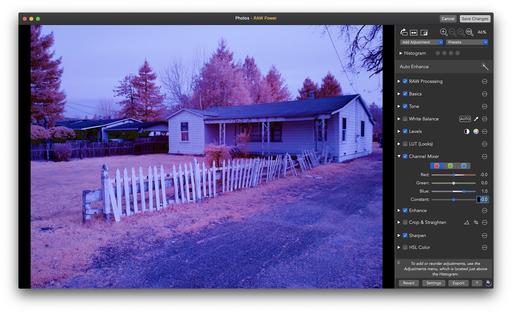 Using the Channel Mixer and other adjustments in RAW Power to begin to shape the image.
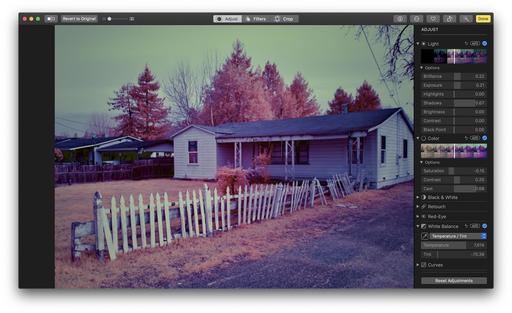
You can use the other tools in this editing extension to further enhance the picture before returning to the Photos interface. Once you're at a stopping point, click on Save Changes to return to Photos.
Photos for Finishing Touches
 You can continue to play with the picture in Photos, or you can send it to another editing extension such as Luminar.
Back in Photos, you can use its adjustment tools to further refine your image. And if you want, you can open it in another editing extension, such as Luminar, to take advantage of its effects.
The great thing about this workflow is that all your efforts are automatically backed up to iCloud and shared across all of your Apple devices. So you can show off your work on your iPhone, iPad, or another Mac. Or, of course, you can share to social media. And at no point in this workflow do you need Photoshop.
Final Thoughts
In terms of Editing Extensions, if you prefer Pixelmator Pro to RAW Power, it also has a Channel Mixer. So that's definitely a good option. Luminar 4 and newer no longer offer Channel Mixers, but Luminar is still good for finishing touches. And finally, RAW Power supports LUTs. There are a number of these profiles available that provide more automated conversions of infrared pictures. Just something to keep in mind as you explore your options.
The Infrared Photography Workshop - Online March 2021
Do you feel like the world is looking like "the same old same old" through your camera's viewfinder? Have you felt your enthusiasm for photography waning as the pandemic wears on? Then it's time for you to consider exploring infrared imaging. This online event will reenergize your creativity and show you how to produce images that are unique and bursting with life.
You can learn more and sign up by visiting The Infrared Photography Workshop Page. Hope to see you there!
Product Links and Comments
There are product links in this article that contain affiliate tags. In some cases, depending on the product, The Digital Story may receive compensation if you purchase a product via one of those links. There is no additional cost to you.
You can share your thoughts at the TDS Facebook page, where I'll post this story for discussion.


