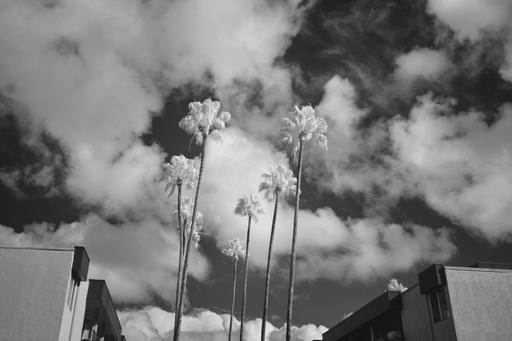
Infrared photography is a great way to see the world with new eyes. I've been having a lot of fun shooting with my Fujifilm X100V camera and the Hoya R72 Infrared Filter. The workflow is easy, and I'm going to share the steps here for an X100 or any other digital camera that passes the IR test.
 "Palm Trees and Apartments" - Fujifilm X100V camera with Hoya R72 Infrared Filter, ISO 640 (via Auto ISO), f/2.0, 1/15th, Auto White Balance, Acros+R B&W film simulation, Jpeg mode. Photo by Derrick Story.
What Cameras Can Shoot Infrared?
One of the reasons I use the X100V is because it easily passed my IR test. Simply take your TV remote controller, point it at the camera in Live View mode, and press the power button to send an IR beam to the camera. If you digicam displays a bright dot on the LCD, then you're in business. The brighter the dot, the better.
Put the Hoya R72 on the Camera
You'll want a bright day for this photo shoot. If you have clouds in the sky with blue, all the better. Set the camera on Auto ISO and let it climb as high as ISO 6400. With the R72 filter, which is quite dense, your shutter speeds will be around 1/15th at f/2, or something in that neighborhood depending on your camera's sensitivity, ISO setting, and maximum aperture.
Set Custom White Balance
By setting your custom white balance to measure green grass or foliage as the target, you can capture a broader range of tones that will improve your tonal options. After you put the 720 filter on your camera (Hoya R72, etc.), then use the custom white balance setting to measure off a living green subject in sunlight.
I recommend that you save this Custom White Balance Setting for future use.
Variation: Set the Camera to B&W Mode
Yes, you can shoot color IR, and that's a whole different ballgame. To get started, I recommend choosing a B&W mode on your camera. For the X100V, I like Acros+Red. You'll be able to preview the infrared effect in live view on the LCD or in the EVF if you have one.
Shoot in RAW+Jpeg mode. The Jpeg will display the Film Simulation, and the RAW will leave you with all of your options open for a future editing date.
Additional Thoughts
One of the things that I like about the X100V for this assignment is that I can switch back and forth between the optical viewfinder and the EVF. It's easier to compose with the optical when the R72 filter is attached.
Look for scenes where infrared shines. Plant foliage against a blue sky with puffy clouds is great. But I also like buildings with landscapes, streets, paths, and anything that gives me the contrast that I want. It's a whole new world.
There is so much more to infrared photography, including working at different parts of the spectrum with cameras that have been modified. But you don't need that to get started. If you like what you get with the R72, then you can continue your journey with additional gear.
Product Links and Comments
There are product links in this article that contain affiliate tags. In some cases, depending on the product, The Digital Story may receive compensation if you purchase a product via one of those links. There is no additional cost to you.
You can share your thoughts at the TDS Facebook page, where I'll post this story for discussion.


