For years I have tried to bend smartphone software to my will. They do some things OK, like geotagging pictures. But they're painful at best when it comes to getting real work done. And by real work, I mean copying images from my camera to an image editor on the phone where I can edit and share them.
I've tested software created by Nikon, Fujifilm, OM System, Pentax, and others. Most of the time, I can get them to work, but in the end, I feel like it's easier to lug around my laptop and use a card reader. But I shouldn't have to.
The processing power in today's iPhone is ample for managing and editing pictures from mirrorless cameras. The screens are absolutely beautiful and large enough for basic tasks. They are cloud-connected devices, so our work is immediately backed up and shared to all of our computers. But where they really shine compared to full-sized laptops, is that they fit in our pockets.
So, with a mirrorless camera around my neck and an iPhone in my jacket, I should be conquering the world. Instead, I find myself wasting time trying to get the two devices to talk to each other with fiddly WiFi software.
Making a Better Connection
One thing that the European Union had right and Apple had wrong was using USB-C for all smartphones. As of iPhone 15, the Lightning connector was replaced by a standard USB-C port. Not only did this ensure that we always have a charging cable available, but many of the accessories that we use with laptops now work with our smartphones... including portable SD card readers.
Combine this reliable hardware connection with universal software that's included in iOS, and you can say goodbye to frustrating WiFi transfers between cameras and mobile devices. Within iOS we have the Files app, which is rock solid. Additionally, Lightroom Mobile is very adept at managing and editing mirrorless camera pictures, as is Photos for iOS.
On the hardware side, a card reader is faster and more stable than fighting with wireless transfer. Plus, it's small. I stash mine in the little coin pocket in my Levi's jeans. Ditching wireless transfer and using a USB-C card reader allows me to leave the laptop behind and travel lightly with just my camera and the iPhone. And when I do get home, all of my pictures are waiting for me on the computer thanks to cloud connectivity.
Step-by-Step Guide to Transferring Pictures from a Mirrorless Camera to an iPhone
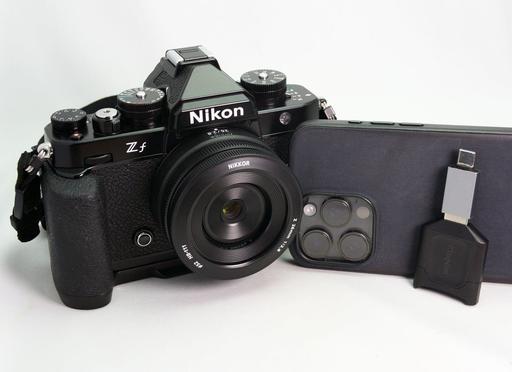
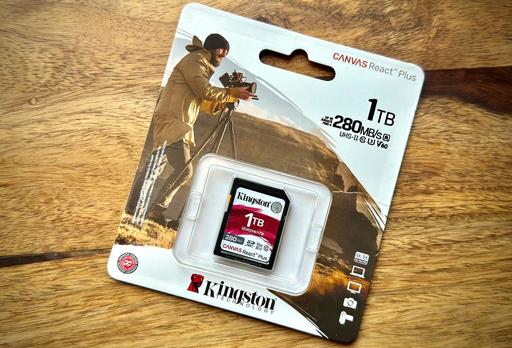
For my latest shoot, I used a Nikon Zf camera, iPhone 15 Pro Max smartphone, a Kingston 1 TB SD card, and a Kingston portable card reader.
I like to shoot RAW+Jpeg because I enjoy experimenting with film simulations that I've loaded into the Nikon. With this workflow, I can decide if I want to copy the Jpegs, RAWs, or both to my iPhone. Let's start with the most basic approach using the Files app.
The Files app is included in iOS. Unlike software designed by camera manufacturers who seem to have a limited understanding of the iPhone, Files is perfectly integrated into the device. Look for the icon with the blue file folder. Now, let's move some pictures.
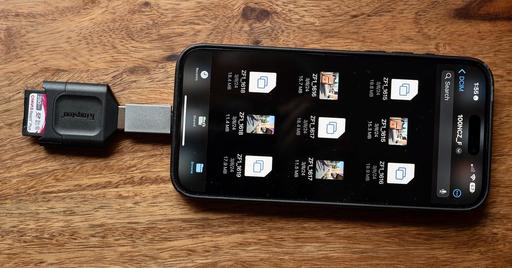
- Remove the SD card from the camera, put it in the card reader, and connect the reader to the iPhone.
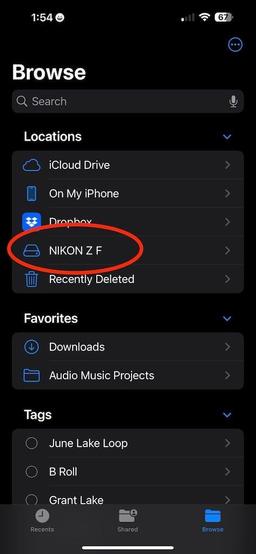
- Open the Files app on the iPhone and look for your SD card under Locations. In my case, it will read NIKON Z F.
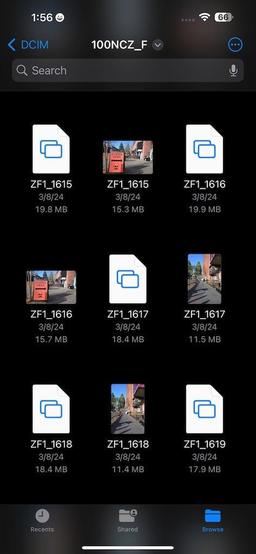
- Tap on the SD card name to take you to the next screen. You will see one or more file folders there. Tap on the one that reads DCIM. Depending on how your camera sets up the file system, an additional folder may exist inside DCIM. Tap on it and your photos will be revealed.
- If you shoot RAW+Jpeg, you will see both versions of your pictures there. To choose the ones you want to copy to the iPhone, tap on the 3 dots in the upper right corner of the screen. Then tap on Select.
- Now, tap on the thumbnails of the pictures you want to copy to the device. They will be marked with a blue check.
- Tap on the Share button in the lower-left corner of the screen. Choose Save Images.
- The pictures are now copied to your camera roll on your iPhone and are accessible via Photos and other apps.
- Swipe up to close the Files app, disconnect the reader from your phone, and return the SD card to your camera.
This process is fast. And the best part is, it works every time.
You'll notice that I have a large 1 TB card for the Nikon Zf. I like to keep all the pictures from an adventure on the card as an additional backup.
With WiFi transfer, this becomes untenable because it takes so long to read all of the files on the card. But with USB-C connectivity, it's nearly instantaneous. In terms of speed, there is no comparison between WiFi and USB-C.
Adding Lightroom Mobile to the Mix
Lightroom on the iPhone and iPad provides a powerful set of editing tools, and it plays nice with the other software. For example, from the Files app, as described above, you can send selected images directly to Lightroom on your mobile device via the Share button.
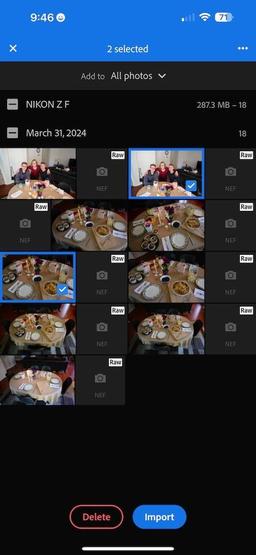
Or you can copy directly into Lightroom, bypassing the Files app altogether, by connecting the SD card and tapping on the blue import icon in the lower right corner of the Lightroom interface.
Lightroom will ask you if you want to add photos from the Device (iPhone), Files (app), or Connected camera/card. Choose Connected camera/card, select the pictures you want, then tap the blue Import button at the bottom of the screen. Bingo!
Once the pictures are in Lightroom, you have a powerful set of imaging tools to adjust them. If you haven't used the mobile version of Lightroom for a while, I think you'll be surprised at how elegantly it has evolved.
After editing, you can share the finished files with other apps on your mobile device, save them to the camera roll, or publish them on social media. They'll also be available when you get home on your computer via the Cloud Tab in the upper lefthand corner of the Lightroom interface. You can pick up right where you left off.
Additional Apps and Hacks
If you're not a Lightroom fan, an excellent alternative is RAW Power from Gentleman Coders. No subscription is required, it's a very affordable one-time purchase, has a powerful set of editing tools, and the developer does a great job of keeping it up to date with the latest camera releases.
Photomator for iOS is also very popular, and for good reason. Easy to use combined with powerful editing tools make this Lightroom alternative a winner.
And here's a fun little hack... Lightroom has a handy export function that enables you to copy files from your mobile device to a USB-C flash drive.
Tap on the Share button at the top of the Lightroom interface, tap Export As... from the popup menu, choose Save to Files, then navigate to the connected flash drive icon in Files, and tap on Save. Yes, you can use USB-C to copy pictures to a flash drive as well.
Wrapping Up
I've waited far too long for camera software that provides a reliable workflow for my iPhone. Now, I don't need it. With my pocket-sized card reader, I can work as fast with mobile devices as I do with a computer. And that means more time to focus on my pictures.


