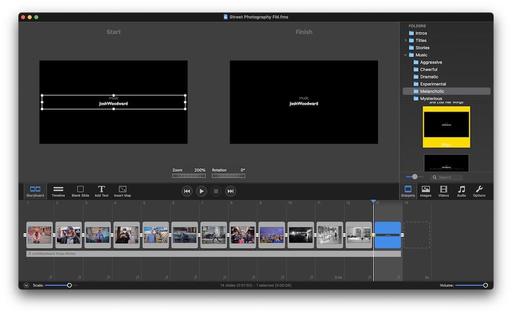
Boinx Software has released FotoMagico 6, the latest version of their top-drawer slideshow authoring software. The bundle includes applications for both the Mac and the iPad, plus tons of extras including templates and royalty-free music tracks.
The New Map Assistant
My favorite feature is the new Map Assistant that allows you to plot and animate a beautiful map that charts the journey of travel slideshows. Here's how to use it.
Start by going to Slideshow > Map Assistant. The first thing that you'll want to do is establish the map region.
With the Map tab highlighted, type the area that you want to illustrate in the Search box under Region. In this case, we entered Los Angeles, CA to move the blue rectangle to that part of the world. Our goal was to display a trip from LA to Las Vegas. So we adjusted the blue frame to cover that journey.
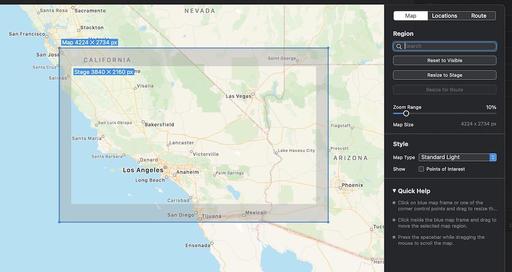
The blue frame indicates which map region will be rendered. You can move it by dragging, or resize it by grabbing the corner points. A label will always display the map dimensions in pixels.
To set the various points of your journey, start by selecting the Route tab. Now click inside the blue box to add a location point in the desired area. It you want one or more of those locations to be Waypoints, then CTRL-click on them to establish that. CMD-click on a point to remove it. If that isn't working properly for you, double-check that the Route tab is highlighted.
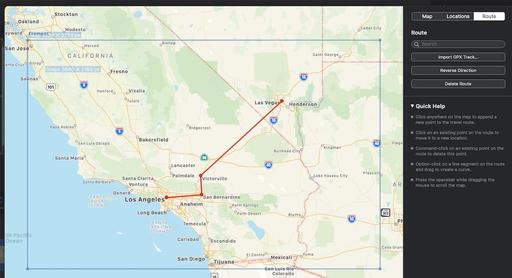
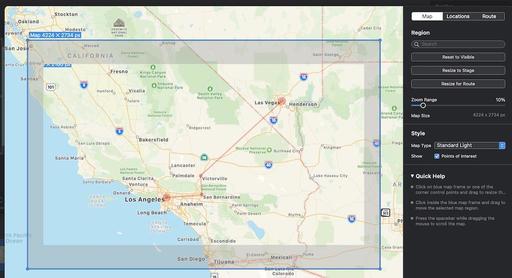
Before you click on Apply, return to the Map tab and choose your map style. There are a few different ones to pick from. Now you can click Apply.
Here's where the fun begins. In the Options panel, you can enable animation by clicking the box that enables animations. Set the Duration for the execution of your route, then move down in the panel to Map and customize the line width, style, waypoints, and other variables.
You can also experiment with animation speed, effects, and more. To put your route in motion, click on the Play button in the middle toolbar. And remember, you can always click on the Edit Map & Route button in the Options panel to make further adjustments.
Other Notable Features
FotoMagico 6 also features professional Image Effects that allows you to quickly customize the appearance of a frame or frames in the presentation with color correction, monochrome, and more. You can apply similar enhancements to words with Text Effects.
Plus you have iPad integration via iCloud so that you can start a project on one device, then continue working on it with another. All of your changes are saved regardless of where you made them.
And there are new templates and music tracks as well.
Availability and Pricing
You can download a free trial from the FotoMagico website and try out all the new features I covered here. If you want to purchase the software, it is available in the Mac App Store or directly from Boinx for $7.99 a month subscription or for $79.99 for a year.
If you want to create professional presentations for publishing online or in person, this is the most powerful and easy to use software available.
You can share your thoughts at the TDS Facebook page, where I'll post this story for discussion.


