When we work on specific parts of our pictures, the editing process tends to slow down as we create masks and screens. But in Capture One Pro, you can still work on segments of the photo, and do so quickly with Style Brushes.
 I used three different Style Brushes for a quick edit of this image. One for the sky, one for the sand, and another for the water.
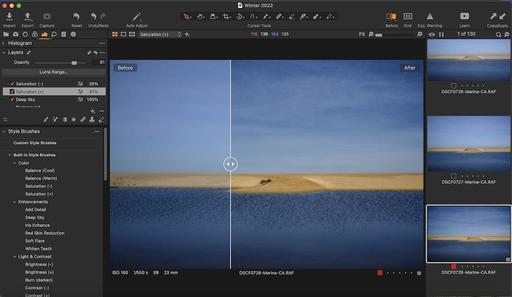
The Style Brushes panel is located beneath the Layers panel in the Exposure tab. If you open up the panel and click on Built-in Style Brushes, you'll see an array of adjustments for color, tone, and enhancements. Simply choose the style brush you want, start painting, and Capture One Pro will create the new layer for you with the name of the brush.
You can see the mask itself by pressing the M key, brush adjustments are located in the lower left of the panel (the two arrows icon pointing opposite directions), and you can change the opacity of the adjustment with the Opacity Slider near the top of the panel.
Once you've finished using a particular style brush, be sure to return to the Background layer for your overall edits such as Clarity and Sharpness.
Style Brushes are an often overlooked tool in Capture One Pro. But they are very handy for quick edits on specific areas of the image such as sky and foreground.
You can share your thoughts at the TDS Facebook page, where I'll post this story for discussion.


