Practically any child who's ever inherited anything from a relative received a box of aging slides and negatives as part of the bargain. None of us really asked for this stuff. It was just loaded up with the rest of the mementos.
The funny thing is, there are often treasures sandwiched in there between the embarrassing vacation shots and awkward birthday moments. But to discover them, we have to set aside a little time to explore.
In my view, it's time well spent.
But then what? Once you discover that timeless portrait of a loved one captured on celluloid, what do you do with it? The answer is nestled right there in your gear bag. Using a digital camera with a close-focusing lens is the easiest way to preserve, enhance, and ultimately share aging film images that may have otherwise languished.
Here's a simple path forward.
Digitize the Film
The first step is to make a digital copy of the negative or slide. You'll have to spend a few minutes getting things set up. But once you do, the process is easy.
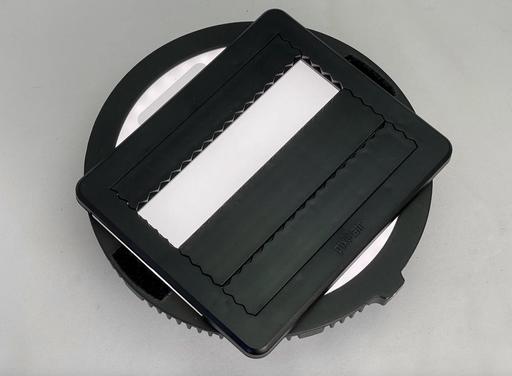 An LED light with a film holder to illuminate the film negative.
You'll need some sort of illuminated stage to put the film negative on so that it's backlit. Currently, I use an LED light with a diffuser and a film holder, but you can use anything in your gadget box that works. I've gone as simple as using a plain white sheet of paper as the diffuser and a large diameter lens protection filter to keep the film flat on the stage. If you have an old lightbox laying around, that works great too.
Once you have the stage set up, put your camera on a tripod and get things as level as possible. Shoot in RAW. This will give you the highest quality output. I use the self timer to trigger the shutter so I don't jar the camera at exposure. And make sure the focus is on the actual film so that the image is as sharp as possible.
Process the Image on Your Computer
If you digitized a negative, then you need to convert it to positive. You can use any photo app that has a Levels adjustment. Mac users can go as simple as opening the file in the Preview app that comes standard on the computer.
 Even the humble Preview app on Macs can be used to convert a negative to a positive.
In Preview, go to Tools > Adjust Color. The Levels adjustment is at the top of that panel. It displays a histogram with three triangle "handles" below it. To convert the negative to positive, grab the handle on the left and drag it to the right side of the histogram. Then grab the handle on the right and drag it to the left. This will create your initial conversion. Now play around with all three handles to get the final exposure you want.
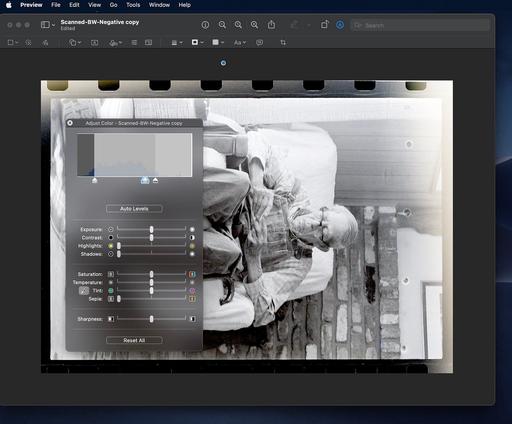 Inverting the Levels adjustment converts your negative to a workable image.
If you want to tone the photo a bit to give it more of an old time look, try the Sepia slider or play with Temperature. When it's time to crop the image, go to Tools > Rectangular Selection and click-drag the frame. Use Tools > Crop to finish it off.
Finishing Touches
You can score points with other family members by sending them a copy of the digitized file. I also recommend printing the image on nice photo paper and framing it for inclusion in the family gallery. Framed prints make excellent gifts too.
Final Thoughts
There are two basic reasons why treasured family images never make it out of the shoebox. First, it does take some time to sift through them to find the ones worth saving. But once that happens, most folks don't realize how easy it is to digitize that content and start sharing it with others. Just cobble together the few items you need to create a backlit stage, then get our your camera.
We can't bring our loved ones back to life. But what we can do is resurrect their best moments - not only for us, but for the generations that follow.


