How do you best set up your scanner when archiving all of those prints and slides that you have in storage? It's really not too bad once you know the numbers you have to plug in, and the resulting digital files they produce. That's what this podcast is about.
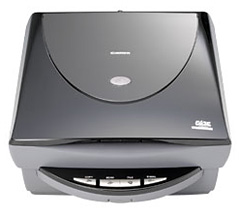
The first thing I want to mention is how much flatbed scanners have improved since I last bought one (which was about 5 years ago). While working on an article for Macworld Magazine, I got to test a number of scanners and really took a liking to the Canon 9950F scanner. The 9950F is both Mac and PC compatible, provides both USB 2.0 and FireWire connectivity, and scans many different sizes of film as well as prints. I use its driver with Photoshop, and when in the "Advanced" mode, have complete control over the scanning process. The results have been beautiful.
As easy as the interface was to use, I still had to make decisions about what numbers to plug into the "Output Resolution" box. Here's where a lot of people get confused. Do you put 150, 300, 600, or 1200? And what are the ramifications of each of those settings?
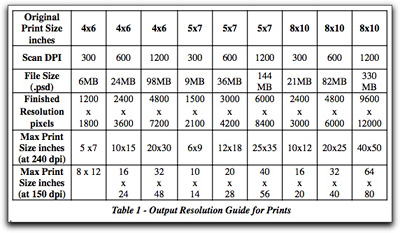
The general rule of thumb is that if you want to make photo-quality prints the same size or smaller than your hardcopy source material, choose 300 dpi. (I actually prefer "ppi" pixels per inch, but used the older term "dpi" dots per inch because that's what the scanning software used.) So if your original photo is 4"x6", then if you scan at 300 dpi, you'll be able to make photo quality 4"x6"s. Actually, I think you can go up to 5"x7" at that setting, so that's what I list in Table 1.
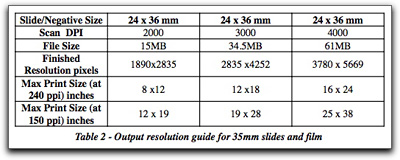
As you increase "Output Resolution," let's say to 600 dpi, you can then make bigger prints from your source material. The tradeoff is that the file size gets much larger too. So the trick is to find the balance between having enough Output Resolution to make the prints you want and controlling the file sizes so you have enough storage to handle all of this digitized material. Take a look at the following tables to help you choose the settings best for you.

------------------

------------------
In the Macworld article that comes out in a month or two, I get into the whole process from scanning, to cataloging, to output. But for now, you can begin to digitize with confidence some of those great shots you have from the "old film days."
Listen to the Podcast
Now that I've piqued your curiosity, it's time to listen to today's audio show titled, "Scanning Tips" You can download the podcast here (33 minutes).
Technorati Tags: digital photography, podcast, technique, tips


Nice podcast!!!!! Thumb up :)
I enjoy your podcasts, keep up the good work.
One thing that I think you need to clarify about scanning prints is that a print has a limited amount of information in it, no matter how good the scanner is, the quality of the source material will limit how much enlargement can be done. It is not practical to enlarge a 4x6 print to 10x15 and expect full photo quality, there is not enough information in that print to make that kind of jump. This would be more reasonable if you were scanning negatives or slides which contain substantially more image information. I think people might think that they can crop out a small portion of their 4x6 print and blow it up to some huge print size without losing any quality just by upping the scanning dpi. There is simply not enough detail in the print to do that. Scanning the negative of that image might make that possible. I think it's an important point that people wouldn't get from your podcast. Related to scanning as well it should be noted that the dynamic range of a print is limited in comparison to a negative or slide. So no matter how good your scanner is, a print may simply not have the shadow or highlight details in it that a negative or slide might, it can't make up detail that isn't there in the source material. And of course there's the whole issue of the skill of the processor who made the print....
I'm not meaning to be a pain in the butt. It's just that I think they're valid points for your target audience in this case.
Richard, I think you make a great point, and I appreciate you posting this reminder. Yes, very true: good data in, good data out. There are physical limitations to how much sampling-up you can do from your printed material. That being said, I think most of the photographers in this audience should probably be scanning at 600 ppi. My guess is that TDS readers have decent source material.
I'd like to make contact sheets from color negatives using a scanner. I have not had success using my cheap six or eight year old Canoscan. Will the 9950F make color contact sheets?
Jack, that's a good question. I still have the scanner, so I can take a look. How were you trying to make them before? While the negatives were in the PrintFile sleeves? And what was the disappointment?
I moved several years ago and did not rebuild my darkroom. I wish that I could get some sort of digital work flow going with color negatives. It would spur me on to find a place that would process my color negatives without scratching the devil out of them and I would use my Leica Ms a lot more than I have in the last few years.
I scan 35mm negatives and transparencies with my Nikon Coolscan IV when I want to make a print. But, it's just too time consuming to scan every negative on the roll just to see what is on the roll.
BTW, I do presently have my color negatives processed to include 3x5 inch prints. But, I would really like to have a contact sheet to store on my hard drive as part of a digital work flow.
Jack,
I've got an Epson 2400 Photo scanner that I bought probably a year and a half ago. I've used both the Epson supplied software (available on their site) as well as VueScan software. I've found that the Epson software did a better job than the Vuescan software with removing the orange masking. The Vuescan gives more control, but ultimately the Epson software produces much more accurate colours. I've had really good results scanning negatives with it, in many cases the scanning software does a much better job with exposure than the person who processed the prints did (granted I didn't take the film to a pro-level lab).
New scanners are not that expensive and can do quite a nice job with negatives. Also, although it's not the prettiest site, I learned a heck of a lot at this site .
http://www.scantips.com/basics12.html
talks about scanners with lamps also built into the top of the scanner as well as the bottom. I did not even know these existed. The manufactures' sites really do not give all that much information about their scanners.
I use Vuescan and have not figured out how to remove the orange mask. My scans with my old Canoscan come out looking just like the color negatives that I placed on the scanner bed. I think a new scanner will be sitting next to my PowerMac very soon.
Richard has brought up some good points (and provided great resources to boot!). And I want to pile on about the difference between scanning your print negatives vs the 4x6s you might have received from the 1-hour photo mart. I think many times we're led to believe that our shots aren't as good as they really are because of poor printing by some commercial outfits. In these instances, scanning your negatives with a new scanner might just restore your faith in your shooting ability. If you've hand-crafted a print in the darkroom, however, you might want to put that 8x10 on the flatbed. Either way, it's nice to have options.
I've only just recently got my hands on a digital camera (RebelXT), before that I was strictly scanning my prints and negatives, and to be honest it is significantly easier/faster to scan prints. It was only when I wanted to substantially correct a print or do significant cropping/enlargements that I would scan the negatives. On a flatbed the transparency scanning process is fairly slow compared to scanning a print - although other scanners might be better.
One other thing that you've got to contend with is that *many* times the 1 hr photo lab is not all that careful handling your negatives. I've had to correct many streaks and spots from my negatives where they've mishandled them. And it's not like when they screw up a print and you can ask them to re-print it. If they damage the negative you're out of luck and have to correct it as best you can yourself.
Good luck Jack and thanks for providing a really nice resource for my recently renewed photo interests Derrick.
Hi Mr Story...This will be my first scanner purchase..I really don't have that many pictures,but enough to get me going. Can any of these scanner print both side of a document? I would love to archive past military records, birth certificates, stuff like that. What would recommend? Any info would help...thanks for your time.
Johnny Brown
Hi Johnny, if your main goal is to scan documents, you can go with a more affordable scanner, such as the CanoScan LiDE 60 for $79. It does a very good job with documents, and you can still scan your photos too. It's not as sophisticated as the more expensive models, but it does take up less space and gets the job done. You will have to scan both sides of your document and label them as "front" and "back" in the file names.
Just heard your scanning podcast and enjoyed it, but since you mentioned Digital Ice technology and also mentioned scanning BW negs, you should perhaps have clarified that while you can use Digital Ice on colour negs and slides, you can't on traditional silver-halide based BW negs. It does work on dye-based chromogenic BW film scanned as RGB though.
Hi Derrick,
a bit behind in Podcasts but the scanning podcast audio quality is just fantastic! Have done something new? Keep up with the good work!
regards, Chris
Hi Derrick,
I wonder if you change the EXIF data of your scanned files to match the original date when you shoot the photo. If yes, when in the process and with what application do you change it? I really dislike that Aperture only can change the timezone.
Thanks, Andreas