The White Balance menu on your digital camera is one of your most powerful tools. Regardless if you have a compact or a DSLR, you can compensate for many difficult lighting situations by simply changing settings in this menu.
I often say that the white balance menu is like having an entire set of filters built right into your camera. The cool thing is, unlike glass filters, you don't have to buy, store, or clean white balance settings. You just have to find the settings.
The easiest way to talk about color temperature, which is what white balance is all about, is in degrees Kelvin. This helps you correlate numbers to lighting situations and the controls on your camera. Most camera manuals will list the lighting situations in degrees Kelvin that their white balance menu items are designed to compensate for. To give you a taste of degrees Kelvin, here are some examples. (This information is from page 146 of the Digital Photography Pocket Guide, 3rd Ed).
Dawn, dusk, candle flame -- 1800-2200K
100W incandescent bulb -- 2800-3000K
Photographic daylight -- 5500K
Open shade outdoors, overcast sky -- 8000-9000K
At the lower end of the Kelvin scale, the light is recorded as warmish red, and at the higher end the camera sees coolish blue.
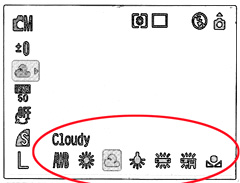
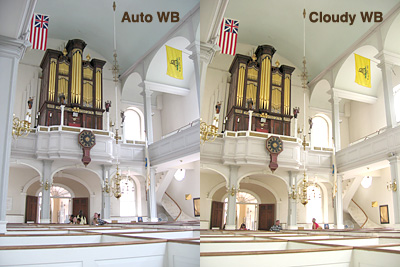
Our eyes naturally compensate for these varying conditions. But cameras have a more difficult time. That's why we have white balance compensation.Take a look at the following comparison of a church interior. I captured these images with a Canon Digital Elph with the flash turned off. The image on the left was recorded with the auto white balance setting. For the picture on the right, I turned on the cloudy white balance setting. (Refer to the screen shot at the top of the page to see the actual setting.) Notice that the tones are cool in auto white balance, but warm up considerably in cloudy mode. Which one looks better? That's up to you. But the point is that you have more control over how your camera records color temperature by finding your white balance menu and learning its settings.

=====================
Listen to the Podcast
Now that I have your curiosity piqued, it's time to listen to today's audio show titled, "White Balance." You can download the podcast here (29 minutes).
Technorati Tags: camera, photography, podcast, technique, tips


You did not mention the ability to change the WB of a RAW file with the software you're using on your computer. JPEG files lock the WB as shot. One more reason to shoot RAW.
While the degree is the unit in the Celsius and Fahrenheit temperature scales, the degree is not used in the Kelvin temperature scale. The unit in the Kelvin scale is the kelvin. So, 2527 degrees Celsius, but 2800 kelvins. 2527°C = 2800KThe degree symbol did not work in the previous post. That A with that diacritical mark over it in the Celcius temperature should not be there.
Hello Jack, thanks for the tip about how to refer to Kelvin. I'll just stick with 5200 Kelvin in the future.
And yes, you're correct about one of the best features of shooting Raw is to be able to delay your white balance decisions. I have mentioned that in other podcasts. But I try to keep the scope focused on these shows so I don't run over 30 minutes. This comment area is a great place to share additional information -- as you have so kindly done :)
I just read a post by Thom Hogan on the dpreview Nikon forum in which he says that the histogram presented by the camera is based on the embedded jpeg file, not the RAW file. So, with this information, it would seem that one should be careful about WB setting when shooting RAW. The histogram that you see might not correspond to the correct histogram for the RAW file. Interesting stuff.
http://forums.dpreview.com/forums/read.asp?forum=1021&message=16864925