There are many ways to share the images stored in iPhoto, and thanks to the power of the entire iLife suite, photo DVDs are a beautiful option. But I don't care for the Share > Send to iDVD command in iPhoto. I think it brings you into iDVD in an awkward place. Instead, I like to open iDVD separately, then use the "Magic iDVD" approach. Here are the steps:
- In iPhoto, create an album and put the pictures in it that you want to use in your DVD slideshow. You can create several albums and put multiple slideshows on one DVD.
- Open iDVD and click on the Magic iDVD button.
- Choose your theme and type the title for your DVD in the title field.
- Go to the Media Browser, click on the Photos tab, and find the iPhoto albums that you want to include on the DVD.
- Drop the images from an album into an open Photo window in iDVD. This creates one slideshow. Repeat this process for each additional slideshow.
- Click on the Burn button and insert a blank DVD.
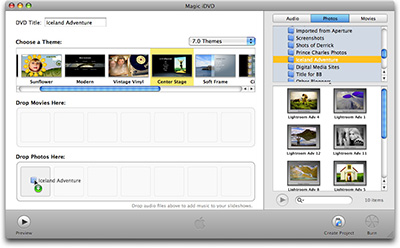
It's that easy. If you want to dress up your DVD or slideshow with music, custom transitions, and other goodies, just click on the Create Project button, then once you're finished with the enhancements, click on Burn.
You can learn more iPhoto 08 tips by listening to my podcast, iPhoto 08.
Technorati Tags: digital photography, software, The Digital Story


I like Send to iDVD better because it allows me to use the Ken Burns effect. but sadly Apple is neglecting iDVD in that it has too many known bugs. I burned a DVD with initial titles coming as green screen.