There are a handful of less obvious editing tools in iPhoto '09 that you may not have stumbled upon yet. Let's see how many of these five techniques you know.
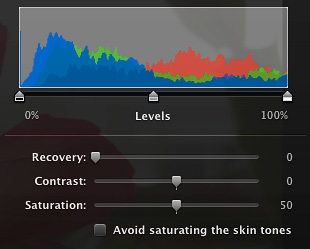
Recovery Slider -- If you open a Raw file in iPhoto '09, you have access to a highlight recovery slider. In editing mode, open the Adjustments panel, then hold down the Option key. The Exposure slider transforms into a highlight recovery tool, as shown in the graphic above. This only works with Raw files, however.

Use Retouch Brush as a Clone Tool -- I'll warn you, this tip is experimental at best. First, click on the Retouch tool. You can adjust the diameter of the tool by pressing the right and left bracket keys. The Retouch tool can behave as a clone stamp if you hold down the Option key and drag over an area of the photo that you want to copy. Then go to another area of the photo where you want to apply the copy, and click and drag again. You should get a clone of the area you copied. The results can be unpredictable, but sometimes they are just what you need. You can return to Retouch mode by simply clicking on an area without dragging. If you totally mess up your image by playing with this, just go to Photos > Revert to Previous, and everything will be OK.
Fine Tuning the Enhance Tool -- The Enhance tool is fairly magical, but it can also be a mystery. Didn't you ever want to tweak it just a bit? Now you can. Open the Adjustments panel first, then click on the Enhance tool. In iPhoto '09, the modifications made by the Enhance tool will appear in the Adjustments panel. All you have to do is tweak the particular slider that you want to modify. Pay particular attention to the Exposure, Saturation, Shadows, Temperature, and Tint sliders.
SHIFT Key to See Previous State -- Did you really improve the photo by making all of those adjustments? If you want to check your work, hold down the Shift key to see the previous state. Once you let go of the key, you'll return to the modified version.
Targeted Zooming -- To zoom in on a particular area of a photo, put your pointer exactly where you want a closer look, then press the 1 key for a 100 percent view of that area, or the 2 key for an even closer look. Return to "fit into view" mode by pressing the 0 key.
More Information About iPhoto '09
"Faces and Places in iPhoto '09" - Digital Photography Podcast 166
Loss of Sharpness When Straightening in iPhoto '09
iPhoto '09 as Your Geotagging Tool?
-
Technorati Tags: Derrick Story, digital photography, iPhoto '09, technique, Technology, The Digital Story


Cool tips. Thanks!
Wonderful tips! Many thanks!