You can make photo art notecards that won't be just good; they'll be professional too. And I'll show you how. This workflow uses Aperture software, an Epson printer, and Red River paper. It's fast, efficient, and archival. Once you're set up, you can print just a few cards whenever you need them, or for larger runs, spend a rainy afternoon creating entire sets of cards to sell or give as presents. Of course you can make substitutions to this workflow, but if you have the tools listed here, that's where I'd start.
Equipment
- Quality ink jet printer. I'm using the Epson R2400 for this project.
- Red River notecard stock. For glossy surface, use 60lb. Pecos River Gloss (#8451) and for matt surface, I recommend Premium Matte C2S (#1567). Both stocks are 7" x 10" and fold down to a 7" x 5" note card.
- Photo software. I highly recommend Aperture 2 (or later) for this project. Why? Because I create the notecards using Aperture's book making tool. This allows me to design everything precisely as I like, and then it remembers all my settings so I can revisit the project at any time and print more cards that look *exactly* like the original set.
- Envelopes. You can use what ever you want here, I found Darice 5" x 7" envelopes at the craft store for about 10 cents each.
Designing Your Card
Since I'm using Aperture, all of my images were already organized. I decided to make a themed set of cards featuring my recent shoot at Bodie State Historical Park in Northern California. I highlighted half a dozen shots for this project, then clicked on File > New from Selection > Book. This is the first step to opening the layout tool. Next, in the following dialog box, choose "Custom" from the "Book Type" popup menu. We won't be using any predesigned templates for this project. Click the New Theme button, give it a name, such as "5 x 7 Notecard," and enter the following information:
Page Size - Width: 7", Height: 10", Margins - Top: 5.5", Bottom: 0.5", Inside: 0.5", Outside: 0.5". Then click OK.
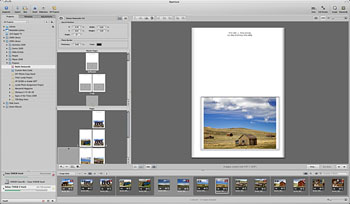
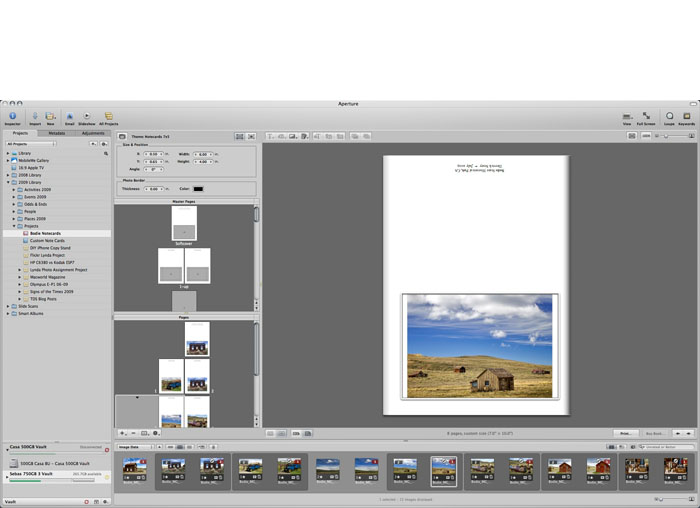
The Aperture layout tool. It was originally designed for books, but it's great for notecards too. Click to enlarge image.
Your selected images will be added to the new project you just created, and you'll be greeted with the layout tool interface. Open up Master Pages (Gear icon > Show Master Pages), and click on the 1-up template. Go back to the Gear icon and choose "Show Layout Options." You'll see new dialog boxes appear above the Master pages that allow you to specify settings.
Go back to the Gear menu, choose Add > Photo Box. A placeholder box will appear on your 1-Up Master page. Click on it to select, then add these numbers to the Size & Position box that's above the Master Pages box:
X: 0.50, Y: 0.65, Width: 6.00", Height 4.00", Angle: 0°. You can adjust these settings later to your particular tastes, but this will get you started. Then right-click on the photo placeholder and choose from the popup menu: Photo Box Alignment > Scale to Fit Centered. You've now set up your template. You can add text by choosing Gear > Add > Text box. Type your text in it, then click on the "T" at the top of the interface to format it. You'll probably have to rotate it 180° if you want it to print correctly on the back of the card.
Now go to the Pages box (below Master Pages) click on the 1-Up thumbnail, and drag a photo from the Filmstrip to the empty placeholder in the big browser window. To make sure your Master Page settings are honored, I recommend going back to the Gear icon and choosing: Reapply Master. You've now designed your first notecard. You can add more notecards by going to the + icon and selecting "Add New Page" from its popup menu. I created eight of these 1-Up pages for my Bodie notecard set.
Get Ready to Print
As with any big printing project, make sure your screen is calibrated and your printer is full of ink and ready to go. I choose the R2400 for this project because it handles card stock easily, plus it seems to like Red River paper. To avoid paper feed problems however, I only load one sheet at a time for notecards.
For notecards using the 60lb. Pecos River Gloss, use the following settings in Aperture.

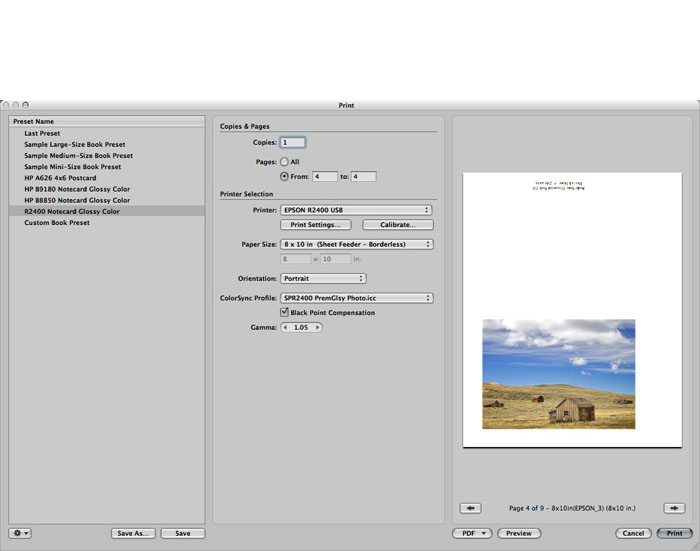
The Aperture Print Dialog. You can save your settings as presets so it's easy to print the job later on. Click to enlarge image.
Select the notecard you want to print, then click the "Print" button in the lower right corner of the Aperture interface. A dialog box will appear with "Custom Book Preset" selected in the left hand column. Make a test printing one card, so I recommend that you use the "From X to X" setting instead of Print All. Next, select your printer from the popup menu. And for paper size, I've had great luck with 8" x 10" sheet fed (even though the paper is really 7" x 10"). I set the ColorSync profile for Epson glossy paper (in this case, SPR2400 PremGlsy Photo.icc), then click the Save As button in the lower left corner to save this preset. Give the preset a descriptive name, such as "R2400 7x10 Notecard Glossy," click OK, then print. Aperture will remember this preset, and you can use over and over again.

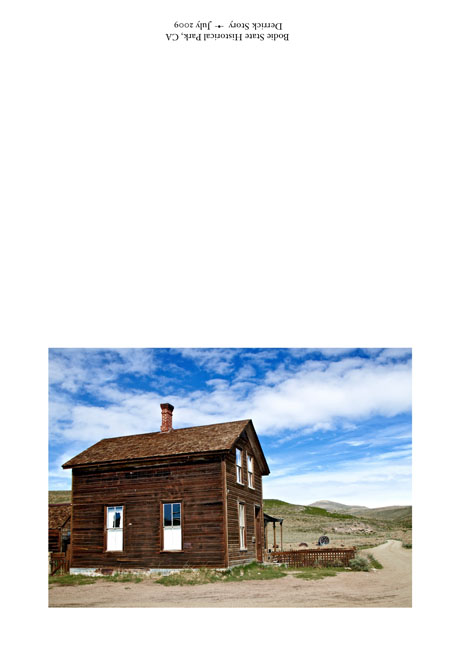
Sample notecard before folding. Red River paper is scored in the middle so it's easy to fold and get a professional looking card. Click to enlarge image.
You have other options in this dialog box too, such as setting Black Point (which opens up the shadow areas) or increasing gamma (which brightens up midtones). The nice thing about these adjustments is that you can tweak your output without having to mess with the picture itself. If I do make print adjustments, I note those settings in the description area of the photo so I can use them again next time.
To print matte surfaced cards, I swap out the black cartridges in the R2400, then create a new preset in the Aperture Print dialog box that uses the Enhanced Matte Paper ICC profile. I then load up a sheet of Premium Matte C2S and make a test print. If I'm not satisfied with the initial output, such as the shadow areas rendering just a little too dark, I make a "New Version from Version" by right-clicking on the image. Now I can adjust the image for the matte surface and try another print.
Since all of my print settings are saved as presets, and my card layouts are saved as templates, I can come back to this project when ever I want to print additional cards. If you use Aperture's Vault, it will save your settings to a backup drive.
Final Touches
Once all the printing was done, it was fun to spread out the cards and choose my favorites. Some images looked better with the glossy surface while others were really nice on matte. I carefully folded the cards along the score, then bundled each one with its matching envelope. I even found 5" x 7" cardboard boxes at the craft store that I could use for packaging sets of notecards.
Obviously there are variations to just about every step in this process. You can use other photo applications or printers. The tools I chose were the result of testing, with these being the easiest and most efficient.
And I have to say, now that the project is over, making custom notecards from my own pictures is very satisfying.
-
Technorati Tags: Aperture, Creative Output, Derrick Story, Digital Photography, printing, Red River Paper, technique, Technology, The Digital Story, Notecard


That's awesome! I didn't know you could use Aperture's book thingy that way. Thanks.
curious Derek...you print on the Red River paper using the Epson glossy ICC profile, instead of Red River's profile?
As for ICC profiles, I used the Epson glossy for the Pecos River Gloss, and my color was quite consistent. If I didn't like the look after a test, then I wouldn't think twice about downloading the ICC profiles from Red River. I've had good luck with them in the past.
As for the flexibility of the Book Making feature in Aperture, it's virtually unlimited once you get the hang of it. Listen to that podcast about it. It's very cool.
http://digitalmedia.oreilly.com/2008/05/06/aperture-layout-application-schorr.html
I love Aperture's book tool and use it for more than books, but still hadn't thought of making folding cards with it. Thanks for the tips.
Thanks, Derrick, for the tip. I have been doing something like this using Word, but being able to do it right out of Aperture is sure a plus!
One problem I am encountering, though: how does one rotate a text box 180º in the Aperture book utility? Can't find a menu command anywhere.
Thank you!
Okay - I just ordered some sample packs from Red River right now. I am going to experiment even though I don't have the best printer in the world. I love my Aperture and I haven't done any of the book stuff yet. I look forward to giving this a try.
Thank you so much for all your tutorials on these things!
Hi,
Great tutorial. I found that the master template already had a photo box, so did not need to add one.
Question: I found that for a 4" x 6" wide photo, through trail and error, to set the X coordinate to 0.4 inches. So, when printed, the photo box would be centered on the 7" paper. However, I would have thought to set the X coordinate to 0.5 inches for centering.
Is this discrepancy due to printing 7" wide paper with an 8" printer setting?
I found a way to make a portrait (vertical) notecard. Just create a new custom book template specifying 10" width and 7" height. The rest of the process flow follows what Derek has already provided.
Hi people, all human situations have their inconveniences. We feel those of the present but never see nor feel those of the future
Hi guys, all human situations have their inconveniences. We feel those of the present but never see or feel those of the future
exemplary work. You have gained a new fan. Please keep up the good work and I await more of the same interesting posts.
Excellent work. You have gained a new reader. I hope you keep up the good work and I await more of these excellent posts.
May I congratulate you on your Excellent work.You have won me over and gained a new fan. in comparison to many of the posts on the world wide web this is a masterpiece, I am ecstatic that I found your work. I will be linking to this from all my sites.
Fantastic work. You have gained a new fan. I hope you can keep up the good work and I look forward to more of these absorbing posts.
Hi Derrick,
I wondered if you could recommend another software other than Aperture. I don't have a MAC, but I do have Lightroom, Adobe Acrobat, Photoshop, etc.
Any suggestions would be helpful.
Great tutorial.
Carolyn