When there's a dark area in your photograph that you want to lighten, the common inclination is to reach for the Dodge tool. I don't know about you, but I find the Dodge tool one of the most difficult to use for getting natural looking results. On my images, it always looks like someone spilled bleach on the photo.
A more elegant approach to lightening a dark area is to use the brushing tool in the Shadows & Highlights brick. It's nearly foolproof in use, an the results are fantastic.
 The Shadows & Highlights brick in Aperture's Adjustments panel.
Here are the steps for using the Shadows & Highlights brush
- Click on the gear icon in the Shadows & Highlights brick (as shown in the illustration).
- Choose Brush Shadows & Highlights In
- Don't click on the check box on the left side. That will happen automatically.
- In the adjustment brick, move the Shadows slider to about 25 for a starting point.
- In the floating palette (that will appear over your photo), move the Strength slider to 1.
- Choose your brush size and softness (in the floating palette).
- Start painting in the dark area you want to lighten. Once you've painted an area, you can adjust the strength of its effect by moving the Shadows slider in the adjustment brick.
- If you need to clean up an overpaint, click on the eraser icon in the floating palette.
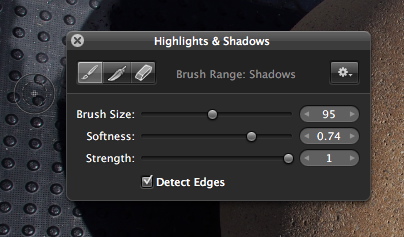 The floating palette
You can always reset the adjustment and start over by clicking on the gear icon in the floating palette and selecting "Clear from entire photo." But I don't think you'll have to do that often, because this is such a beautiful method for lightening dark areas.
More Aperture Tips and Techniques
To learn more about Aperture 3, (especially brushing techniques) check out my Aperture 3 Essential Training on Lynda.com. Also, take a look at our Aperture 3 Learning Center. Tons of free content about how to get the most out of Aperture.
My next open Aperture Workshop is scheduled for Nov. 2012, in Santa Rosa, CA. You can get on the pre-registration list, plus learn about all the other photography workshops offered this season by visiting the TDS Workshops page.
The Digital Story on Facebook -- discussion, outstanding images from the TDS community, and inside information. Join our celebration of great photography!


Great tip Derrick - Had me wondering why the heck I hadn't thought of that before!! :-)
If it hadn't been for my utter incompetence with the Dodge tool, I may not have discovered it myself :-)
Thanks for the tip Derrick. I always forget about using the Shadows and Highlights brick. I'm going to give it another try now.
I know it wasn't your main point, but - I sure am glad to find out I'm not the only one that has trouble using the dodge tool!
Great, I learnt something New about Aperture. Using the overall adjustments for highlights and shadows occasionly, I haven't thought of a more precise and selective way as you described. Thank you!
Using brushes with adjustment bricks can be really powerful. I've tested many of them. But it never occurred to me to use S/H this way. Brilliant. And let's hope the Burn/Dodge tool is waaay better in A4.