October 2005 Archives

Playing with the Flock Preview

What perfect timing for my debut post, as I've just downloaded and installed the developer preview (v 0.4.9) of Flock, a new open source web browser based on the Mozilla code base that's been receiving quite some buzz. My impressions of this very cool browser are still developing. I appreciated Axel Hecht's (of Mozilla Europe) more practical take on Flock. There's a lot to be said about Flock, but to keep things relevant to The Digital Story and you photographers out there, I thought I'd focus on their Flickr toolbar that comes bundled with the application.

One of the photos from the default photo set offered when you launch the Flckr topbar was from Flock's launch party, which I got to serendipitously attend during Web 2.0.  I'm barely visible under the "F" of the Flock sign and a few more pixels to the left.
One of the photos from the default photo set offered when you launch the Flckr topbar was from Flock's launch party, which I got to serendipitously attend during Web 2.0. I'm barely visible under the "F" of the Flock sign and a few more pixels to the left.

Yes, it bundles with the browser, which is a pretty different approach. Apparently, the folks at Flock are applying the "staff recommendations" concept to web browsing features. So Flock comes integrated with cool services that early adopters have embraced like del.icio.us, Flickr and Technorati. They offer a blogging console (from which I'm composing this post right now) that easily facilitates posting images via Flickr. Dragging a thumbnail from the photo strip in the topbar embeds it into your bog post. Below is an example if what I'm describing.
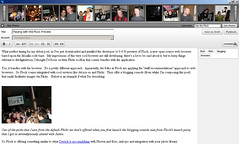
Flock's blogging console and Flickr topbar made composing this entry very straightforward.

So Flock is offering something similar to what Derrick is accomplishing with Photon and Ecto, remote blogging integrated with your photo library in a way I find to be quite useful. Still, I wonder how many others will really benefit from these types of features. The majority of web users are certainly not interested in tools for weblogs. I presume that at least some of you readers of The Digital Story would find value you in this.
Isolating Backgrounds

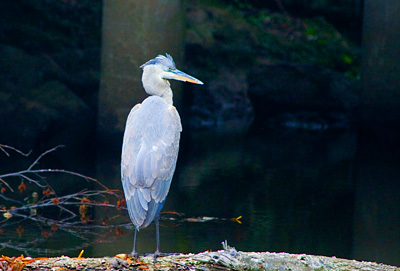
Blue Heron
Blue Heron portrait jumps out because of the isolating background.

One of the situations I look for when shooting portraits, whether in the wilds or the local park, is an isolating background. I was very lucky here. I had been shooting gulls bathing in a fresh water pond where a creek flowed into the ocean. I noticed in the corner of my eye this Heron in the distance. The overcast light was illuminating him beautifully, but the background was dark from a concrete bridge. What a treat!

I switched to spot metering mode so I could base my exposure on the heron and not the background, then began shooting. I would capture about 10 frames, move closer a few feet, then shoot another series -- always being respectful of his space. Once I had the shot I wanted, I backed off and let him enjoy the rest of his afternoon.

Keep an eye out for this type of lighting situation. And if you can, get your shot without disturbing the subject. (Canon Digital Rebel XT, ISO 800, 75-300mm IS lens, 1/350 @ f-5.6)

Technorati Tags: , , ,

High ISOs in the Wild

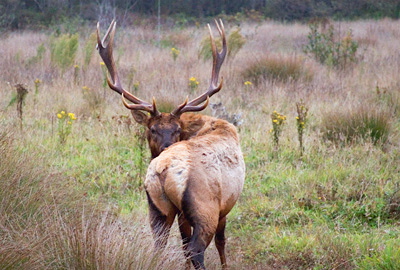
Elk in Twilight Meadow
Elk captured at dusk in meadow with Canon 5D set to ISO 1600.

Sometimes nature presents you with a great shot... but in less than ideal lighting. This was the case with this Tule Elk I discovered in a meadow at twilight. His beautiful antlers (14 points!) were easily discernible with my eyes, but even at ISO 1600, my Canon 5D needed a slowish 1/15 of a second at f-5.6. Without the ability to use a high ISO, I never could have captured this shot.

In a future podcast I'm going to discuss image sensor size and its relationship to usable images at high ISOs.

Technorati Tags: , , ,

One of the great debates among advanced digital photographers is whether to use the JPEG or Raw format for recording images. Both formats are capable of producing high-quality pictures, but when you shoot in JPEG mode, the camera processes the image for you so it is "complete" when you upload it to your computer.

Images captured in Raw format, on the other hand, are not complete when you transfer them to your workstation. This process is more like taking a negative into a darkroom where you can adjust white balance and exposure until you get the perfect image. It's true that you can make those same adjustments in post-production with JPEGs, but it's different because you're readjusting information that's already been set. With Raw you are actually mapping the original bits of information.

One of my battle cries is “good data in; good data out.” The better you capture your shot, the easier it will be to produce high-quality output. By shooting in Raw mode, you're able to delay some difficult decisions until you're in the comfort of your own home, working at your computer.

A Practical Example for Shooting Raw

A good example is determining the correct white balance, which is often difficult at the moment of exposure, especially under fluorescent or mixed lighting. When you shoot in JPEG mode you have to make an immediate decision and, if you're wrong, you have to figure out how to correct it later.

In Raw mode, it doesn't make as much difference which white balance setting you have when you shoot the picture. The camera just records the “raw” data and lets you fine tune the color later while at the computer. You can apply different color temperatures to the image, view their appearance, and have the computer apply one that you like without any compromise to image quality. It's just like choosing white balance at the time of exposure (only better because you're looking at a 17” monitor, not a 2” LCD screen!).

Raw Software

If your camera has the ability to shoot in RAW format, it will include software to work with these images. Photoshop users can also work with Raw files right in Photoshop using the Camera Raw plug-in. (This includes Photoshop Elements that's available for less that $100.) And now iPhoto 5 users can include Raw files in their libraries. So no matter which software you use, this method is as close as you can come to a true digital darkroom, and it provides you with maximum flexibility for processing your images. Working with Raw images requires more work and processing time later at the computer. But for situations in which you want absolute control over quality and final output, Raw is an excellent option.

Which is best for you? A common-sense approach would be to capture at the highest JPEG settings for your “everyday” shooting, and take advantage of the Raw format for difficult lighting situations, or when you want to squeeze every drop of quality out of your picture-taking process.

Listen to the Podcast

Now that you have your curiosity piqued, it's time to listen to today's audio show title, "Raw: To Shoot or Not to Shoot." You can download the podcast here (34 minutes).

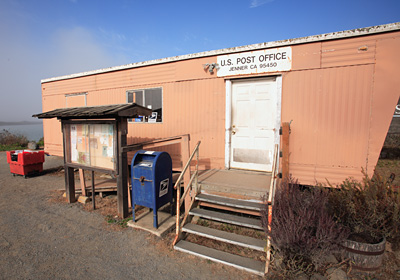
Jenner Post Office

Jenner Post Office
I often prefer to use a wide angle lens for these types of shots... it's more dramatic.

This little Post Office in Jenner, CA (up the Northern California coast) had terrific morning light and a pleasing color palette. I took the first shot standing back at a distance with the zoom set to 40mm. But the image just didn't have the impact that I wanted. So I changed the focal length to 17mm and got as close as possible for this composition. Here's the resulting image.

I'm posting this shot as a reminder to try different angles and focal lengths when you find interesting subjects. It's particularly effective when they hold still for you...

Technorati Tags: , , ,

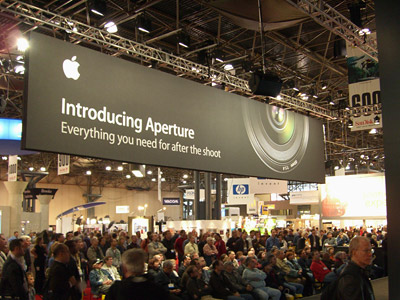
Aperture Draws Crowds at Photo Expo

Photo Expo
Apple with its new product, "Aperture" has been a big star at PhotoPlus Expo in NYC. Photo courtesy of Scott Sheppard - Inside Mac Media, Inc.

I've heard from many sources that Apple's presence on the PhotoPlus Expo trade show floor added the extra boost of energy that the event needed. Apple chose this venue to unveil Aperture, its new pro workflow solution that's particular appealing to Raw shooters. I'll cover more on this software in the coming weeks.

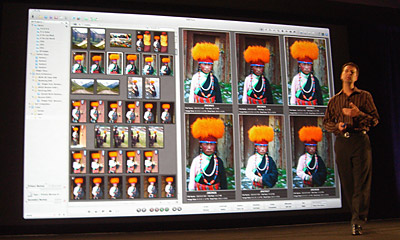
Aperture Demo
Rob Schoeben, VP of Applications Marketing, introduces Aperture at the Apple press event in NYC. Photo courtesy of Scott Sheppard - Inside Mac Media, Inc.

In a nutshell, Aperture is designed to make your Raw workflow as painless as managing Jpegs. The engineering team has spent almost two years researching how photographers like to work and what's most important to them in post production. The design team took what they learned, combined it with the power of Tiger, and created Aperture.

This isn't iPhoto. It will cost you $499. For pros, it's justifiable because at $100 an hour in time savings, you get your money back quickly. To really appreciate this app, you have to see it operating on two side-by-side 30" displays. (Today's hardware announcements are in concert with Aperture and Final Cut Studio.) This is particularly helpful when you're culling images -- placing them side by side at 100 percent -- trying to quickly determine which are the best.

On the downside, the hardware requirements are pretty steep for this application. If you have an old Mac... forget it!

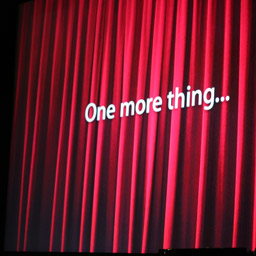
Still One More Thing...

One More Thing...

This week Apple is making another big announcement in conjunction with PhotoPlus Expo. I think we're going to see some serious photography tools coming our way. For more musings on this, see my O'Reilly weblog, Ladies and Gentlemen, It's Photography Time.

Digital cameras have become adept at making movies as well as capturing still images. I've had great fun with the Casio EX-P505 that shoots amazing video using the M2S4 (MPEG-4) Codec. I get 30fps at 640x480 resolution and stereo audio. Many other cameras offer comparable specs too.

For some time now, we've been able to watch the movies we make with these cameras on our computers and even burn them to DVD for TV viewing. But as of Oct. 12, 2005, we can start thinking about carrying our videos around and sharing them with others on the new Apple iPod video that displays movies at 320x240 resolution in full stereo.

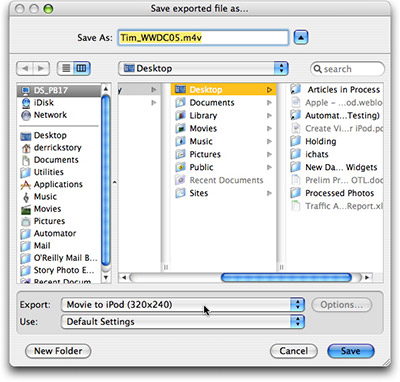
It's quite easy to prepare your movies for the iPod. Just download the latest version of QuickTime Pro (the player only version is free, but to edit and prepare content for the iPod you need the Pro version that costs $30) and open your home movie. Then go to File > Export... and select "Movie to iPod" from the drop down menu as shown below.

Export to iPod
Open your movie in QuickTime Pro, then choose the "Movie to iPod" export option.

You should know that the ripping process is processor-intensive and will take your computer a while, so you might want to go grab some dinner while it prepares the movie. Once it has finished making your production iPod-frienndly, you can open iTunes 6 and drag the movie to the "Videos" folder in the left hand "Source" column. If you don't have iTunes 6 yet, you can download it for free. Now, when you connect your iPod video, it will automatically grab the movie you just loaded into the Video folder, and you can play it right alongside the latest episode of "Lost."

If you want more details, Apple has published a helpful tutorial titled, Creating Video for iPod.

Tips for Capturing Video with a Digital Camera

Here are a few tips to help you capture iPod-friendly video. There's also a helpful article on O'Reilly's Digital Media site by Ian David Aronson that provides additional hints.

  • Shoot in good lighting. Video needs lots of light. If it's too dark inside, then go out, at least for your first project or two.
  • Use a big memory card. Video takes up much more memory than still pictures. I recommend 1GB.
  • Record at the highest quality and resolution possible. For example, if you camera supports 640x480 at 30fps, go for it.
  • Get close. Compose your frame tightly. These movies will be viewed at 320x240, which isn't exactly movie theater size. So stay away from distance shots and get close to your subjects.
  • Try to avoid too much background noise (audio). On-camera microphones tend to pick up *everything,* so try to control background noise best you can. And beware of wind! It sounds terrible.
  • Figure out what you're going to shoot before you press the record button. You don't have to have a full blown storyboard, but sketch out your scenes beforehand.
  • Keep your movies to 5 minutes or less. You have a better chance of holding your audience's attention.

Listen to the Podcast

Now that you have your gear together, it's time to listen to today's audio show title, "Making Movies with Digital Cameras." You can download the podcast here (23 minutes). And for a real treat, I've posted a sample movie titled, The Potting Bench. It's iPod ready now.

"The Potting Bench" - Video #1

I've been experimenting with the movie-making capabilities of digital cameras for quite some time. And I've found that they work great for short subjects. I'll be publishing these movies on a regular basis here. They will be optimized for both computer and iPod playback. So if you've purchased one of the new iPods with video capability, this movie, and the ones that follow, will look great on the 'pod.

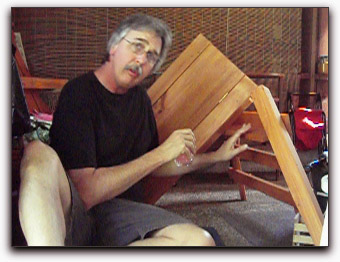
Today's film, "The Potting Bench," was shot with a Contax SL 300R T* at 640x480 @ 30fps. To get better audio than what the Contax can record with its onboard microphone, I used an iPod 3G with a Belkin microphone adapter. I then synched the audio and video in QuickTime Pro -- all very simple tools.

The Potting Bench
Scene from "The Potting Bench," a movie about the follies of easy-to-build home projects.

I added the opening in closing titles in QuickTime Pro too. If you're familiar with the free set of QuickTime AppleScripts, take a look at the "Rolling Credits for Front Movie." It's what I used to create the opening and closing titles for this piece.

But enough talking. Let's get to watching. Download "The Potting Bench" here (2:52 movie).

Note: I'm using a relatively new codec here -- .m4v -- that requires the latest version of QuickTime or iTunes. If your browser doesn't download it easily by simply clicking on the link, then right-click or ctrl-click on it and choose "Download linked file..." Once the file has downloaded to your desktop, or wherever you put this content, you can open it in QuickTime 7 or iTunes 6. Post a comment if you have more to add :)

Jobs Group Shot

I mentioned yesterday that my normal workflow for Raw images has been disrupted by the new .CR2 files from the Canon 5D DSLR. Neither Adobe Bridge nor Apple iPhoto 5 allow me to browse these Raw thumbnails. Once I find a file I like, however, I can open and edit in Camera Raw.

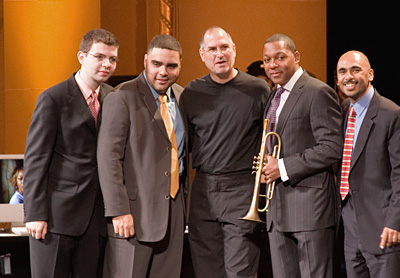
Looking for a temporary workaround, I decided to open the folder of Raw files from the recent Apple "One More Thing..." event in Canon's Digital Photo Professional software that comes bundled with the 5D DSLR. I selected the post-event group shot with Steve Jobs and Wynton Marsalis that was captured from across the room at ISO 1600 with no flash.

The first thing I noticed was that the user interface for Canon's software had improved over their other apps I had used in the past. I was able to quickly locate my Raw files and open their thumbnails. You can rate you pictures with a "check" system, sort by rating, rotate, and view the metadata. To edit, simply double-click on the image. Most of the basic tools are there. I played with white balance mostly, but tried brightness and curves too. When I was finished, I had the option to convert and export the data as an Jpeg, 8-bit Tiff, or 16-bit Tiff. I chose 16-bit Tiff. I would have liked to have a Photoshop file choice too though.

Once I opened the Tiff in Photoshop, I made a few more adjustments to create the picture you see here. Overall, I prefer the Bridge/Camera Raw combination, but for the time being, will probably use the Canon software for browsing my Raw files, then actually work on them in the Adobe software. I am glad, however, that I tried Digital Camera Professional. It's an attractive way to view and sort your Raw pictures (Jpegs too!)... and it's bundled free with the camera.

Dealing with Canon 5D Raw Files

Pacifica, CA

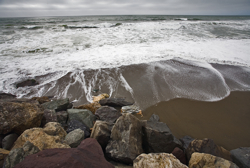
I was in Pacifica, CA today for an appointment and had a chance to test the Canon's 5D Raw format. I must say, it was quite exciting to attach my 17-40mm f-4 zoom to the 5D and see the world full frame at 17mm. The 5D kept up with my pace of shooting and didn't slow me down as it recorded in Raw.

Processing the images was another matter. Adobe Bridge couldn't generate thumbnails for the .CR2 files (Raw on the 5D), nor could iPhoto 5. I could open the images by dragging them to Photoshop and editing in Camera Raw 3.2. But to browse the thumbnails, I had to use Canon's Image Browser application.

I'm hoping that we'll see updates to Bridge and iPhoto 5 soon. In the meantime, my workflow is a little clunky for Canon 5D Raw files.

"To Shoot a Bottle" - Podcast #2

You don't need expensive lighting to get professional results in the studio, especially for product photography. With a little planning, you can use natural light from a window to capture compelling shots. This is a great technique for posting eBay for-sale items and article illustrations. Here's a quick tour of how to set up your existing light studio.

First, you need to find an area with a light source. A north window is ideal because the light is diffused and not too harsh. Then, set up your backdrop. White photographer's seamless backdrop paper works best, but you can use a roll of butcher's paper too. You want to create a "sweep." That means that you attach the paper to the wall (or any vertical surface), then have it curve as it bends toward your horizontal shooting platform. The gentle curve of the sweep eliminates any distracting edges in the background. The white background enables you to place your shot seamlessly on a white web page. Once your backdrop is set up, put your subject on the shooting platform.

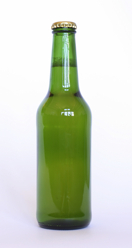
Existing Light Bottle
Glass bottle shot with window light and butcher's paper for backdrop. ISO 100, 1/4 sec. @ f-8, +2 exposure compensation.

-------------------

Mount the camera on a tripod. Set the ISO at 100 to keep image noise to a minimum. Adjust your white balance to "cloudy" to compensate for the bluish light coming through the north window. Set exposure compensation to +2. You need to do this because your camera's light meter will be fooled by the bright white backdrop forcing it to underexpose the subject. By setting your exposure compensation to +2, you will have cleaner whites in the background and a properly exposed subject. If the shot turns out too bright, back off exposure compensation to +1 or +1.5.

Finally, set the self-timer and make sure the camera is focusing on the subject. The self-timer will prevent jarring the camera when you initiate the exposure. Check your shot in the LCD viewfinder; it should look pretty good. The only adjustment you should have to make is possibly adding some side-lighting with reflectors (foamcore or white cardboard works great), or exposure compensation for an image that's too bright or dark.

If you'd like to learn more, check out my Digital Photography Pocket Guide, 3rd Edition. For a crash course on product photography with studio lighting, see my article titled, Professional Product Shots Made Easy. And feel free to post your questions and comments here. See you next time!

If you haven't listened to it already, you can download the podcast here (23 minute show).

Recalibrating Our Spending Habits

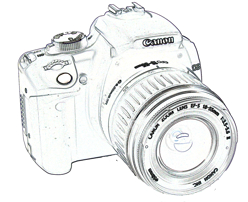
Canon Digital Rebel XT

I was thumbing through Popular Photography last night and noticed that I could buy a top of the line Canon 35mm camera (EOS-1V) for $1,650. In all my years of running Story Photography, I've never owned a pro model film camera, and have survived (nicely) with the midrange Elan 7. In fact, I wouldn't even spring for the EOS-3, a great camera, that's available for less than $900.

Yet, I've plunked down $1,500 for a Canon 10D, $900 for Rebel XT, and recently $3,200 for the Canon 5D digital SLR bodies. Funny how our perceptions change based on the tools that we perceive we need. To my credit, I resisted buying a digital SLR body when they were running close to $10,000. I stuck it out with advanced amateur models until the price became slightly more reasonable. I'm not that crazy.

Canon 5D Already Making Waves

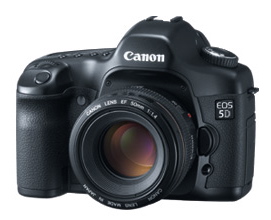
Canon 5D

My Canon 5D has just shipped from B&H Photo. While I wait for it to arrive, I've been chatting with a couple photographers who are already using it. James Duncan Davidson has been shooting with the Canon 5D to cover the Web 2.0 Conference in San Francisco. He's really thrilled about the images he captured at high ISOs, even up to 3200. I examined them myself (you can too), and I must say they are stunning. It appears that this camera is destined to become the darling of many photojournalists and wedding photographers. More on this soon.

Barn and Clouds

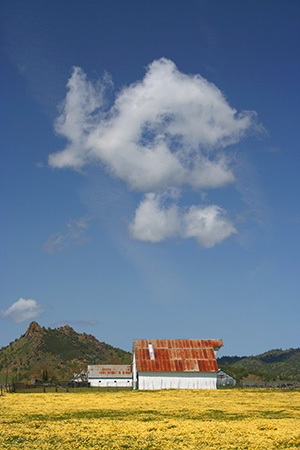
Barn and Clouds

Compact cameras generally use "Auto Flash" as their default mode. And for most flash photography, auto gets the job done. But if you want to improve your photos, to the point where they rival professional images, spend a few minutes exploring the other flash modes on your camera.

Start by locating the "lightening bolt" icon on you camera -- that's the universal symbol for electronic flash. If you're lucky, it's a button control on the back of your camera, which means easy access. Some cameras bury the flash controls in the menu system. If that's the case for your digicam, you'll have to dig a little deeper to find it.

My favorite option is "flash on." This control makes the flash fire regardless of the ambient lighting conditions. I use it often for outdoor portraits. Why, because when working in nature, the light isn't always coming from a flattering angle, such as with this image:

No Flash Portrait

By enabling the "flash on" option, you can add a pleasing front light to the portrait, put a little sparkle in the eyes, and reduce skin imperfections. Look at the difference in this portrait.

Flash On Portrait

A variation of this technique is the "slow synchro" flash mode. Sometimes this option is located in the menu items as "Nighttime Flash," "Nighttime Portrait," or "Night Snapshot." I use this mode at evening parties or whenever I want to capture some background environment along with the main subject.

Slow synchro flash will immediately elevate your party shots above everyone else's who will have a dark background and a harshly lit subject. The main thing to keep in mind is to hold the camera very still during exposure, even for a second or two after the flash has fired. That will keep your background from becoming too blurry. Here's an example.


Nighttime Flash Mode

These simple techniques will dramatically improve your pictures. If you'd like to learn more, check out my Digital Photography Pocket Guide, 3rd Edition. And feel free to post your questions and comments here. See you next time!

If you haven't listened to it already, you can download the podcast here (26 minute show).

Why "The Digital Story"?

I spend quite a bit of time thinking about how to explain things I've discovered. For example, right after I figured out how to use the High Dynamic Range command in Photoshop CS2, I wanted to show it to others. Even during my learning process, I was capturing screenshots and making notes for an article. You'd think I'd find this obsession distracting. But it isn't. It's fun.

Creating an outlet for these discoveries is part of the reason why I've started The Digital Story site. Despite the books I write, classes I teach, and articles I publish for O'Reilly Media, there's still more bouncing around upstairs. Everyday stuff like, why I like one camera model over another, what's the best USB mic for podcasting, and how to make real movies with cheapo digicams. This is the kind of stuff that I'm going to cover here. I'll make regular written posts, will produce a weekly audio show (that you can subscribe to), and share lots of pictures.

You can add fuel to this fire. I'm guessing that similar thoughts pop into your head during your learning and creating process. Send them to me. As the old saying goes, "if you're wondering about something, others probably are too." (Is that really an old saying?)

The tagline for this site is "new tools for the creative mind." They can be as sophisticated as a digital SLR camera, or as simple as nylon stretched over your lens to make a diffusing filter. Regardless, I'd like this to be the office water cooler for those discussions. I hope you'll stop by often for a drink.

Oh, and one other thing... the title of the site: The Digital Story -- That's me, Derrick Story. And I'm definitely digital.