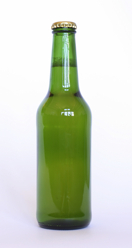
You don't need expensive lighting to get professional results in the studio, especially for product photography. With a little planning, you can use natural light from a window to capture compelling shots. This is a great technique for posting eBay for-sale items and article illustrations. Here's a quick tour of how to set up your existing light studio.
First, you need to find an area with a light source. A north window is ideal because the light is diffused and not too harsh. Then, set up your backdrop. White photographer's seamless backdrop paper works best, but you can use a roll of butcher's paper too. You want to create a "sweep." That means that you attach the paper to the wall (or any vertical surface), then have it curve as it bends toward your horizontal shooting platform. The gentle curve of the sweep eliminates any distracting edges in the background. The white background enables you to place your shot seamlessly on a white web page. Once your backdrop is set up, put your subject on the shooting platform.

Glass bottle shot with window light and butcher's paper for backdrop. ISO 100, 1/4 sec. @ f-8, +2 exposure compensation.
-------------------
Mount the camera on a tripod. Set the ISO at 100 to keep image noise to a minimum. Adjust your white balance to "cloudy" to compensate for the bluish light coming through the north window. Set exposure compensation to +2. You need to do this because your camera's light meter will be fooled by the bright white backdrop forcing it to underexpose the subject. By setting your exposure compensation to +2, you will have cleaner whites in the background and a properly exposed subject. If the shot turns out too bright, back off exposure compensation to +1 or +1.5.
Finally, set the self-timer and make sure the camera is focusing on the subject. The self-timer will prevent jarring the camera when you initiate the exposure. Check your shot in the LCD viewfinder; it should look pretty good. The only adjustment you should have to make is possibly adding some side-lighting with reflectors (foamcore or white cardboard works great), or exposure compensation for an image that's too bright or dark.
If you'd like to learn more, check out my Digital Photography Pocket Guide, 3rd Edition. For a crash course on product photography with studio lighting, see my article titled, Professional Product Shots Made Easy. And feel free to post your questions and comments here. See you next time!
If you haven't listened to it already, you can download the podcast here (23 minute show).


Instead of exposure compensation to control for underexposure of the bottle because of metering off the white paper, would using spot-metering be useful? If not (which I'm guessing is the answer), why not? For a beginner like me, I'm guessing my best bet is to bracket the exposure. I hated doing this with film for anything but crucial shots, but I have begun doing this more and more now that I'm digital. I'm just never sure what I should set for the upper and lower limits of the bracket.
Anyway, just some musings. I'm really enjoying the podcast. Keep up the great work. I've learned a ton already.
Actually, you can use the spot meter to get an accurate exposure, provided that is, you have a true "spot meter" and not a "partial" meter. Most cameras have "partial" that measure 5-10% of the center area. Often partials are fooled because they react to part of the white background just like evaluative patterns do. True spot meters, on the other hand, have a much narrower sensitivity area. I use exposure compensation instead because I've been burned at times by my spot meter :)
Thanks for the suggestion. I'm using a Nikon D70 (because I like my N70 so much) and the spot meter seems pretty good, and I can adjust its diameter. I love my N70, especially since I can continue using my old lenses, but I'm a little disappointed that I can't shoot at ISO 100 and there's a smaller range of shutter speeds than the N70.
Looking forward to your next podcast and the release of Aperture.
I discovered this podcast last Friday (31 Aug 2007) and have since been going through them all from the beginning. After I had listened to them all, I was going to write in to suggest that product photography be covered as we're moving house to another country in a few months and are about to launch an eBay selling campaign to clear out some clutter. I was stoked to find that this very thing was covered in Podcast #2!
So far I've listened to over 20 podcasts and am loving the learning. I've also ordered the DP Pocket Guide 3rd Edition (which, you may be interested to know, is about £10 cheaper to have shipped to Luxembourg from Amazon.com than it is from Amazon.co.uk. It pays to shop around!)