February 2023 Archives

This is The Digital Story Podcast #884, Feb.28, 2023. Today's theme is "AI Photo Editing on Your Smartphone." I'm Derrick Story.

Opening Monologue

Using AI editing tools on a smartphone makes even more sense than on your computer. Image enhancement on mobile devices is not the easiest task in the world. Their smaller screens and less precise input (aka our fingers) present a bit of a challenge. AI tools can help, and today, we're going to look at one such offering from Skylum that can really speed things up. I hope you enjoy the show.

Digital Photography Podcast 884

Tune-In Via Your Favorite Podcast App!


podcast-icon.jpeg

Apple Podcasts -- Spotify Podcasts -- Stitcher

Podbean Podcasts -- Podbay FM -- Tune In

AI Photo Editing on Your Smartphone

Skylum just updated their imgmi app to include AI Skin and AI Body adjustments. Added to the existing tools - Sky Replacement, Remove Powerlines, AI Enhance, Basic Adjustments, Crop & Rotate tool, Erase, and a collection of LUTs called filters - this app is rounding out nicely, especially for one so young (Sept. 2022). Think of it like Luminar Neo for your phone.

There are versions for iPhones, iPads, and Android devices. I haven't tested the Android version, but the ratings on the iOS app store are more favorable than those on Google Play.

The iOS version taps your camera roll and allows you to save finished pictures as a new image back to the same location. Once you return to Photos for iOS, you can continue working on the picture with its tools. Together, Photos + imgmi, you have a powerful image enhancement package that's easy to use.

Before Editing IMG_0290.jpeg

After just a few clicks.
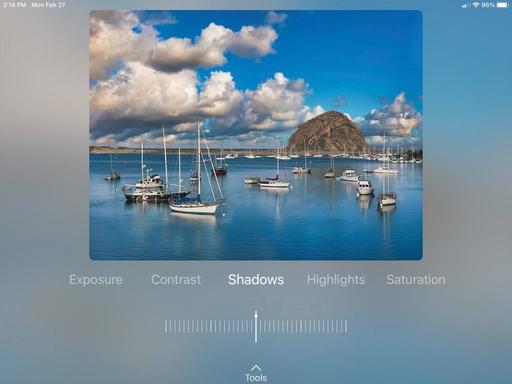
 IMG_0291.jpeg

Select Sky

This is a very powerful feature in the app. The AI identifies the sky area of a photo, then presents you with a number of different substitute options divided into categories such as Blue, Dramatic, Sunset, etc.

Once you choose a sky, tap Tools again for a set of refinements including Adjustments such as Relight, Defocus, Haze, plus, other goodies such as Orientation and Mask.

And if you wish, you can even add your own stock sky images from your camera roll, and they will be available as well. Nice touch!

Remove Powerlines

I think a more apt title would be "Remove Lines." The app can indeed identify power lines and remove them. But in my testing, it often didn't stop there and removed other lines that it found, such as the pin stripping on a car driving by.

Even with these minor hiccups, I'm still glad they included this feature. Power lines are tough to deal with, and this gives us a fighting chance.

AI Enhance

Any Skylum user knows how wonderful this tool is. The mobile version isn't quite as intelligent or powerful as what we use on the computer, but it's still pretty darn good.

Skin and Body AI

These are the two latest features just added this week. And I thought Skin AI was particularly helpful, especially for portraits with side lighting that were not kind to the subject.

Filters

These look like Luts to me, and I like them. Again, broken out into categories such as Creative Portraits, Great Landscapes, Pets, Selfie, and B&W, these filters are far more sophisticated than what we normally see in mobile apps - and you get a lot of them.
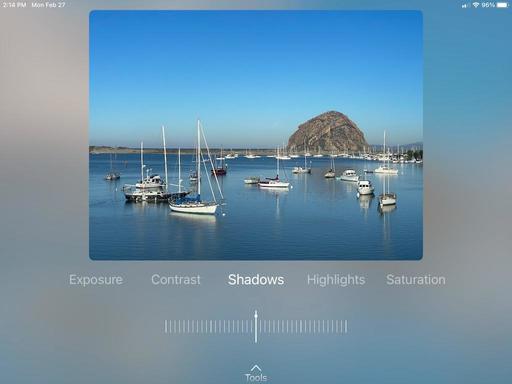
Adjust and Crop

A solid set of basic tools that you would expect to have in an app of this caliber.

Erase

I love having an Erase tool, especially since Photos still haven't included one. The Skylum version lets you set the diameter of the eraser, then you just drag your finger across the area you want gone. It does and intelligent content away fill to replace the removed object. And there is a Restore option if you need to fix an over zealous swipe.

Final Thoughts

I've been waiting for Skylum to bring some of their AI magic to mobile devices, and imgmi is a great start. I like it best on my iPad mini where I have a bit more operating room to use it. It's a wonderful complement to the Photos app.

Skylum offers a 7-day free trial, then an assortment of pricing options. I recommend the $24.99 a year plan. I anticipate they will continue to add tools and enhance this software. But even now, in its early stages, I think it's worth the price.

Couple Finds Trove of 2,000 Cameras and Lenses in Storage Unit

You can read the entire article on PetaPixel.com.

Kristen Cusumano, who works part-time at a tanning salon, was asked by her boss in December to empty out a storage unit. "My boss, the guy who owns the salon, happens to own several other properties around town, including a storage unit. One of the guys who rented out a unit passed away a few years ago and eventually my boss had to empty out the unit.

"My boyfriend was doing some work for him at the time, and my boss asked him if he'd be interested in clearing out the unit. My boyfriend loves doing that kind of stuff, and when he found out that we could keep whatever we found inside as payment, he agreed immediately."

After clearing out all the boxes, the couple now estimates that the collection contained over 1,000 film cameras and roughly 1,000 lenses. The equipment the couple found is a film photographer's dream.

"The vast majority of the collection is Miranda and Minolta," Cusumano says. "There's also a good amount of FEDs, Voigtlander, Zorkis, Zenits, Fujicas, Yashicas, Pentaxs, Prakticas, Mamiya Sekors, Exaktas, Olympus's, Exas, Petris, Konicas, and some TLRs and other brands I can't think of at the moment.

"I'm keeping the Minolta XK, the TLRs, and most likely one of each of the Minoltas since we have so many of them and they're just so aesthetically pleasing to me," Cusumano says. "Fridrik will most likely be keeping an Orion and Miranda T and probably one of each of the Mirandas for the same reason."

It's unclear how long the camera equipment was hidden away in the storage unit, but many of them may now be destined for actual photo-making again.

Brinno's new timelapse camera is a stamina champion with 100 days of life

You can read the entire article DigitalCameraWorld.com.

Brinno TLC300 is the perfect construction camera, offering 100 days of power from four AA cells.

The best timelapse cameras are what you need if you want to create a stop-motion movie of something taking place over days, weeks, or even months. If you want, therefore, to create a video of a building being built, these are what you need. And Brinno is the best-known brand in this specialist camera market - having sold over a million cameras since its first launch in 2008.

The new Brinnoi TLC300 is designed to give users the best possible experience in timelapse, while also keeping things very simple so as to not confuse any users. For instance, the TLC300 is completely IPX4-rated waterproof housing, and pair that with its mounting accessories and its 100-day battery life, you have a camera that can outdo almost all of the current market competitors, and while others use rechargeable battery cells, the TLC300 uses four standard AA batteries available worldwide, so when that 100-days is up, you can easily swap in some more without having to reach your charger.

However, addressing the elephant in the room, this new timelapse camera can only capture 1080p. It might be unlimited until the battery runs out, but there is no escaping the fact that in a world of 4K cameras or the ability to use a mirrorless camera or DSLR and achieve a 4K timelapse - 1080p may seem a little below par. But, it is undoubtedly fine for the web and display use this sort of video is useful - and is a step up from the 720P offered by its predecessor the Brinno TLC200 Pro.

One key feature is the TLC300's ability to schedule recording, not only have you give a certain time on a specific day, but you can also schedule multiple days with breaks in-between scheduling Monday, Wednesday, and Sunday to record and skip the others.

Just Released! Photos for macOS Ventura and iPhone Essential Training

With Photos for macOS, you can manage, enhance, and share photos in a variety of ways. It's evolved into a powerful, but easy to use imaging application. And it's free!

In this course, I take you on a detailed exploration of how to use Photos for both the Monterey and Ventura versions, plus tips for iOS as well.

I start with an exploration of the interface, then move into the new features. Noteworthy topics include how to remove duplicates from your library, different ways to use Live Text to transform your camera into a personal assistant, how to search for pictures by object type, copy images from messages to Photos, use Quick Notes with Photos, and automate common tasks with shortcuts and built-in Mac intelligence.

Also included are updates on some of the recent improvements to the importing process, with lots of useful tips for organizing and editing your pictures. (The editing tools are terrific!) Upon completing this course, you'll be working more effectively with Photos for macOS Monterey, Ventura, and iOS.

If you use a Mac and haven't explored Photos for a while, I think you'll be surprised by its power. Take a look for yourself by visiting Photos for macOS Ventura and iPhone Essential Training.

Virtual Camera Club News

The Nimble Photographer Newsletter is now publishing every Thursday. Readers will enjoy a variety of content spanning from short photo essays, to commentary on weekly events, to reviews of the latest and coolest photo gear.

TDS Workshops! - You can sign up for available workshops by visiting The Nimble Photographer. Inner Circle Members receive a 10-percent discount on all events.

Inner Circle Members: A big thanks to those who support our podcast and our efforts! We are having a blast at our new Inner Circle hangout, the private group I've set up at DerrickStoryOnline. We'd love it if you join us. You can become an Inner Circle Member by signing up at our Patreon site. You will automatically be added to the new hangout.

My Writing on Medium.com: I now have 51 published articles on Medium.com. And if you haven't visited the site, and enjoy good writing on a variety of topics, I suggest that you may want to take a look. You can just go to the home page and enter "Derrick Story" in the search field. And if you like what you read, then follow me!

The New Donation Kit for Carefree Shipping of Found Film Cameras - If you've discovered a film camera that's no longer being used, our new Donation Kit makes it easy to pack and ship. Just visit the Contact Form on thenimblephotographer.com, click the box next to Donating a Film Camera, and let me know what you have. In your note, be sure to include your shipping address.

Affiliate Links - The links to some products in this podcast contain an affiliate code that credits The Digital Story for any purchases made from B&H Photo and Amazon via that click-through. Depending on the purchase, we may receive some financial compensation.

Red River Paper - And finally, be sure to visit our friends at Red River Paper for all of your inkjet supply needs.

See you next week!

You can share your thoughts at the TDS Facebook page, where I'll post this story for discussion.

This is The Digital Story Podcast #883, Feb. 21, 2023. Today's theme is "7 Photography Sins to Avoid." I'm Derrick Story.

Opening Monologue

One of things my mom used to say to me as a child was, "Derrick, you should know better!" Sometimes I did and forgot. Other times I really didn't know better, but that rebuttal only earned me the follow up admonishment, "There is nothing more frightful than ignorance in action." (Goethe) Life is complicated, but photography isn't, and today I'm going to remind you of 7 things that you probably already know, and possibly may have forgotten. I hope you enjoy the show.

Digital Photography Podcast 883

Tune-In Via Your Favorite Podcast App!


podcast-icon.jpeg

Apple Podcasts -- Spotify Podcasts -- Stitcher

Podbean Podcasts -- Podbay FM -- Tune In

7 Photography Sins to Avoid

There are two types of sins in photography, technical and behavioral. We'll start with behavior.

Dex-Video-Web.jpeg

Rule 1: Don't Act Innocent When You're Not

If you're going to take a picture of something, then do it. But don't act like you didn't snap the shutter when you really did.

You can always ask for forgiveness when confronted with, "Did you just take a picture?" The answer is, "I did. Why do you ask?" (Say this politely, don't be a dill weed.) Let the inquirer explain their concern, then try to respond as intelligently as possible.

Rule 2: Don't Take Pictures When Posted Signs Say "No Photography Allowed."

You may not understand the reason why photography is not allowed in certain locations, but nobody cares about your opinion, especially the security guard who caught you on CCD camera.

If there's something forbidden that you really want to photograph, then you'll have to go through the steps of getting permission.

BTW: If you get caught, see Rule 1.

Rule 3: Do Not Use a Telephoto for Unauthorized Public Photography

I love street photography. But there's an unspoken rule that I'm now going to speak: You need to keep it fair by using a lens that gives the subject a chance to know they are being photographed. Standing a half block away with a long telephoto lens is creepy. Don't be creepy.

If you are confronted after taking a picture, see Rule 1.

Now let's cover a few technical sins to avoid.

Rule 4: Don't Let Your Camera Decide What to Focus On

Autofocus cameras are great. But if you let them run the show unchecked, you're going to miss a lot of got shots because the camera did not focus on the most artistic element in the frame.

Invest some time in learning how your autofocus system works, then intervene as appropriate. I like to use a medium cross pattern that I move around the frame with the jog stick on the back of the camera. That way I'm deciding what's interesting, not the camera.

Rule 5: Don't Rely Solely on Auto Exposure

Indeed cameras are pretty smart about exposure. But they will still turn a black anvil into a gray one, and will make that beautiful white snow a shade of yucky.

With mirrorless cameras, exposure compensation is so easy because you get realtime feedback in the electronic viewfinder. There's really no excuse for a poorly exposed shot.

Rule 6: Don't Let Lens Flare Kill Your Contrast

Shooting in the direction of the sun or any bright light source can lead to intriguing and sometime artistic images. But if the sun above can also kill the contrast of an image if glarey light is bouncing off the front of your lens.

And when the sun is low, even a lens hood might not provide enough protection. I often cup my hand around the lens hood to shade the front of the lens.

And if you don't believe it makes a difference, test this yourself with before and after pictures.

Rule 7: Don't Over-Sharpen in Post Production

I don't know why we have this weird obsession with ultra sharp images that also suffer from too much clarity and dehazing. If you want your final picture to look like it was captured with a 2003 digital camera, just be heavy handed with these adjustments.

Yes, many of our pictures can benefit from some sharpening and a dash of dehaze. But know when to say when.

Now you can no longer use ignorance as an excuse!

Meta Will Start Charging $12 a Month For Verification on Instagram

You can read the entire article on PetaPixel.com.

Mark Zuckerberg's Meta is taking a page out of Elon Musk's Twitter playbook and will roll out paid verification to both Instagram and Facebook starting this week.

Announced first via Zuckerberg's Instagram Broadcast Channel this morning, the new program -- called Meta Verified -- will allow users to verify their account with a government-issued ID and get a blue badge in exchange for $11.99 a month if purchased on the web, or $14.99 if bought through iOS.

Zuckerberg positions it as "extra impersonation protection" against accounts claiming to be other accounts and will also allow those who pay for the subscription to get direct access to customer support.

"Long term, we want to build a subscription offering that's valuable to everyone, including creators, businesses and our community at large," Meta adds. "As part of this vision, we are evolving the meaning of the verified badge so we can expand access to verification and more people can trust the accounts they interact with are authentic."

Those who pay for verification will also receive increased visibility and reach in areas like search, comments, and recommendations. Subscriptions will include "proactive monitoring" for account impersonation. The company also promises more "exclusive features" but did not elaborate.

Why You Should Try Editing Your Photos in Reverse

You can read the entire article Fstoppers.com.

It sounds like a strange concept, but the reasoning behind it is sound, and it is straightforward and easy to do. This excellent video tutorial will show you how to edit your photos in reverse and why it will help you make better and more precise photos.

Coming to you from Anthony Morganti, this great video tutorial will show you the ins and outs of editing your photos in reverse. If you work in Lightroom or any program with a similar layout, you probably start with basic global adjustments like exposure, highlights, shadows, etc., then move on to more local adjustments.

And while that works fine for a lot of photos, if you are anything like me, you probably notice that often, once you make some of the local adjustments, you have to go back and refine the global adjustments because they throw the overall image out of balance. Morganti's method of starting with the local adjustments put them in balance first so that when you make the global adjustments, you maintain the relationships between different elements, reducing your workload and making the edits easier. Check out the video above for the full rundown from Morganti, and give it a try!

Just Released! Photos for macOS Ventura and iPhone Essential Training

With Photos for macOS, you can manage, enhance, and share photos in a variety of ways. It's evolved into a powerful, but easy to use imaging application. And it's free!

In this course, I take you on a detailed exploration of how to use Photos for both the Monterey and Ventura versions, plus tips for iOS as well.

I start with an exploration of the interface, then move into the new features. Noteworthy topics include how to remove duplicates from your library, different ways to use Live Text to transform your camera into a personal assistant, how to search for pictures by object type, copy images from messages to Photos, use Quick Notes with Photos, and automate common tasks with shortcuts and built-in Mac intelligence.

Also included are updates on some of the recent improvements to the importing process, with lots of useful tips for organizing and editing your pictures. (The editing tools are terrific!) Upon completing this course, you'll be working more effectively with Photos for macOS Monterey, Ventura, and iOS.

If you use a Mac and haven't explored Photos for a while, I think you'll be surprised by its power. Take a look for yourself by visiting Photos for macOS Ventura and iPhone Essential Training.

Virtual Camera Club News

The Nimble Photographer Newsletter is now publishing every Thursday. Readers will enjoy a variety of content spanning from short photo essays, to commentary on weekly events, to reviews of the latest and coolest photo gear.

TDS Workshops! - You can sign up for available workshops by visiting The Nimble Photographer. Inner Circle Members receive a 10-percent discount on all events.

Inner Circle Members: A big thanks to those who support our podcast and our efforts! We are having a blast at our new Inner Circle hangout, the private group I've set up at DerrickStoryOnline. We'd love it if you join us. You can become an Inner Circle Member by signing up at our Patreon site. You will automatically be added to the new hangout.

My Writing on Medium.com: I now have 75 published articles on Medium.com. And if you haven't visited the site, and enjoy good writing on a variety of topics, I suggest that you may want to take a look. You can just go to the home page and enter "Derrick Story" in the search field. And if you like what you read, then follow me!

The New Donation Kit for Carefree Shipping of Found Film Cameras - If you've discovered a film camera that's no longer being used, our new Donation Kit makes it easy to pack and ship. Just visit the Contact Form on thenimblephotographer.com, click the box next to Donating a Film Camera, and let me know what you have. In your note, be sure to include your shipping address.

Affiliate Links - The links to some products in this podcast contain an affiliate code that credits The Digital Story for any purchases made from B&H Photo and Amazon via that click-through. Depending on the purchase, we may receive some financial compensation.

Red River Paper - And finally, be sure to visit our friends at Red River Paper for all of your inkjet supply needs.

See you next week!

You can share your thoughts at the TDS Facebook page, where I'll post this story for discussion.

Camera Myths that Seem to Persist

When you've been doing something for a long time, it's reasonable to have confidence in your opinions. You know how things work.

For example, a seasoned handyman has a stash of tricks that you would never dream of. Let's say that you're trying to figure out how to remove a stuck screw with a stripped head. You just can't get any torque with your screwdriver. The darn thing won't budge.

The handyman digs around in his toolbox, pulls out a chunk of duct tape, puts it over the stripped head for a bit of traction, and gently removes the stubborn problem with his screwdriver.

Experience is a beautiful thing.

But it can also blind us to change.

Screws haven't evolved much in the past 20 years, but cameras have. And those of us who have been taking pictures for a couple decades have to constantly update our knowledge base. If we don't, we're vulnerable to missed opportunities and passing along outdated information.

Here are three myths that I encounter regularly as a photography educator.

IMG_2524.jpeg

1) You have to keep your ISO setting low for good image quality. True in 1999, not so today.

Modern digital cameras capture fantastic images with ISO settings of 1600, 3200, and yes, even 6400. I've embraced auto-ISO where I let the camera choose the setting in a range between 200 and 3200. And if I need more speed, I will override it. The pictures look great.

2) Serious outdoor and adventure photography requires a full frame sensor camera. Definitely not true.

I just read the Outdoor Photographer's editor's choices for 2022 cameras, and it included two APS-C models and a Micro Four Thirds as well (Fujifilm X-H2S, Canon EOS R7, OM System OM-1). Yes, larger sensors still have an edge in low light shooting and dynamic range. But that gap has narrowed. Increased processing power in the imaging pipeline, computational photography, and improved hardware have moved us to the point where you can use any format you want for serious work.

3) The more megapixels, the better the camera. Nope.

Megapixels are a measurement of graphic resolution. They do not determine the overall quality of a camera. In fact, going back to the Outdoor Photographer editor's list, they chose the lower resolution Fujifilm X-H2S at 26 megapixels over the higher resolution X-H2 at 40 megapixels.

Why? Because the X-H2S is faster allowing it to capture moving subjects with exceptional speed. And 26 megapixels is still plenty of resolution. If you need more, there are plenty of AI-driven resampling programs that intelligently add pixels to those pictures. (Oh yeah, that's fairly new as well.)

I guess these aren't really photography myths. They're just beliefs that aren't true anymore.

Photography can be as simple as pulling out your iPhone and capturing a snapshot, or as complicated as mastering a Sony A7 IV mirrorless camera. Regardless of which you use, we are all benefitting from dramatic hardware and software innovations.

I say, enjoy the ride. It's OK if it's easier than it used to be.

Keep in Touch with the Photography World with Our Weekly Newsletter

The Nimble Photographer Newsletter publishes every Thursday and is chock full of what's happening in the world of digital imaging. Subscribe for Free Now

This is The Digital Story Podcast #882, Feb. 14, 2023. Today's theme is "Your Camera's Hidden Features." I'm Derrick Story.

Opening Monologue

Every camera I've owned had one or two tricks up its sleeve that I didn't initially discover. Then one day I'd be reading a review or listening to a podcast and learn about it. Which make me think, what sort of magic resides inside your camera that you haven't uncovered yet? I'll share a few of my favorites in today's TDS Photography Podcast. I hope you enjoy the show.

Digital Photography Podcast 882

Tune-In Via Your Favorite Podcast App!


podcast-icon.jpeg

Apple Podcasts -- Spotify Podcasts -- Stitcher

Podbean Podcasts -- Podbay FM -- Tune In

Your Camera's Hidden Features

5-axes-IBIS.jpg

To help illustrate my point, I have tips for the Sony A7 IV, Ricoh GR III, Fujifilm X100V, OM System OM-1, and the iPhone. Even if you don't have one of these cameras, knowing about these tips can help you search them out on your device. Let's get started.

Sony A7 IV

HEIF instead of Jpeg. HEIF stores twice as much information as Jpeg in the same file size. For example, Jpeg color is limited to 8 bits, where HEIF can manage 16 bits of color.

The Sony A7 IV allows photographers to choose between Jpeg or HEIF for their compressed format. The setting is:
Menu > Shooting > Image Quality > Image Quality Settings > File Format.

In this menu, you can also select RAW+HEIF for a true power couple. Nearly every app supports HEIF now, in part thanks to Apple's iPhone use of it. And it truly is a cut above Jpegs.

Ricoh GR III

Automatic Horizon Correction. When composing on a LCD screen, it can be difficult to get the horizon perfectly straight. Fortunately, the Ricoh GR III has a Horizon Correction setting that you can enable.

It's in the (7) Shooting Assist menu at the bottom of the screen. When you turn it on, the camera corrects 1.5 degrees if the IBIS is on and 1 degree if it's off. That may not sound like a lot, but it makes a huge difference in your pictures.

BTW: Did you know that the GR III has built in memory that provides up to 40 RAW or 140 Jpegs captures in case you have an SD card problem? You can switch to Internal Memory in the Format menu.

Fujifilm X100V

Film Simulation Bracket. One of the many reasons that Fujifilm photographers love their cameras is because of the great color science express through the various film simulation settings. But what if you weren't exactly sure which one is best for any given subject?

The Film Simulation bracketing that allows you to choose three different styles and have them recorded with each press of the shutter.

Start by choosing the simulations you want via: Menu > Shooting Setting 1 > Film Simulation BKT.

Back out of the Menu, then press the Drive button, navigate down to BKT, and select Film Simulation Bracket. If you shoot RAW+Jpeg, you will capture three RAW files and three film simulations with each press of the shutter button. And the RAW film simulations look different than the Jpeg versions.

One bonus Fujifilm tip: If you mount the excellent WCL 28mm lens on the X100V, the camera automatically identifies it and adjusts the electronic viewfinder and LCD for a 28mm field of view. You can see the difference by switch between the electronic viewfinder and the optical.

OM System OM-1

One-Touch White Balance. We usually know when we should use Custom White Balance to adjust for mixed or artificial lighting, but usually don't because it feels like a hassle. But on the OM-1, it's as simple as pressing a button on the front of the camera.

The top button on the front of the camera, the one with a dimple in it, is for One-Touch White Balance. Just point the camera at a white object or a white sheet of paper that's reflecting the lighting of the room, press the One-Touch button with your middle finger, then while still holding down the button, fire the shutter with your index finger. The camera will ask you if you want to save that setting by pressing the OK button. Once you do, you're set!

Bonus Tip: Handheld Assist. When Handheld Assist is On, the status of camera shake is displayed on the monitor when the shutter button is pressed halfway or during exposure. This is useful for reducing camera shake during long exposure in hand-held shooting.

The gray frame indicates the range that camera shake can be corrected. To minimize camera shake, hold the camera so that the outer indicators (roll shake) are stabilized near the center right/left on the frame and the center indicator (horizontal and vertical shake) near the center within the frame.

How to set Handheld Assist: Press the [MENU] button. In 8. Image Stabilizer, select Handheld Assist. Select Off (default setting) or On.

The iPhone Pro

Lens Correction. In the Camera Settings menu, there's a toggle for Lens Correction. Make sure that it's on so that your images have less distortion with the wide and ultra wide lenses. If you want distortion for effect, toggle it off.

Reveal Additional Settings While Taking Pictures. Some people never discover the hidden settings menu that includes Night Mode, capture proportions, exposure compensation, self-timer, and more. You can reveal it by tapping on the Angle Bracket that's pointing up at the top of the camera interface. Hide the menu by tapping on it again.

OM Digital Solutions releases OM System M. Zuiko Digital ED 90mm F3.5 Macro IS PRO

You can read the entire article on DPReview.com.

The 90mm F3.5 Macro IS PRO is an autofocus lens that delivers up to 2x macro (or 4x with a 2x teleconverter). Its stabilization system is compatible with the Sync IS system, allowing it to work in conjunction with in-body stabilization of Olympus / OM System cameras.

The lens is constructed from 18 elements, arranged in 13 groups. Its design has two focus groups that act conjunction, allowing very close focus when the focus limit switch is in the 'Macro' position. The lens also has a focus ring that can be snapped back to reveal a focus distance scale and (on Olympus or OM System cameras) engage manual focus.

In addition to the slide to switch between MF and AF, there's also a dedicated IS toggle, an L-Fn (lens function) button for assigning custom functions and a focus limit switch which is split between macro, 0.25-0.5m, and 0.25-infinity. The lens weighs 453g (16oz) and measures 136mm (5.4") long with a 70mm (2.7") diameter.

For very close-up work, the lens has a groove behind all these controls, which should be compatible with the tripod collar from the M.Zuiko 40-150mm F2.8 Pro (though OMDS isn't promoting it as such). OMDS says it has no plans to sell the collar separately but it may be possible to source it from service centers.

The OM System 90mm F3.5 macro IS pro will be available in March 2023 with an MSRP of $1,499.99 in the U.S, and CAD $2,049.99 in Canada.We have a wonderful workshop headquarters reserved that puts you right in the middle of this natural goodness. Not only is it a peaceful place for us to gather and work, but you can walk right out your front door and photograph the amazing diversity of wildlife there.

Controversial AI Program Generates Photorealistic Police Sketches

You can read the entire article Petapixel.com.

Two developers have created artificial intelligence (AI) software that generates photorealistic police sketches using DALL-E. Forensic Sketch AIrtist was made to cut down the time it takes to create a police sketch of a suspect. It was created at a Hackathon event in December 2022 and works by inputting facial features.

"First, the artist collects a description from the witness by using our client," explains the software developers.

"Then the client sends the description to our server where the request is parsed and sent to DALL-E's API. After a few seconds, we have the sketch ready to be sent to the client and, in turn, to the artist.

"After that, the artist can opt to end the drawing process or to download the generated sketch and perform some small corrections to it."

In an interview with Vice, Jennifer Lynch, the Surveillance Litigation Director of the Electronic Frontier Foundation, says that the use of AI in police forensics is "incredibly dangerous."

"The problem with traditional forensic sketches is not that they take time to produce (which seems to be the only problem that this AI forensic sketch program is trying to solve). The problem is that any forensic sketch is already subject to human biases and the frailty of human memory," says Lynch

"AI can't fix those human problems, and this particular program will likely make them worse through its very design."

"If these AI-generated forensic sketches are ever released to the public, they can reinforce stereotypes and racial biases and can hamper an investigation by directing attention to people who look like the sketch instead of the actual perpetrator," adds Lynch.

Just Released! Photos for macOS Ventura and iPhone Essential Training

With Photos for macOS, you can manage, enhance, and share photos in a variety of ways. It's evolved into a powerful, but easy to use imaging application. And it's free!

In this course, I take you on a detailed exploration of how to use Photos for both the Monterey and Ventura versions, plus tips for iOS as well.

I start with an exploration of the interface, then move into the new features. Noteworthy topics include how to remove duplicates from your library, different ways to use Live Text to transform your camera into a personal assistant, how to search for pictures by object type, copy images from messages to Photos, use Quick Notes with Photos, and automate common tasks with shortcuts and built-in Mac intelligence.

Also included are updates on some of the recent improvements to the importing process, with lots of useful tips for organizing and editing your pictures. (The editing tools are terrific!) Upon completing this course, you'll be working more effectively with Photos for macOS Monterey, Ventura, and iOS.

If you use a Mac and haven't explored Photos for a while, I think you'll be surprised by its power. Take a look for yourself by visiting Photos for macOS Ventura and iPhone Essential Training.

Virtual Camera Club News

The Nimble Photographer Newsletter is now publishing every Thursday. Readers will enjoy a variety of content spanning from short photo essays, to commentary on weekly events, to reviews of the latest and coolest photo gear.

TDS Workshops! - You can sign up for available workshops by visiting The Nimble Photographer. Inner Circle Members receive a 10-percent discount on all events.

Inner Circle Members: A big thanks to those who support our podcast and our efforts! We are having a blast at our new Inner Circle hangout, the private group I've set up at DerrickStoryOnline. We'd love it if you join us. You can become an Inner Circle Member by signing up at our Patreon site. You will automatically be added to the new hangout.

My Writing on Medium.com: I now have 51 published articles on Medium.com. And if you haven't visited the site, and enjoy good writing on a variety of topics, I suggest that you may want to take a look. You can just go to the home page and enter "Derrick Story" in the search field. And if you like what you read, then follow me!

The New Donation Kit for Carefree Shipping of Found Film Cameras - If you've discovered a film camera that's no longer being used, our new Donation Kit makes it easy to pack and ship. Just visit the Contact Form on thenimblephotographer.com, click the box next to Donating a Film Camera, and let me know what you have. In your note, be sure to include your shipping address.

Affiliate Links - The links to some products in this podcast contain an affiliate code that credits The Digital Story for any purchases made from B&H Photo and Amazon via that click-through. Depending on the purchase, we may receive some financial compensation.

Red River Paper - And finally, be sure to visit our friends at Red River Paper for all of your inkjet supply needs.

See you next week!

You can share your thoughts at the TDS Facebook page, where I'll post this story for discussion.

Thanks to OM System for the illustration of their 5 axes image stabilization system.

This is The Digital Story Podcast #881, Feb. 7, 2023. Today's theme is "Recording Video to Enhance Your Still Photography." I'm Derrick Story.

Opening Monologue

Many stills photographers overlook the fantastic movie capture tools built into our cameras. Primarily, because they are not interested in making movies. But what if those ignored features could greatly enhance your photo presentations? Wouldn't that be useful? Find out how on today's TDS Photography Podcast.

Digital Photography Podcast 881

Tune-In Via Your Favorite Podcast App!


podcast-icon.jpeg

Apple Podcasts -- Spotify Podcasts -- Stitcher

Podbean Podcasts -- Podbay FM -- Tune In

Recording Video to Enhance Your Still Photography

I can tell you why I don't make more movies than I do. It's because I hate video editing. It bores me to tears.

But that doesn't mean that I completely bypass the video features on my iPhone and OM System OM-1. Why? Because many of those settings can record content that vastly improves my photo presentations. Let me show you a couple examples.

Environmental Audio

QuickTime-Movie-Export.jpg

When your record a movie with your camera, you are capturing both sound and pictures. Those two elements can be separated and used independently.

Here is an example that you can see for yourself. Recently I was scouting for our upcoming Pt. Reyes Photography Workshop. I found a wonderful spot where the geese were talking and the toads were croaking. It was so melodic and peaceful.

I initially captured a few still pictures. But they just didn't do justice to what I was experiencing at the moment. So I set my iPhone to movie mode and recorded the scene. The movie itself is good and does a better job of telling the story than just the still pictures. But what if I could combine the two?

In Photos, I exported the audio only which gave me an .M4A file. I then opened the file in my favorite audio editing app, Fission. I trimmed the soundtrack, added fade-in and fade-outs, and boosted the audio volume.

I added my new soundtrack to my Apple Music library. Then I opened Photos and selected the images I wanted and created a Slideshow Project.

Using the Ken Burns effect to keep things moving, I substituted my "marsh sounds" audio track for the canned Apple music. I've published a short teaser here so you can see for yourself how well it works.

A Few Tips

  • Capture Panos - Broad panoramas play really well in slideshows with the Ken Burns effect enabled.
  • Get Yourself a Handy Audio App - For the Mac, I really like Fission by Rogue Amoeba for $35. But there are many good ones for Mac and Windows.
  • Keep Your Audio Files Organized - You'll find that you'll build up a sweet audio library that you can go to time and time again.

One final note on the value of movie capture. If you camera can record 4K video, you can pull out individual still frames from that footage to fill in gaps in your slideshows. This works really well.

It's worth it to review your recording settings on your smartphone and your camera. They can prove to be very valuable for immersive photo projects.

Two Seats Left for the Pt. Reyes In-Person Photography Workshop - May 16-19, 2023

Pt. Reyes and its surrounding areas (Tomalas,Inverness, etc.) provide a wealth of landscape and wildlife photography - and we will explore both!

This four-day photography adventure takes you to rugged Northern California coastline, rolling hills, seashore wildlife, Tule Elk, tranquil inlets, and so much more.

This is the perfect getaway to relax, breath fresh air, enjoy the company of your fellow photographers, eat good food, and fill your memory cards with beautiful images.

We have a wonderful workshop headquarters reserved that puts you right in the middle of this natural goodness. Not only is it a peaceful place for us to gather and work, but you can walk right out your front door and photograph the amazing diversity of wildlife there.

You can sign up for any of these events by visiting our Photography Workshops Page. Inner Circle Members receive a 10 percent discount on all events.

Go Wide! A look at four top ultra-wide primes for Micro Four Thirds

You can read the entire article on DP Review.

One of the great things about the Micro Four Thirds system is that it's easy to find a good long lens - including the ones you used to use on your DSLR (remember those?). With its quarter-size sensor the system gives us the reach of a 400mm lens when we've only mounted a 200mm. The downside of course comes when we want a wide angle view, as the 2x crop factor means we need a 10mm lens to get the same view we'd achieve with a 20mm on a full-frame camera.

Fortunately though, we now have a pretty decent array of extreme wide-angle options for the system (including quite a few zooms). For this article I've restricted myself to prime lenses, and have still put together a good little collection to compare. The idea is both to demonstrate what's available and to show what impact slight differences in focal length have on the angle of view of the lens. I've picked four lenses of about the same focal length and within a tight price range, but which have a number of characteristics that lend each a distinct identity. The lenses going head-to-head are:

  • Laowa 7.5mm F2 MFT $499
  • Meike 8mm F2.8 $399
  • Panasonic Leica DG Summilux 9mm F1.7 ASPH $498
  • Samyang 10mm F2.8 ED AS NCS CS $430

As is often the case now, those looking for ultra-wide options, especially at an affordable price, should consider the many manual focus lenses on the market. Thus only one lens in this comparison offers autofocus and comes from a mainstream Micro Four Thirds manufacturer. I'll be looking at the physical characteristics of the lenses, their coverage, how nice they are to use as well as the quality of image they produce.

In all the following images taken with these lenses, the aperture was set to F8 to help eliminate vignetting as much as possible. All samples were made with a Panasonic Lumix G9. We're including the angle of view in the specs so you can get a better idea of how much of a scene you'll see, something not always accurately reflected by the focal length in millimeters.

Just Released! Photos for macOS Ventura and iPhone Essential Training

With Photos for macOS, you can manage, enhance, and share photos in a variety of ways. It's evolved into a powerful, but easy to use imaging application. And it's free!

In this course, I take you on a detailed exploration of how to use Photos for both the Monterey and Ventura versions, plus tips for iOS as well.

I start with an exploration of the interface, then move into the new features. Noteworthy topics include how to remove duplicates from your library, different ways to use Live Text to transform your camera into a personal assistant, how to search for pictures by object type, copy images from messages to Photos, use Quick Notes with Photos, and automate common tasks with shortcuts and built-in Mac intelligence.

Also included are updates on some of the recent improvements to the importing process, with lots of useful tips for organizing and editing your pictures. (The editing tools are terrific!) Upon completing this course, you'll be working more effectively with Photos for macOS Monterey, Ventura, and iOS.

If you use a Mac and haven't explored Photos for a while, I think you'll be surprised by its power. Take a look for yourself by visiting Photos for macOS Ventura and iPhone Essential Training.

Virtual Camera Club News

The Nimble Photographer Newsletter is now publishing every Thursday. Readers will enjoy a variety of content spanning from short photo essays, to commentary on weekly events, to reviews of the latest and coolest photo gear.

TDS Workshops! - You can sign up for available workshops by visiting The Nimble Photographer. Inner Circle Members receive a 10-percent discount on all events.

Inner Circle Members: A big thanks to those who support our podcast and our efforts! We are having a blast at our new Inner Circle hangout, the private group I've set up at DerrickStoryOnline. We'd love it if you join us. You can become an Inner Circle Member by signing up at our Patreon site. You will automatically be added to the new hangout.

My Writing on Medium.com: I now have 51 published articles on Medium.com. And if you haven't visited the site, and enjoy good writing on a variety of topics, I suggest that you may want to take a look. You can just go to the home page and enter "Derrick Story" in the search field. And if you like what you read, then follow me!

The New Donation Kit for Carefree Shipping of Found Film Cameras - If you've discovered a film camera that's no longer being used, our new Donation Kit makes it easy to pack and ship. Just visit the Contact Form on thenimblephotographer.com, click the box next to Donating a Film Camera, and let me know what you have. In your note, be sure to include your shipping address.

Affiliate Links - The links to some products in this podcast contain an affiliate code that credits The Digital Story for any purchases made from B&H Photo and Amazon via that click-through. Depending on the purchase, we may receive some financial compensation.

Red River Paper - And finally, be sure to visit our friends at Red River Paper for all of your inkjet supply needs.

See you next week!

You can share your thoughts at the TDS Facebook page, where I'll post this story for discussion.