October 2019 Archives

The iPhone does a great job of recording panoramas. But what do you do with them afterwards? They are hard to share on social because they're quite small when displayed in their entirety. As a result, those tiny details defeat the original purpose of sharing an impressive scene.

Beach-Pano.jpg Maui Beach Pano - There has to be a better way to display this! Photo by Derrick Story.

I have two suggestions for you. The first, for viewing on the iPhone, is to use a dedicated app, such as PanViewer. You can have your image fill the entire screen, then tilt or swipe to enjoy the image details.

But my favorite way is to incorporate the panorama images into a Photos slideshow, then output it as a movie. Here's an example, titled Maui - Morning to Night that incorporates two iPhone panoramas with a few still images.

These movies are easy to create. Start in Photos for macOS. Click on the plus sign that appears when you mouseover My Projects in the Sidebar. Name your presentation. The click on the Add Photos button (+) at the bottom where the thumbnails are displayed. Mix in a few standard images with your panoramas, and arrange them in the order that you want. Finally, apply the Ken Burns theme, and play. You will be delighted with the presentation.

You can export the slideshow as an HD video, then share on Vimeo, YouTube, Facebook, and anywhere else you display your stuff.

You probably have a nice stockpile of panoramas right now. Put them to use! And show them to the world.

And stay tuned for my upcoming training on LinkedIn Learning and lynda.com titled, Photos for macOS Catalina and iPadOS that shows you all the amazing things you can do with this new software. Hope to release this title in November. Stay tuned! In the meantime, you can watch Photos for macOS Mojave right now. It will provide you with the info you need for making great slideshows!

You can share your thoughts at the TDS Facebook page, where I'll post this story for discussion.

This is The Digital Story Podcast #711, Oct. 29, 2019. Today's theme is "Fire in Sonoma County, Again." I'm Derrick Story.

The Kincade Fire, which began on Wednesday, Oct. 23, 2019 in Geyserville, CA has spread south to Windsor, and yes, close to the northern part of Santa Rosa. Because of the danger that it presents to my home, studio, and two cats, Theresa and I are flying out of Maui right away to deal with the situation. This podcast shares some insight to the challenges at hand.

IMG_5354.jpg

I've never been one of those grumpy guys who mumbled, "Cameras don't take pictures, people do." In part, because I like new photography gear and enjoy using it. Image making is both man and machine.

But that doesn't mean that I need to pack all of my stuff every time I travel, especially if I'm not on assignment. This week in Maui is a perfect example of how rewarding life as a nimble photographer can be.

Sea Turtle on Maui Sea turtle rising for a breath of air. Olympus TG-4 compact camera in UW mode. Photo by Derrick Story.

I almost bought the Olympus TG-6 for this trip. It's a great camera, but I have the TG-4 that's still performing well. So well, in fact, that I couldn't justify spending the $449 for the latest model. So I didn't. And so far, I have not regretted that move once. (Or should I say: non-move.) The TG-4 is performing wonderfully both topside and while snorkeling.

Butterfly Fish on Maui Olympus TG-4 while snorkeling is wonderful at capturing the sights beneath the surface. Photo by Derrick Story

As an aside, if you spend any time on adventures at all and want to be able to take pictures regardless of the conditions, the Olympus Tough ($449) is an amazing camera. I highly recommend it.

Lapping Waves at Sunset Waves rolling on shore at twilight. Olympus TG-4. Photo by Derrick Story.

Another essential item on the island has been my Apple Watch Series 2. Again, not the newest kid on the block by any measure. I must admit that the Apple Watch Series 5 is impressive. But the Series 2 is what's on my wrist right now.

There are a few things about the Apple Watch that I really like on these trips. Since I'm swimming a lot, I can leave the hotel with the watch only and leave my iPhone X back in the room. (I do carry the iPhone when I'm not in the water.) It's wonderful having the watch log my exercise, tell time, and play music through my AirPods (which I stash in a waterproof pouch while swimming). It basically keeps me on track when I'm out and about.

egret-maui.jpg Ergret on Maui. Olympus TG-4. Photo by Derrick Story.

My goal here isn't to sound off like a tightwad. But I think the pace of change with our technology has slowed enough to where we can still use gear that's a few years old, and with excellent results.

The TG-4 does capture in RAW and my photo processing software is better than ever (Photos for iPadOS, Luminar 3, Photos for macOS). Having solid post production applications allow me to get more out of my images. I use Luminar 3 as an editing extension for Photos for macOS when I'm on vacation. They're a wonderful tandem.

So yes, software has been one of the keys to all of this. The other of course, is being a good photographer at capture. By giving the hardware every opportunity to be successful when I'm taking the picture, I set up a good opportunity to finish off the image with the modern software that's available. The upshot is that I'm able to walk around with just a TG-4 and an Apple Watch for the better part of the day.

I'm having a a great time traveling as light as possible. Life as a Nimble Photographer has its rewards, for sure. And I'm still coming home with many, many wonderful images.

There are product links in this article that contain affiliate tags. In some cases, depending on the product, The Digital Story may receive compensation if you purchase a product via one of those links. There is no additional cost to you.

You can share your thoughts at the TDS Facebook page, where I'll post this story for discussion.

This is The Digital Story Podcast #710, Oct. 22, 2019. Today's theme is "The Evolution of the Olympus OM-D E-M5 Mark III." I'm Derrick Story.

Opening Monologue

I first learned about the original E-M5 in a closed door meeting at CES 2012. Olympus broke the news to the public the next month, and we started a whole new era of mirrorless photography. Now with the Mark III ready to hit the streets, I thought we'd take a look at this latest model, and the 8-year journey it took to get here. I hope you enjoy the show.

The Evolution of the Olympus OM-D E-M5 Mark III

The Olympus OM-D E-M5 Mark III is once again a substantial improvement over its two previous generations. Before I get to the evolution of this camera, let's review the basic specs for the just-announced model.

E-M5-MarkIII-Front.jpg The Olympus OM-D E-M5 Mark III

  • 20.4 Megapixel Live MOS sensor
  • TruePic VIII Quad Core Processor
  • Dual F.A.S.T. AF (Contrast & Phase Detection AF) 121 Point (All Cross Type) On-Chip Phase Detection)
  • 5-Axis Image Stabilization with up to 6.5 Shutter Speed Steps Compensation with Sync-IS
  • 2.36M dot OLED Electronic Viewfinder
  • 3.0" Vari-Angle Touch LCD
  • Dust, Splash and Freezeproof
  • 10fps [H] mode 6fps [L] mode mechanical shutter 30fps [H] mode 10fps [L] mode silent electronic shutter
  • 4k Video Capture (30/25/24 fps) with Flat Picture Mode
  • USB In-camera Charging
  • 30fps Silent Electronic Shutter
  • PRO Capture Lag-Free Electronic Shutter Mode
  • Some people have referred to the Mark III as a mini-EM-1, and I think there's good reason for that nickname.

    But its evolution really took a different path, and I think its worth going back to 2012 to understand the real significance of this camera.

    PA202695.jpg Top decks of the E-M5 (left) and the E-M5 Mark II

    The first E-M5 was actually a fairly simple camera to operate. It had a mode dial on the left top panel with PASM, i-Auto, movie, Scene, and Art Filter options. On the right side were unmarked twin control dials with function and movie buttons. That was it.

    But its functionality was fantastic. You could program the function buttons and the dials to suit your shooting style. The body was weather resistant, and the handling was very comfortable. I still shoot with one today in the studio. I use it for my product shots.

    Some people complained that the buttons were too "spongy" due to their weather sealing. I know what they mean, but they never really bothered me that much. The camera is quite durable, and it's performing as well today as when I first bought it.

    PA202702.jpg

    Then, in February 2015, the Mark II was released. This was a very different camera, and one of my all time favorites.

    First of all, it was a wonderful HD video camera. Olympus replaced the up and down tilting LCD with a fully articulated model. The sensor-based image stabilization was further refined. And with the optional grip, you had jacks for both mic and headphones. The video it rendered was truly beautiful. Again, I still use this camera today. It's really good for live streaming.

    The top deck of the Mark II was more sophisticated than its earlier sibling. A convenient on/off switch was moved to the mode dial, and there were now four buttons and two dials on top. I really liked the program lever on the back that allowed me to switch from my still photography settings to movie settings in one easy motion.

    This camera was equally capable for both stills and movies. Plus Olympus added the 40MP High Res Shot feature. And they continued to refine its features and performance through multiple firmware upgrades.

    One thing that held back both the Mark I and the Mark II was computer processing power. In particular, burst modes in RAW were limited and the camera often had to pause to write to the card. And the second limitation was the 16MP sensor. And this brings us to the Mark III.

    Not only does it look more like an E-M1 Mark II on the top deck, it features a more robust TruePic VIII Quad Core Processor inside. The overall appearance is sleeker than the chunky Mark II, plus we now have 4K video (which many wanted in the Mark II), Pro Capture, 30fps silent electronic shutter, and a 20MP sensor. Horsepower is no longer an issue.

    In a sense, we've returned to the cleaner look of the Mark I, but with the firepower of the E-M1. I think this is going to be a winning combination for Olympus. It was worth the 4-year wait.

    Our LA Street Photography Experience is Coming this March

    This 3-day event on March 13-15 explores classic Los Angeles locations and architecture. Our excursions will take us as far west as Venice Beach, as well as famous movie spots and the back streets of this fascinating Southern California area.

    You will learn new techniques for safe and effective street photography, how to capture the vibe of great architecture, and enjoy some classic California cuisine along the way.

    Olympus Educator, Mike Boening, is our co-instructor. Those of you who have worked with Mike at our SF Street Photography events know how much he brings to the table. Not only is he an official Olympus Educator, he's an accomplished street photographer, and he's going to bring gear for you to test and learn about.

    If you want to join Mike and me this coming March, just visit the information and registration page, or go to www.thenimblephotographer.com and click on the Workshops link, or go to the Olympus site - no matter how you get there, Mike and I are looking forward to working with you this coming Spring.

    Amateur Photographer Magazine Celebrates 100 Years of Olympus

    You can visit their site here.

    I downloaded a copy to my iPad for $3.99 using their app, which is free in the App Store. It's a terrific article with lots of pictures of Olympus gear over the years, including the Olympus Flex twin lens, Olympus 35 rangefinder, the original PEN f, and of course, the amazing OM series.

    They also show selected Olympus print ads from over the years, a cool article, What Olympus Means to Me, a discussion on the Micro Four Thirds Era, and an article on OM to OM-D. There is a lot of great stuff here for those who appreciate the innovation of this brand.

    Updates and Such

    Inner Circle Members: A big thanks to those who support our podcast and our efforts!

    Podcasting Skills Course - The course date is scheduled for November 9, 2019. Registration is open now at www.thenimblephotographer.com.

    B&H and Amazon tiles on www.thedigitalstory. If you click on them first, you're helping to support this podcast. (The Digital Story is supported by its audience. When you purchase through links on our site, we may earn an affiliate commission.) And speaking of supporting this show, and big thanks to our Patreon Inner Circle members:

    Affiliate Links - The link to the Olympus OM-D E-M5 Mark III contains an affiliate code that credits The Digital Story for any purchases made from B&H Photo via that click-through. Depending on the purchase, we may receive some financial compensation.

    And finally, be sure to visit our friends at Red River Paper for all of your inkjet supply needs.

    See you next week!

    More Ways to Participate

    Want to share photos and talk with other members in our virtual camera club? Check out our Flickr Public Group. And from those images, I choose the TDS Member Photo of the Day.

    Podcast Sponsors

    Red River Paper - Keep up with the world of inkjet printing, and win free paper, by liking Red River Paper on Facebook.

    The Nimbleosity Report

    Do you want to keep up with the best content from The Digital Story and The Nimble Photographer? Sign up for The Nimbleosity Report, and receive highlights twice-a-month in a single page newsletter. Be a part of our community!

    Want to Comment on this Post?

    You can share your thoughts at the TDS Facebook page, where I'll post this story for discussion.

I was curious to see if my iPad mini 5 could be useful in Sidecar mode when working with Photos for macOS Catalina. What I was looking for here is an out-of-the-box experience. I didn't want to buy additional software or learn how to become an illustrator. What I did want to see is if this new Catalina feature would be useful in my existing workflow.

The answer is a qualified "yes."

01-ENABLE-MARKUP.jpg Enabling Markup in the editing mode of Photos.

The positive qualification is for those who use Markup in Photos (which I love!). Beyond using the Retouch brush in editing mode, there isn't much to do yet in Photos when using your iPad as a tablet with the Apple Pencil. But if you go to Markup, everything changes for the better.

02-Enabling-the-iPad-from-within-Markup.jpg Enabling your Apple Pencil from within Markup.

And the cool thing is, it's super easy to do. First, you have to make sure that your hardware is Sidecar enabled. Basically that means you have an iPad that uses an Apple Pencil. (In my case, that's an iPad mini 5.) And you also need a Mac that's essentially 2016 or later. If you have any questions about compatibility, I recommend this "Sidecar" white paper from Apple for reference. Once you have your gear in order, just follow these steps.

  • Launch Photos for macOS Catalina on your Mac, open a picture and go to Edit mode.
  • Turn on your iPad and have your Apple Pencil ready.
  • On your Mac, in Edit mode, click on the Options button (3 dots in a circle) and choose Markup from the list.
  • In Markup on the Mac, look for the little tablet icon in the toolbar, and click on it. Your iPad should show up in the list.
  • Choose your iPad from the popup, and start using your Apple Pencil on the iPad to illustrate your picture.

It's that easy!

03-Choose-Pen-and-Color.jpg Once your Apple Pencil is enabled in Markup, choose the right tip and color, and start having fun.

If anything goes wrong, just refer to the "Sidecar" instructions to get your tablet up and running.

I've always liked Markup in Photos. It's so powerful and fun. But using it with an Apple Pencil and my iPad takes it to a whole new level. Give it a try.

And stay tuned for my upcoming training on LinkedIn Learning and lynda.com titled, Photos for macOS Catalina and iPadOS that shows you all the amazing things you can do with this new software. Hope to release this title in November. Stay tuned! In the meantime, you can watch Photos for macOS Mojave right now.

You can share your thoughts at the TDS Facebook page, where I'll post this story for discussion.

ISO 32000 with the Sony a7R Mark IV

In my podcast review of the Sony a7R IV, I commented that the images it captures at ISO 32000 and 64000 are quite useable for certain subjects. I thought you might want to see what I was referring to.

ISO 32000 with Sony a7R IV

These photos were recorded in very low light conditions with the Sony a7R IV with G-Master 24-70mm f/2.8 zoom at ISO 32000 in RAW. I processed the files in Capture One Pro 12 (latest build) and exported sampled-down pictures as Jpegs for publishing.

DSC00173-a7Riv-D-Story.jpg

The shoot location is the Blind Scream haunted house in Santa Rosa, CA. The sets and actors there are top notch. It's worth a visit if you're in town. If that's not doable, here's how the Sony a7R IV renders the scenes.

You can share your thoughts at the TDS Facebook page, where I'll post this story for discussion.

This is The Digital Story Podcast #709, Oct. 15, 2019. Today's theme is "The Sony a7R Mark IV Field Test." I'm Derrick Story.

Opening Monologue

It's big, it's beautiful, and it captures 61 MP files: the Sony Alpha a7R IV mirrorless digital camera with 24-70mm f/2.8 lens is a technology marvel. I wrapped my hands around one and spent a month using it on photo assignment, from darkened haunted houses to mid-day festivals on the green. And today I'm going to share what I learned during those shoots.

The Sony a7R Mark IV Field Test

The kit that I've been using for the last few weeks is the Sony a7R IV with G-Master 24-70mm f/2.8 zoom. What a tandem! I basically felt like I could walk into any assignment with just that camera and lens and come away with the shots I needed. It is a confidence-inspiring rig for sure.

In case you haven't been online for the last month, here are the basic specs.

sony-a7r-m4.jpg

  • 61MP full-frame back-illuminated sensor
  • 15-stop dynamic range, 14-bit uncompressed RAW, ISO 50 to 102,4005
  • Up to 10 fps continuous shooting at 61MP with AE/AF
  • Autofocus: 567 phase-detection / 425 contrast AF points
  • Real-time Tracking and Real-time Eye AF for human, animal and movie
  • APS-C crop mode delivers 26.2MP high resolution images
  • 5.76 million dot UXGA OLED Tru-Finder electronic viewfinder
  • High-speed 2.4 and 5GHz Wi-Fi / FTP transfer and wireless PC remote
  • In-Body Stabilization: 5-Axis Optical
  • Max Video Quality: 4K 30fps
  • Twin SD card slots
  • Weather sealed.
  • After shooting with this camera for a month, here are my real world observations.

    • It's true, low light performance is fantastic. I shot regularly at ISO 6,400 with acceptable results. ISO 3200 is a piece of cake. ISO 64,000 is acceptable for certain situations.
    • Full frame sensor with Sony G-Master 24-70mm zoom is a pro rig. Optics and camera complement each other well. The results are impressive. File dimensions is a crazy 9504x6336 pixels. RAW files were around 123 MBs per shot. Extra Fine Jpegs were 34 MBs per shot.
    • The Jpegs are good, but the RAWs are better. I did my testing with Capture One Pro 12.1.3. The out of the camera RAWs with C1P looked better, especially colorwise, than the Jpegs. This probably had as much to to with C1P as it did Sony. Editing the RAWs, however, provided less headroom for highlights and shadows compared to some of my other cameras. You do, however, get built-in lens corrections with the Jpegs.
    • Autofocusing, tracking, Eye-AF, animal-AF, and everything else AF is impressive.
    • This is also a movie-making beast. Videographers should be very interested in this camera.
    • You have to spend some time to learn the menus and customize the camera. If you don't, it will frustrate you.
    • If I were a portrait photographer only, I'm not sure I would choose this camera. Skin appears more ruddy that with some of my other rigs. I would probably seek out a lens that was better for portraits.
    • The 24-70mm GM produces lovely background and bokeh, however. Its image detail is incredible.
    • Viewfinder, ergonomics, and shooting experience is excellent. This camera is a pleasure to use.

    The bottom line is, I have no problem recommending the Sony a7R IV with G-Master 24-70mm f/2.8 zoom $5,696. If I were to buy a full frame camera right now, this would probably be at the top of my list. And I much preferred shooting with it compared to the Panasonic S1.

    Our LA Street Photography Experience is Coming this March

    This 3-day event on March 13-15 explores classic Los Angeles locations and architecture. Our excursions will take us as far west as Venice Beach, as well as famous movie spots and the back streets of this fascinating Southern California area.

    You will learn new techniques for safe and effective street photography, how to capture the vibe of great architecture, and enjoy some classic California cuisine along the way.

    Olympus Educator, Mike Boening, is our co-instructor. Those of you who have worked with Mike at our SF Street Photography events know how much he brings to the table. Not only is he an official Olympus Educator, he's an accomplished street photographer, and he's going to bring gear for you to test and learn about.

    If you want to join Mike and me this coming March, just visit the information and registration page, or go to www.thenimblephotographer.com and click on the Workshops link, or go to the Olympus site - no matter how you get there, Mike and I are looking forward to working with you this coming Spring.

    The 5 fastest lenses in 2019

    You can read the entire article here from Digital Camera World.

    All of these are faster than f/1.0...

    • Handevision / Kipon Ibelux 40mm f/0.85 Mark II - Canon EF-M, Fujifilm X, Micro Four Thirds, Sony E, Leica L - $1,480.
    • Zhongyi Mitakon Speedmaster 50mm f/0.95 - Canon RF, Nikon Z, Sony FE, Micro Four Thirds - Full frame version is $799.
    • Voigtl�nder Nokton 10.5/17.5/25/42.5mm f/0.95 - MFT - $799
    • Leica Noctilux-M 50mm f/0.95 ASPH - Leica M - $11,295
    • Nikkor Z 58mm f/0.95 S Noct - Nikon Z - $8,000

    Updates and Such

    Inner Circle Members: A big thanks to those who support our podcast and our efforts!

    Podcasting Skills Course - The course date is scheduled for November 9, 2019. Registration is open now at www.thenimblephotographer.com.

    B&H and Amazon tiles on www.thedigitalstory. If you click on them first, you're helping to support this podcast. And speaking of supporting this show, and big thanks to our Patreon Inner Circle members:

    And finally, be sure to visit our friends at Red River Paper for all of your inkjet supply needs.

    See you next week!

    More Ways to Participate

    Want to share photos and talk with other members in our virtual camera club? Check out our Flickr Public Group. And from those images, I choose the TDS Member Photo of the Day.

    Podcast Sponsors

    Red River Paper - Keep up with the world of inkjet printing, and win free paper, by liking Red River Paper on Facebook.

    The Nimbleosity Report

    Do you want to keep up with the best content from The Digital Story and The Nimble Photographer? Sign up for The Nimbleosity Report, and receive highlights twice-a-month in a single page newsletter. Be a part of our community!

    Want to Comment on this Post?

    You can share your thoughts at the TDS Facebook page, where I'll post this story for discussion.

Texas Hold'em Is Back, and for Free

We can't edit pictures all the time. For those moments when you just want to lean back and enjoy your iPad, you can now fire up the classic Apple game, Hold'em - and you can do so for free.

texas-holdem.jpg

This was my favorite game back in the iPod days. Even on that tiny screen, it was fun as I pitted my poker skills against a cast of characters determined to bankrupt me. But then, it went away. Now, after an 8-year absence, it's back. It's part of Apple's celebrating 10 years of the App Store.

Part of the clever design is based on the orientation of your iPad or iPhone. Hold it horizontally, and you have an overview of the table. Turn it vertically, and you get a close-up of the player that you're dealing with at the moment. Nice.

You can download Hold'em for free. It might take a few minutes, however, because it's about 1.5 GBs in size. Those colorful characters and settings do require their megabytes.

As far as the play itself goes: Just as fun as I remember, and even more beautiful... especially on my iPad mini 5. Get yours today.

You can share your thoughts at the TDS Facebook page, where I'll post this story for discussion.

Finally! Dark Mode for Instagram

Bright is nice, but dark is better if you're a photographer. And now, Instagram will render in dark mode if you've enabled it on your iOS device.

dark-mode.jpg

You can toggle between dark and light on Instagram via your system setting in iOS 13. So you might want to add the Dark Mode shortcut to your Control Center. That way you can easily switch between the two.

To set this up, go to Settings > Control Center > Customize Controls and tap on the green + next to Dark Mode. That will move it to the active panel.

Now, all you have to do is swipe downward from the upper right corner of your screen to bring up Control Center, then tap on the Dark Mode icon.

If you like Instagram, you're probably really going to like it in Dark Mode. Set it up, and see what you think.

You can share your thoughts at the TDS Facebook page, where I'll post this story for discussion.

This is The Digital Story Podcast #708, Oct. 8, 2019. Today's theme is "What Bicycle Repair Taught Me about Photography." I'm Derrick Story.

Opening Monologue

If you've listened to any of my Nimble Photographer podcasts, you know that I believe we can improve our pictures by learning lessons from musicians, illustrators, and writers. But from mechanics too? Oh yeah. This week's photography podcast features a 1982 Peugeot racing bike, a perennial flat tire, and a lesson well learned. I hope you enjoy the show.

What Bicycle Repair Taught Me about Photography

A while back, I bought a 1982 Peugeot Course bike on Craigslist. I knew that was going to be a good match when I called the seller, and the first thing he asked me was how tall I was.

"I'm 6'7"," I replied.

"Great, come on over," he said.

This particular Peugeot had a wonderfully large frame that was still light as a feather. It needed some work, but the price was right and the fit was perfect. So I bought it.

The repairs went smoothly: new brake pads and adjustment, replaced the gear cassette, new front rim, new super cool gum-walled tires, and I was ready for a quick dash downtown.

I absolutely love the ride on this bike. The frame geometry is a bit more upright which made acceleration easy as I pumped directly down. The frame had just the right amount of "give" for imperfect roads and bike paths. I was a very happy rider.

That is, until the next morning when I discovered that the back tire was flat. It's always the back tire. I didn't have time to change it that day, so it had to wait until the weekend.

CDCIM100MEDIADXO_0303.jpg

I couldn't find the offending intruder that punctured the tube, so I just replaced it with a brand new one. Life was good again, that is, until the next morning.

On today's show, I tell the rest of this story and how it connected me to my photography.

Our LA Street Photography Experience is Featured on the Olympus Workshops Page

Olympus has taken an interest in our March Street Photography workshop, and they have listed it on the Learn and Support section of their web site. You can see for yourself by clicking here.

This 3-day event on March 13-15 explores classic Los Angeles locations and architecture. Our excursions will take us as far west as Venice Beach, as well as famous movie spots and the back streets of this fascinating Southern California area.

You will learn new techniques for safe and effective street photography, how to capture the vibe of great architecture, and enjoy some classic California cuisine along the way.

Olympus Educator, Mike Boening, is our co-instructor. Those of you who have worked with Mike at our SF Street Photography events know how much he brings to the table. Not only is he an official Olympus Educator, he's an accomplished street photographer, and he's going to bring gear for you to test and learn about.

If you want to join Mike and me this coming March, just visit the information and registration page, or go to www.thenimblephotographer.com and click on the Workshops link, or go to the Olympus site - no matter how you get there, Mike and I are looking forward to working with you this coming Spring.

Bargain! SanDisk 500GB Extreme Portable USB 3.1 Type-C External SSD

You can get the excellent SanDisk 500GB Extreme Portable SSD Drive for just $89.99 - that's $50 instant savings.

I've been using the Extreme SSD for a year now, and I absolutely love it. It is so light and portable that it fits anywhere. And it's really fast.

I can use this drive to store my Capture One Pro libraries, and the performance is equal to what I experience with my Mac's internal SSD. These little guys are really sweet, and you can get a deal on it right now.

Updates and Such

Inner Circle Members: A big thanks to those who support our podcast and our efforts!

Podcasting Skills Course - The course date is scheduled for November 9, 2019. Registration is open now at www.thenimblephotographer.com.

B&H and Amazon tiles on www.thedigitalstory. If you click on them first, you're helping to support this podcast. And speaking of supporting this show, and big thanks to our Patreon Inner Circle members:

And finally, be sure to visit our friends at Red River Paper for all of your inkjet supply needs.

See you next week!

More Ways to Participate

Want to share photos and talk with other members in our virtual camera club? Check out our Flickr Public Group. And from those images, I choose the TDS Member Photo of the Day.

Podcast Sponsors

Red River Paper - Keep up with the world of inkjet printing, and win free paper, by liking Red River Paper on Facebook.

The Nimbleosity Report

Do you want to keep up with the best content from The Digital Story and The Nimble Photographer? Sign up for The Nimbleosity Report, and receive highlights twice-a-month in a single page newsletter. Be a part of our community!

Want to Comment on this Post?

You can share your thoughts at the TDS Facebook page, where I'll post this story for discussion.

I'm currently testing the Sony Alpha a7R IV for an upcoming review. What was interesting for me, at the same time, I was preparing a Minolta Maxxum 700si for TheFilmCameraShop. As I typically do, I researched the 700si and realized that I was looking at the very DNA of the Sony alphas.

PA048279-Etsy-Minolta-700SI.jpg Minolta Maxxum 700si 35mm film camera.

The 700si was released in 1993. The battleground for 35mm SLRs in the 1990s was electronics, and no one did this better than Minolta. The autofocus A-Mount (which is still used on many Sony cameras today) feels very perky, even by today's standards. The 700si only had four sensors, in a horizontal line, but it could focus in low light (-1 EV).

The 14-segment patterned metering system is very accurate. Top shutter speed is 1/8000th. And with a Minolta 5400 flash, you could sync up to 1/8000th of a second.

PA048285-Etsy-Minolta-700SI.jpg

What was really interesting to me were the removable cards that expanded the functionality of the camera. The Data-2 card captured EXIF data that could be recalled for up to four rolls of film. The Custom xi card enabled you to customize certain camera settings for your particular shooting style, such as leaving the film leader out after rewind. The Multi-EX-2 card added multiple exposure capability. And there were many of these cards available.

PA048289-Etsy-Minolta-700SI.jpg

These cards could be interchanged via a slot in the grip and customized with controls in a flip-out panel. The entire system is somewhat clever, and somewhat fun, all at the same time They may seem simple by today's terms, but to me they represented an approach that was innovative and unique.

PA048281-Etsy-Minolta-700SI.jpg

Minolta's DNA in Sony cameras goes beyond just the A-Mount. (For more on lens compatibility, check out this article.) And I see a way of thinking that was developed by Minolta that still flickers in Sony cameras today. Sony acquired Minolta's camera technology in 2006. If you're a Sony shooter, and pick up a 1990s Minolta, certain things will feel familiar.

It was pure chance that I was researching the 700si at the same time I was testing the a7R IV. I hadn't really thought about the DNA shared between the two. But I certainly could feel it. Hat's off to Minolta. They really started something big.

You can share your thoughts at the TDS Facebook page, where I'll post this story for discussion.

iPad photographers are enjoying the best days ever. First, the release of iPadOS with improved Photos and file management. Now, the bar has been raised again with Pixelmator Photo 1.1.

editing-mode.jpg 
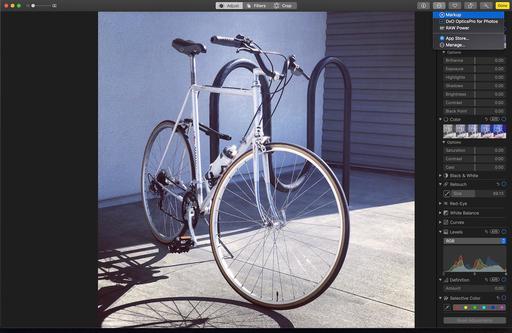
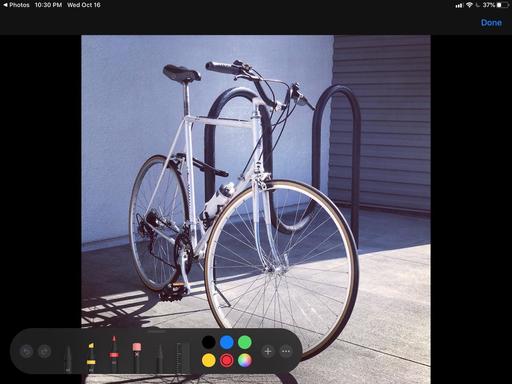
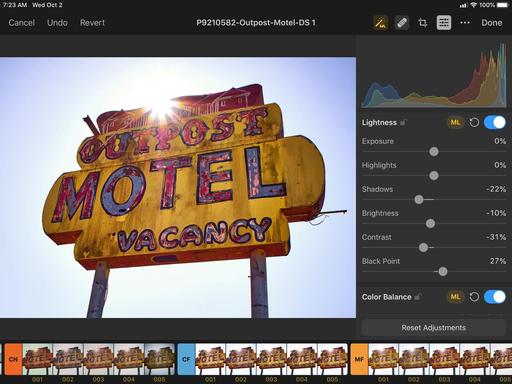
Editing interface for Pixelmator Photo.

My recommendation is that you skip the trip to Starbucks this morning and spend your $4.99 on this app. It's full featured, powerful, fast, and it integrates seamlessly with Photos for iPadOS and iCloud Drive. Honestly, the workflow couldn't be easier.

Show Photos vs Show Files

If you're already using Photos for iPadOS, the Show Photos view is a natural way to begin. You control the view by tapping the "Show Files / Show Photos" link at the top of the interface.

photos-library-view.jpg 
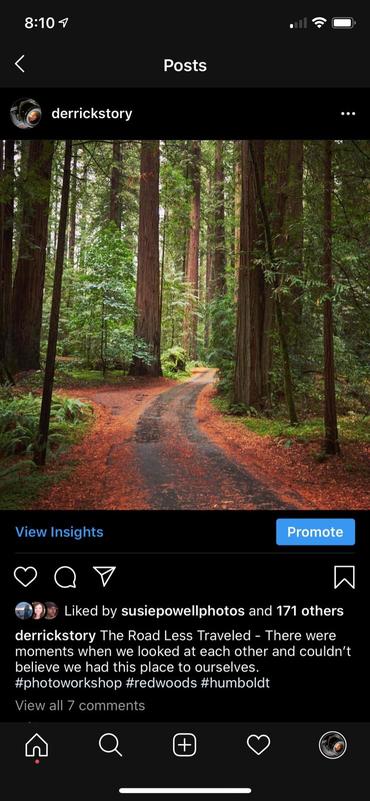
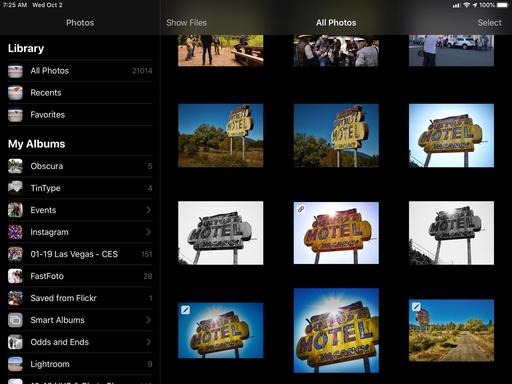
Show Photos view that lets you access your entire Photos library.

Pick an image, work on it with Pixelmator's excellent tools, then click the Done button. Pixelmator will ask you if it can modify the image in your Photos library. Give it permission, and it's updated. The edits are fully non-destructable, so you can return to the original at any time.

After a number of tests, this system worked very well. The image showed up as advertised in Photos, and if I wanted, I could continue working on it there using its adjustments such as Brilliance and Definition. A long-press on the picture would show me the original - how it looked before both the Pixelmator and Photos edits. Very nice.

icloud-drive-view.jpg 
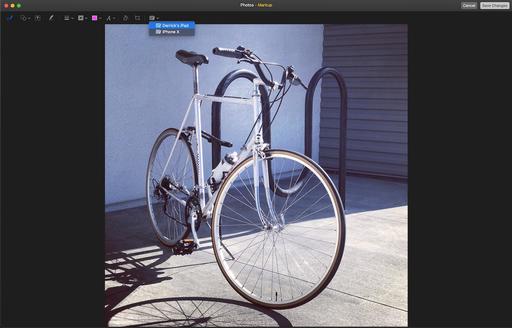
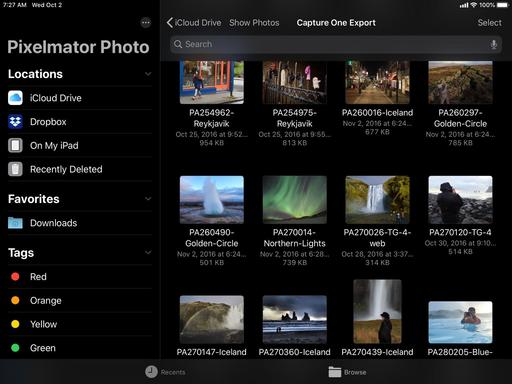
Accessing iCloud Drive in Show Files mode.

In Show Files mode, I can open any compatible image from my iCloud Drive, stored on the iPad itself (outside of the Photos library), or in Dropbox. This is more like the traditional: open a file > work on it > save it > and go back to browsing mode workflow. It's easy and straight forward.

Export Options

Regardless of where the image came from, you can export it using a variety of options. Just tap on the 3 dots (...) in the upper right corner of Pixelmator and choose Export from the popup menu.

export-mode.jpg 
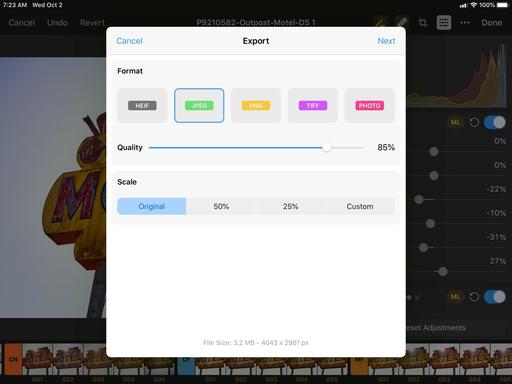
Exporting options in Pixelmator.

Lots of great options here. It feels like a real export dialog. I know that sounds funny, but I'm not used to these sort of things on my iPad mini. And I'm loving it.

I decided to open an image from my iCloud Drive, edit it in Pixelmator, then export it to Photos. Worked great. Lots of options here. Have fun.

Batch Processing

This is an unexpected and welcomed perk. Batch processing is one of those things that we think we need a computer for, instead of being able to depend solely on a tablet. For many jobs, that's no longer the case.

batch-processing.jpg 
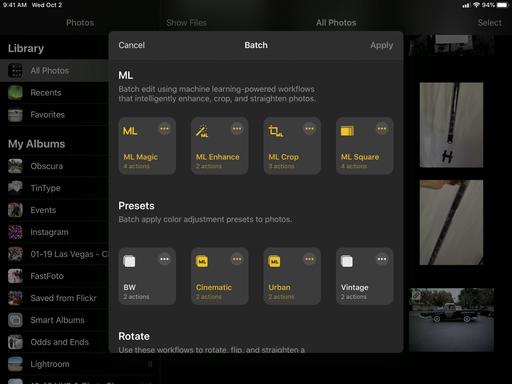
Some of the Batch Processing presets.

Get started by tapping on Select on browsing mode. Choose the pictures that you want to batch process, then tap on Batch. You have a number of presets to choose from including machine learning enhance, cropping, visual presets, rotating, straightening, and file format. The presets with three dots (...) allow you to customize them. Once the batch has been run, you can save the images or share them with all of the usual options.

Image Editing

The first thing that I liked about the image editing tools was that I could use my Apple Pencil for everything. Not only is this fun and precise, it feels much more professional than using the Healing Tool with my finger.

more-editing-tools.jpg 
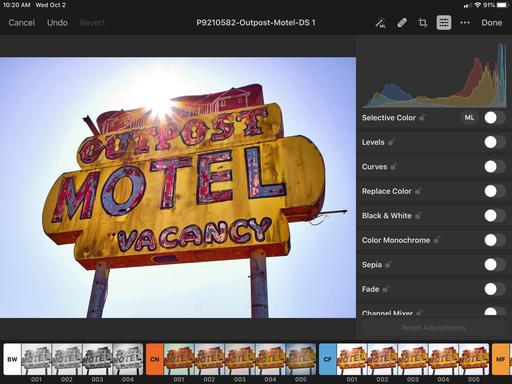
Just a few of the editing tools in Pixelmator.

There are editing tools for just about everything you would want, including adjustments for tone, color, sharpening, vignette, healing, cropping, and machine learning auto correct. There are also a bounty of presets divided into categories such as Black & White, Cinematic, Classic Films, Modern Films, Landscape, Vintage, Urban, Night, and all the presets from Pixelmator Pro. And you can create custom presets as well.

The workflow is non-destructive. And if you start by working on an image from your Photos library, you can seamlessly bounce back and forth between the two environments, taking advantage of the best tools from each app. It really couldn't be easier.

The Bottom Line

If you're running iPadOS and love photography, run don't walk to the App Store and buy Pixelmator Photos for $4.99 before they come to their senses and charge what this app is really worth, which is at least double the asking price. Highly recommended.

You can share your thoughts at the TDS Facebook page, where I'll post this story for discussion.