March 2021 Archives

This is The Digital Story Podcast #784, March 30, 2021. Today's theme is "The Bag I Use 90 Percent of the Time (and why)" I'm Derrick Story.

Opening Monologue

The real point of this show isn't the particular bag that I use, but the features that it has and how they are useful for the modern Nimble Photographer. My hope is that this discussion will help find a compact carrying solution that you'll reach for every time you step out the door. All of this and more on today's TDS Photography Podcast. I hope you enjoy the show.

Tune-In Via Your Favorite Podcast App!


podcast-icon.jpeg

Apple Podcasts -- Spotify Podcasts -- Stitcher

Podbean Podcasts -- Podbay FM -- Tune In

The Bag I Use 90 Percent of the Time (and why)

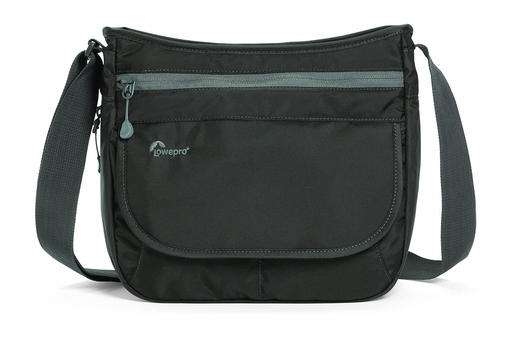
When Lowepro released the StreamLine 150 in 2013, it was intended for lightweight vacation travel with a compact camera. Its multi-device design offered dedicated storage for a 7" tablet, smartphone, compact camera, and personal items.

streamline-150.jpg

Even though DSLRs still roamed the earth then, there were a number of mirrorless photographers who appreciated the stylish practically of the StreamLine 150 and embraced it for their shrinking camera kits. One of things I like about it is the abundance of small lined pockets that I can use without additional protection cases. Let's take a closer look.

Basic Specs and Features

  • Measures 11"x10"x1" and weighs on 0.75 pounds.
  • 2 padded and softly lined device front compartments protect against dust, scratches and abrasion.
  • 2 additional front pockets for accessories.
  • Largish main pocket.
  • Two slim pockets for iPad mini or comparable tablet.
  • Weather-resistant materials and design.
  • Long shoulder strap.

The reason why it's been my go-to bag is because it's slim, stylish, and doesn't look like a camera bag. Some folks might say it looks like a man-purse :-)

I like the way it hugs my body when I'm biking or exploring urban environments. I can tuck it under my arm without attracting any attention. Yet, I have quick access to everything I need.

Inside, I typically carry an Olympus MFT body or the Fujifilm X100V. The iPhone 12 Pro Max fits perfectly in one of the front lined pockets. An extra pair of glasses fits in the other.

Lens cloths, memory cards, and other small items fit nicely in the accessory pockets. Generally, I keep my camera in the roomy main storage space. And there's still room for personal items.

The bags I carry have really become smaller over the years. And as such they are easier to protect from both the elements and prying eyes.

The Lowepro StreamLine 150 is hard to find these days. But I have a brand new one with its original packaging that I will raffle off to our Inner Circle Members. If you're part of our Inner Circle, or join us by April 5th, you can toss your hat in the ring to win the brand new Lowepro Streamline 150. The winner will be announced on next week's podcast.

A New Infrared Photography Online Workshop Begins May 2021

Back by popular demand!

If you want to learn the ins and outs of IR photography from the comfort of your home during this online event, then check out The Second Infrared Photography Workshop that begins in mid-May.

The workshop is already half sold-out via the pre-announcement to our Inner Circle Members (who also receive a discount for the event.) But we still have seats open. I wouldn't delay however if you want to attend.

You will learn how to:

  • Choose best IR filter to start with.
  • How to test your existing digital camera for infrared sensitivity.
  • Learn about the different types of IR conversions for digital cameras.
  • See how different IR filters produce wildly different results.
  • Learn how to fine-tune your images with software you already own.
  • Discover advanced techniques to take your images to the next level.

You can sign up now for $145. Inner Circle Members, visit out Patreon site for a discount coupon code.

Lens Hoods: Do You Actually Need Them?

You can read the entire article on F-Stoppers.

I was curious to hear Marc Newton, from The School of Photography, say that you absolutely must use lens hoods. In the artistic world I don't believe there are any musts really but this video breaks down the reasons he thinks lens hoods are essential pieces of equipment. He's absolute right in some of the things he says and this is a great introduction to beginner photographers, especially, who might be wondering whether to use lens hoods or not. Funnily enough, in some of the example images he provides, I prefer those without the use of a lens hood.

The New Donation Kit for Carefree Shipping of Found Film Cameras

We have more time around the house than ever. And you finally dove into that bedroom closet that's been begging for some organization.

If you found a film camera that you're no longer using, our new Donation Kit makes it easy to pack and ship. Just visit the Contact Form on thenimblephotographer.com, click the box next to Donating a Film Camera, and let me know what you have. In your note, be sure to include your shipping address.

If it's a camera we can use for the shop, I'll send you a Donation Kit that includes a USPS Priority Mail shipping box and prepaid label. All you have to do is tape it up, insert the camera, and add the label. USPS will pick up your shipment from the front door of your house during their regular mail delivery. It's that simple!

Your donation help get analog gear in the hands of aspiring fine art photographers, and the proceeds help support this podcast.

Virtual Camera Club News

Inner Circle Members: A big thanks to those who support our podcast and our efforts!

Second Session of Integrating iPhone into a Pro Photography Workflow Online Workshop - April 21 to May 15, 2021: The first session of "Integrating iPhone into a Pro Photography Workflow" Online Workshop has sold out. But now I've posted a second session that begins April 21, 2021. If you're interested in attending, just go to catalog page.

My Writing on Medium.com: I now have more than 25 published articles on Medium.com. And if you haven't visited the site, and enjoy good writing on a variety of topics, I suggest that you may want to take a look. You can just go to the home page and enter "Derrick Story" in the search field. And if you like what you read, then follow me!

EV Explorers for Those Who Are Interested in Electric Cars: I've created a new group on DerrickStoryOnline titled EV Explorers. The tagline for this group is: "Bringing Curiosity and Nimbleosity to the World of Electric Vehicle Transportation." Here we can share information, tips, discoveries and more about using electric vehicles for our photography adventures. If you want to join this group, click on this link for an invite. We're going to keep this as a private group for now, but you are invited to join us.

Affiliate Links - The links to some products in this podcast contain an affiliate code that credits The Digital Story for any purchases made from B&H Photo and Amazon via that click-through. Depending on the purchase, we may receive some financial compensation.

And finally, be sure to visit our friends at Red River Paper for all of your inkjet supply needs.

See you next week!

Product Links and Comments

There are product links in this article that contain affiliate tags. In some cases, depending on the product, The Digital Story may receive compensation if you purchase a product via one of those links. There is no additional cost to you.

You can share your thoughts at the TDS Facebook page, where I'll post this story for discussion.
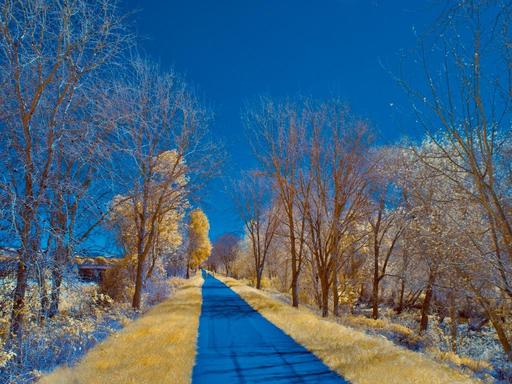
Often referred to as the Ultra Color filter because it lets more visible light in, the 590NM filter on a converted camera is one of my favorites. It produces vibrant colors where leaves glow golden yellow and skies are bright blue.

EMIR0479.jpeg Bike trail photographed with a converted Olympus E-M10 III, 14-42mm Olympus EZ zoom, Kolari 590NM filter, processed in RAW Power. Photos and illustrations by Derrick Story.

There are a couple scenarios where you can work with this slice of the light spectrum. The easiest is to buy a starter kit, such as the Kolari Pocket Full-Spectrum Camera with Infrared Filter Starter Kit for $229. The 590NM is included in the kit. You can also have one of your existing digital cameras converted, or you can buy a converted camera in the lens mount of your choice.

Once you have your camera, and a 590NM filter mounted on it, then make a custom WB setting on a gray card, sidewalk, or similar toned surface. Now you're ready to shoot.

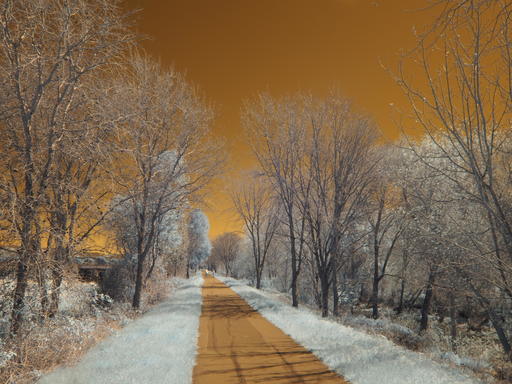
When you first look at the images, they will have a color scheme that looks something like this.

unconverted-org-1024.jpeg Original file before processing. The Channel Mixer is the key adjustment required for conversion.

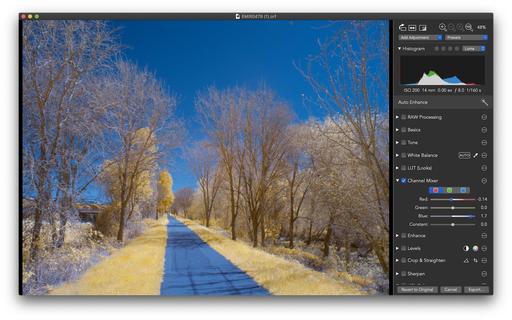
This is not the final product. The image is completed in post production using an editor that has a Channel Mixer. You can use Photoshop, RAW Power, or Pixelmator Pro to name a few. This is where you do what we call the "Red/Blue Swap".

channel-mixer-1600.jpg Editing the IR image in RAW Power using the Channel Mixer.

The starting point is to go to the Red Channel and set the Red Slider to 0 and the Blue Slider to 100. Then you go to the Blue Channel and set the Red Slider to 100 and the Blue Channel to 0. Then you do a second pass where you further adjust the sliders to taste. Notice in the illustration above that I have in the Red Channel Red set to -0.14 and Blue to 1.7. That's how I got the effect that I wanted.

I worked with with B&W IR photography for years before trying my hand at color. In a previous article titled, B&W Infrared Photography with an R72 Filter, I talk about that process with a regular digital camera. But now that I've ventured into color work, I love having the option to shoot with either look, with 590 being my favorite.

Product Links and Comments

There are product links in this article that contain affiliate tags. In some cases, depending on the product, The Digital Story may receive compensation if you purchase a product via one of those links. There is no additional cost to you.

You can share your thoughts at the TDS Facebook page, where I'll post this story for discussion.
This is The Digital Story Podcast #783, March 23, 2021. Today's theme is "Hands On Review of the Fujifilm X-E4 Mirrorless Camera" I'm Derrick Story.

Opening Monologue

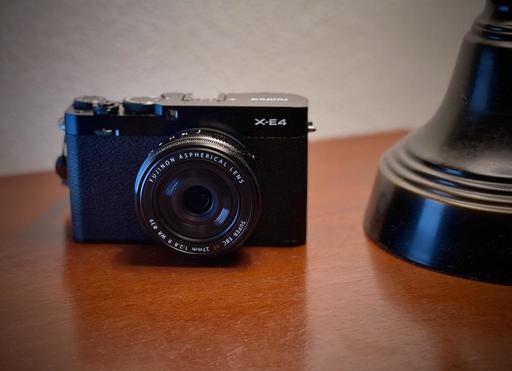
The FUJIFILM X-E4 is a camera that I've fallen in and out of love a dozen times since I've had it. On one hand it's compact, handsome, and powerful. On the other it lacks image stabilization and the desired number of customizable buttons. So where do I land with the X-E4? I'll reveal my verdict and more on today's TDS Photography Podcast. I hope you enjoy the show.

Tune-In Via Your Favorite Podcast App!


podcast-icon.jpeg

Apple Podcasts -- Spotify Podcasts -- Stitcher

Podbean Podcasts -- Podbay FM -- Tune In

Hands On Review of the Fujifilm X-E4 Mirrorless Camera

X-E4-1024.jpeg

When Fujifilm announced the X-E4, I thought for sure that I was going to buy it after my review period expired. It's so compact, its controls are familiar, and the image quality could for sure be counted on. Plus, I really like the 27mm f/2.8 lens that's bundled with it.

But it isn't perfect. So before I get into my personal pros and cons, let's review its basic specs and features.

Basic Specs and Features

  • 26.1MP APS-C X-Trans BSI CMOS 4 Sensor (6240 x 4160)
  • X-Processor 4 Image Processor
  • DCI/UHD 4K at 30 fps, Full HD at 240 fps
  • 2.36m-Dot 0.62x OLED EVF
  • 3.0" 1.62m-Dot 180 Degree Tilting Touchscreen
  • 425-Point Hybrid AF System
  • ISO 160-12800, up to 30-fps Shooting
  • Bluetooth and Wi-Fi Connectivity
  • Film Simulation Modes
  • XF 27mm f/2.8 R WR Lens
  • Same battery as the X100V

The Things that I Like

  • Handsome, compact body
  • Excellent resolution from the APS-C sensor
  • Cool 27mm lens bundled, good sharpness and color
  • Tilting LCD is very nice
  • Lots of creative controls such as film simulations, manual focusing aids, vintage lens profile ability, and more
  • On the fly geotagging works great with my iPhone
  • Love having the same battery as my X100V
  • Headphone adapter included in the box.
  • USB-C port and charging is nice.

Things I Don't Like as Much

  • No in-body image stabilization, and OIS lenses hard to come by
  • No grips on the camera, and grip accessories add to overall cost
  • Jpegs feel over processed with mushy bokeh
  • RAWs are noticeably darker than image on LCD and Jpegs
  • Would much prefer an f/2.0 prime
  • UHS-1 card slot seems like a miss
  • Lack of programmable buttons is disappointing
  • Why a weather-proofed lens on a non weather-proofed body?
  • No battery charger in the box
  • No built-in flash nor accessory flash included
  • No M-C-S switch
  • Play button moved to an awkward location

I've really enjoyed shooting with the camera and the 27mm lens. And I've adapted my favorite compact Pentax HD optics as well, and the images look fantastic.

I was hoping for an interchangeable lens version of the X100V. But the X-E4 falls short of those expectations. The X100V is weatherproof, has a faster lens, more physical controls, built-in flash, hybrid viewfinder, and more rugged build. The lack of IS in the X100V isn't as big an issue because it only has the 35mm equivalent lens. And I think that the Jpegs and RAWs look better from the X100V as well.

So here's what I've decided to do. I have a review model of the Fujifilm X-S10 coming that includes 5-axis IS and a built-in flash, but for only $100 more. I'm going to test it against my X-E4 experience. But for now, I'm holding off on purchasing the X-E4. It's fun, but I think I need more for a $1,000.

If you're interested in the camera, The FUJIFILM X-E4 with 27mm lens is available now for $1,049.

How I Adapted My Pentax HD Lenses to a Fujifilm Camera

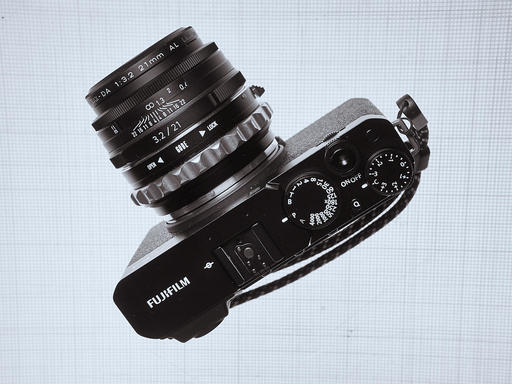
Two of my prized compact primes include the Pentax HD Pentax DA 21mm f/3.2 AL Limited and the Pentax HD Pentax DA 70mm f/2.4 Limited. Both are magnificent, and each costs about $450.

The trick was finding the right adapter. The Pentax lenses don't have an aperture ring, and their default state is stopped down. A standard Pentax-K adapter wouldn't work. I needed something specifically for DA lenses.

Fortunately, I found the wonderful Gobe Lens Adapter that not only allows me to adapt the Pentax optics to the Fujifilm camera, but it provides aperture control as well. And it's a beauty, both in design and function.

After testing the adapter, I broadened my lens kit to include the Pentax HD Pentax DA 40mm f/2.8 Limited as well. I have now quadrupled my optics kit for the X-E4 for only the price of the Gobe adapter ($26.50). And the resulting images are wonderful.

1.6 million ISO! Here's a guided tour of the upcoming Pentax K-3 Mark III

You can read the entire article on Digital Camera World.

UPDATE: Ricoh Imaging has given users a guided tour of the Pentax K-3 Mark III, its long-gestating APS-C flagship camera.

Despite confirming in February that the body has been delayed, Ricoh is keeping the Pentax K-3 Mark III flame alive with this 20-minute deep dive into the new camera's capabilities - including its top sensitivity of 1.6 million ISO.

Ricoh product planner Shigeru Wakashiro gives a top-to-bottom overview of the Mark III, taking in everything from the new image sensor to the improved optical viewfinder. If you ever wanted reassurance that the DSLR isn't dead despite the mirrorless revolution, Wakashiro might make a believer out of you.

Check out the full video below - and don't forget to hit the subtitles / closed caption (unless you understand Japanese!).

The New Donation Kit for Carefree Shipping of Found Film Cameras

We have more time around the house than ever. And you finally dove into that bedroom closet that's been begging for some organization.

If you found a film camera that you're no longer using, our new Donation Kit makes it easy to pack and ship. Just visit the Contact Form on thenimblephotographer.com, click the box next to Donating a Film Camera, and let me know what you have. In your note, be sure to include your shipping address.

If it's a camera we can use for the shop, I'll send you a Donation Kit that includes a USPS Priority Mail shipping box and prepaid label. All you have to do is tape it up, insert the camera, and add the label. USPS will pick up your shipment from the front door of your house during their regular mail delivery. It's that simple!

Your donation help get analog gear in the hands of aspiring fine art photographers, and the proceeds help support this podcast.

Virtual Camera Club News

Inner Circle Members: A big thanks to those who support our podcast and our efforts!

Second Session of Integrating iPhone into a Pro Photography Workflow Online Workshop - April 21 to May 15, 2021: The first session of "Integrating iPhone into a Pro Photography Workflow" Online Workshop has sold out. But now I've posted a second session that begins April 21, 2021. If you're interested in attending, just go to catalog page.

PS: Looks like a second session of the Infrared Photography Workshop is coming as well. Tune in next week for more details.

My Writing on Medium.com: I now have more than 25 published articles on Medium.com. And if you haven't visited the site, and enjoy good writing on a variety of topics, I suggest that you may want to take a look. You can just go to the home page and enter "Derrick Story" in the search field. And if you like what you read, then follow me!

EV Explorers for Those Who Are Interested in Electric Cars: I've created a new group on DerrickStoryOnline titled EV Explorers. The tagline for this group is: "Bringing Curiosity and Nimbleosity to the World of Electric Vehicle Transportation." Here we can share information, tips, discoveries and more about using electric vehicles for our photography adventures. If you want to join this group, click on this link for an invite. We're going to keep this as a private group for now, but you are invited to join us.

Affiliate Links - The links to some products in this podcast contain an affiliate code that credits The Digital Story for any purchases made from B&H Photo and Amazon via that click-through. Depending on the purchase, we may receive some financial compensation.

And finally, be sure to visit our friends at Red River Paper for all of your inkjet supply needs.

See you next week!

Product Links and Comments

There are product links in this article that contain affiliate tags. In some cases, depending on the product, The Digital Story may receive compensation if you purchase a product via one of those links. There is no additional cost to you.

You can share your thoughts at the TDS Facebook page, where I'll post this story for discussion.
Two of my prized compact primes include the Pentax HD Pentax DA 21mm f/3.2 AL Limited and the Pentax HD Pentax DA 70mm f/2.4 Limited. Both are magnificent, and each costs about $450.

Pentax-Lens-X-E4-P3215263-Camera.jpg Pentax HD 21mm mounted on a Fujifilm X-E4 using a Gobe adapter with aperture control.

But since I have fewer photo assignments these days because of COVID, I'm not using my Pentax DSLRs as much. And it seemed a shame to let these great optics languish in the storage cabinet.

So I decided to explore using them on the new FUJIFILM X-E4 Mirrorless Digital Camera. If they worked as I hoped, they would be a wonderful complement to the Fuji 27mm that comes with the camera.

The Pentax 21mm would equal to 31.5mm on the cropped-frame Fuji, and the Pentax 70mm works out to 105mm. With the Fujifilm 27mm providing a 40mm field of view, that's an excellent trio. I would have to manually focus the two Pentax lenses. But that's not a problem for me. You can read about that in my article titled, The Joy of Manual Focus Lenses on Mirrorless Cameras.

The trick was finding the right adapter. The Pentax lenses don't have an aperture ring, and their default state is stopped down. A standard Pentax-K adapter wouldn't work. I needed something specifically for DA lenses.

Fortunately, I found the wonderful Gobe Lens Adapter that not only allows me to adapt the Pentax optics to the Fujifilm camera, but it provides aperture control as well. And it's a beauty, both in design and function.

After testing the adapter, I broadened my lens kit to include the Pentax HD Pentax DA 40mm f/2.8 Limited as well. I have now quadrupled my optics kit for the X-E4 for only the price of the Gobe adapter ($26.50). And the resulting images are wonderful.

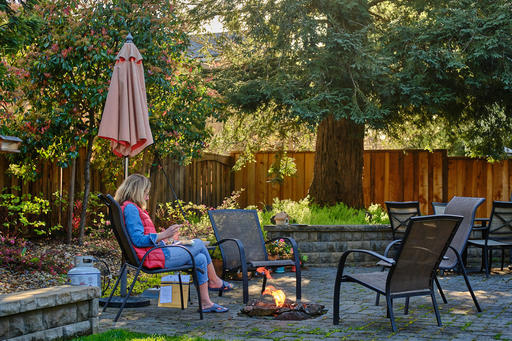
Backyard-Pentax-40mm-DSCF0076-Fuji-X-E4.jpg "Backyard Relaxing" - Fujifilm X-E4 with Pentax HD 40mm lens using the Gobe Adapter. ISO 320, 1/140th, f/4.0. Raw file processed in Capture One Pro 21. Photo by Derrick Story.

It's a joy to use adapted lenses on the X-E4 because its outstanding EVF also supports 4 different styles of manual focusing aids. The camera also supports creating lens profiles for the non-Fuji optics. So my metadata correctly reads Pentax 40mm for the optic. The only thing I don't get is the f/stop data. But I'm usually shooting wide open or at f/4 anyway.

I'm really having a blast with the Pentax trio and the X-E4. Mirrorless cameras in general, and the Fujifilm models in particular, allow for so much flexibility. And it really helps to keep the gear costs in check.

Product Links and Comments

There are product links in this article that contain affiliate tags. In some cases, depending on the product, The Digital Story may receive compensation if you purchase a product via one of those links. There is no additional cost to you.

You can share your thoughts at the TDS Facebook page, where I'll post this story for discussion.
This is The Digital Story Podcast #782, March 16, 2021. Today's theme is "Do I Really Need All Those Photo Subscriptions?" I'm Derrick Story.

Opening Monologue

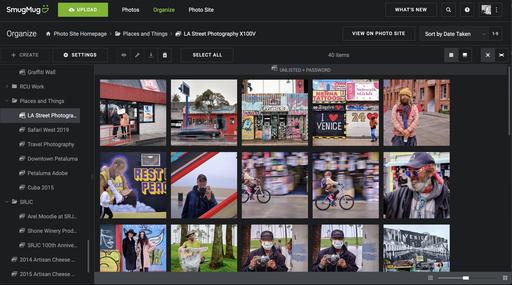
A reminder for my upcoming SmugMug subscription renewal arrived yesterday saying that I could lock-in the low rate of $85 if I pay for an entire year. Since the pandemic, I haven't used SmugMug once because I'm not doing client shoots. And it got me thinking about the rest of my annual charges. I think it's time to take stock of all my photo sharing subscriptions. And that's the focus of today's TDS Photography Podcast. I hope you enjoy the show.

Tune-In Via Your Favorite Podcast App!


podcast-icon.jpeg

Apple Podcasts -- Spotify Podcasts -- Stitcher

Podbean Podcasts -- Podbay FM -- Tune In

Do I Really Need All Those Photo Subscriptions?

I think part of what I had to deal with concerning this project was acknowledging that I'm not the same photographer I was at the beginning of 2020. Most of my assignments are created by me for my blog posts, LinkedIn Learning trainings, Medium articles, and workshops.

Smugmug-gallery.jpg

I really don't need models anymore because I still can't interact with them, and I don't need sites to manage online galleries for those models and clients. Things have really changed. And the SmugMug renewal notice brought all of this home.

So here's what I've been working on. The subscriptions I've decided to discontinue, I've been downloading all of my content off them in preparation to end the service. I had to start this ahead of time to allow the days required to ensure I got everything.

Looking back over the last 10 years of work, I was amazed at how much content I had online. With SmugMug, for example, it was gallery after gallery that I downloaded. But I did so one at a time so I could organize the work on my backup hard drive. I just chip away at it while working on other projects.

So, what did I keep, and what did I let go? Let's take a look.

  • SmugMug - Let Go $85 a year - I really like SmugMug, and it was my go-to service for client password-protected galleries. Their organization, features list, and rendering are terrific. But I just don't do that work anymore, and it doesn't make sense to pay them $85 a year to archive that content. I've moved it all offline on to my backup hard drives.
  • Flicker Pro - Keep $59 a year - Fortunately, SmugMug bought Flickr, so they still get some of my money. I'm keeping Flickr because it's cheaper, more versatile, and I have a deeper history of images there. Plus, we have the TDS Online Community on Flickr that I love, and draw images from for the TDS Member Photo of the Day. Flickr stays. (You might want to check out The Digital Story Public Group on Flickr where we have more than 80,000 images by TDS members. It's great!)
  • Adobe Photography Plan (20GB) - Keep $9.99 a month - I like Lightroom and love having access to the latest Adobe photography features with this plan. I don't keep it for the storage, rather for the apps. And I appreciate them keeping the price stable over the years.
  • Model Mayhem - Let Go $35 every 6 months - I have met many terrific people via Model Mayhem and hundreds of wonderful photographs have resulted. But again, my life is different now. I ended my subscription.
  • Dropbox Plus 2TB - Keep $119 a year - Even though Dropbox is more than a photography plan, I use it mainly for that. And because of its versatility and popularity, it has keep its relevance even in this new chapter of my career. My online clients use it, and I need it as much as ever.
  • iCloud 2TB - Keep $9.99 a month - If I had to keep just one cloud storage service, it would be iCloud. Since I'm in the Apple ecosystem, this services manages all the work I do on my Mac, including my photos. I wish they had a level in-between 200 GB (which isn't enough) and 2 TB (which gives me lots of head room). Regardless, it's a keeper for me.

So, I've managed to trip 1/3 of my services in 2021. I'll review everything again in 2022 and go from there. Who knows what my world will be like by then?

The Vanagon is Gone!

I know this is a story near and dear to many hearts in our community, but I've sold the Vanagon that I used for workshops over the years, a vehicle filled with 20 years of fond memories.

I've been working on it since that one miserable hot summer day a few years back when I had to have it towed from SF to Santa Rosa. I had feared that she died that day. But like a Phoenix from the ashes, she came back to full functionality. Of course, this included hours of my sweat equity combined with a few trips to Hans in Sebastopol.

And on the day that I handed over the pink slip to a young German pre-med student and his girlfriend, she was running like a top. I honestly had a lump in my throat watching her drive away.

Fortunately, Vanagons retain an excellent resale value on the used market, and the cash payment for my 1990 will be a sizable part of the downpayment for my new all-electric VW ID.4 5 passenger SUV.

This begins a new chapter in my road trip adventures. I'll be using the ID.4 for upcoming workshops and my ongoing exploration of the world.

I placed my reservation back in February, and was able to place the order just last week. So the new car is currently being built, and I should be behind the wheel by late April. I'll keep you posted!

Adobe Photoshop's 'Super Resolution' Made My Jaw Hit the Floor

You can read the entire article on Petapixel.

Adobe just dropped its latest software updates via the Creative Cloud and among those updates is a new feature in Adobe Camera Raw (ACR) called "Super Resolution." You can mark this day down as a major shift in the photo industry.

I have seen a bit of reporting out there on this topic from the likes of PetaPixel and Fstoppers, but other than that the ramifications of this new feature in ACR have not been widely promoted from what I can see. The new Super Resolution feature in ACR essentially upsizes the image by a factor of four using machine learning, i.e. Artificial Intelligence (AI).

What does this mean practically? Well, I immediately tested this out and was pretty shocked by the results. Though it might be hard to make out in the screenshot below, I took the surfing image shown below, which was captured a decade ago with a Nikon D700 -- a 12MP camera -- and ran the Super Resolution tool on it and the end result is a 48.2MP image that looks to be every bit as sharp (if not sharper) than the original image file. This means that I can now print that old 12MP image at significantly larger sizes than I ever could before.

What this also means is that anyone with a lower resolution camera, i.e. the current crop of 24MP cameras, can now output huge image files for prints or any other usage that requires a higher resolution image file. In the three or four images I have run through this new feature in Photoshop I have found the results to be astoundingly good.

The New Donation Kit for Carefree Shipping of Found Film Cameras

We have more time around the house than ever. And you finally dove into that bedroom closet that's been begging for some organization.

If you found a film camera that you're no longer using, our new Donation Kit makes it easy to pack and ship. Just visit the Contact Form on thenimblephotographer.com, click the box next to Donating a Film Camera, and let me know what you have. In your note, be sure to include your shipping address.

If it's a camera we can use for the shop, I'll send you a Donation Kit that includes a USPS Priority Mail shipping box and prepaid label. All you have to do is tape it up, insert the camera, and add the label. USPS will pick up your shipment from the front door of your house during their regular mail delivery. It's that simple!

Your donation help get analog gear in the hands of aspiring fine art photographers, and the proceeds help support this podcast.

Virtual Camera Club News

Inner Circle Members: A big thanks to those who support our podcast and our efforts!

Second Session of Integrating iPhone into a Pro Photography Workflow Online Workshop - April 21 to May 15, 2021: The first session of "Integrating iPhone into a Pro Photography Workflow" Online Workshop has sold out. But now I've posted a second session that begins April 21, 2021. If you're interested in attending, just go to catalog page.

My Writing on Medium.com: I now have more than 25 published articles on Medium.com. And if you haven't visited the site, and enjoy good writing on a variety of topics, I suggest that you may want to take a look. You can just go to the home page and enter "Derrick Story" in the search field. And if you like what you read, then follow me!

EV Explorers for Those Who Are Interested in Electric Cars: I've created a new group on DerrickStoryOnline titled EV Explorers. The tagline for this group is: "Bringing Curiosity and Nimbleosity to the World of Electric Vehicle Transportation." Here we can share information, tips, discoveries and more about using electric vehicles for our photography adventures. If you want to join this group, click on this link for an invite. We're going to keep this as a private group for now, but you are invited to join us.

Affiliate Links - The links to some products in this podcast contain an affiliate code that credits The Digital Story for any purchases made from B&H Photo and Amazon via that click-through. Depending on the purchase, we may receive some financial compensation.

And finally, be sure to visit our friends at Red River Paper for all of your inkjet supply needs.

See you next week!

Product Links and Comments

There are product links in this article that contain affiliate tags. In some cases, depending on the product, The Digital Story may receive compensation if you purchase a product via one of those links. There is no additional cost to you.

You can share your thoughts at the TDS Facebook page, where I'll post this story for discussion.
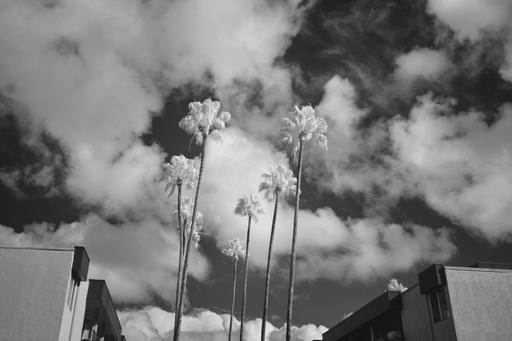
Infrared photography is a great way to see the world with new eyes. I've been having a lot of fun shooting with my Fujifilm X100V camera and the Hoya R72 Infrared Filter. The workflow is easy, and I'm going to share the steps here for an X100 or any other digital camera that passes the IR test.

C1P-DSCF2355-X100V-R72.jpeg "Palm Trees and Apartments" - Fujifilm X100V camera with Hoya R72 Infrared Filter, ISO 640 (via Auto ISO), f/2.0, 1/15th, Auto White Balance, Acros+R B&W film simulation, Jpeg mode. Photo by Derrick Story.

What Cameras Can Shoot Infrared?

One of the reasons I use the X100V is because it easily passed my IR test. Simply take your TV remote controller, point it at the camera in Live View mode, and press the power button to send an IR beam to the camera. If you digicam displays a bright dot on the LCD, then you're in business. The brighter the dot, the better.

Put the Hoya R72 on the Camera

You'll want a bright day for this photo shoot. If you have clouds in the sky with blue, all the better. Set the camera on Auto ISO and let it climb as high as ISO 6400. With the R72 filter, which is quite dense, your shutter speeds will be around 1/15th at f/2, or something in that neighborhood depending on your camera's sensitivity, ISO setting, and maximum aperture.

Set Custom White Balance

By setting your custom white balance to measure green grass or foliage as the target, you can capture a broader range of tones that will improve your tonal options. After you put the 720 filter on your camera (Hoya R72, etc.), then use the custom white balance setting to measure off a living green subject in sunlight.

I recommend that you save this Custom White Balance Setting for future use.

Variation: Set the Camera to B&W Mode

Yes, you can shoot color IR, and that's a whole different ballgame. To get started, I recommend choosing a B&W mode on your camera. For the X100V, I like Acros+Red. You'll be able to preview the infrared effect in live view on the LCD or in the EVF if you have one.

Shoot in RAW+Jpeg mode. The Jpeg will display the Film Simulation, and the RAW will leave you with all of your options open for a future editing date.

Additional Thoughts

One of the things that I like about the X100V for this assignment is that I can switch back and forth between the optical viewfinder and the EVF. It's easier to compose with the optical when the R72 filter is attached.

Look for scenes where infrared shines. Plant foliage against a blue sky with puffy clouds is great. But I also like buildings with landscapes, streets, paths, and anything that gives me the contrast that I want. It's a whole new world.

There is so much more to infrared photography, including working at different parts of the spectrum with cameras that have been modified. But you don't need that to get started. If you like what you get with the R72, then you can continue your journey with additional gear.

Product Links and Comments

There are product links in this article that contain affiliate tags. In some cases, depending on the product, The Digital Story may receive compensation if you purchase a product via one of those links. There is no additional cost to you.

You can share your thoughts at the TDS Facebook page, where I'll post this story for discussion.
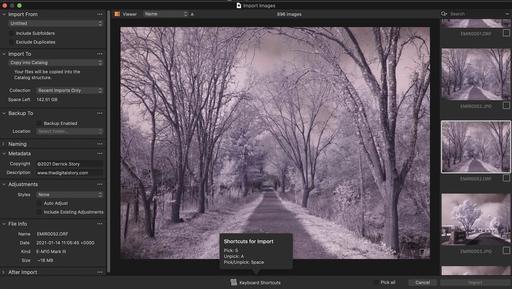
Just this morning there's an update to Capture One Pro 21 (officially 14.1) that includes a new feature called the import browser. And I love it!

C21-Import-Browser-1600.jpg

Instead of copying the contents from a memory card and thinning out the shoot afterwards, this new feature makes it easy to only choose the shots you want to bring into the application.

Just click on the Viewer icon in the upper left corner. The Import dialog screen now features a big, beautiful browser that provides a detailed look at the images on the memory card. Use the arrow keys to navigate from one image to the next, and keyboard shortcuts to mark the ones you want to bring into the app.

Importing pictures just became a lot more enjoyable (and efficient).

Capture One Pro 21.1 is a free upgrade for C1P 21 users. A free trail is available at the Capture One Pro home page.

You can share your thoughts at the TDS Facebook page, where I'll post this story for discussion.
This is The Digital Story Podcast #781, March 9, 2021. Today's theme is "A Growing Interest in Fixed-Lens Cameras" I'm Derrick Story.

Opening Monologue

Whether it's a super-compact Sony RX-100, a handsome Canon G5X, or a posh Leica Q2, fixed-lens cameras are more and more part of the conversation among photographers who want to combine imaging power with portability. On today's show, we'll examine some of the thinking behind their popularity and my recommendations if you're in the market for one yourself. I hope you enjoy the show.

Tune-In Via Your Favorite Podcast App!


podcast-icon.jpeg

Apple Podcasts -- Spotify Podcasts -- Stitcher

Podbean Podcasts -- Podbay FM -- Tune In

A Growing Interest in Fixed-Lens Cameras

One of the most popular questions during the recent iPhone Pro Workshop was inquires about great fixed lens cameras to complement an advanced smartphone (itself a fixed-lens device). The thinking being, I really like my iPhone, but I also want an excellent digital camera. And if I don't have to buy a bunch of lenses and accessories, I can spend a bit more on the camera itself.

Sony-RX1.jpg

That perfectly reasonable thinking. Another viewpoint was" "I already have an interchangeable lens system that I like. I don't plan on starting over. But I would like a more compact camera for those times I don't want to lug my system around." Yet another common sense approach.

There is something appealing about a camera that only needs a spare battery as a accessory. It's easy to grab on the way out the door, stash in your jacket pocket, and call it a day.

Plus, there are some great cameras to choose from. Here are my five favorite fixed lens models, ranging from the most expensive to downright affordable.

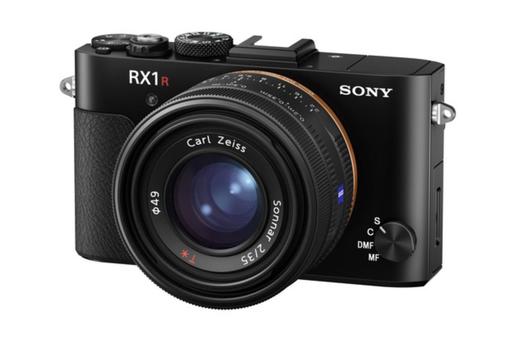
  • Sony Cyber-shot DSC-RX1R II $3,298 - The Sony RX1R gets the nod over the Leica Q2 because of its more versatile 35mm Zeiss lens (compared to 28mm), lower price tag (compared to $4,995), and tilting LCD. This is a beautiful full frame 42MP camera that will be used and cherished for years to come.
  • Fujifilm X100V $1,399 - I think Fujifilm comes closest to the Leica rangefinder look and feel of any competitor, but without the steep price tag. Start with the Hybrid 0.52x OVF with 3.69m-Dot OLED EVF, add an impressive 35mm equivalent f/2 lens, tilting LCD, and a 26.1MP APS-C X-Trans BSI CMOS 4 Sensor, and you have an impressive work of art that happens to take great pictures.
  • Sony Cyber-shot DSC-RX100 VII $1,298 - If you want a more versatile zoom, then the RX100 is a top quality choice. Its 24-200mm Zeiss optic has a maximum aperture of f/2.8 at the wide end. Plus you get a 20.1MP 1" Exmor RS BSI CMOS Sensor, popup EVF, tilting LCD, and Fast Hybrid AF System with 315 Phase-Detection Points - all packed into a compact package that you can stash in your front jeans pocket.
  • Ricoh GR III Digital Camera with GW-4 Wide Conversion Lens Kit $1,149 - This super-compact and discreet GRIII provides plenty of punch with its 24.2MP APS-C CMOS sensor with a fast f/2.8 28mm prime lens with image stabilization. You don't get a tilting LCD or integrated flash, but you do get an accessory 21mm wide lens for some very exciting imagery, especially in the urban environment.
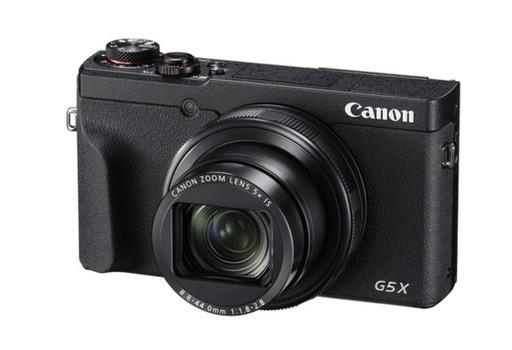
  • Canon PowerShot G5 X $899 This handsome, compact Canon is a great deal. For $700, you get a 20.2MP 1" CMOS sensor, 24-120mm zoom lens with a maximum aperture of f/1.8 at the wide end, terrific image stabilization, tilting LCD and pop up EVF, plus in-camera charging. -

Canon-G5X.jpg

There are other excellent contenders such as the Panasonic Lumix DC-LX100 II ($797) that didn't make the top five for features such as a fixed LCD, that may not be an issue for you. Any of these choices would make an excellent single-camera companion to your smartphone, and provide lots of enjoyment along the way.

My Writing on Medium.com

I now have more than 25 published articles on Medium.com. And if you haven't visited the site, and enjoy good writing on a variety of topics, I suggest that you may want to take a look. You can just go to the home page and enter "Derrick Story" in the search field. And if you like what you read, then follow me!

Second Session of Integrating iPhone into a Pro Photography Workflow Online Workshop - April 21 to May 15, 2021

The first session of "Integrating iPhone into a Pro Photography Workflow" Online Workshop has sold out. But now I've posted a second session that begins April 21, 2021.

If you're interested in attending, just go to catalog page.

In this workshop you will explore:

  • Working with just one digital camera and an iPhone.
  • Taking advantage of a versatile fast prime lens on your digital camera and using iPhone for additional focal lengths.
  • Perfecting a RAW workflow with the iPhone.
  • Leveraging Apple ProRAW for those who have iPhone 12 Pro.
  • Building a kit that allows you to travel lighter without compromising capability.
  • Post processing tips and techniques using Photos on Mac, iPad, and iPhone.
  • Investigating other software and workflows to augment your imaging prowess.

You can sign up by visiting the workshop catalog page.

Sennheiser MKE 200 review

You can read the entire article on Digital Camera World.

The Verdict: The Sennheiser MKE 200 is an instant upgrade microphone that will level up your camera or smartphone audio recording. For novices looking to match it with their mobile, Sennheiser doesn't offer the suite of solutions Shure does with the pricier MV88+ -- a mount, mini tripod, and an app to manage audio recording. What saves the MKE 200, therefore, other than its value is that it also doubles up as a DSLR or mirrorless camera microphone, and works a treat at improving audio capture at a relatively low cost.

Pros: Instantly upgrades audio capture quality, Battery-free solution, Smartphone and camera support. Cons: Confusing front to back design, No on-body gain control.

Compact, the Sennheiser MKE 200 weighs just 48g, and measures 69 x 60 x 39mm. No batteries required, it's a plug and record solution, and it's totally fuss-free. There aren't any gain control settings on the mic, it's available in black and black alone, and the one visual flourish comes in the form of its blue coiled cables.

The Sennheiser MKE 200 attaches to a cold shoe adapter, which makes it ideal for DSLRs and mirrorless cameras. Smartphone users will want to pick it up with a phone mount sporting one, so factor that into the cost of your microphone setup. Alternatively, you can thread the mic onto a tripod, so if you have a dual tripod mount, you could also be sorted.

EV Explorers for Those Who Are Interested in Electric Cars

I've created a new group on DerrickStoryOnline titled EV Explorers. The tagline for this group is: "Bringing Curiosity and Nimbleosity to the World of Electric Vehicle Transportation." Here we can share information, tips, discoveries and more about using electric vehicles for our photography adventures.

If you want to join this group, click on this link for an invite. We're going to keep this as a private group for now, but you are invited to join us.

I'll be sharing my story of going through the process of buying the VW ID.4. We're also going to talk about travel tips with EVs, and the different models available in 2021 including Tesslas, the Ford Mustang Mach, the Bolt EUV, and emerging car manufacturers as well.

As the group and our knowledge grows, we'll see where this takes us. I'm sure we'll have meetups and workshops that focus both on EV travel and photography. I have secured the domain EVexplorer.com if a dedicated website seems appropriate. Really, there is no limit to this.

The bottom line is that we've been a part of the photography revolution that has moved us to smartphones and mirrorless cameras. Now it's time for the automobile revolution to get us where we want to go without killing the very planet we want to enjoy.

If this sounds appealing to you, then join us at EV Explorers.

The New Donation Kit for Carefree Shipping of Found Film Cameras

We have more time around the house than ever. And you finally dove into that bedroom closet that's been begging for some organization.

If you found a film camera that you're no longer using, our new Donation Kit makes it easy to pack and ship. Just visit the Contact Form on thenimblephotographer.com, click the box next to Donating a Film Camera, and let me know what you have. In your note, be sure to include your shipping address.

If it's a camera we can use for the shop, I'll send you a Donation Kit that includes a USPS Priority Mail shipping box and prepaid label. All you have to do is tape it up, insert the camera, and add the label. USPS will pick up your shipment from the front door of your house during their regular mail delivery. It's that simple!

Your donation help get analog gear in the hands of aspiring fine art photographers, and the proceeds help support this podcast.

Virtual Camera Club News

Inner Circle Members: A big thanks to those who support our podcast and our efforts!

Affiliate Links - The links to some products in this podcast contain an affiliate code that credits The Digital Story for any purchases made from B&H Photo and Amazon via that click-through. Depending on the purchase, we may receive some financial compensation.

And finally, be sure to visit our friends at Red River Paper for all of your inkjet supply needs.

See you next week!

Product Links and Comments

There are product links in this article that contain affiliate tags. In some cases, depending on the product, The Digital Story may receive compensation if you purchase a product via one of those links. There is no additional cost to you.

You can share your thoughts at the TDS Facebook page, where I'll post this story for discussion.
VW ID.4 EV First Impressions

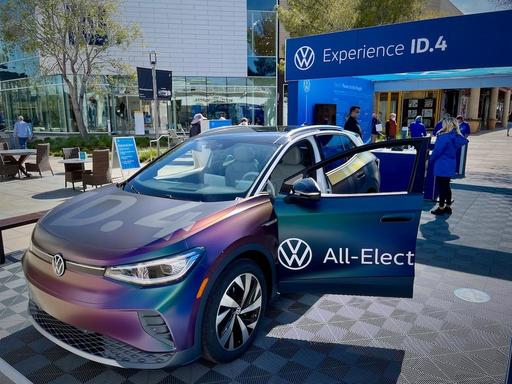
This ID.4 review is possible because of Volkswagen's Experience Event that I recently attended. They had four cars on hand, and you could take one away for a 30-minute spin, then ask questions when you returned. It was an informative morning. And since VW is accepting orders for the car online, "experiencing" the vehicle is helpful to decide if it's the right choice.

IMG_0284.jpeg

Leading up to the test drive, I had read as many reviews as possible. They varied from positive via the Verge and Mashable, to critical from the Wall Street Journal. Car and Driver was somewhere in between. So am I.

After reading those articles, I had specific things I wanted to investigate with the ID.4. And this 30-minute experience was just what the doctor ordered.

My bottom line, before we get into the details, is that VW has done a very good job with its first serious attempt at a full-time electric vehicle.

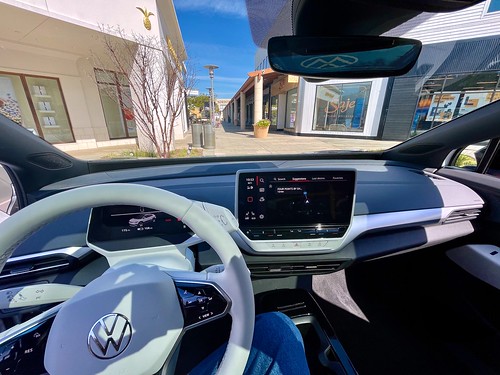
VW ID.4 Experience View from the driver's seat looking forward in the VW ID.4. Visibility is good in this car.

What I Liked

The car accelerated better than some of the reviews had indicated. I had no problem merging onto a busy freeway, and maneuvering from lane to lane. I thought the acceleration was smooth and fast enough to meet my needs. My other car is an Audi A3 with a turbo engine. I did not feel like I was giving up my mojo with the Volkswagen.

Something that I had not read about, but wanted to test, was the turning radius. I had become very spoiled with the Audi, and was not willing to go back to lumbering hippos that required 3-point turns. The ID.4 was nimbly impressive. I was spinning around on a dime in the parking lot before returning the car. I'm sure anyone watching was thinking that I had lost my mind.

The info system was fine, but I will be tapping CarPlay most the time with my iPhone. (CarPlay is on the must-have list, BTW.) Overall, I thought the cabin controls were intuitive and well-placed. I loved the panorama roof with sliding interior fabric cover. And the seats were very comfortable.

Speaking of the cabin, the fit and finish of the components were high-quality. This is another case where it felt like I was sitting in my Audi instead of what I would expect from a Volkswagen. They did a great job with the interior.

VW ID.4 Experience Due to my height (6' 7"), I had the front seat moved all the way back and reclined to accommodate my legs, which the car did nicely. There was still room in the back seat behind me as well.

I should also note that I'm 6' 7" tall, and there was enough head and leg room for me to sit comfortably. My impression is that you can seat 6-footers up front, and normal folks in the back, no problem at all.

Things I Didn't Like as Much

Per the reviews, The brakes do take some getting used to. They were not as firm as what I commonly expect, and I felt like I was pressing further into their arch to reach the stopping power that I wanted. I'm sure this is something that I would get used to, but it did jump out at me on the first drive. Plus I didn't have the opportunity to test "regen" braking, which I'm sure changes the feel as well.

Something that I had not read about, but noticed, was that the steering seemed sensitive on the freeway around 75 MPH. Whatever movements I made with the wheel were immediately conveyed to the car. There wasn't that little bit of play that makes for easy cruising. With a little more time, I could test the different driving modes. My guess is that "Sport" might tighten up the steering.

Again, over time, and after testing the different driving modes, it would be interesting to see what my final verdict was. On surface streets, however, steering was great. I'm thinking a mode change for freeway.

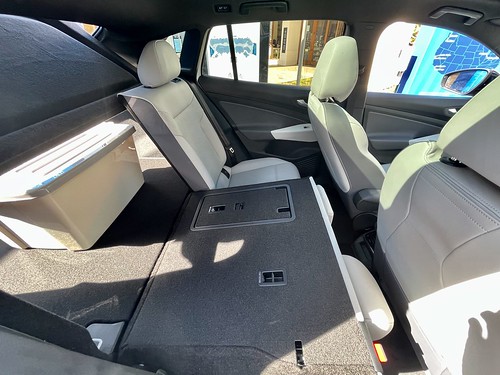
VW ID.4 Experience Plenty of traditional SUV cargo space, but not much more in the way of smaller pockets and cubby holes.

And finally, even though you have SUV-like cargo storage with with ID.4, especially when the back seats are folded down, there weren't many other more convenient spots to stash your stuff. The ID.4 doesn't provide any storage under the front hood, even though the motor is in the rear. And aside from the common side pockets in the doors, and some room in the center console, not much happening in the front cabin either.

The Bottom Line After My Experience

For an everyday bang-around car that can comfortably seat four and has enough cargo space for daily life, I think the ID.4 is a good option. Its respectable 250-mile range means that most drivers will only have to charge up once, maybe twice a week. And it's comfortable enough for longer trips if you don't mind topping off along the way.

What really impressed me, however, is how nimble and sporty it felt. Even though you get the cubic-feet storage that most of us need, it's fun to drive. The ID.4 is easy to park and maneuver in parking lots. And when it's time to merge on to the freeway, this EV has enough giddy-up to take its place among any of its fossil-fuel counterparts.

My sense is that Volkswagen wanted to design an electric car with wide appeal and a little flare. I think they accomplished that goal. There are enough new things in the ID.4 to delight, yet it still feels comfortable for folks buying their first EV.

As for me, I'm looking forward to logging more miles with it and discovering its true personality.

This is The Digital Story Podcast #780, March 2, 2021. Today's theme is "My Impressions of Online Workshops" I'm Derrick Story.

Workshop-2.jpg

Opening Monologue

Having just completed my fourth online workshop since the pandemic began, I'm starting to get a feel for the strengths and weaknesses of this approach. In today's TDS Podcast, I share my recent experiences and look forward to the evolution of how photographers will work together in the future. I hope you enjoy the show.


Tune-In Via Your Favorite Podcast App!

Apple Podcasts

Spotify Podcasts

Stitcher Podcasts

Podbean Podcasts

Podbay FM

Tune In


My Impressions of Online Workshops

It was 8:30 AM this past Saturday morning when I sat down at the iMac that rests on a folding table in what used to be my portrait room at the studio. Like a pilot preparing for takeoff, I began the sequence of checking network download and upload speeds, USB audio, camera settings, and Zoom itself. By 8:45 I was feeling relatively confident that I was prepared for a day of workshop presentations.

At 8:55, the first handful of participants began to appear in my Zoom window. At this point, folks are often adjusting their cameras, organizing their work surface, and preparing for the day ahead.

Like any live performance, nobody knows exactly what to expect. Each photographer has 8 images to present and discuss. But in addition to that anticipation, there are a myriad of technical considerations that have to work well for the day to be a success.

And indeed it was! By 3 PM everyone had shared their work and we settled in to a few minutes of relaxed conversation. You could tell there was a shared sense of accomplishment, not only for the presentations themselves, but for the fact that we pulled off this magical experience with participants from California, to Florida, and across the pond - all at the same time.

We talked about the nature of workshops going forward. And most of us, myself included, believe that the online experience is here to stay. Maybe it would be exactly in the form that it is right now, but there are many good takeaways that can be applied to our work going forward.

Based on those experiences, here's my impression of online workshops and the path going forward.

  • We're All Better at Zoom - One of the improvements to come out of 2020 is the higher quality of interactions online. Lighting, audio, and timing have improved greatly with Zoom meetings.
  • People Who Could Never Attend Our Workshops Before Can Now - The financial investment is radically different when you consider travel costs, lodging, and meals. And because online events are far more affordable, I'm meeting community members that I might not have otherwise.
  • More Time for Instruction and Photo Assignments - We might not be in exotic locations, but the tradeoff is we have more time to work on our assignments, and get feedback along the way.
  • Meeting People on Zoom is Different than in Person, However - On one hand, it's fun seeing the different home environments, on the other, there's still nothing like sitting around a big table and sharing a meal.
  • We Now Have an Online Space for Our Workshops - I would like to think that at some point I would have created DerrickStoryOnline, but the fact is that I had not until the Pandemic.

Moving forward, I'm really excited about our events. We now have a well-oiled machine for those topics that work great online. Plus, I can add a whole new dimension to our physical events with Zoom preparation meetings, online sharing, and post-workshop follow up.

I must admit, I'm a little surprised at this silver lining for our workshop gatherings. And I think the 2022 season is going to be fantastic as a result.

Follow Up Note: One of our recent workshop participants, William Porter, posted a review of the TDS iPhone event on his blog. If you would like a user perspective, check out IPHONE PHOTOGRAPHY WORKSHOP. Cheers!

Second Session of Integrating iPhone into a Pro Photography Workflow Online Workshop - April 21 to May 15, 2021

The first session of "Integrating iPhone into a Pro Photography Workflow" Online Workshop has sold out. But now I've posted a second session that begins April 21, 2021.

If you're interested in attending, just go to catalog page.

In this workshop you will explore:

  • Working with just one digital camera and an iPhone.
  • Taking advantage of a versatile fast prime lens on your digital camera and using iPhone for additional focal lengths.
  • Perfecting a RAW workflow with the iPhone.
  • Leveraging Apple ProRAW for those who have iPhone 12 Pro.
  • Building a kit that allows you to travel lighter without compromising capability.
  • Post processing tips and techniques using Photos on Mac, iPad, and iPhone.
  • Investigating other software and workflows to augment your imaging prowess.

You can sign up by visiting the workshop catalog page.

The Best Cloud Storage Platforms for Photographers in 2021

You can read the entire article on Petapixel.

As another year of taking photos rolls on, having enough storage is yet another thing on every photographer's checklist. Thanks to the cloud, we can have another layer of security and enjoy the convenience of accessing our photos anywhere as long as we have an Internet connection.

Those who are frequently using free cloud storage platforms as an extra back-up may already know that they will soon have one less option. Google Photos will stop providing unlimited free photo back-ups on June 21st. Past the 15 GB mark, you'll need to pay for a Google One subscription starting at $1.99 per month for 100 GB. If you need more space, you can get 200 GB for $2.99 per month, 2 TB for $9.99 per month, and 30 TB for $149 per month.

The lowest tier doesn't sound so bad until you get to the part that apart from photos, other files like Google Docs, Sheets, Slides, and Forms will also be counted in the storage caps starting on June 1st. If you're a heavy user of these platforms and frequently store your photos, or if you need them for a secure long-term backup of your entire photo archive, you will likely find yourself needing to purchase extra space through the years.

If you don't need that much space yet or just need a temporary back-up for your extra photos, of course, there are still some remaining free options. We say temporary because these free services come with caveats like file type limitations and small storage allocation. Still, a good number of these platforms also offer options for upgrades once you're ready to pay for extra space and useful features.

EV Explorers for Those Who Are Interested in Electric Cars

I've created a new group on DerrickStoryOnline titled EV Explorers. The tagline for this group is: "Bringing Curiosity and Nimbleosity to the World of Electric Vehicle Transportation." Here we can share information, tips, discoveries and more about using electric vehicles for our photography adventures.

If you want to join this group, click on this link for an invite. We're going to keep this as a private group for now, but you are invited to join us.

I'll be sharing my story of going through the process of buying the VW ID.4. We're also going to talk about travel tips with EVs, and the different models available in 2021 including Tesslas, the Ford Mustang Mach, the Bolt EUV, and emerging car manufacturers as well.

As the group and our knowledge grows, we'll see where this takes us. I'm sure we'll have meetups and workshops that focus both on EV travel and photography. I have secured the domain EVexplorer.com if a dedicated website seems appropriate. Really, there is no limit to this.

The bottom line is that we've been a part of the photography revolution that has moved us to smartphones and mirrorless cameras. Now it's time for the automobile revolution to get us where we want to go without killing the very planet we want to enjoy.

If this sounds appealing to you, then join us at EV Explorers.

The New Donation Kit for Carefree Shipping of Found Film Cameras

We have more time around the house than ever. And you finally dove into that bedroom closet that's been begging for some organization.

If you found a film camera that you're no longer using, our new Donation Kit makes it easy to pack and ship. Just visit the Contact Form on thenimblephotographer.com, click the box next to Donating a Film Camera, and let me know what you have. In your note, be sure to include your shipping address.

If it's a camera we can use for the shop, I'll send you a Donation Kit that includes a USPS Priority Mail shipping box and prepaid label. All you have to do is tape it up, insert the camera, and add the label. USPS will pick up your shipment from the front door of your house during their regular mail delivery. It's that simple!

Your donation help get analog gear in the hands of aspiring fine art photographers, and the proceeds help support this podcast.

Virtual Camera Club News

Inner Circle Members: A big thanks to those who support our podcast and our efforts!

Affiliate Links - The links to some products in this podcast contain an affiliate code that credits The Digital Story for any purchases made from B&H Photo and Amazon via that click-through. Depending on the purchase, we may receive some financial compensation.

And finally, be sure to visit our friends at Red River Paper for all of your inkjet supply needs.

See you next week!

Product Links and Comments

There are product links in this article that contain affiliate tags. In some cases, depending on the product, The Digital Story may receive compensation if you purchase a product via one of those links. There is no additional cost to you.

You can share your thoughts at the TDS Facebook page, where I'll post this story for discussion.