So much has changed with my camping over the years, but the biggest improvement happened when I moved my tent off the ground and relocated it to the top of my car. There are many reasons for this adjustment, and photography is in there among them. I want to start with the tent itself, because you might have difficulty imagining what I'm talking about.
What Is a Roof Top Tent?
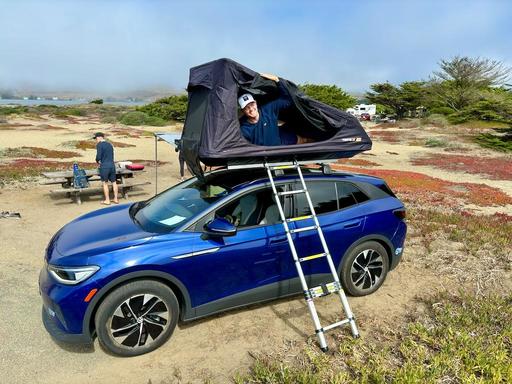
The TentBox Go is a 73-pound folding tent that mounts on the roof racks of my VW ID.4. Collapsed, it is 18" high, allowing me to park the car in the garage. Set up, it is 45" tall with a 90" x 45" base that looks like a trampoline. I have a matching closed-foam air mattress that goes on top of the base, and the combination has provided me with the most comfortable night's sleep of my entire camping career.

The first question that people ask me when they see the TentBox Go on my car is: "How do you get up there?" The kit comes with a collapsible ladder that hooks on to the side of the platform. I climb four rungs up and roll into the tent.
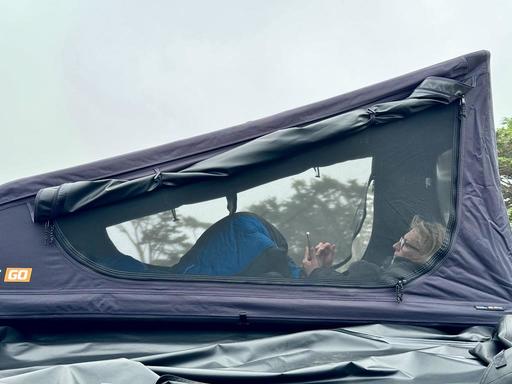
There are windows on three sides plus a skylight. Each side window has a zippered screen to keep bugs out at night, and can be opened freely during the day. This provides an elevated panoramic view of my location, which can be anywhere that I'm able to park the car.
All of my gear stays below, locked up at night. The kitchen is configured in the back hatch area. All I have to do is open the rear boot and everything is there to prepare my next meal.
Camera gear, solar power station, and other technical items are on the back seat or on the floor. If I need to grab a quick photo, I know exactly where my bag is and can access it immediately.
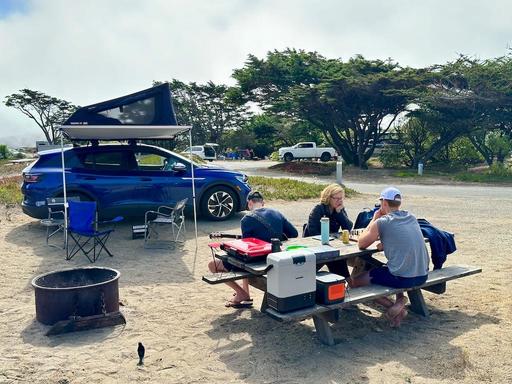
There are removable black screens on the inside of the VW's windows so passersby can't see in the car. I usually have a sunshade positioned in the front window.
Being able to camp anywhere I can park the car goes beyond convenience. It's also a secret weapon for photography.
In addition to a bedroom, the TentBox Go is also a rooftop studio.
From this vantage point, I can photograph sunrises through one window and sunsets out the other. And instead of waiting to return to the darkroom for processing, I can open the laptop and work on the pictures from my picturesque second-story studio. It's fun and functional.
Details About Setup and Maintenance of the TentBox Go
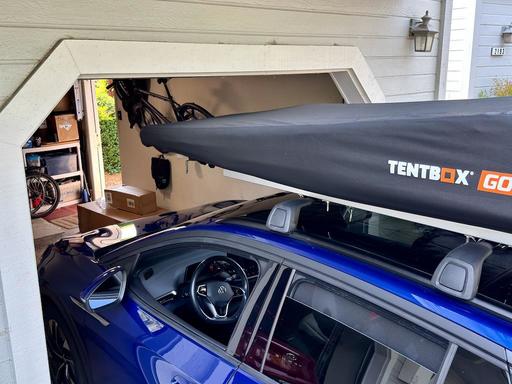
The tent and aluminum frame arrive in a large, single box. Even though the final configuration weighs 73 pounds, it feels heavier when all packed up. I had to drag it by the packing straps from the front porch to the garage.
Since I already had a camping trip on the books, I wanted to build this thing as quickly as possible so I could start testing it before having to depend on it in the middle of nowhere. My brother-in-law agreed to come over on a Saturday and help me with the project.

We both watched the assembly video a couple of times before our meeting. I pulled the car out of the garage to give us plenty of room for our workshop. The video says to allow 90 minutes to assemble and mount the TentBox Go on the top of the car. Three hours later, we joked that they must have meant 90 minutes per person.
Much like a complicated Ikea project, we had to take our time and double-check our work along the way. We would watch a video snippet, and then execute that particular task.
We felt there was a little sleight-of-hand involved with our instructor. He would say, "do this," then instantly be at the next stage while we hit rewind trying to figure out our misstep. But with patience, we too achieved success.
The TentBox Go is well designed, both for its use during camping, but also for living securely atop the car. But that final stage, attaching it to the roof racks, was a bit more difficult than we anticipated.
Their concept was clear and easy. Use four brackets to attach the tent platform to the roof racks. Each bracket had four long bolts and matching nylon-lined nuts. A spanner wrench was included in the kit, but we needed a second one so we could both work at the same time.
Because the bolts had such great length, it took a long time to ratchet on each nut. To say it was slow-going is an understatement. And of course, this final stage comes after a few hours of assembly.
We did secure all eight bolts, and the tent is steady as a rock on top of the car, even at 70 MPH. But it does raise an issue to be considered. What about the end of the season when you want to remove and store the TentBox Go? The tedious process of removing all eight bolts feels daunting at best. More on that later in the article.
Car Mileage and the TentBox Go
This leads to the second most common question folks ask me: "How does it affect your car mileage?"
When you drive an electric vehicle, kWhs per mile is a huge consideration. Car manufacturers consider every detail to get the greatest distance from each kilowatt. The aerodynamic design down to the wheel covers is fine-tuned. Surely, attaching a wedge-shaped tent to the top isn't what they had in mind.
When I studied the tent configuration I noticed that there was 6" of clear space between the top of the car and the bottom of the tent. In my mind, this meant that the basic airflow over the car remained somewhat the same. The question was: How much drag on top of that would the tent create?
The results were fascinating. I kept careful logs for two months.
Prior to the tent, the car averaged 3.3 miles per kWh. This includes summer, winter, air conditioning, heating, freeway driving, around town, and along mountain roads.
With the TentBox Go mounted atop the VW, I'm still averaging 3.3 miles per kWh if I keep the speed below 60 MPH. On a recent slow-going, windy road Highway 1 camping trip, I averaged 3.7 miles per kWh.
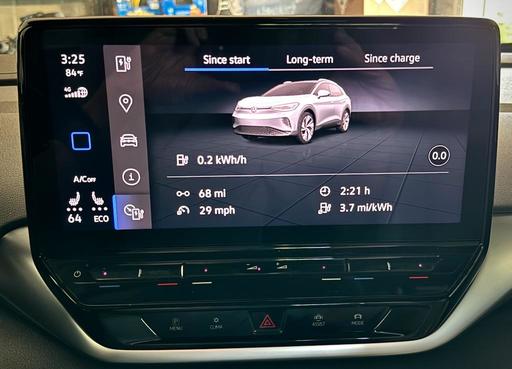
On the freeway, if I raise my speed to 70 MPH or more, my efficiency drops down to 2.7 miles per kWh. That's substantial, and it would notably decrease my range over a long trip.
I did some quick math for a long road trip with mostly highway miles. If I drive at the speed I normally prefer, 72-75 MPH, I would lose approximately 35 miles of range in-between charges. This is a tolerable compromise for adventures within a 500 mile radius. But for longer, multi-day driving excursions, I would have to factor in more time for charging.
The bottom line for me is: over the last two months is that I've slowed down on the freeway, moving from the fast lane to the middle part of the road. By doing so, I'm getting an all-around 3.3 miles per kWh with the TentBox Go on top.
But for a longer, multi-day trip to Durango, CO, where camping isn't involved, I decided to remove the TentBox and gain back the extra range. Initially, I wanted to keep it up there because I like the idea of being able to stop anywhere and set up camp. But since my destination is a cabin, the wiser decision was to leave my rooftop tent behind.
Removing and Storing the TentBox Go
Before my long trip to Colorado from Northern California, I reluctantly removed the TentBox Go from atop the ID.4. Instead of using the included spanner wrench to remove the nylon-lined nuts, I opted for a long socket and ratchet. This was a good move. It only took me 20 minutes to remove all 8 nuts and slide the bolts off the rail.
Before the next step, I marked the rails with the positioning of the TentBox on my roof racks so I could quickly reinstall it before my next camping trip. I also measured with a ruler, and took pictures of everything. This should take the guesswork out of reinstallation.

The entire unit is resting on its side in the garage. I'm guessing that it will only take about half an hour to reinstall it. I did need a second person to help me lift it off the car. And I will need help again to put it back up there.
Final Thoughts
I can't wait to go camping again. Having an upstairs bedroom on top of the car, with a patio coming off the side, has revolutionized my outdoor adventures.
As for design improvements, I would very much like a faster mounting system instead of the long bolts with nylon-secured nuts. I think the cover could have a smoother finish with less wind resistance too. That might help my Miles per kWh mileage. But other than those two wishes, I have to say that this lightweight, easy-to-set-up tent is a joy for relaxing during the day, and a good night's sleep once the campfire is extinguished.
The TentBox Go Roof Top Tent is available for $1,199. I also highly recommend the accessory fitted mattress ($125) for that extra layer of comfort.
Other Articles in This Series
The Bluetti AC70 Power Station Review - Off-the-Grid Freedom.
The Jackery Explorer 300 Plus Review - Power Your Roadtrips.
Jackery 40W Mini Solar Panel for Your Cameras and Devices.
Roadtripping with the BODEGAcooler Mini 12V Portable Fridge/Freezer - A Review.
Hot Coffee, Soup, on the Road with this Portable Electric Kettle.
Note: The affiliate links in this article help support my research and writing. There is no additional charge to you the customer. Thank you for using those links.


