Recently in Consumer Electronics

  Page 1 of 2 in Consumer Electronics  

Elite-30-1024.jpg

As much as I like the beefy Bluetti AC70 power stations I use for camping, they do have their girth and weight... sometimes more than I need.

Many of my appliances are less demanding, such as my BodegaCooler, and work great with smaller, more portable units. That's when the Bluetti Elite 30 V2 Portable Power Station is the perfect choice.

It's light - only about 10 pounds (but feels less), compact - roughly 10" x 7", and it still packs a punch. So much so, in fact, that I can use it for powering the portable fridge, and also for cooking a pot of rice, recharging the eBike, and topping off a MacBook Air.

In the past, the smaller, more portable power stations were fine for electronic devices and LED lighting. But they often came up short for higher wattage items such as hot water kettles and rice cookers.

That's not the case now with the Elite 30 V2. It punches well above its weight.

Real World Tests of the Bluetti Elite 20 V2

cooking-rice-1024.jpeg

One of my first tests to gauge its muscle was to cook a pot or rice. The Macook portable rice cooker I use draws 200 watts. I loaded it up then plugged it into the Elite 20, and 18 minutes later I had a pot of fluffy Jasmine white rice. I used a little over 20 percent of the Elite's battery.

cooked-rice-1024.jpeg

Next, for the real test, I boiled a pot of water with my Stoke Voltaics Joulle kettle that draws 500 watts. Normally I have to tap a larger power station, such as the AC70, for this task. But the Elite 30 V2 has 600 watts output, plus power boost. I filled the kettle and fired it up.

hot-water-1024.jpeg

Within a few seconds the kettle was drawing 476 watts from the Elite 20 V2. And a few moments later, I had boiling water for a cup of Jasmine Green Tea. The power station capacity started at 78 percent and was reading 61 percent as the tea was steeping.

I was impressed. I've never been able to use the Joulle kettle with a 288Wh power station before. I always had to pack something bigger. Now, with the Elite 30 V2, I can travel much lighter for day trips, and still have the power I need for cooking, coffee, and tea.

BodegaCooler-1024.jpeg

Another handy option for this compact power station is the BodegaCooler 36L Portable Refrigerator stashed in the back of the VW ID.4. When I'm not using the fridge, I can store the petite Elite 30 V2 inside the fridge compartment. When it's time to chill out for a road trip, pull out the Bluetti, plug in the BodegaCooler, and enjoy a days worth or refrigeration in the back of the SUV.

Inside-Cooler-1024.jpeg

Features and Specifications

With a total output power of 600W-120V-5A, the Elite 20 V2 can power most appliances without needing its power boost (that's listed as 1500 watts, although I did not test that limit). Its USB-C ports are beefy: 1 x 100W max and 1 x 140W max. My MacBook Air M4 refuels quickly via USB-C using this power station.

The LiFePO battery has 3,000+ cycle lifespan (to 80 percent original capacity.) It has fast AC input, with bypass. I generally recharge my Bluetti with a 100-watt solar panel, also with bypass so I can use the battery and charge it at the same time.

The smartphone app works great allowing for customizing the settings and keeping track of the unit's status.

Bottom Line

kitchen-1024.jpeg

The Bluetti Elite 30 V2 provides impressive performance for a small form factor power station. In addition to keeping mobile devices topped off, it's terrific for portable fridges, hot water kettles, and cooking units that require 600 watts or less of power.

The Elite 30 recharges quickly via AC input (80 percent in 45 minutes) and is compatible with solar panels. The buttons, LCD interface, and smartphone app are easy to use.

And best of all, the Bluetti Elite 30 V2 is super portable. It fits practically everywhere from a standard daypack to behind the seat of your car.

It won't replace your more heavy-duty 1,000 Wh units for big jobs, but for day trips, overnights, and around the house, it's a wonderful combination of power and portability. And at at $219, you can't beat the Bluetti Elite 30 V2 for value.

Highly recommended.

Other Articles in This Series

The Stoke Voltaics Nomad Cooking System Review - Camp Meals Reinvented

The Bluetti AC70 Power Station Review - Off-the-Grid Freedom.

Perfect for SUV Camping - The Bodegacooler 36L Car Refrigerator Review.

Roadtripping with the BODEGAcooler Mini 12V Portable Fridge/Freezer - A Review.

Hot Coffee, Soup, on the Road with this Portable Electric Kettle.

A Hands-On Review of the TentBox Go Roof Top Tent.

The BodegaCooler Dual-Door 48-Quart Review.

The Hele Box Car Camping Platform Review.

Author's Note

The links in this article are included as a convenience for the reader. They are affiliate links, and they help support my research and publishing. Thank you for using them.

nomad-sizzle-pan.jpeg

The Stoke Voltaics Nomad Cooking System ($219) has inspired me to prepare more fresh meals in camp. That's quite a statement from someone who, for years, shied away from all but the simplest cooking on the road.

There are a few reasons for this change of attitude. The Nomad System has overcome the barriers that took the fun out of campsite cooking. I'll start with those obstacles, then explain how they no longer exist with the Stoke Voltaics gear.

What I Once Hated About Camp Cooking

Wind was my number one nemesis for preparing meals. I tend to camp along the California Coast, and there always seems to be a breeze. I love the fresh air blowing off the Pacific Ocean. It's invigorating - until that is, it's time to cook.

coleman-gas-stove.jpeg Even with the wind guards up, it's difficult to shield the flame in breezy conditions. Plus my previous cooking system seemed more messy.

Wind is difficult to block and makes it nearly impossible to maintain even heating on a pan. Plus, it wastes fuel.

Then there was the bulk. Too many pans not integrated with each other wasn't efficient for packing or cleaning up after the meal. If I wanted to cook anything that required more than boiling water, it felt like I had to pack an entire box of just pots and pans.

My third obstacle was messy cleanup. Open-flame cooking often left black-soot residue on the outside of the pan, and the uneven heat caused food-burning on the inside. When washing dishes after the meal, I often wondered if the food was worth the extra effort.

How the Nomad Cooking System Overcame These Difficulties

Instead of cooking on an open flame, the Nomad Kit is all-electric. There's a base unit that couples with either the sizzle pan or boiling pot. The pieces fit together smartly and are very stable.

nomad-cooking.jpeg Wind is no longer a concern, and the entire cooking experience is more tidy.

If you've ever cooked with an induction system at home, the Stoke Voltaics approach will feel familiar. Once you turn on the system, the base heating unit (called a cooking reactor), immediately begins to warm the connected pan. A dial lights up on the base indicating the voltage you've set - 200 watts to 1,000 watts - and how long the unit has been turned on.

Wind has absolutely no effect on the transfer of heat from the cooking reactor to the pan. You can choose between the sizzling pan or the bubbling pot. Eighty percent of my meals are prepared in the sizzling pan. It measures 8.65" in diameter with a 3.5" high lip and holds up to 45 ounces. When preparing meals for one or two people, this pan can do it all.

The kit is also very compact. The base heating unit, sizzle pan, bubbling pot, detachable handle, lid, and power cord all fit in a carrying bag that's about the size of a volleyball.

Stoke Voltaics makes a custom carrying bag for this kit ($29), and I highly recommend it.

Once the meal is over, cleanup is a breeze. The outside of the pan remains pristine because there's no flame to cause soot-ash on the exterior. The interior surface has a robust non-stock coating applied to the high-grade aluminum alloy material. Combined with even heat distribution, that's maintained through smart technology, food rarely sticks and is easy to wipe out.

OXO-dishwashing-kit.jpeg OXO Outdoor Wash, Dry, and Stow System.

Speaking of cleanup, I highly recommend the OXO Outdoor Wash, Dry & Stow System. With its built-in dish rack and twin tubs, tidying up the kitchen after a meal is a snap. To conserve water, I use a pot of soapy water in one tub and then rinse there as well. This works well with the Nomad kit because I don't want to immerse the components anyway. Fortunately, they clean up so easily, I don't have to.

Powering the Nomad Cooking System

I did a lot of testing at home with the Nomad to get a feel for how much power I had to bring for a 3-day, 2-night camping trip. I learned that most of my cooking began at the 600 watt setting, then tapered off to 400 watts. There is some fluctuation with electrical draw because it's a smart system that will adjust wattage on its own to maintain an even heat.

test-kitchen.jpeg My home test kitchen to practice before hitting the road.

The math worked out to my needing a BLUETTI Solar Generator AC70 per day for cooking breakfast (including coffee), lunch, and dinner. The AC70 is a 768 Wh unit. I like it because it stores lots of power, but it isn't too heavy to carry around.

With two AC70s, I had plenty of juice for cooking and hot water. I also brought a Jackery Explorer 1000 v2 Power Station to run the BodegaCooler 38 Quart electric cooler. Additionally, I could power lighting and recharge mobile devices with the Jackery - plus it served as my backup if the Bluettis ran low.

Even though the power stations do take up some space in my VW ID.4, they are easier to pack than round propane tanks that bang around. They're also much cleaner.

Final Thoughts

sizzle-pan-breakfast.jpeg Breakfast in the sizzle pan. All photos in this article by Derrick Story.

Both with my testing at home, and while camping, I had great success with the Stoke Voltaics Nomad Cooking System. In fact, I'm still using it after the trip because I like it so much.

All of the components are made of quality materials and feel long-haul durable. The design is good. I particularly like the removable handle that is both easy to use and sturdy.

I do have one suggestion for version 2: I would make the control dial bigger with an easier-to-read LCD screen. The current design works, but a larger display would definitely be better for this kit.

Some people have commented to me that the price seems high. I don't feel that way. This is a complete cooking system for $219 that includes the heating element, sizzle pan, cooking pot, lid, and handle. I do wish Stoke Voltaics included the travel carry case in the kit, instead of being an accessory, because I feel that it's necessary on the road.

Based on performance so far, and the quality materials, I'm predicting years of service from the Nomad. If you already have the power stations, and better yet, solar panels to go with them, you could run your kitchen off the grid indefinitely.

Highly recommended.

Key Specifications for the Nomad Cooking Kit

  • Power Range: 200-1000 watts, adjustable in 200W increments.
  • Weight: Approximately 7 pounds (3 kg).
  • Material: High-quality, 304 food-safe stainless steel and food-grade, BPA-free plastic components.
  • Nomad Reactor: 6.8 inches diameter x 2.5 inches tall.
  • Sizzling Pan: 8.65 inches diameter x 3.5 inches height.
  • Bubbling Pot: 8.65 inches diameter x 5.55 inches height.
  • Sizzling Pan: 45 oz (1400ml) capacity.
  • Bubbling Pot: 50 oz (2400ml) capacity.

Other Articles in This Series

The Bluetti AC70 Power Station Review - Off-the-Grid Freedom.

Perfect for SUV Camping - The Bodegacooler 36L Car Refrigerator Review.

The Jackery Explorer 300 Plus Review - Power Your Roadtrips.

Jackery 40W Mini Solar Panel for Your Cameras and Devices.

Roadtripping with the BODEGAcooler Mini 12V Portable Fridge/Freezer - A Review.

Hot Coffee, Soup, on the Road with this Portable Electric Kettle.

A Hands-On Review of the TentBox Go Roof Top Tent.

The BodegaCooler Dual-Door 48-Quart Review.

The Hele Box Car Camping Platform Review.

Author's Note

The links in this article are included as a convenience for the reader. They are affiliate links, and they help support my research and publishing. Thank you for using them.

Bluetti-in-Boot-1024.jpeg 
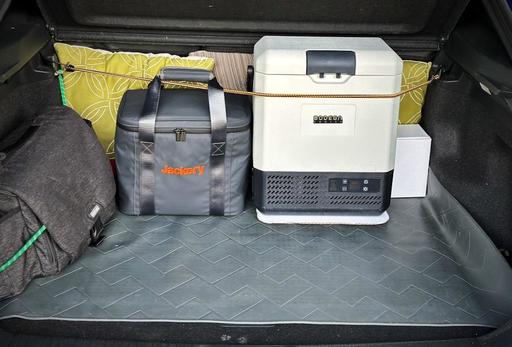
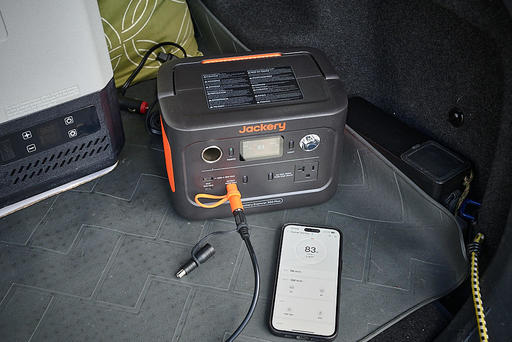
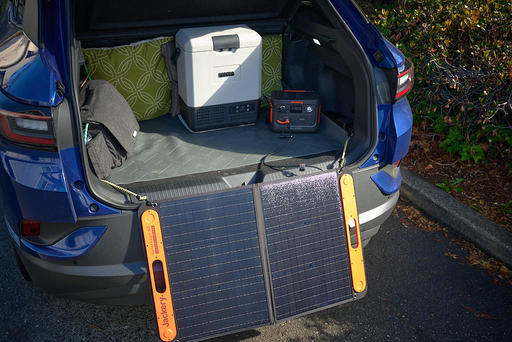
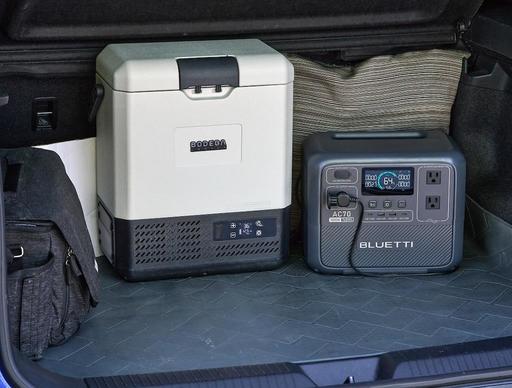
Bluetti AC70 Power Station connected to a Bodega Mini Fridge in the boot of a VW ID.4

One thing I've learned while testing portable power stations is the importance of finding the right balance between ample energy storage in a unit that's still light enough to carry around. That's why I've come to appreciate 1,000-watt models, which walk that line between capacity and mobility, and most recently in that category, the Bluetti AC70.

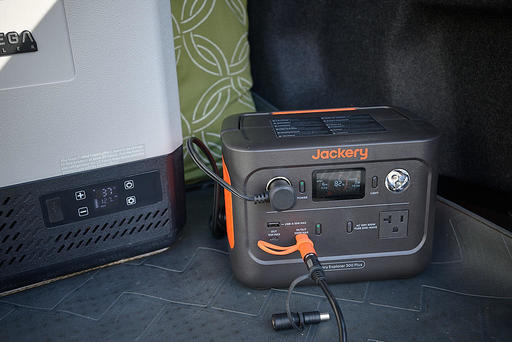
This 22.5-pound unit measures 12.4" x 8.2" x 10.1". I can pick it up with one hand, carry it to the car, and it doesn't take up much room in the boot. Its LFP (Lithium Iron Phosphate) batteries have a total capacity of 768Wh with two AC outlets (1,000W Rated Power/ 2,000W Lifting Power), two USB-C ports (100 watts), a pair of USB-A ports (12 watts), and a 12V DC car accessory outlet. If needed, surge power can go up to 2,000 watts.

During testing, the AC70 powered a mini fridge, hot water kettle, room fan, laptop, stereo system, LCD television, and living room lamps. It's beefy enough to serve as a backup power source at home and mobile enough to run an entire campsite on the road. This type of versatility means that the AC70 will provide a return on its modest investment regardless if you're a road-tripping photographer or someone who wants to trim energy costs at home with portable solar.


Things I Like (and what also could be improved)

What I liked

  • Bright, informative LCD screen
  • Dedicated standard DC input for solar panels
  • Excellent mobile app for monitoring the unit and adjusting its settings
  • Fast recharging via AC outlet, solar, car accessory port, or gas generator
  • Simultaneous input/output capability
  • Customizable configuration
  • Robust design
  • Excellent value for 1,000-watt unit (currently available for $429)

What could be improved

  • Lacks built-in emergency light
  • Bluetooth only, no WiFi to extend range of mobile app

There's a great deal of competition among portable power stations. Each brand has its personality and features. Let's take a look at what Bluetti has packed into the AC70.


Input - Adding Power to the AC70

input-output-1024.jpeg Input from a 100-watt solar panel and simultaneous DC and AC output.

SOLAR: I have a 100W solar panel permanently set up on my south-facing patio at the studio. I use it to keep all my power stations topped off. Most of my small appliances at work run off the solar-fueled power stations. That includes lighting, all of my electronics, cooling fans, and the television.

The AC70 fits right into this scenario. During the day it receives a flow of 65-75 watts from the panel, which is enough to power my appliances downstairs. If I need more juice, I can set up a 200W panel knowing the AC70 can accept up to 500Ws (12V-58VDC, 10A) from solar. At that level, I could refuel the unit in about 3 hours. And yes, it does have pass-through charging, so I can input and output simultaneously.

PLUG-IN AC: When I'm on the road, I can also top off the Bluetti via 120V AC in the hotel. (I like to camp for two nights, then hotel one night.) This form of charging, plugging the AC70 into the wall, was one of my first peeks into its unique feature set.

There are three modes for plugin charging - Silent, Standard, and Turbo. Silent, which is easiest on the batteries and doesn't prompt the fans to kick on, limited charging to 265 watts. Standard, which is the middle option, logged in at 437 watts. And Turbo kicked it up to 928 watts.

It's good to know that you can refuel the AC70 in less than an hour, but I would reserve the Turbo setting for those times when speed is most important, because it does add more stress to the batteries than the other modes.

Plus, using Silent mode, I went from 14 percent full to 100 percent in just a little over 3 hours with no noise or stress. This will be my default setting.

12V CAR ACCESSORY PORT: There's an adapter to tap the 12V car accessory port for recharging. I tend not to use that option since I have an electric VW ID.4, and I'd rather use its juice to reach my next destination, but it's great to have that adapter if needed.


A Word About the Bluetti Mobile App

IMG_1769.jpeg

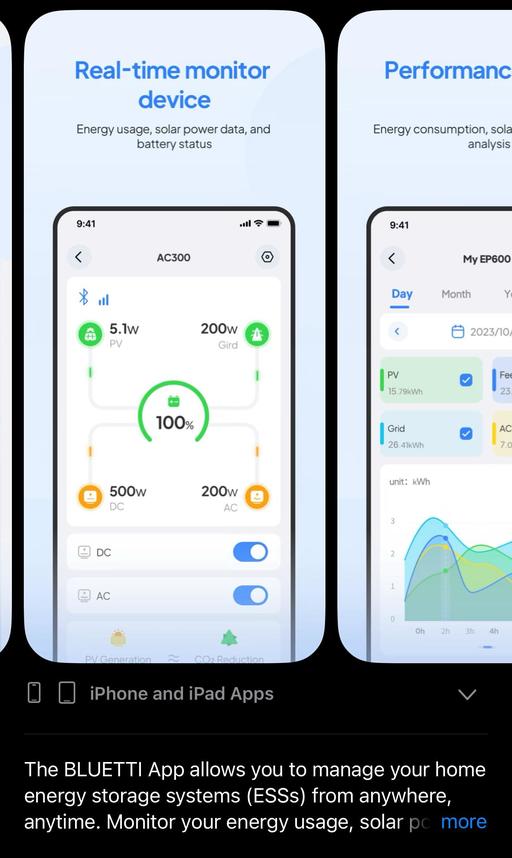
The easiest way to monitor activity and adjust settings is with the mobile app. Using my iPhone, I was able to control nearly every aspect of the AC70, including changing the charging modes I just discussed.

The app also contains a ton of information to help you learn how to better use the device, contact tech support, and more. The Bluetooth connectivity was stable, and if I wandered far away from the Bluetti, it easily reconnected when I was back in range. That said, I do wish it had WiFi as well. This would be particularly handy at home where I could monitor the AC70 from any room.


Powering Appliances with the Bluetti AC70

Hot-Water-Kettle-1024.jpeg A hot water tea kettle drawing 1000 watts plus is a good test for any power station.

This is a reason why we have a power station in the first place... to power and charge things. And in this capacity, the AC70 performs its job admirably.

I'll start with a pair of USB-C ports with a maximum power output of 100 watts. These are output-only ports, which I prefer, so there's no confusion when you're trying to transfer power to another USB-C device.

One such example is using the AC70 to top off smaller units that have two-way ports. The energy always flows the way that I want, from the larger unit to the smaller one.

USB-C is also handy for my MacBook Pro laptop, Nikon Zf camera, Olympus OM-1 camera, Apple Watch, and just about every other portable device that I depend on. When I plug in the Mac, the output reading zooms up to 74 watts providing a quick charge of the laptop. And I can charge both camera and MacBook at the same time.

For photographers and videographers on the go, the AC70 provides freedom from AC outlets. It can power cameras, computers, and accessories for an entire day, regardless of your location.

I don't use them as much, but there are also two USB-A outlets that are rated at 12 watts in total. They are handy for smaller peripherals such as keyboards and mice.

For heavy-duty appliances, such as hot water kettles, microwaves, and televisions, there are a pair of AC outlets. This is where robust really comes into play. Smaller 300-watt units are fine for light duty, but if you plug a 750-watt microwave or 1,000-watt tea kettle into them, they shut down.

The AC70 can handle both of these scenarios. My litmus test is a 1,000-watt tea kettle that I have on the kitchen counter at work. I plugged it into the Bluetti, filled halfway with water, and turned it on.

The LCD readout soared to over 1,000 watts, but that wasn't a problem for the AC70 because of Power Lifting, which allows the Bluetti to handle high-power resistive loads up to 2,000 watts. (If it's disabled, you can turn it on in the Setting Mode by pressing and holding the AC power button.)

Of course, battery drainage is going to be faster in these situations. But generally speaking, we're usually only talking about a few minutes to boil water or heat up a dinner.

Finally, we can't overlook the venerable 12V car accessory port that can power 12V DC appliances up to 120 watts. I like it because its direct current is the perfect source for my Bodega Portable Refrigerator that only draws 35 watts in Eco mode. That's a lot of cold drinks from the AC70.


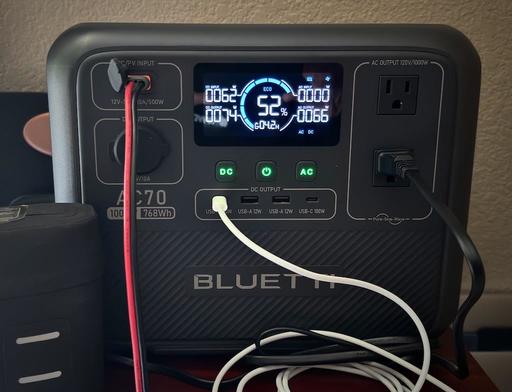
ECO Mode on the Bluetti

IMG_1758-Standard-AC-Charge-Mode-1024px.jpeg 
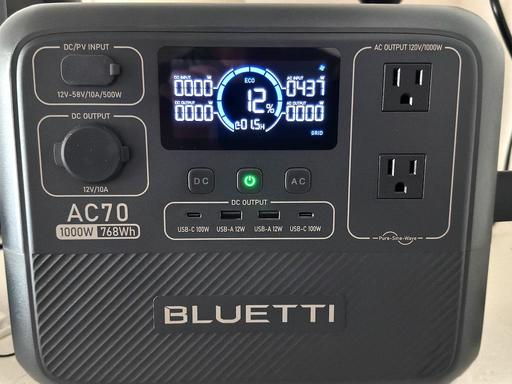
ECO Mode indicated on the LCD display. Also, showing AC charging in Standard Mode.

This setting is important for conserving energy in the AC70. That's because the power station is much more than a bunch of Lithium batteries packed in a case.

There's an operating system (complete with OTA firmware updates), Bluetooth radio, and lots of internal electronics. If you were to leave the system on, even without output load, the AC70 would slowly drain power.

In my tests, it lost 3 percent in a 6-hour period, with no load (going from 100 percent to 97 percent.) I wasn't surprised by this, but it was a good reminder to shut down the AC70 when its services were not needed. ECO mode can help with that.

When operating in this mode, the AC or DC output will automatically turn off if the AC70 is bearing below the threshold you set, or with no load at all for the amount of time you've selected in the settings. This helps the Bluetti retain more of its energy.

Eco mode settings can be set independently for AC and DC. With either, there are increments of 1-4 hours and minimum wattage draw as well.

If neither the AC nor the DC outlets are enabled, the AC70 will shut down automatically after a short period of time. So if you want it to stay on, enable either AC or DC, even if nothing is plugged in.

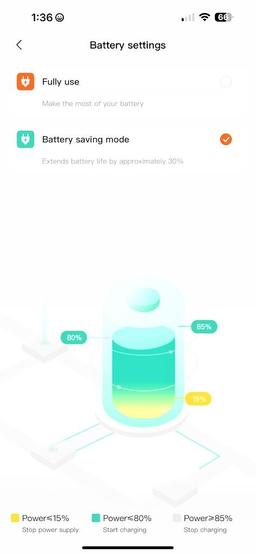
All of the Eco mode settings are available in the Bluetti mobile app.


Final Thoughts

If you've never experienced the robust joy of a 1,000-watt portable power station, I doubt you will be able to go back to smaller units except for specialized situations.

Everything gets easier with more storage. A cloudy day is no longer a deal-breaker, and your camping trip can stretch to an extra day or two.

At 22 pounds, the AC70 is right on the edge of portability. Most people can grab it single-handedly and carry it to its working destination. It will fit on top of a roller bag for transport to a hotel room.

(When your mates ask you why you're bringing a roller bag on a camping trip, you can show them why as you transport the AC70 up to the room for refueling on an off day.)

What separates the Bluetti AC70 from other units I've tested is its high value, being priced less than similarly featured 1,000-watt power stations - plus its bright, informative LCD screen; truly useful mobile app; and excellent design.

And for photographers, campers, and road trippers, the Bluetti AC70 provides that much-needed muscle in a unit compact enough to take anywhere.

Other Articles in This Series

Jackery 40W Mini Solar Panel for Your Cameras and Devices.

The Jackery Explorer 300 Plus Review - Power Your Roadtrips.

Roadtripping with the BODEGAcooler Mini 12V Portable Fridge/Freezer - A Review.

Hot Coffee, Soup, on the Road with this Portable Electric Kettle.

Note: The affiliate links in this article help support my research and writing. There is no additional charge to you the customer. Thank you for using those links.

IMG_1034.jpeg

I've always packed meals for my roadtrips. I like the flexibility of being able to stop anywhere for lunch. I eat healthier. And now that I'm exploring the world in an EV, I can fuel up my body while I charge the car.

What I wasn't as crazy about was dealing with melting ice sloshing around in the cooler. Anyone who camps or roadtrips knows exactly what I'm talking about. Draining the cooler, keeping food separated from the melting ice, and constantly drying things off took a lot of the fun out of the project.

All of that changed with the BODEGAcooler Mini 12V Portable Freezer. I have the 9-quart model that fits easily in the boot of my VW and is easy to carry around to a picnic table or campsite.

IMG_8214.jpeg

The unit is cooled by a compressor positioned in the bottom that's powered by one of three ways: 1) 12V car outlet, 2) portable power station such as a Jackery 300 Plus, or 3) an AC adapter that you plug into a wall outlet. In normal cooling mode (Eco) it draws only 35 watts.

The temperature can be set on the unit itself or via the Bluetooth Smart Car Fridge app that enables you to monitor all cooler functions. The ideal temperature via my testing is 38 degrees F. Drinks are icy-cold and food stays fresh.

The BODEGAcooler Mini also includes a custom ice pack that fits in the lid. This helps reduce energy draw. The handle is sturdy making the unit easy to carry. And overall it's quite durable. I keep it in the back of the VW ID.4 and it's always ready to go when I plug it into the 12V car outlet in the boot area.

Note to ID.4 Owners: By default, the 12V outlet in the boot is only energized when the car is turned on. This isn't ideal for refrigerators that like constant flow of juice. VW engineers did design the option to send continuous power to the 12V outlet. You just have to reposition the fuse for that circuit from the top position to the bottom position. Here's a video that shows you how.

The capacity of the 9 quart is surprisingly big enough for two people for a day, or for a solo weekend trip. I keep drinks, sandwich fixin's, and other items that require refrigeration in the cooler, and then the bread and related staples in a separate food bag. If you need more storage, there are bigger coolers available. But they do become more cumbersome to lug around.

Bottom Line

IMG_0985.jpeg

The BODEGAcooler Mini 12V Portable Freezer is amazingly powerful for the little electricity it draws. I'm very impressed. And the fact that I no longer have to mess with ice for my roadtrips is a bonus. And if I do want to make ice, I can in the Bodega. It gets that cold! Highly recommended.

Use Coupon Code: DERRICKSTORY for a 10 percent discount.

Other Articles in This Series

Jackery 40W Mini Solar Panel for Your Cameras and Devices.

The Jackery Explorer 300 Plus Review - Power Your Roadtrips.

The Bluetti AC70 Power Station Review - Off-the-Grid Freedom.

Note: The affiliate links in this article help support my research and writing. There is no additional charge to you the customer. Thank you for using those links.

Bodega-300-Plus.jpg

My photography kit requires a constant flow of energy. Feeding those cameras, laptops, and flash units is easy enough at home - just plug them in and forget it. But road trips require a bit more planning.

And it's not just photography gear I have to power. There's a cooler for drinks and meals, LED lighting to illuminate the edges of the day, and personal electronics need attention too - iPhone, Apple Watch, and iPad mini. All of these watts add up.

After testing a variety of electronic generators, I've settled on a couple to power my outdoor life. One of my favorites is the Jackery Explorer 300 Plus Portable Power Station ($299 before discounts).

Having been a fan of the previous generation, the Jackery Explorer 300 Portable Power Station ($279 before discounts), I think the newer model brings important improvements over its reliable predecessor.

OM1-300-Plus.jpeg Explorer 300 left side and Explorer 300 Plus right side charging an Olympus OM-1, 9 watts output.

On the inside, the 300 Plus uses the newer Lithium Iron Phosphate formula (LiFePO4) that increases battery life to 3,000 cycles compared to 500 cycles for the previous generation. Charging time is also faster, a mere 2 hours via AC outlet for 0-100 percent, compared to 4.5 hours for the Explorer 300.

The LED screen is updated on the 300 Plus providing a more dynamic, easier-to-read display for input, output, battery-level, WiFi, and Bluetooth. That's right, the latest model is compatible with the Jackery Mobile App that enables you to configure, monitor, and change settings in real-time via your phone. The 300 Plus also includes an integrated light.

iPhone-Bodega-300-Plus.jpg The Jackery 300 Plus in the boot of my VW ID.4 powering my Bodega portable refrigerator. The iPhone app helps me monitor levels, even when I'm not standing right there.

In addition to my camera gear and personal electronics, the Explorer 300 Plus powers the BODEGAcooler Mini 12V Portable Freezer P8 that only draws 35 watts of power when the compressor is running. And if I'm camping or stopped for lunch, I can pull out a Jackery solar panel and generate enough electricity to power the fridge and send the extra electricity to the Explorer 300 Plus.

If there's sun, I can power all of my camera gear, electronics, and the fridge indefinitely via the solar panel. Plus it's nice not having to worry about ice for the cooler.

Tech Specs for the Explorer 300 Plus

  • Capacity: 288Wh - Cell Chemistry: LiFePO4 - Cycle life: 3000 cycles to 80%+ capacity
  • Power - AC Output(x1): 120V, 60Hz, 300W (600W Peak) - USB-C Output(x2): 100W Max, 5V,3A (5V, 9V, 12V, 15V, 20V up to 5A) - USB-A Output(x1): 15W Max 5V,3A - Car Port(x1): 12V,10A - Bypass mode AC input/output: 100V-120V~60Hz, 300W Max - USB-C Output(x1): 15W Max 5V,3A - AC Input: 100V, 60Hz, 15A Max - DC Input: 12-27V,5A Max, 100W Max
  • Dimensions - Length: 9.1in (23cm) - Width: 6.1in (15.5cm) - Height: 6.6in (16.7cm) - Weight: 8.27lbs (3.75kg)
  • Charging Time - AC Adapter: 2 Hours - Car Adapter(12V): 5.5 Hours - Solar Panel: 9.5 Hours

Nice Touches with the Explorer 300 Plus

One thing that Jackery does with all of its products is keep you informed about the input and output levels. So when a solar panel is connected, you know the wattage being sent to the battery. And when you start using multiple outlets for your electronics, you can keep track of the total draw.

iPad-Zf-MBP-300-Plus.jpeg Watts Add Up! You wouldn't think that these personal devices would draw that much, but this trio results in 69 watts.

I also like the control I have via the mobile app. I can do little things like set the duration for the display, or turn on the auxiliary light. And I can also configure the Explorer 300 Plus battery parameters to extend its life.

IMG_1075.jpeg I don't have to babysit the recharging of the Explorer 300 Plus thanks to this setting. When it reaches 85 percent, it stops charging. If usage dips to 15 percent, it turns off.

Discount Code

If you want just the Explorer 300 Plus without the solar panel, use Discount Code: JADEAL to lower the price to $255.

Shipping is free. My experiences with customer service have been excellent. And the warranty is top-notch.

Beware however... once you start generating your own electricity, it becomes addictive. I'll cover more gear in upcoming articles.

Other Articles in This Series

Jackery 40W Mini Solar Panel for Your Cameras and Devices.

Roadtripping with the BODEGAcooler Mini 12V Portable Fridge/Freezer - A Review.

The Bluetti AC70 Power Station Review - Off-the-Grid Freedom.

Note: The affiliate links in this article help support my research and writing. There is no additional charge to you the customer. Thank you for using those links.

solar-panel-ID424px.jpg Hanging a Jackery solar panel via bungee cords off the back of the ID.4 to power the Bodega refrigerator and refuel the Explorer 300 Plus.

I have a handsome Timex Intelligent Quartz chronograph that I wore for years before my first Apple Watch, and plan on owning for years to come. One month ago I had to retrieve it from my dresser drawer, take it to the shop, and get a new battery for it. It was going to be my companion for the next 30 days.

watches-1024.jpeg

How I Ended Up Without an Apple Watch

I didn't plan on going retro. It just sort of happened. Theresa had bought my first Apple Watch, a Series 2, five years ago for a momentous birthday. With another big celebration on the horizon, she decided that it was time for me to update to a Series 7. No argument from me.

"They have a promotion going right now where you can trade in your current timepiece for a credit. Let's go to the store and do that," she said.

I picked out my new watch with a cool summer-flavored band. But when it came to get credit for my Series 2, we were informed that it was too old. No one wanted it. (But it still worked fine!)

My intention all along was to leave it in the hands of Apple where it would be used or recycled responsibly. So we left the store without it, and with my gift in a clean white paper bag. Problem was, my birthday was a month away.

As we left the mall without anything on my wrist, I realized my miscalculation. (Hey... wait a minute!) That's where the Timex reenters the scene.

What I Missed Returning to Analog

At first it was fun to wear the Timex again. It's a flyback chronograph, so I can reset its stopwatch by just pressing a button and watching the fourth hand sweep back to the top. But it's a cumulative timer without any sort of warning. So I had to keep an eye on it when timing the chicken on the BBQ. After a few close calls, I opted for using the timer on my phone instead.

I became more lax about workouts without my cheerleader watch encouraging me to get off my butt and exercise. I mindlessly strayed out into UV 6 sunshine without sunblock, missed text messages and phone calls, and had to calculate tips in my head. I was a first-world-problems mess.

On the upside, I did catch the occasional approving nod from classic watch aficionados who didn't realize my handsome chronograph was actually a Timex.

Finally, My Birthday

Fast forward to Tuesday evening when I opened my birthday gift. There was my new Series 7 - a larger more legible watch face, new Blood Oxygen and ECG measurements, Apple Pay, weather, workouts, and yes, the timer. (It will even tell me when I fall down. Hope that doesn't happen.) Within 30 minutes I had everything set up just right.

Fortunately, I had only gained one pound during my digital hiatus. But a pound a month equals 6 more by year's end. Now I'm back on track. I closed all of my rings yesterday, applied sunblock at the appropriate time, and didn't burn the chicken. Life feels normal again.

I'm going to leave my handsome Timex on the nightstand for a while. I'm grateful for its service in my time of need. But I have to say, five years from now when I'm ready to turn in my Series 7, I'm going to make sure the new watch is on my wrist before I leave the store.

You can share your thoughts at the TDS Facebook page, where I'll post this story for discussion.

Both the Sands Expo and the Las Vegas Convention Center were filled with an incredible array of gadgets and tools. But after 3 days of exploring, my favorite discover is the SabineTek SmartMic+ ($159, available now).

smartmic.jpg

This little audio powerhouse, about the size of a USB Flash drive, connects to a smartphone via Bluetooth and is capable of performing a number of truly useful tasks. And it does so with wonderful fidelity.

I can clip it to my shirt and record audio for podcasting and reporting, even in busy environments. The SmartMic does a great job of automatically balancing the volume of my voice with the ambient sound. You can still here the background, but it's at a pleasant level. You can listen for yourself by tuning in to the first part of my CES Report Podcast where I wore the mic to the Pepcom event at the Mirage Hotel.

If you want to record video interviews on the go, the SmartMic also proves wildly useful. Using the downloadable app (iOS and Android), you clip the mic to the person you're interviewing and press the video record button on the phone's app. The app records the audio and video of the subject (audio via the SmartMic), and the phone records the audio of the person asking the questions. Then it's all balanced together in the final video. Very clever. And it works great.

The SmartMic+ can also be used for vlogging, and with mirrorless cameras and DSLRs. And because it's so compact, you can have it with you always. Buy two SmartMics, and you can enable two-way mode where one mic serves as the input, and the other is the receiver.

many-uses.jpg

The SmartMic+ kit is nicely packaged and includes accessories such as a sponge cover, headset, charging cable, fleece cover (for wind protection), and even a soft pouch. I've had fun testing it throughout the week here in Las Vegas. And it is the one discovery that I want to take home with me.

You can learn more and purchase the SmartMic+ now at the SabineTek site

You can share your thoughts at the TDS Facebook page, where I'll post this story for discussion.

CES 2020 Preview

CES Las Vegas is right around the corner, and I anticipate a good year at the show with many, many tech announcements. I'll have a full report from the event on Tuesday's TDS Photography Podcast. But let's take a moment first to ponder what I'll probably see at the show.

DSCF0878.jpg

Here are some of the things that are on my radar.

  • New DSLR announcement from Nikon. Most likely the D780 full frame.
  • DJI has something up its sleeve that we will hear about.
  • Lots of 5G news from the mobile sector.
  • Electric bikes and scooters are really going to come into their own this year.
  • Smart homes are going to have to get secure, and that assurance will be their focus.
  • A ton of evolution in the automotive sector, from self-driving to all electric.
  • Folding phones to clever laptops and tablets.
  • Television news, of course.

I'll start my reporting on Sunday night, Jan. 5. The podcast will publish on Monday night, Jan. 6. Stay tuned!

You can share your thoughts at the TDS Facebook page, where I'll post this story for discussion.

The DJI OSMO Pocket ($350) debuted before CES with much fanfare and discussion. The petite, 3-axis gimble, 4K movie camera fits nicely in a top shirt pocket, but packs an incredible amount of imaging power in its svelt frame. It's not perfect, but by any reasonable measure, it is a breakthrough device.

DJI OSMO Pocket - Front

Highlight features include:

  • Gimbal Camera with 1/2.3" CMOS Sensor
  • Compact 4.1 oz, 4.8" High Design
  • Up to 4K Video at 60 fps, up to 100 Mb/s
  • Connects to Smartphone via Mimo App
  • 12MP JPEG or DNG Raw Still Photos
  • Includes Lightning & USB Type-C Adapters
  • Optional Wi-Fi & Bluetooth Monitoring
  • POV, ActiveTrack & FaceTrack Modes
  • Standard Time-Lapse & Motionlapse
  • NightShot & Panoramic Modes

The functions that I was most interested in were video recording (1080p and 4K), SloMo capture, timelapse, panorama, and audio recording. Because I've been using a DJI Spark for over a year, I felt like I already knew the OSMO when I first fired it up. They are indeed cousins from the same family.

Initial Setup

And like a DJI drone, the initial introduction might test your patience. Instead of powering up and recording a video, you must first endure a mildly tedious setup process where you register the device with your DJI account. All I have to say is you will get through it, and don't let it deter you from your goal of embracing the OSMO. Do plan on 10-15 minutes before you can actually get to work.

Using as a Standalone Device

DJI OSMO Pocket - LCD

There are two basic ways to use the OSMO Pocket: as a standalone device and connected to your smartphone. I began my journey using it as a standalone, walking through the press events at CES. It must have been quite a sight seeing a tall man strolling through the crowds with this petite device in his hand. As you will witness from the movie, no one seemed to care. The OSMO Pocket is too cute to be intimating.

With a little practice, I learned to shorten my stride providing even smoother capture. The gimble is terrific, in spite of the cameraman, and viewing the footage creates a real sense of presence. At this point, I was already hooked.

In standalone mode, you have a 1-inch screen to serve as the monitor. It's helpful for initial setup. Swipe right-to-left to configure the video settings, swipe up to initiate any of the special features such as ActiveTrack, and swipe down for the settings menu. When you've recorded the footage, swipe left-to-right for playback. It's that simple to operate.

But the real key to using the OSMO in motion is to set it up, then use your eyes to make the movie. Once I centered the screen on the scene that I wanted to record, I only checked it sporadically during capture, instead concentrating on holding the device steady as I moved through the crowd. With a little practice, this technique can produce very intimate moments. It's a little like becoming at one with the universe.

Working with a Connected Smartphone

When I did need to be more involved with the settings, such as working outside in contrasty light, I connected the OSMO Pocket to my iPhone X. This also requires downloading the DJI Mimo app. Again, controlling my Spark with the iPhone made the transition to the Mimo app quite comfortable. (The OSMO Pocket is both iOS and Android compatible, each with their own interchangeable connectors.)

Osmo-OSMO-Pocket.jpg

Adding the iPhone X to the mix not only gave me a bigger screen to work with, but better controls for exposure and gimble operation. Plus reviewing the video is quite nice, and you can even save and publish at this point if you wish.

The Mimo app can also stitch your panoramas and produce the timelapse videos you've captured. If you want to build your own panos, such as with Lightroom, the individual files are the microSD card in the OSMO.

Night Photography and Slow Motion Capture

Since I was in Las Vegas, I decided to really push the envelope and record night video in slow motion mode. The OSMO Pocket has a tiny 1/2.3" CMOS Sensor, so this seemed like a challenging test.

I'll let you judge for yourself by viewing the following movie. Clearly, the footage isn't theater quality, but it's impressive if you stop and think that all I've done is pull this little device out of my pocket, hold it in my hand, and record.

Vlogging and Audio

Some of the harshest criticism of the OSMO Pocket comes from the very audience it was designed for: video bloggers. Triple-tap the right button, and the camera lens whips around pointing directly at the operator. Press the record button, and start talking.

The mic port is on the back side of the OSMO, so it's clearly there for field reports. I recorded my spot with car traffic in the background so you could get a feel for the dialog in normal outdoor settings. (I haven't enhanced any of the clips in any way.)

And just to be brutal, I set the OSMO Pocket to 4K capture. I thought it handled both the audio and video quite well, and is definitely usable for individual field reports. See what you think.

Bottom Line

The DJI OSMO Pocket is a perfect device for those who want to capture the world while moving through it. You can easily add your own commentary, suplement the reporting with 12MP still images, panoramas, and timelapse clips.

I don't see it as a device for two-person interviews and more sophisticated reporting. The OSMO Pocket is for individuals, sharing their thoughts and their view of the universe. And as such, I consider it a breakthrough device, especially for $350.


Nimble Photographer Logo

The DJI OSMO Pocket has a high Nimbleosity Rating. What does that mean? You can learn about Nimbleosity and more by visiting TheNimblePhotographer.com.

Want to Comment on this Post?

You can share your thoughts at the TDS Facebook page, where I'll post this story for discussion.

5 Takeaways from Day 1, CES 2019

The doors opened at Las Vegas Convention Center and the people flowed through them to experience the first day of the 2019 Consumer Electronics Show. After exploring both the North and Central Halls, here 5 takeaways from my adventure.

DSCF0938.jpg

Automotive is Cool

DSCF0906.jpg

Transportation is indeed getting exciting. Automotive technology is sophisticated and seems to entering a new golden age. And it's not just cars as we know them, but versatile robotic devices that can transport people and cargo in a variety of situations.

Polaroid and Kodak Refuse to Give Up

DSCF0952.jpg

3-D Printing, instant photography, clever projectors, and a variety of fun imaging tools filled both booths. To be honest, they were a couple of the most fun places to hang out.

Full Frame Mirrorless is Just Too Big

DSCF0949.jpg

I got a good look at the Panasonic S2, spent time in the Sony booth, checked out Nikon, and visited Canon. Most lenses for full frame mirrorless, especially the zooms, are just to dang big and heavy. In terms of size and weight, it feels like DSLRs all over again.

Sony Puts Pro Support on Display

DSCF0974.jpg

Among all the glitz and glamor in the Sony booth, there was the Pro Support team working on cameras. Not sure whose they were, but the message was clear that Sony wants to be a player with professionals.

CES is Fun

DSCF0977.jpg

There's a reason why the halls are crowded. CES is a fun event. It's thought-provoking, entertaining, and sometimes just plain whacky. But it's a treat for the senses, and it provides some insight into the direction of consumer technology for the year ahead.

You can share your thoughts at the TDS Facebook page, where I'll post this story for discussion.