My original iPad was in virtual retirement on the top closet shelf. Since it doesn't support iOS 6 or 7, it seemed destined for my personal electronics museum. And that seemed wrong.
The battery is still good, the screen is colorful and bright, and the wireless is just as viable as ever. I was determined to make it relevant again.
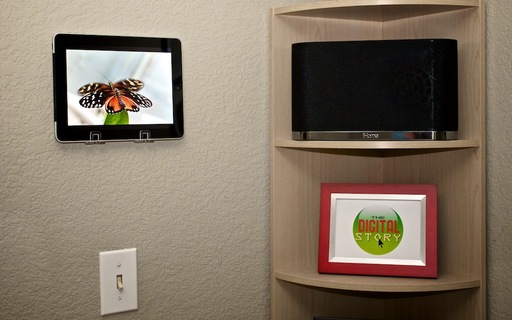 The original iPad displaying a slideshow of my work in what used to be a dark corner of the stairwell where my iHome AirPlay speaker system is located.
I found a wall mount for it at Padbracket.com and decided that my old iPad could become the ultimate digital picture frame. After a few days of use, I can't imagine why I waited so long. (There are a variety of creative wall mounts for your iPad online. Shop around a bit to find one you like.)
The setup is easy. Create an Album in the Photos app specifically for the images you want to display on your new digital picture frame. Then go to Settings > Picture Frame, and select the Album along with the other options you prefer, such as transitions and display time for each image.
When it's time to show off your work, you don't even have to unlock the iPad. Push the Power button, tap on the Picture Frame icon in the lower right corner, and enjoy the show.
You can change things up by running a weather app with pretty pictures and the local temperature. There are still many available for iOS 5.
I like that my original iPad is back in business. And the looping slideshow brightens up that corner of the studio. If you have an iPad collecting dust, you might want to give it new life as a digital picture frame.
iPad for Digital Photographers
This is the kind of stuff I write about in iPad for Digital Photographers-- now available in print, Kindle, and iBooks format.
Want to Comment on this Post?
You can share your thoughts at the TDS Facebook page, where I'll post this story for discussion.
Join me on my Instagram site as I explore the world of mobile photography. And now Instagram features 15-second movies too.