December 2005 Archives

Favorite Photo Gear of 2005

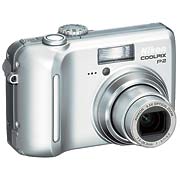
Nikon P2
The Nikon P2 is among my favorite photo gear selections for 2005. Read on for more...

Lots of great hardware was released in 2005. So much in fact, that I don't have time to list it all. But I certainly have my favorites. Here's my short list of the best of the best.

Nikon Coolpix P2 -- This beautiful compact camera takes great pictures providing you with 5 megapixels of resolution, a Nikkor 36-126mm glass lens, 2.5 inch LCD monitor, and WiFi connectivity. In other words, it's a great Nikon compact that allows you to wireless connect to your computer or printer. The P2 is also one of the few compact cameras that gives you decent control of the aperture. Not bad for less than $399.

Canon Digital Rebel XT (350D) -- I have lots of cameras, but this light, powerful digital SLR body is my absolute favorite for casual shooting. The 8-megapixel CMOS sensor, compact body, and tasteful design makes it as beautiful to hold as the pictures it produces. You can pick one up with an 18-55 mm lens for less than $899.

iPod video with Camera Connector -- Talk about having your music and your photos too. The latest iPod is a great digital music device, can play video, and is a wonderful storage container for your photos. If you purchase the $29 Camera Connector, you can upload images directly from your camera to the iPod for backup and storage on the go. For less than $300, you have a terrific camera accessory and the best digital music player on the planet.

Not a bad lineup. Soon I'll post my favorite software of the year too.

Technorati Tags: , ,

Grab Shot 10 - Moose Can't Read

Moose Can't Read

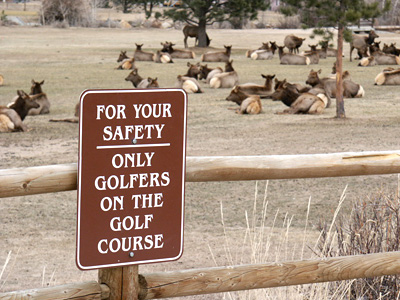
"My wife and I were on our way from from a weekend in Estes Park, Colorado," wrote Brad Bumgarner. "My wife noticed a bunch of cars parked along the side of the road, and being curious, we pulled over to see what was going on. It was the middle of December, and we had spent the weekend heading into the Rocky Mountain National park looking for wildlife to photograph. Alas, we finally found them -- on the golf course! Apparently moose can't read..."

Brad captured this image with a Minolta DiMage 7i, 1/80 shutter, f6.7, ISO 100.

If you have an interesting candid you'd like to share, take a look at our Submissions page, then send us your Grab Shot. If we publish it, you'll receive an ultra cool custom carabineer keychain.

Technorati Tags: , ,

Next Podcast

The next Digital Story audio show is scheduled for Tuesday, Jan. 3, 2006. You'll learn how to read the Histogram on your camera's LCD monitor, plus a few tips on how to apply this knowledge when working in your favorite image editor.

I'll also have more details about our latest new feature called, Photo Assignment. The first challenge will be "Ice." So put on your thinking caps and start capturing those frosty creative interpretations.

If you would like to listen to any of the previous audio shows, just click on the Podcasts button at the top of the home page. And keep those Grab Shots coming in... yours might be the next one published. For more information, see the Submissions page.

Technorati Tags:

Car Window Photography

Car Window Photography

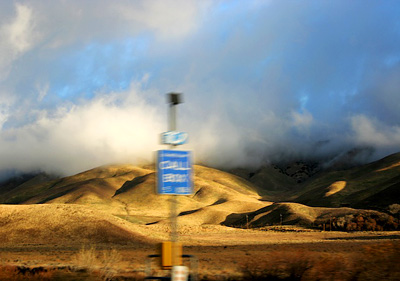
When you find yourself on a road trip, be sure to keep your camera handy. Car window photography produces images that have an entirely different feel than other shots.

Objects in the foreground will show motion blur while the landscape remains relatively sharp. This juxtaposition gives the viewer a sense of motion -- something that we don't typically see in travel shots.

Keep in mind, however, that it's best to let someone else drive while you're taking pictures. No shot is worth finding yourself stranded in a ditch by the side of the road...

Technorati Tags: , , ,

Grab Shot 9 - Slander Resort

Slander Resort

"While vacationing in the Florida Keys last week," said Craig Lee, "I spotted this sign. I pulled over and shot it through the windshield. It's actually the "Islander Resort" in Islamorada, but the sign was under repair -- probably from damage from Hurricane Wilma. I drove by again the next day and workers from the sign company were back repairing their repair."

Fortunately Craig had his camera with him before the final fix was made.

If you have an interesting candid you'd like to share, take a look at our Submissions page, then send us your Grab Shot. If we publish it, you'll receive an ultra cool custom carabineer keychain.

Technorati Tags: , ,

Remember the Self-Timer Setting!

Self Timer Group Shot

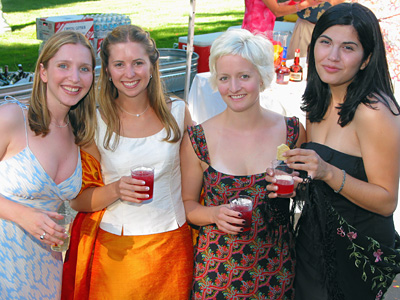
Don't leave yourself out of group shots. Remember to use the self-timer setting on your camera so you can join the action. First set up the shot, put your camera on a steady surface (tripods are the best), check the focus, enable the self-timer, press the shutter, and run like the dickens to get in the shot -- you have about 10 seconds before the exposure is made.

If you can, position your camera within flash range (10 feet) and use fill flash, as in this sample shot. You'll find that it puts a little extra twinkle in the eyes.

Technorati Tags: , ,

Last Minute Holiday Gift Ideas

Red Tree

Photographers are better prepared than most for pulling last minute gifts together. Here are a few ideas to get the creative juices flowing.

  • Gift Certificate for Family Portrait -- Here's a sure-fire way to score points with the relatives. Whip up a quick gift certificate for a family portrait taken by you. You can promise a few prints plus the images on CD. If you have an extra 8" x 10" picture frame around, you can mount the certificate in there with a note: Your Family Portrait Here!
  • Photo Lessons for that Budding Photographer -- While you have the printer fired up, you can generate another gift certificate for 5 Photo Lessons for that budding photographer who is getting a digital camera for the holidays. Someone else buys the camera; you provide the lessons.
  • Preload Family Album on Color iPod -- Do you know someone getting a new iPod? You can preload a family album on it before wrapping it. That way when they open the iPod, it will be ready for viewing from the get-go. Be sure to put the pictures on CD too so the recipient can load them into his or her iPhoto album when they sync the iPod to their computer.
  • Be a Holiday Photographer -- If you listened to Podcast #12, you know there are lots of advantages to being the holiday photographer. Add another one to the list... you can offer it as a gift.
  • Framed Enlargement -- When all else fails, you can print out a nifty 8" x 10" print and mount it in a frame. Try to choose a subject that is of interest to the recipient. And make sure it's a top quality photo! That being said, these gifts can be home runs...

If you have other last minute gift ideas, please post a comment and share it with our readers. Also, don't forget to check out More Last Minute Holiday Gift Ideas. Happy Holidays!

Technorati Tags: ,

I think being the event photographer is a blessing. Whether I'm at an office party, family gathering, or celebrating with friends, my camera enables me to move effortlessly from one conversation to another. If I'm feeling stuck, I can always say, "Excuse me, but I see a shot over there I need to grab."

The camera also facilitates introductions. "Hi, I'm taking pictures for the host. My name is Derrick. Do you mind if I grab a quick shot of you and your wife?" The next thing you know you're in friendly conversation. The role of holiday photographer is much better than standing there with a drink in your hand wondering how long you have to hang around.

Bounce Flash

Business Card Bounce Flash

I think holiday events are a great time to try the bounce flash technique. Instead of pointing the flash directly at the subject, you "bounce" it off the ceiling. The light is much more diffused, like a cloudy day, and can be very flattering for portraits. One of the reasons that I think holiday parties present a good opportunity for this technique is because they're often in homes with lower ceilings that are painted a shade of white -- perfect for bounce flash.

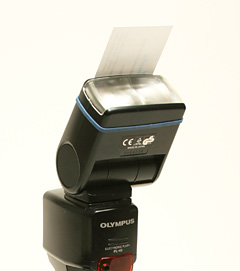
One drawback to bouncing light is that the subject's eyes can go dark because the illumination is from above. A great trick to fix that is to attach a plain white business card to the flash head with a rubber band as shown in this illustration. It "kicks" just enough light toward the eyes to brighten them up while still getting the benefits of bounce flash.

Generally speaking, I increase the ISO to 400 for bouncing because you do lose some light from the added distance and the surface of the ceiling. Otherwise, you should be able to use Program mode and auto flash. Try it!

Software Links

Windows
QuickTime Pro
Ulead CD and DVD PictureShow
Ulead DVD Workshop

Mac
QuickTime Pro
BetterHTML Export plug-in for iPhoto
Apple iLife Suite includes iPhoto, iMovie, and iDVD

All Platforms
Flickr (I've linked you to my Flickr page so you can see an example).

=====================

Listen to the Podcast

Now that I have your curiosity piqued, it's time to listen to today's audio show titled, "The Holiday Photographer." You can download the podcast here (28 minutes).

Technorati Tags: , , , ,

Ziploc Bags for Cold Weather

Ziploc Bags

During cold weather, make sure you have at least one Ziploc bag in your camera case. Not only are they useful for protecting your equipment in the rain, but they help with condensation too.

Bringing a camera in from the cold weather to a warm house promotes condensation forming on the outside of its body, possibly migrating to the inside of the camera where it can confound electrical components. To prevent this mishap, place your camera in a Ziploc bag before coming inside. Leave the camera in the sealed bag until it reaches room temperature. The condensation will collect on the bag, not your camera, thereby protecting your investment.

Technorati Tags: , , ,

Stephen Johnson at Apple Store, SF

Stephen Johnson

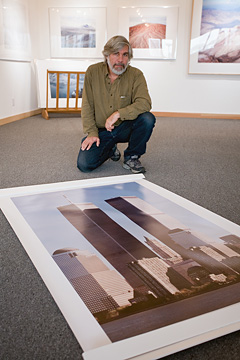
Stephen Johnson, digital landscape photography pioneer, will be speaking at the SF Apple Store on Dec. 27, 7 p.m. Stephen will discuss his groundbreaking digital landscape photography project, "With A New Eye." You'll learn about the concept, tools, inspiration, and means for accomplishing this massive 8-year project.

I've had a chance to visit Stephen at his gallery in Pacifica, CA, which is just south of San Francisco. His work is magnificent. If you're in the Bay Area on Dec. 27, spend an hour with Stephen Johnson. The visit will get your creative juices flowing.

I took this photo of Stephen at his gallery while he was showing me a section of his massive print of the New York City skyline that he captured before the Sept. 11 attack. The image of the twin towers was haunting... for both of us.

Technorati Tags:

Grab Shot 8 - Fits Like a Glove

Fits Like a Glove

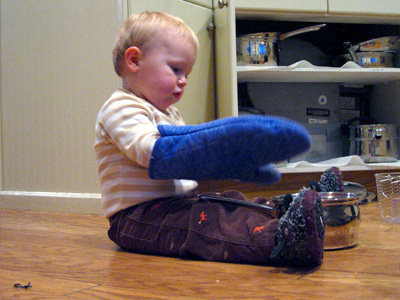
"While visiting my daughter (and armed with my Powershot S45,)" said Jim Stocking, "I decided to take advantage of some things I learned from the podcast. The result is this still of my grandson in RAW mode pushing the ISO to 400 for an available light shot. To avoid blur, I mounted my camera on a UltraPod II and set it on the floor. I like that he doesn't need expensive toys to entertain himself. It reminds me of the Mastercard ads: priceless"

If you have an interesting candid you'd like to share, take a look at our Submissions page, then send us your Grab Shot. If we publish it, you'll receive an ultra cool custom carabineer keychain.

Technorati Tags: ,

EarThumps and CEO Card Case
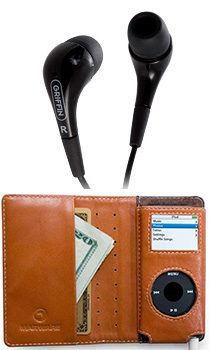
The Griffin EarThumps and Marware CEO Card Wallet are my two favorite nano accessories for under $25

I've been reviewing lots of iPod accessories for the holiday season. But the two that I'll be keeping for my nano are the Griffin EarThumps and the Marware CEO Card Wallet.

You can read my reviews of the EarThumps and the Card Wallet for more details. But the bottom line is that both of these accessories are affordable, stylish, and very functional. I had a difficult time finding a nano case I liked until I tested the Marware Card Wallet. And the EarThumps are much more comfortable than the standard iPod earbuds... and sound great too -- especially if you like bass.

Technorati Tags: , , , ,

"Sunglasses" Polarizer in a Pinch

Sunglasses Polarizer
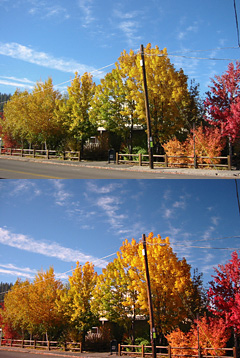
Top photo recorded with a compact digicam and no filter. Bottom image captured using sunglasses as a polarizing filter...

Most of us don't carry all of our photo accessories when we're on the go with our compact camera. But, if you have a quality pair of polarizing sunglasses, you can use them as a polarizing filter in a pinch.

The top image was taken without any filter. Good color, for sure, but I really wanted more intensity in the foliage and sky. So I placed one side of my polarizing sunglasses right up against the camera lens and recorded another image. The polarizing effect of the sunglasses deepened the blue sky, gave the clouds a little more "snap," and saturated the colors of the trees.

Keep this tip mind the next time you're out shooting grab shots with your compact camera. You might be surprised by the results.

Technorati Tags: , ,

Grab Shot 7 - The Lava Stops Here

Lava Flow

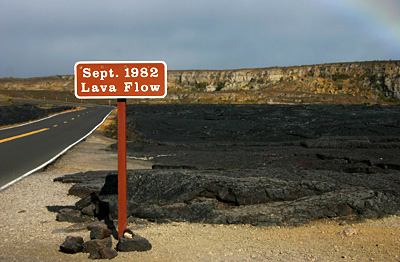
While exploring Hawaii, Jan Blanchard spotted this official sign at the end of a lava flow. She pulled out her Canon Digital Rebel (with 18-55mm zoom) and captured the shot in Program mode. She dialed down exposure compensation -2/3 of a stop to keep from overexposing the dark flow of the lava.

Technorati Tags: ,

"Photography Etiquette" - Podcast #11

Portrait Subject
I try to get a model release at the end of every shoot. Plus, I think it's courteous to offer extra prints to the subject if I plan on publishing the shot.

Much of good etiquette, while working as a photographer, comes from common sense. Things like: don't interfere with the action, don't obstruct the mother's view at a wedding, be frugal with your flash in darkened environments, and ask permission to publish photos of people whom you can recognize in the shot.

Photographers who publish, or who are aiming to do so, should carry a model release and business cards with them. The cards are useful for identifying yourself to someone you just photographed. It also provides the subject a way to get a hold of you in the future. The model release is the tool you use to secure permission to publish a photo that shows the subject's likeness.

As I said in the show... I'm not a lawyer. This is not legal advice. But my experience has taught me to get model releases whenever possible -- even for shots of family and friends. If I do publish the photo, I like to let the subjects know where it was published. If possible, it's a nice gesture to send the subject a copy of the publication.

If the photo is going to be used on the label of a commercial product, such as instant coffee, I think it's wise to negotiate a fee with the subject and draft another, more specific model release.

Finally, if the person asks you to send a picture, and you agree to do so, please follow up. All too often photographers get distracted and forget to fulfill their end of the bargain.

Here's a sample model release that I use. I'm sharing this for illustrative purposes only. But you can use the language if you wish.

=====================

Photographic Subject Consent Form

I hereby give my consent for appearing as a photographic subject, and I release to [photographer's name] all rights of any kind included in the media product in which I appear.

This is a full release of all claims whatsoever that I or my heirs, executors, administrators, have now or hereafter against [photographer's name] or his employees, regarding any use that may be made of said photographic reproductions.

I understand that it is the purpose of [photographer's name] to use the material in a legitimate manner not intended to cause embarrassment or harm. Images published on the [photographer's name] web site do not include name or other personal information.

I have read this entire document, understood the contents, and I have willingly agreed to the above conditions.

Print names	
Date	
Signatures 		
Address (optional)	
Phone	
Subject's description		
Location	

=====================

Listen to the Podcast

Now that I have your curiosity piqued, it's time to listen to today's audio show titled, "Photography Etiquette." You can download the podcast here (21 minutes).

Technorati Tags: , ,

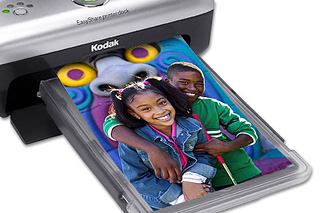
Kodak Easyshare Printer
Dye sublimation printers provide us with archival 4"x6" prints from our digital cameras within minutes.

For years now I've wrestled with inkjet printers to produce the lingua franca of amateur photography: the 4x6 print. I've used Epsons, HPs, and Canons, only to meet the same frustrating fate. It just takes too much fiddling around to squeeze out a few borderless snapshots. Don't get me wrong, I've had great results producing colorful business forms and 8"x11" enlargements. I expect to spend a little more time on those types of output. But 4"x6" prints, whether from Photoshop, iPhoto, or directly from the camera, should be fast and simple.

So, I began researching dye sublimation printers (dye sub, for short). Not the big ones that cost lots, but those little portable units that specialize in snapshots. They use dye sublimation thermal transfer printing. After you send the image to the printer, the paper makes four passes across the printing element. The first pass is yellow, and you don't see much image detail at this point. With magenta, the second pass, it begins to look more like a photograph but not a pretty one. After the third pass, cyan, the image snaps to life and looks beautiful. Most printers add one more layer, a coating that protects against UV rays and moisture. A very nice touch! You can actually run water across these prints without damaging them. And the images last for years and years.

Many camera systems, such as Kodak, Olympus, and Canon, have matching printers for their cameras. However, if your digicam has the PictBridge protocol, it should be able to communicate with any PictBridge-compatible printer. So shop around. Here are a few models to get you started:

Grab Shot 6 - Free Sand

Free Sand

Brad Immanuel captured this shot of his son in Golden Gate Park, San Francisco, during the De Young Museum construction. He used his Canon Rebel XT, which is the camera Brad carries on his weekly family bike rides. The camera was set in Program mode at ISO 400. The EF 18-55mm lens was extended all the way to 55mm. Brad didn't report if they actually brought any sand home...

Technorati Tags: ,

Canon PowerShot S2 IS
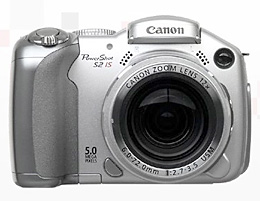
The Canon PowerShot S2 IS is the current favorite choice among those who ask me for camera advice.

As you can imagine, I get lots of inquires this time of year concerning the best camera to buy. For those who are looking for an all-in-one prosumer model, the Canon PowerShot S2 IS has been the model most often selected among the options I present. Why do people like this camera? The 12X optical zoom combined with image stabilizer is appealing in a package that is light to carry around. 5 megapixels is enough resolution for most folks, especially considering that they won't have to do much cropping thanks to the optical zoom range. And the street price of $450 is within reach of most camera-buying budgets.

I do think the S2 is a terrific camera. That's why it's on my short list of consumer recommendations. But the news here is how popular it's been with people who actually plunk down their hard earned dollars.

Technorati Tags: , ,

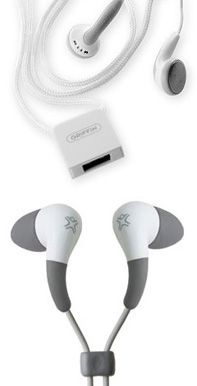
TuneBuds (top), FS1 (bottom)

You'd think this battle of earbuds would be no contest -- pitting XtremeMac FS1 High Definition Earphones that cost $149.95 against Griffin TuneBuds that only set you back 20 bucks. But I've just finished testing both on my iPod shuffle, and I was surprised by the outcome.

Overview of XtremeMac FS1 Earphones

The FS1 package is an attractive one (bottom image to the left). You get very stylish earphones that fit comfortably. XtremeMac includes silicon and foam sleeves plus a set of flanged tips. So you're bound to find something that's perfect for your ears. Plus you get a very nice zippered carrying case. One of the selling points of the FS1 earphones is that you get balanced sound at low levels of volume. This is true. And listening to music at a lower level is bound to be less harmful over the long haul.

But XtremeMac's claim of deep bass was not apparent to me. In fact, these earphones produce sound quality that I characterize as "cool" -- a bit too much treble response. This was especially apparent with rock selections with lots of cymbals. In fact, on some songs, I couldn't turn up the volume because the excessive treble response would bother me.

Griffin TuneBuds Overview

I then attached the TuneBuds to the shuffle via the USB port as designed. This is a slick trick because you still have your standard earphone port available. Two people can listen to music at the same time -- one through the TuneBuds and the other with standard earphones. This function also made comparing the FS1 phones to the TuneBuds easier.

Overall, the TuneBuds sound very similar to the earbuds that come with the shuffle. The sound is "warmer" than produced by the FS1 earphones, and there's definitely more bass. The USB port connectivity that enables two people to listen to one iPod is a welcomed bonus. The TuneBuds cost less than Apple's original earbuds, yet sound as good. I should also note their design. You have fewer wires to wrangle with because the earbuds are incorporated into the lanyard. Very handy for active folks.

Conclusion

Considering that you can buy 7 sets of TuneBuds for the price of one set of FS1 earphones, I'd have to say that the TuneBuds are clearly the better value. And for my ears, they sound better too. I'd recommend that you listen to the FS1 earphones first if you're considering picking up a set. I could see some folks preferring the very clean sound at low levels. But, if you like the way your existing Apple earbuds sound, you can buy the TuneBuds sight-unseen. I think you'll be happy.

Technorati Tags: , , ,

Grab Shot 5 - Sitka Squirrel

Sitka Squirrel

While exploring Sitka National Historic Park in Alaska, Randal Schwartz spotted this squirrel having a bite to eat. He quickly pulled out his Nikon CoolPix 5700, extended the 8X optical zoom all the way, and captured the moment. By setting his ISO to 400, Randal had a fast enough shutter speed to avoid camera shake and record this crisp image.

If you have an interesting candid you'd like to share, take a look at our Submissions page, then send us your Grab Shot. If we publish it, you'll receive an ultra cool custom carabineer keychain.

Technorati Tags: , ,

"Low Light Photography" - Podcast #10

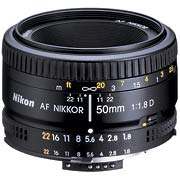
Nikon 50mm f-1.8 lens

Digital cameras excel in low light, especially DSLRs that enable you to increase your ISO to 400 and above without excessive compromise in image quality... or, at least, it's often worth the tradeoff to get the shot.

But there's more you can do beyond simply jacking up the ISO. An effective technique to capturing good images in dim conditions is to actually get more light to the image sensor. An easy way to do this is acquire a "fast" lens, such as a 50mm prime lens that's rated at a maximum aperture of f-1.7 or f-1.8. An f-1.8 lens, when set to its maximum aperture, transfers much more light to the image sensor than a zoom lens with a maximum aperture of f-4, for example. Take a look at this sequence of f-stops on a standard 50mm lens:

1.8 - 2.8 - 4 - 5.6 - 8 - 11 - 16 - 22

Each of these f-stop settings correspond to one full ISO setting:

100 - 200 - 400 - 800 - 1600 - 3200

So let's say that your f-4 zoom lens requires you to increase your ISO setting to 800 to get a reasonable handheld shot (let's say 1/30th or a second at f-4) in dim lighting. In that same lighting condition, your 50mm prime lens set to f-1.8 would allow you to shoot the same shot at ISO 200 (1/30th of a second at f-1.8) instead of ISO 800. By letting more light through to the image sensor (f-1.8 vrs f-4), you are able to lower the ISO setting using the same shutter speed.

Speaking of shutter speeds, they fall into this equation also. Here's their sequence:

1/15th - 1/30th - 1/60th - 1/125th - 1/250th - 1/500th

So with a f-1.8 lens, you may decide to keep the ISO at 800 and increase the shutter speed to 1/125th of a second instead. This would make it easier to freeze action. These are the sort of options you enjoy with a "fast" lens. Here are the numbers again, all stacked on top of each other:

f-stop:....1.8.......2.8...........4.........5.6...............8.............11

ISO:.......100.......200........400......800............1600........3200

Shutter:.1/15th...1/30th..1/60th.1/125th....1/250th.....1/500th

What are examples of these magical "prime" lenses. You can get a Nikon 50mm f-1.8 lens brand new for $105, and cheaper used. Same goes for Canon mount. A Canon 50mm f-1.8 lens can be had brand new for $80, and even less used.

Listen to the Podcast

Now that I have your curiosity piqued, it's time to listen to today's audio show titled, "Low Light Photography." You can download the podcast here (34 minutes).

Technorati Tags: , , ,

Shooting Through Hotel Glass

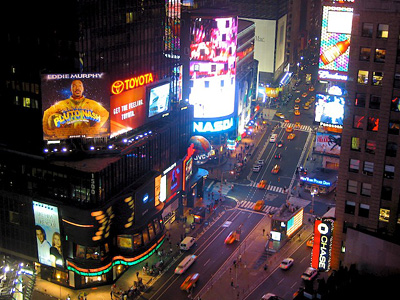
NYC Times Square

You travel photos aren't limited to locations where the tour bus stops. One of the first things I do, after dropping my suitcase on the bed, is look out the hotel window for a photo opportunity. Bright, colorful lights from a high vantage point often translate into beautiful nighttime images.

If your hotel window doesn't open, and they usually don't, just apply the standard "shooting through glass" technique. I like to first put a rubber lens hood on the camera to protect the front of the lens, but it isn't necessary if you're careful. Dim the room lights, or turn them off all together (so you don't get reflections in the window), then position the front of the lens barrel as close to the glass as possible. Make sure you turn your flash off. Then hold the camera very steady and shoot a couple frames. If you get camera shake because of the low light, then increase the ISO to 400 or 800 and try again. You can use a tripod if one is handy.

These types of images are particular good for "establishing shots" at the beginning of slideshows. And they often capture the interest of your viewers from the get-go.

Technorati Tags: , ,

Getting to Know Aperture

Aperture

I've just spent my first full day with Apple's new pro photo application, Aperture. Unlike most users, I'll be using this program strictly on a 17" PowerBook. (If you're curious about how it performs on a laptop, read my Mac DevCenter post, Aperture on a PowerBook, Pt. 1.) Since I've just splashed my feet wet, I have a suggestion to help you get off to a good start with this new tool.

After you install the application, but before you import any photos, insert the Introducing Aperture DVD and watch the "Acquiring Images" segment. Then import a batch of pictures. Next, watch the "Aperture Interface" and "Browsing & Organizing" segments, then apply what you've learned to your images. Work back and forth between the instructional segments and your own library of photos until you've finished the training. Then read the help section about how to set up a "Vault" so you can back up your work on an external hard drive.

You'll be ready for a good night's sleep after this. But you will have made tremendous headway toward learning the application. I'll post more tips soon.

Technorati Tags: ,

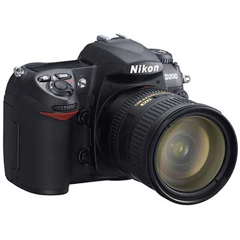
Nikon D200

In a recent poll of The Digital Story podcast listeners, the Nikon D200 topped the list of "most desired" DSLRs. Listeners to Podcast #8 were asked to post the DSLR they most wanted to buy in Show Notes section of that show. The top 5 cameras were as follows:

  1. Nikon D200
  2. Canon 5D
  3. Canon Rebel XT (350D)
  4. Nikon D50
  5. Nikon D70

Even though it was a small sampling (39 votes) the audience consists of avid photographers who are interested the latest cameras.

Technorati Tags: ,

Fast Shutter Speed to Freeze Action

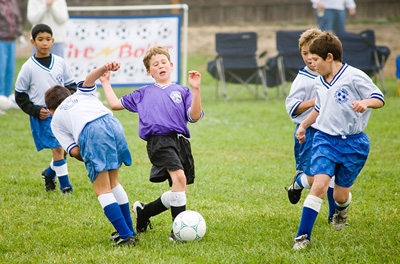
Soccer Action

Outdoor action photography requires two elements -- optical magnification and fast shutter speed. This shot was captured with a 300mm telephoto lens on a Canon 5D at 1/500th of a second. In order to get the shutter speed I needed to freeze the action, I increased the ISO setting to 800. As extra insurance, I shot in Raw mode so I would have more options in post production.

If you like action photography, look for a camera/lens combination that provides lots of optical reach and can provide good image results at ISO 400 or higher.

Technorati Tags: , ,