March 2008 Archives

jennifer_triplet.jpg

Lots of reader mail has been flowing in lately, and a few of the questions have me stumped. So I thought I'd occasionally run one or two by our adept virtual camera club members to see if anyone has an answer.

Dale writes: "I've been using burst mode on my D300 and noticed something odd that perhaps you could comment on. Whenever I shoot in burst mode I find that the camera records the images slightly out of order."

"For a portrait session, that wouldn't matter of course, but for sports it's a little annoying because I like to have the images in the correct order when I view them on the LCD or in software later."

"For example, when I shoot basketball games, a player might be going up for a lay up, and in the next image, he or she is still driving to the basket. I sometimes will delete images during timeouts, and it's very disconcerting to have the images out of order. Perhaps this is a minor thing, but it sure would be helpful to have them in the correct sequence."

"Have you experienced this or know any solutions?"

Dale, I haven't shot much with a D300 (though would like to), so I don't know what is going on here. But hopefully a few of our readers will have some idea of what may be causing this.

Please post a comment if you think you have an answer... or something interesting to add.


Now Available! The Digital Photography Companion. The official guide for The Digital Story Virtual Camera Club.

  • 25 handy and informative tables for quick reference.
  • Metadata listings for every photo in the book
  • Dedicated chapter on making printing easy.
  • Photo management software guide.
  • Many, many inside tips gleaned from years of experience.
  • Comprehensive (214 pages), yet fits easily in camera bag.

Technorati Tags: , , ,

photoshop_world.jpg

I'm heading out to Photoshop World this week, and I should have lots to report.

First, I'll be recording interviews in the O'Reilly Media booth with some great photographers including: John Paul Caponigro, Vincent Versace, and Stephen Johnson. I'm also going to chat with Mikkel Aaland live from Tasmania via AIM as he reports on the Lightroom Adventure II from way down under.

photo_companion_card.jpg

During my stay in Orlando, I'll also promote my new book, The Digital Photography Companion. O'Reilly Media, the publisher, is giving away Photo Companion Cards that I designed, which include tables for exposure compensation, lighting, white balance settings (with Kelvin), and an "After Every Shoot" checklist. The cards look just like the tables in the back of Companion, so if your attending Photoshop World, be sure to come by the O'Reilly booth and get your hands on one. Can't wait to grab a few myself.

If anything hot catches my attention while I'm in Orlando, I'll post here about it. Otherwise, stay tuned for some terrific audio interviews coming your way.


santafeworkshops-int.gif

Events! See the TDS Event Calendar for photography workshops, speaking engagements, and trade show appearances, including my Beginning Workflow with Adobe Photoshop and Lightroom on June 22-28, 2008 in Sante Fe, New Mexico.


Technorati Tags: , , , , ,

aperture-plug-ins.jpg

There's so much to like about Aperture 2.1, but the game-changer is Edit API. Apple has created a bonafide plug-in architecture for Aperture that enables 3rd party developers such as Nik Software (Viveza) and PictureCode (Noise Ninja) to place their technology within Apple's pro level photo management application.

In order to give you a glimpse at the possibilities, Apple is providing the first plug-in for free and part of the 2.1 download. Dodge and Burn works just like tools in your favorite external editor, except you don't have to go anywhere. Consider it your "internal editor" that provides very elegant tools for lightening and darkening specific areas of a photo. But wait, there's more. Go to the popup menu in the interface and you'll also see options for saturate, desaturate, sharpen, blur, contrast and fade. This is one heck of an example plug-in.

edit_api_tds.jpg

The file handling is similar to roundtripping with an external editor. You choose an image in your library to edit, Aperture opens it in the plug-in window, your make your adjustments, then when you save, a new master Tiff is placed in your Aperture library. As always, your original file remains safe. And, if that original is located on an external drive, the new edited plug-in Tiff will be stored there too.

Tablet users will really enjoy this editing experience. Dodge and Burn is fully tablet compliant. This means you can work quickly and accurately with a pressure sensitive pen. And if you're a custom keystroke kind of dude, you can set your own combination for any of the plug-ins enabling one-touch activation.

Developers interested in creating plug-ins for Aperture will be happy to read that the SDK will be available soon. You can find out more by contacting aperturedeveloper@apple.com.

In the meantime, enjoy using Dodge and Burn. It's a much welcomed addition to the Aperture toolset.


Now Available! The Digital Photography Companion. The official guide for The Digital Story Virtual Camera Club.

  • 25 handy and informative tables for quick reference.
  • Metadata listings for every photo in the book
  • Dedicated chapter on making printing easy.
  • Photo management software guide.
  • Many, many inside tips gleaned from years of experience.
  • Comprehensive (214 pages), yet fits easily in camera bag.

Technorati Tags: , , , , ,

ruth_cooper_ladybugs.jpg

I attended the San Francisco stop of the Aperture World Tour today and had the opportunity to listen to New York pro shooter David Bergman talk about his workflow. This is a guy who sometimes captures as many as 4,000 Raw images in a single assignment.

Since a hobby of mine is appreciating the different ways photographers apply star ratings in their photo management applications, I thought I might pass along David's approach. He starts by going through the entire shoot once applying either a single star on no star to every picture. If a shot gets a single star, it's a legitimate photograph. It might not be a winner, but the focus, exposure, and composition are acceptable. If an image doesn't get a star, then it will most likely never be used.

David then sorts the images, and goes back through the one star images. This time, he looks at them a bit closer, and applies two stars to the pictures that he thinks have potential. He then makes one more pass, this time through the two star images, and applies three stars to the handful of keepers from the shoot. These will be the photos that he will perfect and pass along to the client.

What about four and five stars? David says that four stars are reserved for portfolio pieces, and it's very rare that he would rate an image five stars unless he felt is was a true hero shot.

I know my approach to rating has changed over the years. I thought you might enjoy reading this approach by a big time shooter.

Four star ladybug shot by TDS member Ruth Cooper

Technorati Tags: , ,

Multiple printers are easier to manage on a network than trying to connect them directly to your computer, or tougher yet, multiple computers. You can set up a network without spending too much. Basically you need a wireless access point, such as an Apple Airport Extreme, and a good USB hub.

network_printing.jpg

For my printer hub, I went with the Belkin Mac Mini USB 2.0 4PT Hub because it has the same footprint as the wireless base station (as you can see in the photo, hub is on the bottom).

Of course, when you estimate a job like this, you say to yourself, "two, maybe three hours." Listen to the podcast to see what happened in my case.

studio_printers.jpg

Monthly Photo Assignment

Paper is this month's photo assignment. Writing paper, wallpaper, bathroom sheets, doctor's office, paper pushers, paper airplanes... lots of possibilities for this one. You can read more about how to submit on our Submissions page. Deadline for entry is March 31.

Listen to the Podcast

Now that I've piqued your curiosity, it's time to listen to today's audio show titled, "Network Printing." You can download the podcast here (31 minutes). You can also subscribe to the podcast in iTunes

The Digital Story Podcasts are available for direct download from Apple iPhones. I've created a special mobile download page here. Just load the page in Safari, browse the podcast line-up, and click on the one you want to listen to.

Want to share photos and talk with other members in our virtual camera club? Check out our new Flickr Public Group. It's a blast!

Check out what you can do with an $150 underwater housing and a compact point and shoot by taking a look at my underwater gallery from the Caribbean.

Have you looked at the Park by the Numbers Camera Phone Project? If you have a camera phone, you've got to check this out.

Event Calendar

Events! See the TDS Event Calendar for photography workshops, speaking engagements, and trade show appearances.


Technorati Tags: , , , , ,


Sponsor Notes...

Lowepro Bags for Photographers On the Go -- Lowepro gear for every type of camera rig, every type of photographer.

Add Magic to Your Slideshows -- FotoMagico presentations are so amazing that your audience will be asking how you did it.

story_webinar.jpg

I have this fun talk I've been doing at conferences and user group meetings titled Five Ways to Make Your Photos Look Better, and this coming Thursday, March March 27 at 10 am Pacific Time (17:00 GMT), I'm going to share it online via a live webinar hosted by O'Reilly Media.

The gist of it is this: Thousands of pictures are recorded every day. Many of these shots are personal and not meant to be viewed as art. But what if you could capture the world everyone else sees, but in a more beautiful way? Derrick (that would be me) shows you five ways to make your pictures look a cut above those snapshots we typically see.

You can sign up here for the webinar, but you might want to do so soon; there is a limited number of seats.

It's my first whack at this medium. I think it's going to be loads of fun.


Now Available! The Digital Photography Companion. The official guide for The Digital Story Virtual Camera Club.

  • 25 handy and informative tables for quick reference.
  • Metadata listings for every photo in the book
  • Dedicated chapter on making printing easy.
  • Photo management software guide.
  • Many, many inside tips gleaned from years of experience.
  • Comprehensive (214 pages), yet fits easily in camera bag.

Technorati Tags: , , , ,

rick_brandt_ps.jpg

The February 2008 Photo Assignment was "Empty," and we have a spacious selection of images to show you -- 17 photos submitted by Digital Story members who demonstrate their ability to explore the open spaces of their environment.

To produce the gallery, the pictures were first loaded into Aperture. I then added the accompanying stories to the IPTC caption field and combined it with the EXIF data from the photograph. The final step was to create a web gallery in Aperture and upload it to the Digial Story server. You can view this month's photo assignment here.

The March 2008 assignment is "Paper." Start working on your contribution now. Details can be found on the Submissions page. Because of our new gallery format, you can now submit photo assignment pictures up to 600 pixels in the widest direction. Please follow the instructions carefully for labeling the subject line of the email for your submission. It's easy to lose these in the pile of mail if not labeled correctly. For example, the subject line for next month's assignment should be: "Photo Assignment: March 2008." Also, if you can, please don't strip out the metadata. And feel free to add any IPTC data you wish (These fields in particular: Caption, Credit, Copyright, Byline), I use that for the caption info.

Good luck with your March assignment, and congratulations to all of the fine contributors for February. It's an excellent collection of images.

Photo by Rick Brandt

Technorati Tags: , ,

howard_lewis_gs_mar.jpg

"My wife and I were visiting Alexandria and one of our stops was a beautiful fort," wrote Howard Lewis. "Alexandria is a great city, and we found the people to be very outgoing and interesting in conversation. They seemed very happy we were there. At this particular location, there were many young people dressed in the most colorful clothing you could imagine. We stopped and talked with some of them, and I was fortunate to be able to photograph some of them. After chatting with these young women, as they were walking away, I took one shot of them so I could remember our meeting and their wonderful clothing."

If you have a candid you'd like to share, take a look at our Submissions page, then send us your Grab Shot. We'll try to get it published for you on The Digital Story.

And you can view more images from our virtual camera club in the Member Photo Gallery.


Now Available! The Digital Photography Companion. The official guide for The Digital Story Virtual Camera Club.

  • 25 handy and informative tables for quick reference.
  • Metadata listings for every photo in the book
  • Dedicated chapter on making printing easy.
  • Photo management software guide.
  • Many, many inside tips gleaned from years of experience.
  • Comprehensive (214 pages), yet fits easily in camera bag.

Technorati Tags: , ,

Summer_Fall_08_banner.jpg

From June 22 to June 28, 2008, I'll be facilitating a Digital Lab at Santa Fe Workshops titled, Beginning Workflow with Adobe Photoshop and Lightroom. I'm very excited about having the opportunity to teach this lab, not just because I'll be working in Santa Fe for a week (although, not bad either), but because I'll be able to share one of my favorite workflows for photographers who want to work efficiently.

The basic approach is to use Adobe tools to identify your best shots quickly, then perfect and move along without getting bogged down in Photoshop. I have lots of great techniques that empower you to be in control or your workflow, and shift your focus back to capturing great shots.

Part of this formula is keeping a few tips in mind while shooting your Raw images. If you know how you want to work on the back-end, then you can capture to optimize that process. I think this approach makes us better craftsmen, and it builds confidence while working in the field.

Plus, we'll all be in Santa Fe. What a great location to share our thoughts and improve our photography. You can register online here, or call (505) 983-1400. If you download the Summer Catalog, (7.5 MBs) you can peruse all the great opportunities available in Santa Fe this coming year.


santafeworkshops-int.gif

Events! See the TDS Event Calendar for photography workshops, speaking engagements, and trade show appearances, including my Beginning Workflow with Adobe Photoshop and Lightroom on June 22-28, 2008 in Sante Fe, New Mexico.


Technorati Tags: , , ,

Second-curtain flash is a technique where the flash fires at the end of a long exposure instead of the beginning. This puts the motion blur in the right location: behind the subject.

second_curtain_flash.jpg

I discovered a PDF online from my DP Hacks book that provides a great tutorial for this technique. You can grab it by downloading Second-Curtain Flash for Cool Effects.

My personal advice. Find that setting on your camera, and just leave it there. I can't think of an instance when I would want the flash to fire at the beginning of the movement instead of at the end. And if you have more to add on this, please post a comment.

Photo by David Goldwasser.

Technorati Tags: , , ,

digiscoping_rig.jpg

So, your telephoto lens isn't powerful enough? No problem. Just find a spotting scope, or any type of scope, and hook up a digiscoping rig. In the podcast, I explain how.

You can also download a PDF explaining everything you need to know about DIY digiscoping. It's from my "classic" photography book, Digital Photography Hacks.

You can also download another PDF about the Walking Stick Mount, which is another tip that I cover in this week's show.

Monthly Photo Assignment

Paper is this month's photo assignment. Writing paper, wallpaper, bathroom sheets, doctor's office, paper pushers, paper airplanes... lots of possibilities for this one. You can read more about how to submit on our Submissions page. Deadline for entry is March 31.

Listen to the Podcast

Now that I've piqued your curiosity, it's time to listen to today's audio show titled, "Digiscoping and More." You can download the podcast here (29 minutes). You can also subscribe to the podcast in iTunes

The Digital Story Podcasts are available for direct download from Apple iPhones. I've created a special mobile download page here. Just load the page in Safari, browse the podcast line-up, and click on the one you want to listen to.

Want to share photos and talk with other members in our virtual camera club? Check out our new Flickr Public Group. It's a blast!

Check out what you can do with an $150 underwater housing and a compact point and shoot by taking a look at my underwater gallery from the Caribbean.

Have you looked at the Park by the Numbers Camera Phone Project? If you have a camera phone, you've got to check this out.

Event Calendar

Events! See the TDS Event Calendar for photography workshops, speaking engagements, and trade show appearances.


Technorati Tags: , , , , ,


Sponsor Notes...

Lowepro Bags for Photographers On the Go -- Lowepro gear for every type of camera rig, every type of photographer.

Add Magic to Your Slideshows -- FotoMagico presentations are so amazing that your audience will be asking how you did it.

PPhoto_50_14_dg.jpg

One of my biggest complaints about the Canon lens arsenal are their 50mm options. There is the sharp, but grindy 50mm f-1.8. This is the lens I use, but not the one I want. Canon's 50mm f-1.4 is only slightly better design wise, but soft at the edges when wide open. And the 50mm f-1.2 is huge and way to expensive for my budget. Therefore, I've begrudgingly stuck with the high-value but low sex appeal 50mm f-1.8 for all these years.

But Sigma may be coming to my rescue. They just announced their 50mm F1.4 EX DG HSM, and boy does it look sweet. It will be available in Sigma, Canon, Nikon, Pentax, and Sony mounts. Their specs are exactly what I'm looking for:

  • Standard lens with large maximum aperture of F1.4.
  • It creates sharp images with high contrast and ensures superior peripheral brightness.
  • Incorporates molded glass aspherical lens, perfectly correcting coma aberration and creating superior image quality.
  • Super multi-layer lens coating reduces flare and ghosting.
  • Hyper Sonic Motor (HSM) ensuring silent, high-speed AF with manual focus override.

Sigma had not announced price and availability yet. Oh please make it soon and affordable. I'll follow up as soon as I get my hands on one.

Technorati Tags: , , , ,

dpc_in_pocket.jpg

"The new trim size [of The Digital Photography Companion] will make it more appealing for bookstore shelving, but we wanted to make sure it stayed portable too," wrote Colleen Wheeler in her post, It's Still a Pocket Guide at Heart. (The Companion is someone you want with you, not home on the shelf when you need to figure out your exposure compensation setting.) So we went with a 5 1/2 by 8 1/2" size that will fit nicely in camera bags. Oh, and it still fits in some (larger) pockets. (Author carrying case not included.)

Photo by Colleen Wheeler (editor of Companion). Pocket by Derrick Story.

Event Calendar

Events! See the TDS Event Calendar for photography workshops, speaking engagements, and trade show appearances.


Technorati Tags: , , ,

"Needle and Rail" - Grab Shot 142

hai_vu_gs.jpg

"After lunch a few blocks from work, I saw this tempting view of the Space Needle and the Monorail," said Hai Vu. "Too bad, I didn't have a camera with me, so my cell phone had to do. I fixed up the image in Lightroom and converted to B&W with a hint of yellow for an old picture look."

Hai Vu used a Sony Ericsson W810 cameraphone to capture this image. I happen to have that phone too, and it takes surprisingly good 2-megapixel images, as this shot will attest. As I've said a hundred times before, the best camera in the world is the one you have with you. Nice shot!

If you have a candid you'd like to share, take a look at our Submissions page, then send us your Grab Shot. We'll try to get it published for you on The Digital Story.

And you can view more images from our virtual camera club in the Member Photo Gallery.

Event Calendar

Events! See the TDS Event Calendar for photography workshops, speaking engagements, and trade show appearances.


Technorati Tags: , ,

spyder3.jpg

The good news about an updated monitor calibrator, such as the Spyder3Elite by ColorVision, is that it reminds us that we have to calibrate in the first place.

By way of anecdote, I'm setting up a just-arrived MacBook Pro 17", and wanted to make a quick print yesterday. After making sure I had the right drivers for Leopard, I then noticed that the image looked a little different on the screen than what came out of the printer. Oh rats! Calibration.

The Spyder3 has been on my radar, and fortunately, PhotographyBLOG has just reviewed the Spyder3Elite. Here's their introduction to the product:

"The Spyder3Elite is the top-of-the-range product in Datacolor's new line-up of display calibration devices. You need to calibrate your monitor to ensure that the colours you see on your screen are the colours seen on someone else's screen, or on the paper when you print. The Spyder3Elite uses a 7 colour detector engine and a larger light aperture to improve performance and colour accuracy over both the previous Spyder2 and competing brands. It also features an Ambient Light Control which will automatically measure the light in a room at regular intervals. Jon Canfield recalibrates his entire studio to find out if the Spyder3Elite delivers on its promises..."

The Spyder3Elite is available on Amazon for $236.

Now I've got to get back to my MacBook Pro and get that monitor looking right...

Technorati Tags: , , ,

marty_german_hidi_cr.jpg

"I read about the lunar eclipse just a few hours before it was to start, in an urgent email from a friend," said Marty German. "I had just enough time to Google the local start times for each of the main phases."

How Marty Took the Shots

"I setup my 1980s Leitz Tiltal tripod and mounted my Nikon D200 camera with its 1980's Nikon 80-200 f/2.8 ED AF lens manually focused to infinity, and set it to its maximum 200mm zoom. It was the longest lens that I own. I shot everything in raw so that I could 'tweak it' later. As it turned out, this made all of the difference! To minimize vibrations I used the self timer to trigger the actual shots."

"Because my first shot was of the full moon at 'first contact', it was basically a 'full sunlit' object. So the same exposure to photograph someone on the beach in full sun, is perfect for shooting the full moon."

"I guessed my starting exposure using the f:16 rule. This rule says to use f:16 at the shutter speed nearest to your ISO setting. In this case this was 1/500th of a second (because I was shooting at ISO 500) but after bracketing a few shots, f:11 turned out to be the best exposure. I think this was because the eclipse had already begun."

"As quickly as possible, I made a dozen shots before retreating into my warm house. It was 22 degrees here in CT. This is good for a 'dry' clear sky but challenging for the photographer to endure! When the wind blew, my tears froze to my eye lashes making it difficult to compose the moon in the viewfinder."

"An hour later, I went back outside and repeated the same basic procedures, but this time the luminance of the mostly eclipsed moon had decreased. The best test exposure histogram changed to f:9 at 1/500th of a second with everything else remaining the same."

"After another dozen 'duplicate' CYA shots, I went back in to thaw out, again. Unfortunately, gloves don't work the controls of a DSLR very well so I didn't have any on. Did I say it was really cold out?"

"Another hour later and the moon was dark except for the 'earth shine' created by our atmosphere catching and bending our star's light and acting as a giant filter!"

"The rust color is created by the dust particles and gases in our atmosphere. From the look of the moon, our atmosphere was pretty dirty that night! The same as it looks through the smoke of a campfire at night. Because our atmosphere is so thin, only a small ring of sunlight around the rim of the earth gets bent enough by the atmosphere to illuminate our moon when it is in this totality of our eclipse. For this final shot of the rusty moon, I opened up the lens to it's maximum f:2.8 aperture and the exposure was all the way down to 1/10th of a second."

"All night, I'd been watching high cirrus clouds moving in and in this final shot they softened the moon noticeably. The secret to getting a shot through 'steady' air is to make lots of repeat shots and hope you get a clear one. Patience and persistence is required! That's why I made a dozen duplicate exposures of the first two phases. But for this third shot, with the clouds getting heavier and the exposure much longer, I made two dozen exposures for this last shot of the moon."

"As it turned out, only one out of all of these final shots was good enough to use! This kind of photography often comes down to luck no matter how good your gear and preparedness is."

How Marty Processed the Images

"I used my Aperture 2 trial software to 'process' the three shots. Thanks to Derrick's, "Aperture 2: New Features" tutorial on lynda.com, it took only a couple of minutes for me to adjust each shot, fine tuning exposures, boosting contrast and reducing color noise. Now I have to come up with the money to buy Aperture, and it's all your fault, Derrick ;-) (BTW Great tutorial! Thanks again.)

"Normally I'd have used Capture NX to process my Nikon raw shots, but I found that the new Aperture interface was faster and easier to use, and IMHO, the raw converter in Aperture 2 is as good as NX's and both NX and Aperture produce noticeably better Nikon raw conversions than ACR does."

"Because my longest lens is only a 200 mm lens, the moon shots required a lot of cropping and the final moon image of each ended up being only 500 pixels square. This was also simple to set precisely so that they were all exactly the same size in Aperture 2."

"I took these three images and combined them in Photoshop CS3 to make up the final montage, and then up-sampled the final image to 300 dpi and 4" x 6" which is 1800 pixels by 1200 pixels."

"I made this montage for my 9 year old nephew, Clay. I hope you enjoy my pictures as much as I've enjoyed looking at all of your best shots on the Digital Story Public Pool on Flickr."

Photo of the Lunar Eclipse Phases by Marty German.


More Tips from The Digital Photography Companion

"How I Did It" is a new feature of The Digital Story featured on The Digital Photography Companion mini site. These are techniques from virtual camera club members who have built upon information in The Digital Photography Companion, or have come up with new tips altogether.

We're building a living library of knowledge for everyone to use (and contribute to). If you have a "How I Did It" tip to share, just send it to me with the sample photo, and put "How I Did It" in the email subject.

Technorati Tags: , , , , ,

dpc_cover_sm.jpg

If you only had one digital photography book, would this be it? My biased answer is a resounding "Yes!" The Digital Photography Companion is off the press and headed to bookstores everywhere as you listen to this show.

Because you're a member of this virtual camera club, however, you deserve a little inside information. And that's exactly what you're going to get in this podcast -- interesting tidbits about the book that you can't get anywhere else. I've also typed up my notes in the TDS post titled, "The Digital Photography Companion": Author's Release Notes.

And remember, this is the official camera guide of The Digital Story. It even has the TDS logo on the back.

Monthly Photo Assignment

Paper is this month's photo assignment. Writing paper, wallpaper, bathroom sheets, doctor's office, paper pushers, paper airplanes... lots of possibilities for this one. You can read more about how to submit on our Submissions page. Deadline for entry is March 31.

Listen to the Podcast

Now that I've piqued your curiosity, it's time to listen to today's audio show titled, "Meet the Digital Photography Companion." You can download the podcast here (32 minutes). You can also subscribe to the podcast in iTunes

The Digital Story Podcasts are available for direct download from Apple iPhones. I've created a special mobile download page here. Just load the page in Safari, browse the podcast line-up, and click on the one you want to listen to.

Want to share photos and talk with other members in our virtual camera club? Check out our new Flickr Public Group. It's a blast!

Check out what you can do with an $150 underwater housing and a compact point and shoot by taking a look at my underwater gallery from the Caribbean.

Have you looked at the Park by the Numbers Camera Phone Project? If you have a camera phone, you've got to check this out.

Event Calendar

Events! See the TDS Event Calendar for photography workshops, speaking engagements, and trade show appearances.


Technorati Tags: , , , , ,


Sponsor Notes...

Lowepro Bags for Photographers On the Go -- Lowepro gear for every type of camera rig, every type of photographer.

Add Magic to Your Slideshows -- FotoMagico presentations are so amazing that your audience will be asking how you did it.

As the author, I'm one of the first people on the planet to get my hands on the just-printed The Digital Photography Companion. This seems like a good opportunity to provide you with insights about the book that you won't find anywhere else.

Before I get to the anecdotes, let's start with the basic specs. The trim size is 5.5" wide by 8.5" tall. It's a nice size that fits in a lot of places. Companion is 228 pages, full color, and printed on 60# coated stock. Personally, I would have preferred a slightly denser 70# stock, and may get my way in future editions (depending on how the first run sells). The good news about the lighter paper stock is that it does keep the thickness of the book to about .5", which makes it easy to stash in the camera bag or jacket pocket. Overall, the book has a very nice look and feel, with good robust binding and clean printing. I'm always nervous about sending the work off the the printer. For the first printing of Companion, they did a great job.

dpc_pge100.jpg
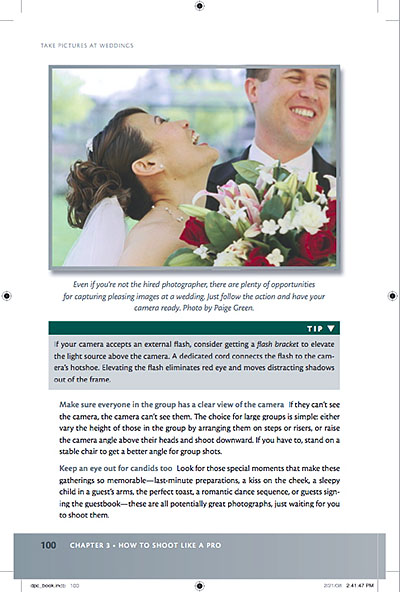
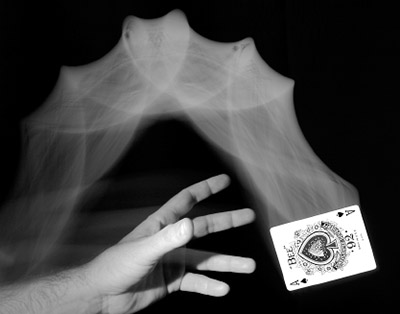
A galley print from page 100 of The Digital Photography Companion. I had some excellent contributors to the book too. This candid was captured by Paige Green.

Who Is This Book For?

Companion is for the average amateur who is passionate about photography and wants to take better pictures. So if you're a seasoned pro, you're not going to get as much from this guide as someone who is more at the enthusiast level. That being said, I've been taking pictures since I was 11 years old, and there's plenty of good stuff in here that I continue to refer to. Companion is also designed to be the official manual for The Digital Story virtual camera club. (The TDS logo and URL is on the back cover.) And we have a dedicated Companion area on the site for us to add more techniques and reader contributions to keep this a living, breathing project.

The Cover

dpc_cover_sm.jpg

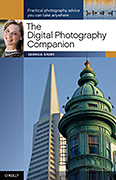
The cover turned out beautifully. The photo reproduction is spot-on, front and back. One interesting tidbit that I want to share has to do with the main cover image. The composition features the Sentinel Building -- now occupied by American Zoetrope. The photo was captured with a Canon G1, a somewhat elderly compact camera. This sets the tone for one of the major themes of the book: You don't have to have "professional" equipment to shoot professional looking images. Learning how to use the tools you have is what's important. When you get your hands on Companion, take a close look at this picture, and see what you think. The cover shot also sets the tone for another theme: get closer. Most shots that you'll see of this tandem (the Sentinel building and the Transamerica Pyramid) will be more loosely composed. I decided to shoot them tight.

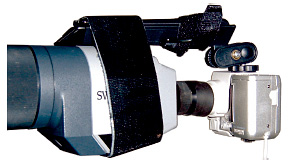
Types of Cameras Used for Illustrations and Metadata

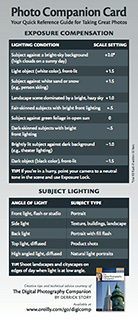
Speaking of different types of cameras, one of the new features in Companion is a metadata table in the Appendix (starting on page 196). It lists every shot in the book with its basic information such as camera model, exposure settings, focal length, ISO, location, and photographer. This is to help you understand how each photograph was recorded, and to some degree, drives home the point that camera type doesn't matter nearly as the other variables. A large percentage of images in the book were captured with compacts and entry-level DSLRs. (The best camera is the one you have with you!)

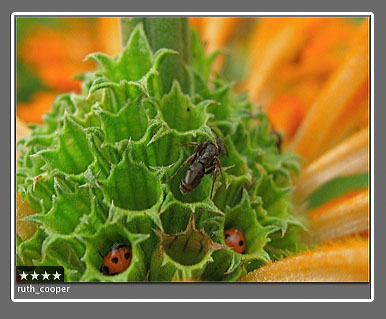
This doesn't mean that we compromised on the images. No way! One mistake that I made in earlier books was that I would use a shot that happened to be a great example of a particular technique, but the photo itself might not have been as appealing as it could have been. For this book, I wanted every shot to be compelling, and be a good example. This was a good call. Companion is my most attractive book to date.

This Book Has an Interface

There's definitely a "look" to many photography software applications these days. The charcoal or neutral gray background that is perfect for picture viewing. When you open up Adobe Bridge or Lightroom, or Apple's Aperture, or even the Events in iPhoto, you see what I mean. I like this look and wanted to bring it to Companion. Not only is it appealing to the eye, it feels in sync with what we're seeing on the computer these days.

As part of this, the tables had to be redesigned to fit in with the rest of the interface. This particular area was actually the brainchild of the book's editor, Colleen Wheeler. After many conversations between the two of us, she decided to bring our ideas to life so we could show the designer exactly what we had in mind. Colleen built samples and templates in Apple's Pages program. We played with the look, and ultimately submitted them to the designer, David Futato.

dpc_p187.jpg

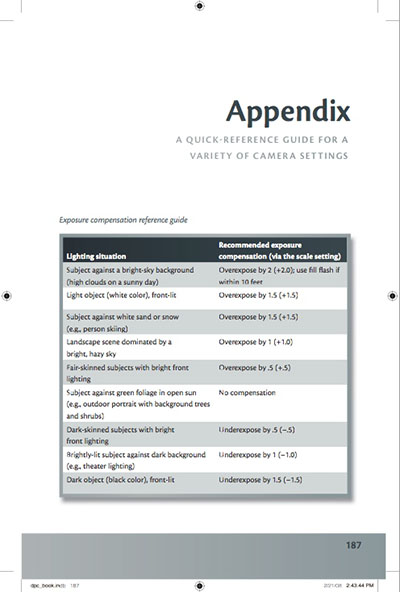
It seemed to resonate with him. David refined the look that Colleen created in Pages, and I think it's quite attractive. Then, by adding lots of photo examples, tons of tables, extensive table of contents and index, plus a full blown Appendix, we have what Colleen calls, "the most reader friendly book I've ever worked on."

What's Different in Companion Compared to Pocket Guide

You may be familiar with Companion's little brother, Digital Photography Pocket Guide, 3rd Ed. I've had owners of the previous book ask me why they should be interested in Companion. There are a number of reasons.

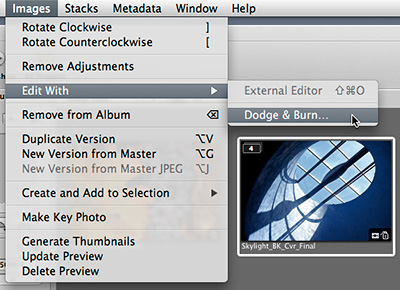
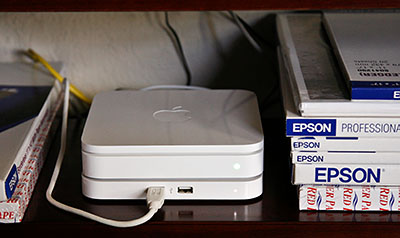
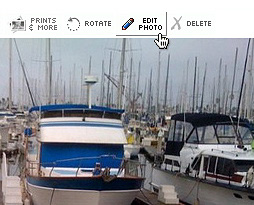
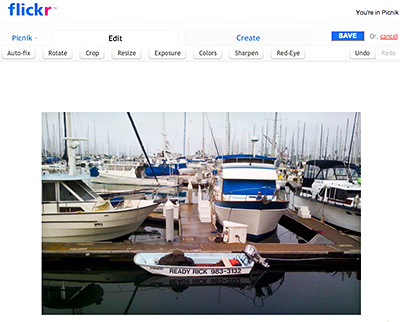
First, Companion is completely up to date. So regardless if we're talking about camera specs or the latest version of Aperture (2.0), Companion is right there on top of it. Next, I have two completely new chapters that aren't in Pocket Guide, "I've Taken Great Pictures, Now What?" and "Printing Made Easy." Both of these chapters are designed to help you once you're uploaded your images to the computer. I think the printing chapter is particularly useful, because I've taken all of the voodoo out of getting great prints. Just follow these steps and your prints will look great.

Also, I've added more tables, better pictures, and put them all in a more attractive design. In a lot of ways, this is the book I wanted to do from the beginning. And thanks to solid Pocket Guide sales in the past, I was able to get the resources that weren't available before.

Final Thoughts

My goal for this project was to create a book that would appeal to the eyes, be informative without attitude, and help empower whoever embraced it to take pictures that were a cut above the general photography aptitude. And, I wanted to make people smile. No so much a ha-ha smile that follows a good anecdote, but more the smile that results from feeling confident. And in the end, you will be the judge as to whether I accomplished that or not.

The Digital Photography Companion is available now on Amazon.com, and for less than $20. The revenue it generates helps support our virtual camera club, The Digital Story, which will always be free and open to any photographer who wants to participate.

Technorati Tags: , , ,

applescript_banner.jpg

Have you seen this? Sal Sogholan just published an amazing Aperture-InDesign Integration Demo on Apple.com that enables you to use Aperture as the database for an InDesign-based publishing system, complete with maintaining direct links to the related master images in the Aperture library. "Placed previews can be updated as needed and even replaced with high-resolution exports in preparation for offset or direct-to-plate printing."

And the best part is, you can try it for yourself by downloading the Aperture-InDesign demo installer. Sal had warned me that there were some powerful scripting hooks baked into the latest version of Aperture. This manifestation is one of the first of many cool automation tools to pop out of that oven. Take a look for yourself.

Technorati Tags: , , , , ,

"Summit of Faith" - Grab Shot 141

jim_austin_gs.jpg

"It was late afternoon on Cat Island. Atop Mt. Alvernia, the hermitage was perched, under fast-moving clouds," said Jim Austin. "Steps leading up to this monastery were small. Near them was a tomb, where Father Jerome was buried."

"When Father Jerome arrived on Cat Island, he bought the highest hilltop he could see. It was called Comer Hill, and is, in fact, the highest hill in the Bahamas (206 feet) with a 360 degree view of the island."

"Before he died at age 80, Father Jerome hand built this Hermitage out of native rock, and constructed a bell tower, chapel, bedroom, two fireplaces, a cistern, the Stations of the Cross, hand laid steps up a 50 degree incline, and his own tomb. The roman numeral fourteen in this picture represents the tomb of Jesus and the rock at its entrance."

Jim used a Canon Rebel XT with a wide angle lens (10mm) and the ISO set to 100. The aperture was f-8.

If you have a candid you'd like to share, take a look at our Submissions page, then send us your Grab Shot. We'll try to get it published for you on The Digital Story.

And you can view more images from our virtual camera club in the Member Photo Gallery.

Event Calendar

Events! See the TDS Event Calendar for photography workshops, speaking engagements, and trade show appearances.


Technorati Tags: , ,

flickr_edit.jpg

In this week's podcast on mobile photography, I talk about how easy it is to upload your photos directly from the mobile device to an online service such as Flickr. I often post mine using the email application on the iPhone. (And remember, we have a Digital Story Public Group on Flickr.)

The problem is, the iPhone doesn't have an image editing application. So what do you do if you want to make a few adjustments to your picture after it's posted online? A while back, Flickr struck up a deal with Picnik to enable roundtrip image editing from your Flickr library. You have all the common tools available, and when you're done, Picnik updates your Flickr library with the adjusted photo. It couldn't be easier.

picnik_edit.jpg

I do this post editing with a computer when I have the opportunity later (either on a laptop or in an Internet cafe). Why not use the iPhone for online editing too? Well, not until they are Flash-enabled. Picnik needs Flash for online editing. Sigh, maybe someday...

Technorati Tags: , , , ,

canon_iris_mode_dial.jpg

According to a recent story in Photography Bay, Canon has applied for a patent to use Iris watermarking to help photographers protect their images. In short, you have the camera read your iris, then it embeds your unique biological data into every shot. You can have additional metadata added if you wish. (Notice the callout 106d that indicates Registration mode.)

This is really interesting stuff. If you want to read more about how Canon envisions this, take a look at the Photography Bay article. It may be available on your next camera...

Technorati Tags: , , , ,

Cameras are useful for much more than just taking pretty pictures. They are sophisticated data capture devices that you can use to record important information. And because you always have a camera with you, even if it's a camera phone, you can use this functionality to make your life easier.

In this podcast, I discuss how I use compact cameras to never forget where I've parked, plus lots of other useful applications. This is handy stuff that will make your daily life better.

floor_6_iphone.jpg

Parking garage sign recorded with an iPhone just after stepping out of the car. I'll never forget where I parked!

Monthly Photo Assignment

Paper is this month's photo assignment. Writing paper, wallpaper, bathroom sheets, doctor's office, paper pushers, paper airplanes... lots of possibilities for this one. You can read more about how to submit on our Submissions page. Deadline for entry is March 31.

Listen to the Podcast

Now that I've piqued your curiosity, it's time to listen to today's audio show titled, "Camera as a Data Capture Device." You can download the podcast here (26 minutes). You can also subscribe to the podcast in iTunes

The Digital Story Podcasts are available for direct download from Apple iPhones. I've created a special mobile download page here. Just load the page in Safari, browse the podcast line-up, and click on the one you want to listen to.

Want to share photos and talk with other members in our virtual camera club? Check out our new Flickr Public Group. It's a blast!

Check out what you can do with an $150 underwater housing and a compact point and shoot by taking a look at my underwater gallery from the Caribbean.

Have you looked at the Park by the Numbers Camera Phone Project? If you have a camera phone, you've got to check this out.

Event Calendar

Events! See the TDS Event Calendar for photography workshops, speaking engagements, and trade show appearances.


Technorati Tags: , , , , ,


Sponsor Notes...

Lowepro Bags for Photographers On the Go -- Lowepro gear for every type of camera rig, every type of photographer.

Add Magic to Your Slideshows -- FotoMagico presentations are so amazing that your audience will be asking how you did it.

mike_doel_hidi.jpg

"I had been trying to consider how to tackle the theme of "Empty" for a recent TDS photo assignment, when a significant snowstorm provided the inspiration," said Mike Doel. "In addition to knowing that the golf course would be empty, I figured that it would also be a good example of one of the tips I've learned from The Digital Story - try to find photos that catch views that are unique or unexpected."

How Mike Did It

"When I arrived at the course, the first thing I did was to get permission to take photos. Having received that (as well as a "you've got to be nuts" look) from the staff member in the pro shop - surprisingly still open for business - I headed out with my Canon 5D, my Canon EF 24-105 f/4.0 L IS USM lens, and my tripod. The first tee box was cluttered with fallen branches and other debris, so I hiked down the ninth fairway to get a better shot."

"The shot was composed with five main elements - the red sign that tells the viewer we're at a golf course, the "empty" bench which reinforces the theme of the assignment, the two trees on either side, and the background with the lake and foot bridge. The shot is perhaps a bit too symmetrical (it would have been better if I gotten the bench a bit more to the side), but I was having a tough time doing that without obscuring the bridge. I especially liked how the red of the sign stood out against the white background, and it was the sign that I focused on."

"From another one of Derrick's tips, I knew that snowy scenes like this can fool your camera's light meter, which expects to find scenes with lots of midtones. Since snow is white and not 18% gray, I knew I had to over-expose the image to get the right color. I figured about 1 and 1/3 stops of over-exposure would do the trick, but I ended up using Aperture's exposure slider to actually boost it a bit more in post-production. The shot was taken in manual exposure mode at an aperture of f/16, shutter speed of 1/60th of a second, and an ISO of 100. The 1/60th of a second shutter speed is just long enough to provide a bit of motion to the falling snow."

"When shooting in really cold temperatures like this, you have to be careful about bringing your camera back into warmer temperatures - especially if it's into a room with any significant humidity in the air. The water in the air could condense onto your cold camera equipment (similar to what happens when people with eyeglasses come inside from the cold) and cause all kinds of havoc. A good tip is to put your camera into a gallon ziplock bag before coming inside. Once the camera has warmed up to room temperature, it is safe to take it out of the bag."

Photo of 9th Tee by Mike Doel.


More Tips from The Digital Photography Companion

"How I Did It" is a new feature of The Digital Story featured on The Digital Photography Companion mini site. These are techniques from virtual camera club members who have built upon information in The Digital Photography Companion, or have come up with new tips altogether.

We're building a living library of knowledge for everyone to use (and contribute to). If you have a "How I Did It" tip to share, just send it to me with the sample photo, and put "How I Did It" in the email subject.

Technorati Tags: , , , , ,