October 2016 Archives

This is The Digital Story Podcast #556, November 1, 2016. Today's theme is "The OM-D E-M1 Mark II." I'm Derrick Story.

Opening Monologue

At first I was wondering, "Why were we in Iceland to test the new Olympus OM-D E-M1 Mark II?" After my first hour in the field, I had the answer: We had already shot in rain, cold, and sleet. Then we stood behind waterfalls, worked atop mountains to capture the Northern Lights in below-freezing temperatures, and had only two batteries to last us during the day's agenda. That's why we were in Iceland, and I'm going to tell you about how this camera survived in today's show.

The OM-D E-M1 Mark II

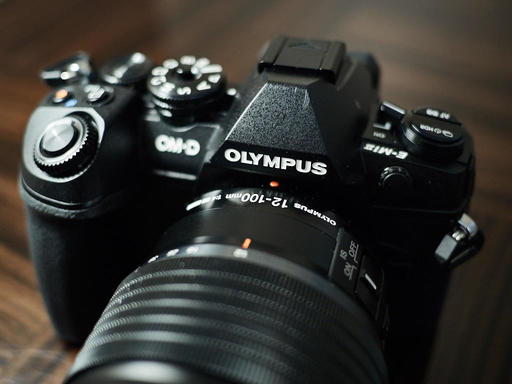
I just spent a week in Iceland testing the incredible E-M1 Mark II. Before I get into my hands on experience, let's review the highlight features.

PA285054-E-M1-MarkII.jpg

  • 20 Megapixel Live MOS sensor
  • 15fps sequential shooting (mechanical)
  • Cinema 4K video capture
  • 121-Point Dual FAST AF - Contrast & Phase Detection AF, all 121 points are cross sensors
  • Highly weather resistant body
  • 1/8000th second top shutter speed
  • Fully articulated 3" touch monitor
  • PRO Capture Lag-Free Electronic Shutter Mode
  • Dual SD card slots
  • Larger, more powerful battery
  • Still highly nimble, weighing in at 498 grams

As for the shooting experience, I highly recommend the new 12-100mm f/4 PRO lens. What a combination! I go into greater detail during the first segment of today's show.

In the News

Yongnuo Releases Budget 100mm f/2 Lens for Canon, Costs Just $170 (via Petapixel)

After tasting some success selling their budget 50mm f/1.8 and 35mm f/2 lenses, Yongnuo is adding another piece of glass to its ultra-affordable arsenal. Earlier today, they announced the arrival of their YN 100mm f/2 lens, and it'll only cost you $170.

The lens is made up of 8 lens elements in 6 groups, 58mm filter size, a 9-blade aperture, and looks pretty much exactly like Canon's EF 100mm f/2 USM.

Where it differs greatly is the price point. The Canon 100 currently costs $500, but you can already find the YN 100mm f/2 on AliExpress for just $170 US. Until it shows up in US stores we can't confirm that price will hold, but if it does, that'll be yet another dirt cheap Canon (and, in a few months, Nikon) alternative from Yongnuo.

Updates and Such

Big thanks to all of our Patreon members! I was able to pay for the podcast server and the backup system from last month's pledges. Your contributions are making a positive impact.

I'll be announcing the 2017 TDS Workshop season next week. And I have to tell you, this is our most exciting lineup to date. Keep eye peeled!

B&H and Amazon tiles on www.thedigitalstory. If you click on them first, you're helping to support this podcast. And speaking of supporting this show, and big thanks to our Patreon Inner Circle members.

And finally, be sure to visit our friends at Red River Paper for all of your inkjet supply needs.

See you next week!

More Ways to Participate

Want to share photos and talk with other members in our virtual camera club? Check out our Flickr Public Group. And from those images, I choose the TDS Member Photo of the Day.

Podcast Sponsors

Red River Paper - Keep up with the world of inkjet printing, and win free paper, by liking Red River Paper on Facebook.

MacPaw Creators of CleanMyMac 3 and other great software for Apple computers. Visit www.macpaw.com today.

Hedge for Mac - The fast solution for moving photos and videos from memory cards to drives, or drives to drives for that matter. Learn more at Hedge for Mac.

The Nimbleosity Report

Do you want to keep up with the best content from The Digital Story and The Nimble Photographer? Sign up for The Nimbleosity Report, and receive highlights twice-a-month in a single page newsletter. Be a part of our community!

Want to Comment on this Post?

You can share your thoughts at the TDS Facebook page, where I'll post this story for discussion.
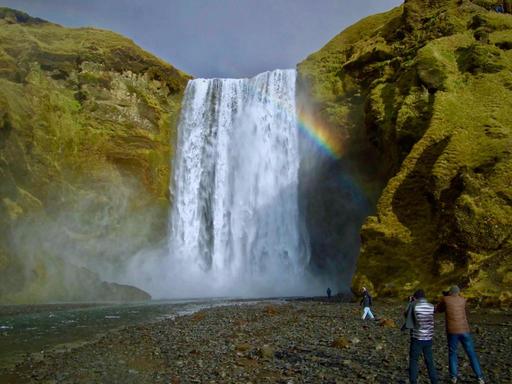
I forgot to adjust one of my cameras to the proper time here in Iceland. And those images were driving me crazy in my Capture One catalog because they were out of order. Unfortunately, I discovered that there was no easy way to fix this problem within Capture One.

PA270026-TG-4 web2.jpg The original time stamp for this shot of Skogafoss Falls, Iceland was 7 hours off. I needed to fix that. Olympus TG-4 in Program mode. Image by Derrick Story.

After a great deal of hunting, I discovered that I must leave the application for my fix. So, I turned to Photos for macOS, which does have a batch time stamp fix tool. The basic task went like this.

  • Export images out of Capture One Pro.
  • Delete the existing shots from the Capture One Catalog.
  • Create a new library in Photos for macOS.
  • Import pictures into Photos.
  • Use the Adjust Date and Time tool in Photos to fix the time stamps.
  • Export the images out of Photos and back into Capture One Pro.

I was very careful along the way and backed everything up, just in case something went wrong. But I have to say that the entire process was a real hassle. In the future, I'm going to be more diligent about checking the time stamps on all of my cameras. I certainly don't want to spend time on this again.

More Capture One Pro Tips and Techniques

Improve your skills by watching Capture One Pro Essential Training now available on lynda.com. More than 5 hours of tips, tricks, and techniques. Plus many free movies using advanced techniques.

Master Photos for OS X

(It's More Powerful than You Think)

For hands-on tutorials, be sure to take a look at Photos for OS X Essential Training on lynda.com. I cover everything you need to know to get the most from this surprisingly powerful image management application.

You can share your thoughts at the TDS Facebook page, where I'll post this story for discussion.

The Olympus E-M1 Mark II in Iceland

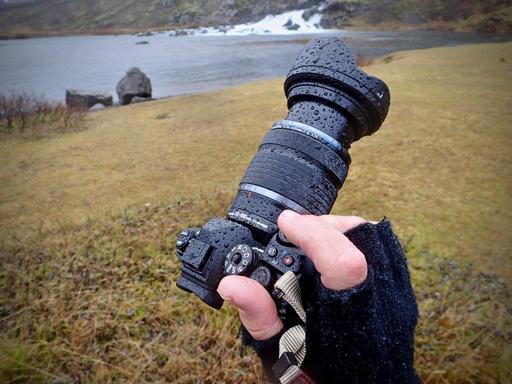
As we explored the waterfalls and geysers in Iceland's famous Golden Circle, we faced rain, wind, and cold temperatures. And not once during the entire day did I worry about my camera.

PA260080.jpg Olympus OM-D E-M1 with the new Olympus 12-100mm f/4 Pro lens. Photo by Derrick Story.

The Olympus OM-D E-M1 with the new Olympus 12-100mm f/4 Pro lens is an amazing all-weather resistant duo that captures stunning images. (We can't share those quite yet, but stay tuned.) The most difficult part of the day was keeping the front element free of droplets while shooting. Other than that, I would occasionally wipe down the camera with a bandana in-between scenes.

The E-M1 Mark II has all the features that you would expect, building upward from the excellent M-1. But Olympus has added many new touches too. The battery is beefier, there's a pro grip accessory, a new pro flash will be available, and the focus and burst rates can compete with the best of DSLRs.

As for the 12-100mm lens... that is all I shot with the entire day. One lens, every situation. The focusing is fast and sure, the range is terrific, and with its built-in image stabilization (coupled with the sensor-based IS in the camera), I was able to capture soft, running water shots without a tripod (6.5 stops of stabilization!)

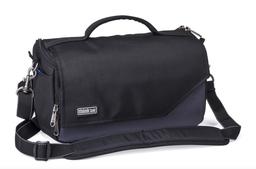
The E-M1 Mark II, 12-100mm zoom, 25mm f/1.2 prime, and my accessories all fit easily in the svelte Think Tank Mirrorless Mover 25i. Which is amazing when you think about it... an entire pro kit in a challenging environment that weighs just a few pounds.

I'll be reporting more on the OM-D E-M1 Mark II, and publishing pictures once the embargo lifts. But after day 1 of putting it through its paces, I can tell you this is one heck of a pro kit.

Want to Comment on this Post?

You can share your thoughts at the TDS Facebook page, where I'll post this story for discussion.
think-tank-mirrorless-mover.jpg

After nourishing myself with one of those famous Icelandic hot dogs, I spent a couple hours photographing the colorful activity on the chilly, damp streets of Reykjavik using the Think Tank Mirrorless Mover 25i to protect my weather resistant Olympus OM-D E-M5 Mark II with dust and splash proof Olympus ED 12-50mm zoom.

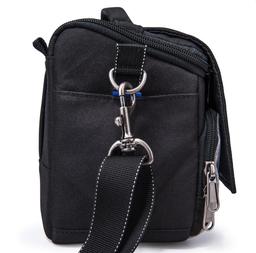
The quality of construction in this bag is top notch, as you would expect from Think Tank. The key to the design is the quick access top flap that uses a magnetic closure system for quick access while shooting, but has the option of zippered security when the weather turns bad.

mirrorless-mover-side.jpg

This system is highly efficient. I could leave my OM-D protected in the bag while exploring the streets of Reykjavik, then grab it quickly to capture an action shot when presented with the opportunity. The trick is to leave the camera on and ready to shoot.

Inside the bag I stashed the Olympus OM-D E-M5 Mark II with dust and splash proof Olympus ED 12-50mm zoom, an Olympus 60mm f/2.8 macro (also dust and splash proof), and the Olympus Tough TG-4. There was plenty of room for all of these components, plus the accessories I needed for the day. Yet, the bag was light and positioned discreetly behind my arm, wearing it messenger style.

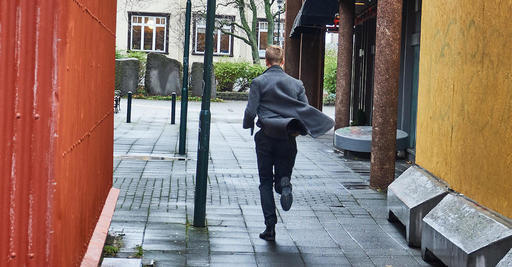
running-Reykjavik.jpg "Running Late" - Olympus OM-D E-M5 Mark II with 12-50mm lens, ISO 400, f/5.6 at 1/60th. Photo by Derrick Story..

Other niceties include a dedicated tablet pocket that holds my iPad mini, smartphone pocket, twin SD card holders, high quality metal hardware, top handle, back belt loop, fitted rain cover (if the weather gets really bad), and stretchable side pouches on both ends, outside of the bag.

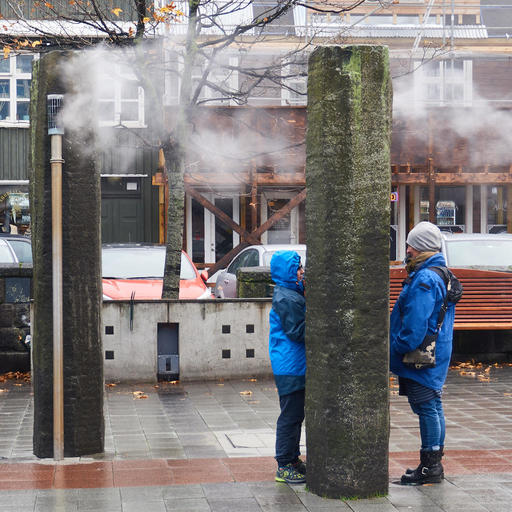
Natural-heat-Reykjavik.jpg "Natural Heat" - You can warm yourself via the steam pipes tapping the water beneath the ground. Photo by Derrick Story.

The Mirrorless Mover 25i fits nicely in my suitcase for travel. I filled it with socks to stay efficient. When I was ready to shoot, I emptied the socks and added the gear I needed for the day. It is a great bag for the nimble photographer on the go.


Nimble Photographer Logo

The Think Tank Mirrorless Mover 25i has a high Nimbleosity Rating. What does that mean? You can learn about Nimbleosity and more by visiting TheNimblePhotographer.com.

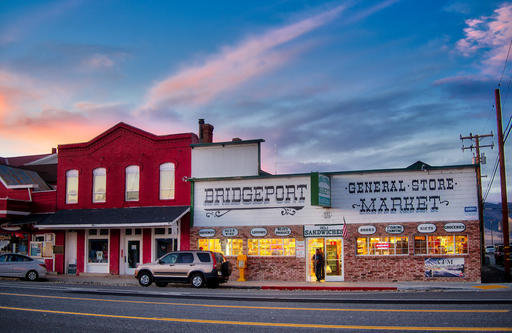
This is The Digital Story Podcast #555, October 25, 2016. Today's theme is " Bridgeport." I'm Derrick Story.

Opening Monologue

I'm recording this show on a crisp Sunday morning in the Eastern Sierra. We're in Day 3 of our TDS Fall Photography Workshop, and while the participants are working on their current assignments, I'm slipping off to say hello to you. Here's what's been going on.

cain-house-bridgeport.jpg

Top 5 Tripods for 2016

Top 5 Tripods for 2016 via PhotographyTalk

  • Sirui T2205X - If you want a lightweight tripod that's compact, yet has a maximum height of nearly 5 feet, the Sirui T-2205X is the tripod for you. It weighs just 2.6 pounds, meaning you can easily carry it on long journeys without getting fatigued. Folded down, the tripod is a mere 14.6 inches long, again, making it a great choice for photographers that need a full-size tripod but don't want to deal with carrying something that's heavy or cumbersome.
  • Handlepod - Handlepod offers sturdy support in a highly compact package and gives you the versatility of utilizing it in a number of ways. Hold it in your hand for steadier low-light or long exposure shots. Brace it against a support like a wall or a post for instant tripod-like stability. Use the Handlepod's built-in elastic cord to lash it to a steady object like a tree or even the side mirror of your car. That's versatility that no tripod can match!
  • Manfrotto 190go! - Being able to take shots close to the ground is not something that all tripods offer, but the Manfrotto 190go! certainly does. The center column can be positioned at a 90-degree angle to the ground, giving you the ability to take shots at a height of just 2.75 inches. As if that's not attractive enough, the 190go! is made of aluminum for strong, sturdy support, but doesn't weigh a ton either - just 3.7 pounds.
  • 3 Legged Thing Equinox Winston - With a maximum height of 76.9 inches, the Equinox Winston tripod from 3 Legged Thing will give you the height you need for virtually any shot. The Equinox Winston doesn't neglect the need to go low either, as it can get down to 10.6 inches above the ground for low perspective shots. Another advantage this tripod has over others is that it can support over 88 pounds.
  • Velbon Ultra 555A - This small, aluminum tripod from Velbon has five leg sections for an extended height of just over 60.6 inches, but folds down to a compact 14.7 inches when not in use. Weighing in a 3.25 pounds, it's relatively lightweight as well. It's telescoping legs have a twist to lock feature, ensuring that the legs don't become disengaged, causing the tripod to fall. The legs can be set at three different angles, giving you leeway to shoot from different perspectives. It even allows for shooting just 5 inches off the ground for those must-have shots with lots of foreground details.

Follow Us on Apple News for iOS Devices

I'm happy to announce that The Digital Story, The Nimble Photographer, and theAnalogstory are all available on the Apple News App for iOS devices. Just click on the following links on your iPhone or iPad, then save us to your Favorites.

Updates and Such

Big thanks to all of our Patreon members! I was able to pay for the podcast server and the backup system from last month's pledges. Your contributions are making a positive impact.

I'll be announcing the 2017 TDS Workshop season by the end of October. And I have to tell you, this is our most exciting lineup to date. Keep eye peeled!

B&H and Amazon tiles on www.thedigitalstory. If you click on them first, you're helping to support this podcast. And speaking of supporting this show, and big thanks to our Patreon Inner Circle members.

And finally, be sure to visit our friends at Red River Paper for all of your inkjet supply needs.

See you next week!

More Ways to Participate

Want to share photos and talk with other members in our virtual camera club? Check out our Flickr Public Group. And from those images, I choose the TDS Member Photo of the Day.

Podcast Sponsors

Red River Paper - Keep up with the world of inkjet printing, and win free paper, by liking Red River Paper on Facebook.

MacPaw Creators of CleanMyMac 3 and other great software for Apple computers. Visit www.macpaw.com today.

Hedge for Mac - The fast solution for moving photos and videos from memory cards to drives, or drives to drives for that matter. Learn more at Hedge for Mac.

The Nimbleosity Report

Do you want to keep up with the best content from The Digital Story and The Nimble Photographer? Sign up for The Nimbleosity Report, and receive highlights twice-a-month in a single page newsletter. Be a part of our community!

Want to Comment on this Post?

You can share your thoughts at the TDS Facebook page, where I'll post this story for discussion.
Connecting Capture One to Aurora HDR

Once my RAW file sequences are safe and sound in Capture One Pro, I can open them in Aurora HDR for finishing the work. Here are the four basic steps I use to make this connection.

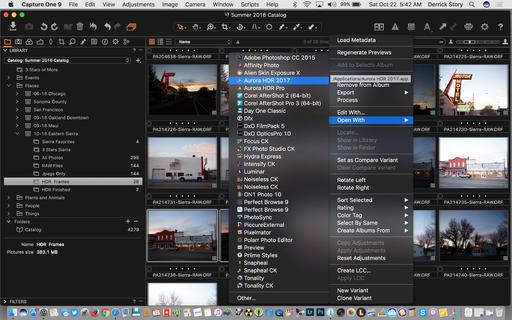
Step 1 - Select your three shots in Capture One, then use the Open With command. I right-click on one of the thumbnails to reveal this popup menu.

01-open-with.jpg

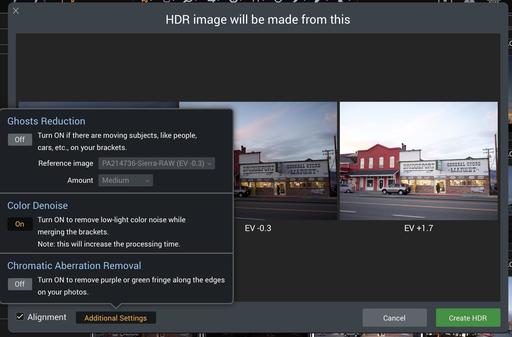
Step 2 - Check the Alignment box in the following screen, and make any additional choices required for your images.

02-make-settings.jpg

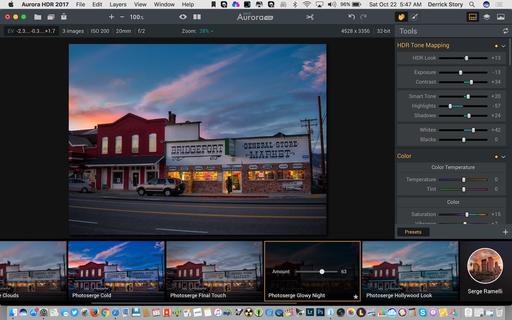
Step 3 - Once Aurora HDR has processed your images, you can choose from the presets to get the look you want. Presets are revealed by clicking on the big, round icon in the lower right corner.

03-choose-preset.jpg

I often adjust the amount of the preset, then fine tune its settings by working the sliders in the Tools panel.

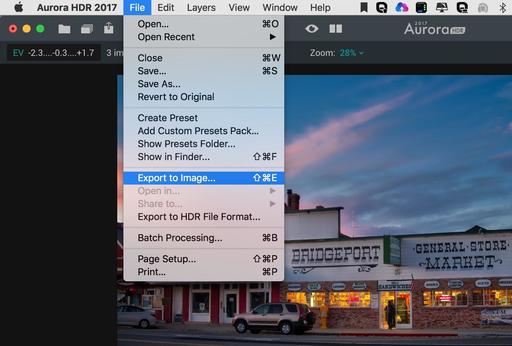
Step 4 - Export the final version of the shot by choosing File > Export to Image in Aurora HDR. Since I'm usually sending this photo back to Capture One, I export a full-size, 8-bit Tiff file. I then import that Tiff back into Capture One and keep it in the same project as the original shots.

04-export-image.jpg

The exported image can be worked on some more with Capture One tools. I keep the finished HDRs in their own album, within the Project. That way they're easily accessible when I want to display them or export out as lower resolution Jpeg.

If you want to save the work you've done in Aurora HDR, then use the Save command. That file can be reopened in the state that you left it for further fine tuning.

Bridgeport-Dusk-2016.jpg "Bridgeport General Store at Dusk" Olympus OM-D E-M5 Mark II with Panasonic 20mm f/1.7 prime at ISO 320, handheld. Images by Derrick Story.

Capture One and Aurora HDR are a terrific tandem for creating and managing high quality dynamic range images from your RAW file sequences.

More Capture One Pro Tips and Techniques

Improve your skills by watching Capture One Pro Essential Training now available on lynda.com. More than 5 hours of tips, tricks, and techniques. Plus many free movies using advanced techniques.

I've also created a dedicated Capture One Pro Training page on The Digital Story. You can follow all of the tips and techniques that I publish in one convenient spot.

Thinking About Making the Transition from Aperture or Lightroom? - Download my free eBook titled, Rocky Nook's Guide to Moving to Capture One Pro. I show you the steps to create a test library, then build the foundation for a smooth transition to Capture One Pro.

Want to Comment on this Post?

You can share your thoughts at the TDS Facebook page, where I'll post this story for discussion.
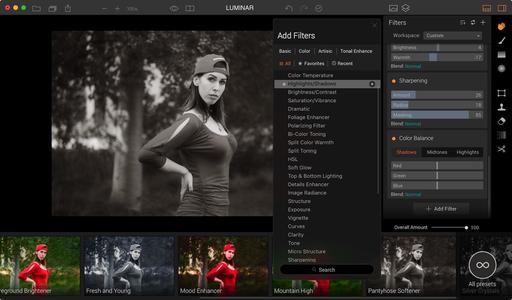
Luminar Needs to Be on Your Radar

I've been working with a beta version of Luminar, the latest innovative photo application from Macphun. And I can tell you right now, this is software worthy of your attention.

luminar-Filters.jpg

What they've done is modernize the approach to the image editing tools that we all need to use, but are not always sure how to implement them. Macphun has made this easier by creating a Filter panel that contains the various adjustments we need, then allows us to combine these adjustments in any manner that we want. And for those combinations that we want to use over and over, we can save them as presets or workspaces.

Additionally, we can use these filters with other tools in the application, such as brushes and gradient screens. So, while you're working, you're not thinking about how to create a mask, rather, you're just making the picture look better. For those who really want to dig in, there are layers that make sense, a history function that's easy to use, a cloning tool, and much more.

Plus, Luminar works as an Editing Extension for Photos for macOS, and as a plug-in for Lightroom, Aperture, and Photoshop. The icing on the cake is that it's going to be affordable too: $60.

The application is scheduled for release in mid-November. Stay tuned here for updates, tutorials, and offers. I want to help us all learn this app together. This is terrific software that I think is going to add great enjoyment to your image editing.

Master Photos for macOS

(It's More Powerful than You Think)

VIDEO TRAINING

Want to see how easy it is to apply local edits to your images using Editing Extensions? Take a look at my new lynda training, Photos for OS X: Extensions for Local Adjustments.

And for an overview of all of the great features in Photos, my Photos for OS X Essential Training will get you up and running quickly. I cover everything you need to know to get the most from this surprisingly powerful image management application.

INSTRUCTIONAL GUIDE

The Apple Photos Book for Photographers

For photographers who are more than just casual snapshooters, or who are making the transition from Aperture or iPhoto, The Apple Photos Book for Photographers shines a light on the sophistication of this app and the ecosystem it taps into. Available as an eBook now, and coming to print later this year.

Want to Comment on this Post?

You can share your thoughts at the TDS Facebook page, where I'll post this story for discussion.
This is The Digital Story Podcast #554, October 18, 2016. Today's theme is "My Return to Iceland." I'm Derrick Story.

Opening Monologue

My first trip to Iceland was nearly a decade ago, when I was there on assignment with the "Lightroom 12" to capture imagery and test the beta version of Adobe's fledgling image management application. We were there in the summer, and the days were 23 hours long. It was amazing. And now I'll return again. This time for another assignment.

It's going to be a crazy couple weeks. On Thursday morning I head up to the Eastern Sierra for the TDS Fall Workshop. I'm so looking forward to it. I return home on Sunday night, then catch a plane on Monday morning to Iceland.

iceland-2006.jpg

I thought you might be interested in what I'm packing for these back-to-back trips.

In the News

Could Flash Porter Be The Field Back-up Solution of Your Dreams? (via ThePhoblographer)

Flash Porter is a Kickstarter campaign aimed at doing one thing: creating the worlds best field backup solution.

The unit is essentially a small battery powered memory card reader with a screen and built in storage of varying capacity levels - somewhat Gameboy-esq in its appearance. The idea is similar to something like WD's My Passport Wireless Pro, but more advanced with multiple memory card slots (not just SD) a built in screen, etc. The Flash Porter also supports RAW image display from most of today's popular brands, which means that unlike the Toshiba and WD offerings, you will actually be able to see and interact with the RAW files on the unit - such a key feature for us photographers.

The Kickstarter Campaign has 10 days remaining. If you would like to see this project become a reality you can head over to the Kickstarter page to get more information and to support the project.

Follow Us on Apple News for iOS Devices

I'm happy to announce that The Digital Story, The Nimble Photographer, and theAnalogstory are all available on the Apple News App for iOS devices. Just click on the following links on your iPhone or iPad, then save us to your Favorites.

Updates and Such

Big thanks to all of our Patreon members! I was able to pay for the podcast server and the backup system from last month's pledges. Your contributions are making a positive impact.

I'll be announcing the 2017 TDS Workshop season by the end of October. And I have to tell you, this is our most exciting lineup to date. Keep eye peeled!

B&H and Amazon tiles on www.thedigitalstory. If you click on them first, you're helping to support this podcast. And speaking of supporting this show, and big thanks to our Patreon Inner Circle members.

And finally, be sure to visit our friends at Red River Paper for all of your inkjet supply needs.

See you next week!

More Ways to Participate

Want to share photos and talk with other members in our virtual camera club? Check out our Flickr Public Group. And from those images, I choose the TDS Member Photo of the Day.

Podcast Sponsors

Red River Paper - Keep up with the world of inkjet printing, and win free paper, by liking Red River Paper on Facebook.

MacPaw Creators of CleanMyMac 3 and other great software for Apple computers. Visit www.macpaw.com today.

Hedge for Mac - The fast solution for moving photos and videos from memory cards to drives, or drives to drives for that matter. Learn more at Hedge for Mac.

The Nimbleosity Report

Do you want to keep up with the best content from The Digital Story and The Nimble Photographer? Sign up for The Nimbleosity Report, and receive highlights twice-a-month in a single page newsletter. Be a part of our community!

Want to Comment on this Post?

You can share your thoughts at the TDS Facebook page, where I'll post this story for discussion.
Considering Last Year's Model

Fresh off the heels of Photokina, and with Photo Plus just ahead, there are many tempting new cameras available for enthusiasts. The question is, do you go new, or with last year's model?

fujifilm-ad.jpg

Take the Fujifilm X-T1 vs the Fujifilm X-T2. The XT-1 is available now, brand new in the box with warranty, for $899, while the just announced XT-2 is selling for $1,599. That $700 difference could land you a top notch lens that will last for years.

If you look at key differences, it's true, there are many. The question is, however, how important are they to your work. Both cameras are top notch, weather-resistant wonders. The XT-2 has a 24MP sensor, 4K video capture, improved autofocus, and some nice design tweaks. Compared to the XT-1's 16MP sensor with a bit slower performance and lower video capture resolution, Fuji really did make some improvements with the XT-2.

This is the point where you have to step back and think analytically. "What is the net gain for my photography?" I'm not automatically advocating that you go with the XT-1 or the XT-2. What I am suggesting is that you ask the question.

In some instances, I think the answer is easier than in others. If a key feature that you need is substantially improved, then the latest model makes total sense. But if you don't shoot video, and don't require the swifter autofocus, is the 16MP XT-1 a great fit?

What I do know is that there is this golden opportunity right when the new model is available and there's inventory of the older model in unopened boxes. In all honestly, we really can't lose here.

We're on Apple News!

Find us now on the Apple News App for iOS! Just open this link on your iOS device, then add The Digital Story to your Favorites.

Want to Comment on this Post?

You can share your thoughts at the TDS Facebook page, where I'll post this story for discussion.
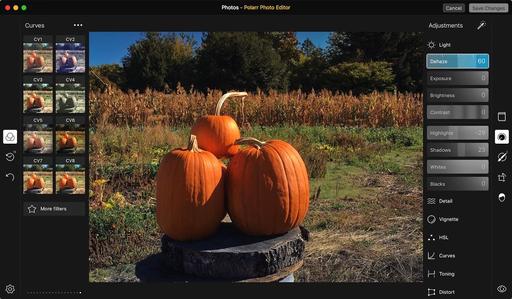
New Editing Extension - Polarr Photo

If you're looking for a new goodie to spruce up Photos for macOS, you might want to take a look at Polarr Photo Editor, currently on sale for $1.99.

adjustments.jpg

You buy it as an app, but doing so also loads an editing extension that works great in Photos for macOS. First launch the Polarr app to make sure everything is working OK. Then close it. Next go to System Preferences > Extensions > Photos and check the box next to Polarr. It's now ready to go as an extension.

Launch Photos for macOS and choose a picture to edit. Select Polarr from the list of Extensions in Edit mode. Your image will open in the Polarr interface. There are numerous filters to browse on the left side of the screen, and plenty of adjustments on the right.

The adjustments include all of the usual suspects for light and color, but there are plenty of surprises too, such as debase, distort, and grain. You can check your progress with the before/after button in the lower right corner.

The most recent version includes copy/paste adjustments. That might not seem practical, since you can only work on one image at a time with editing extensions, but Polarr remembers your copied adjustments for the next picture you open with the tool. Nice. It's actually quite useful.

There are plenty of tools and filters to explore here. And you certainly can't argue with the $1.99 sale price. Load it up this weekend and see what you can do with it.

Master Photos for macOS

(It's More Powerful than You Think)

VIDEO TRAINING

Want to see how easy it is to apply local edits to your images using Editing Extensions? Take a look at my new lynda training, Photos for OS X: Extensions for Local Adjustments.

And for an overview of all of the great features in Photos, my Photos for OS X Essential Training will get you up and running quickly. I cover everything you need to know to get the most from this surprisingly powerful image management application.

INSTRUCTIONAL GUIDE

The Apple Photos Book for Photographers

For photographers who are more than just casual snapshooters, or who are making the transition from Aperture or iPhoto, The Apple Photos Book for Photographers shines a light on the sophistication of this app and the ecosystem it taps into. Available as an eBook now, and coming to print later this year.

Want to Comment on this Post?

You can share your thoughts at the TDS Facebook page, where I'll post this story for discussion.
Recently I talked about the Magnum Square Print Sale, where for a specific time you could purchase signed or estate-stamped prints for $100 from over 60 Magnum photographers. I bought two and have them on the wall at the studio. I love them!

limited-posters.jpg

Here's another opportunity worth considering. The LUCIE Foundation is offering LUCIE Editions, limited edition posters made by master photographers recognized at The Lucie Awards. These Lucie Honorees represent some of the most important photographers of the 21st century.

I just purchased Kareem and Wilt by master sports photographer John Biever, the 2012 Lucie Honoree for the Achievement in Sports Photography Award. There are 450 unsigned limited edition posters, size 18" x 24", and 50 signed limited edition posters, also the same dimensions. The unsigned poster is available for $25, and signed is $50. Shipping was $9.50.

I love being surrounded by great photography in my workplace. I find images like this inspiring. These posters are beautiful and affordable. You might want to take a look.

Do You Like Film?

Take a look at theAnalogstory - Film Photography in the Digital Age. We cover great 35mm cameras, personal stories from film photographers, quick tips, and even a camera shop. Stop by, won't you?

Want to Comment on this Post?

You can share your thoughts at the TDS Facebook page, where I'll post this story for discussion.

This is The Digital Story Podcast #553, October 11, 2016. Today's theme is "If Only One Tradeshow." I'm Derrick Story.

Opening Monologue

Photo Plus Expo is right around the corner, Oct. 19-22 at Javits Convention Center in New York City. It combines the best U.S. expo hall for photographers, and excellent conference program, and the opportunity to photograph once of the best street shooting cities in America. And if I could go to only one trade show a year, Photo Plus would be it. I explain why in today's show.

If Only One Tradeshow

I've attended a half dozen Photo Plus shows over the years and have loved everyone of them. Sometimes I was working, other times teaching, but always exploring and interacting. Here are five reasons why I highly recommend this event.

blue-ny.jpg

It's in New York! - This alone makes it worth attending. PPE is the perfect excuse to escape to Manhattan for street shooting, deli sandwiches, night life, and the electricity that is always switched on there. Plus you can finally make that pilgrimage to B&H Photo.

Terrific Expo Hall - More than 225 top quality exhibitors all under one roof. It's more intimate than Photokina, but much larger and diverse than Photoshop World and other mid-sized events. Over the course of my stay, I usually take at least three tours of the exhibits.

Meet Other Photographers - There are more than 21,000 of you there, and most of them are just as happy to be attending as you are. The years that I've been an exhibitor there, I thought the NY crowd was the most interesting to interact with. In this online world we live in, it's so nice to be in the same space as other enthusiasts.

Solid Conference Program - The PhotoPlus Conference features over 100 seminars, including Photo Walks, Master Classes, new One Day Intensive Classes, and Keynotes. If there's a photographer whom you've wanted to meet, chances are good he'll be there teaching.

Great Floor Demos - If you can't afford a conference pass, you can get into the Expo Hall for $20 (if you buy now) and enjoy great presentations in many of the large booths including Canon and Nikon. I think the demos are PhotoPlus are top drawer.

If you're in the New York area, I recommend attending the Expo on Friday Oct. 21 instead of Saturday the 22nd. The floor is less crowded and the exhibitors are still fresh.

In the News

The Cameras You All Really Want Are Only Going to Get More Expensive (via ThePhoblographer)

If you've noticed something about the price points of cameras, you'll realize that they're only becoming more and more expensive. That's because of a number of factors including the slow crush of most point and shoots from phones and exactly what they're capable of doing. Add onto that the fact that the prosumer market is growing and willing to spend a lot more money to get the image quality they want, and you'll now get what we wanted in some ways or another: the camera and high end photography industry is now something only available to the rich and those that truly want to spend the money to create something inspired by their creative passion.

At the same time, many of you know exactly what lots of us have known for a while now: cameras are so good that you can pretty much use anything out there and get the image that you want. It makes sense when like four companies make all the sensors! What you eventually end up paying for then are more features, horsepower under the hood, and far better image quality potential that will force you to make a more careful decision. For example, how many of you really need 42MP sensors in your camera? What about 24MP? Or what about 16MP? Do you really need a more revamped autofocus or will you be alight with focusing and recomposing? We all love talking about gear, but sometimes it truly isn't necessary.

52 Projects for 2017

52 photography projects: A photo idea to try every week of the year

Here are five of my favorite from this excellent list.

  • Water drop art - The basic idea with this project is to suspend a container of liquid and let drops fall through a small hole, then capture the resulting splash.
  • Minimalist mono landscapes - Instead of cramming an entire view into a single frame, shoot a series of minimalist long exposure landscapes instead.
  • Time-lapse photo - How many of us have the time to fit time-lapse photography into the daily routine? Force yourself to try this addictive technique by making it one of your photo projects for 2017.
  • The 50 x 50 x 50 project - Take 50 pictures in 50 days using nothing more than a 50mm lens. A simple project idea that really helps to develop your photographic eye.
  • Self-publish a photo book

Follow Us on Apple News for iOS Devices

I'm happy to announce that The Digital Story, The Nimble Photographer, and theAnalogstory are all available on the Apple News App for iOS devices. Just click on the following links on your iPhone or iPad, then save us to your Favorites.

Updates and Such

Big thanks to all of our Patreon members! I was able to pay for the podcast server and the backup system from last month's pledges. Your contributions are making a positive impact.

I'll be announcing the 2017 TDS Workshop season by the end of October. And I have to tell you, this is our most exciting lineup to date. Keep eye peeled!

B&H and Amazon tiles on www.thedigitalstory. If you click on them first, you're helping to support this podcast. And speaking of supporting this show, and big thanks to our Patreon Inner Circle members.

And finally, be sure to visit our friends at Red River Paper for all of your inkjet supply needs.

See you next week!

More Ways to Participate

Want to share photos and talk with other members in our virtual camera club? Check out our Flickr Public Group. And from those images, I choose the TDS Member Photo of the Day.

Podcast Sponsors

Red River Paper - Keep up with the world of inkjet printing, and win free paper, by liking Red River Paper on Facebook.

MacPaw Creators of CleanMyMac 3 and other great software for Apple computers. Visit www.macpaw.com today.

Hedge for Mac - The fast solution for moving photos and videos from memory cards to drives, or drives to drives for that matter. Learn more at Hedge for Mac.

The Nimbleosity Report

Do you want to keep up with the best content from The Digital Story and The Nimble Photographer? Sign up for The Nimbleosity Report, and receive highlights twice-a-month in a single page newsletter. Be a part of our community!

Want to Comment on this Post?

You can share your thoughts at the TDS Facebook page, where I'll post this story for discussion.
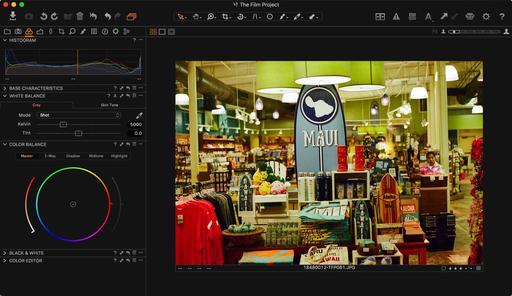
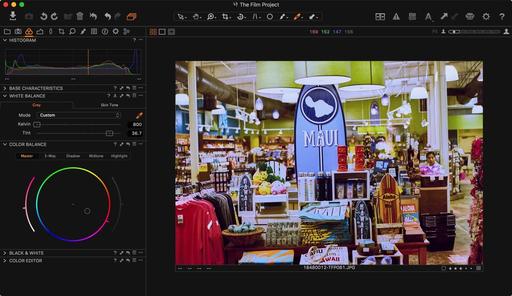
Existing light street photography is a blast, but it sometimes leads to off-putting colors. Fortunately, the images can easily be corrected in two steps using Capture One Pro.

original-image.jpg Original image captured in a shop in downtown Lahaina, Maui.

Here's the original image captured on Kodak 400 negative film. Whether the picture is analog or digital, the same sort of things can happen with artificial lighting. The first step is to go to the Color Tab in Capture One Pro and make a White Balance adjustment.

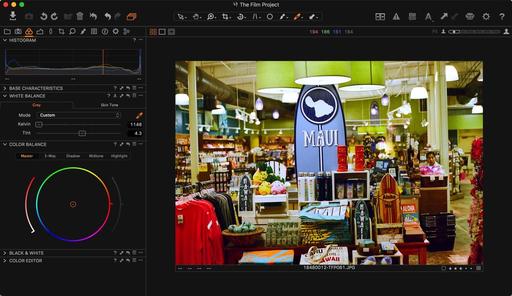
I use the eye dropper and click on a neutral tone in the image. This gets me half way there. The correction is an improvement, but not exactly what I want. I could continue to fine tune with the Kelvin and Tint sliders in the White Balance tool if I wanted. But I have another option too.

white-balance-adj.jpg Using the White Balance adjustment certainly helps.

What I prefer to do, however, is to use the Color Balance tool that's right beneath White Balance. Since my main problem is the green hue caused by the fluorescent lighting, I offset it with moving the center circle indicator towards the red.

I'm I'm not exactly sure what I need to do, I can move the circle indicator all around until I find something that I like. Since this is a global adjustment affecting highlights, shadows, and mid-tones, I start my work within the Master tab. But I often continue to play with the different options in the Color Balance panel. I like the 3-Way Control that provides adjustments for shadows, highlights, and mid-tones individually.

color-balance-v2.jpg Being able to fine tune with the Color Balance tool provides even more control.

Just like everything else in Capture One Pro, you can save these adjustments as presets, or Copy and Apply the settings to other images that have similar lighting problems. The entire process is very fast. And getting rid of unwanted color casts really improves existing light images in urban settings.

More Capture One Pro Tips and Techniques

Improve your skills by watching Capture One Pro Essential Training now available on lynda.com. More than 5 hours of tips, tricks, and techniques. Plus many free movies using advanced techniques.

I've also created a dedicated Capture One Pro Training page on The Digital Story. You can follow all of the tips and techniques that I publish in one convenient spot.

Thinking About Making the Transition from Aperture or Lightroom? - Download my free eBook titled, Rocky Nook's Guide to Moving to Capture One Pro. I show you the steps to create a test library, then build the foundation for a smooth transition to Capture One Pro.

Want to Comment on this Post?

You can share your thoughts at the TDS Facebook page, where I'll post this story for discussion.
Even though I shoot mirrorless most of the time, I still like using my Canon 5D Mark II. When I made the transition to Micro Four Thirds, I sold many of my Canon optics to pay for the new gear. As a result, I have a few gaps in my DSLR kit.

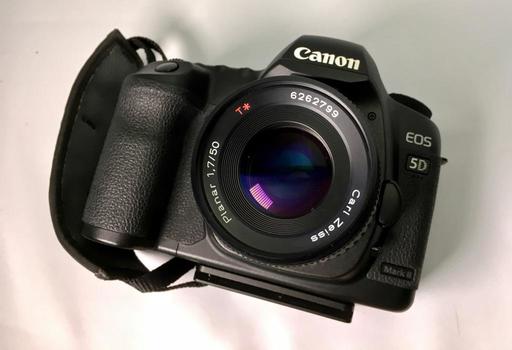
One of those gaps was a macro lens. My beautiful Canon 100mm L Macro fetched a great price on the used market. It was a good call to sell it. So now, when I want to shoot close with the 5D, I use this rig that leverages my Zeiss lenses that I have on hand for film photography.

IMG_2169.jpg

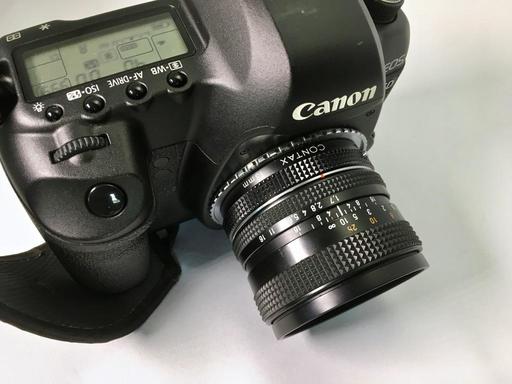
The macro rig that I've cobbled together uses a Zeiss 50mm f/1.7, Contax 13mm extension tube, and a Fotodiox lens mount adapter. If I had to buy this stuff, which I didn't, it would run me about $175 on the used market. And if I substituted an excellent Yashica 50mm for the Zeiss, total cost drops to about $65. (But it's so hard to resist the Zeiss...)

IMG_2172.jpg

The 13mm extension tube combined with the 50mm focal length provides excellent magnification. I shoot in manual mode, setting the aperture on the lens, then adjusting the shutter speed until the readouts are correct in the viewfinder. Since macro photography is a bit slower than other types of shooting, using manual exposure and focusing isn't really a handicap.

macro-web.jpg Canon 5D Mark II with Zeiss 50mm lens and Contax 13mm extension tube. Aperture set to f/1.7. Photos by Derrick Story.

Much of the work I do with the Canon is in the studio, and having a array of full frame optics to complement the handful of EOS zooms I kept, feels like a real luxury. And the image quality is terrific.

We're on Apple News!

Find us now on the Apple News App for iOS! Just open this link on your iOS device, then add The Digital Story to your Favorites.

Want to Comment on this Post?

You can share your thoughts at the TDS Facebook page, where I'll post this story for discussion.
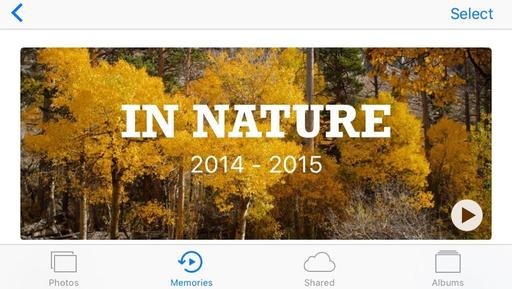
Photos users still exploring the new features on their Macs should not overlook the addition of Memories to their iPhones. In some ways, the mobile version surpasses the desktop experience.

IMG_2120.jpg

What makes sense about Memories on an iPhone is that it's the perfect device to share our experiences with others. And the ability to enhance a handful of images by creating professional looking slideshows with just a tap on the screen elevates the entire presentation.

Test it for yourself right now. Tap on the Memories button at the bottom of the Photos interface and turn your device to sideways to landscape mode. Tap the play button in the right corner, and Photos will build a slideshow based on the images in that Memory and start playing it.

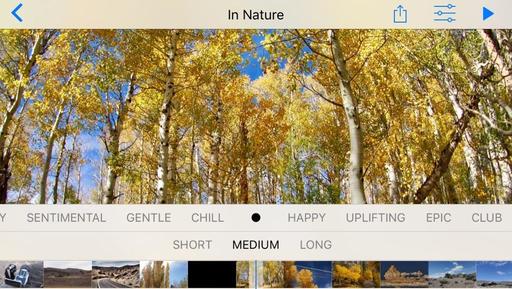
Terrific. But you can step in and fine tune the presentation. Tap on the screen again to reveal the controls, as shown below.

IMG_2123.jpg

Directly beneath the image appears a row of themes you can choose from, things like Sentimental, Gentle, and Chill. And if you have enough slides, right below that is a second row that lists three durations, Short, Medium, and Long. So depending on the mood that you want to convey, and the amount of time your viewer has, you can reconfigure the presentation with just two taps on the screen.

For even more control, tap on the Adjustments icon in the upper left corner. Now you have additional editing options for the title, music, duration, and specific images included in the slideshow. Tap Done once you've made your changes.

You can share the presentation beyond your iPhone by tapping the Share button at the top of the screen. All of the usual suspects are available, including Facebook, YouTube, and Vimeo.

I recommend building your Memories on the desktop version of Photos for macOS. It's easier than working on the phone, and everything is instantly shared via iCloud anyway. But when it's time to show off the pictures, design the presentation on the fly for your viewer, then blow their socks off. It really is impressive.

Master Photos for OS X

(It's More Powerful than You Think)

For hands-on tutorials, be sure to take a look at Photos for OS X Essential Training on lynda.com. I cover everything you need to know to get the most from this surprisingly powerful image management application.

More Help and Insights on Photos for OS X

Don't forget about the Photos for OS X Special Feature Section on The Digital Story. It's a roundup of tutorials, videos, and articles focused on helping you master Apple's latest photo management software. You can also find it under Photography in the top nav bar.

Want to Comment on this Post?

You can share your thoughts at the TDS Facebook page, where I'll post this story for discussion.
This is The Digital Story Podcast #552, October 4, 2016. Today's theme is "Off-Season Projects." I'm Derrick Story.

Opening Monologue

Over the next few months, the days will shorten and the weather becomes less favorable for North American photographers. So after we've had our fill of Fall color, it's time to think about projects that we shelved during the long days of summer. This week I offer a few ideas for you to consider during your photography off-season.

Off-Season Projects

When I was mowing lawns to augment my income during those college days, I liked the Winter. I might not have made as much money, but I enjoyed working on my gardening equipment in the garage during those crisp Southern CA winter days. And now, as a photographer, I have similar feelings about getting my business in order for the next busy season. Here are a few suggestions for your downtime.

Migrate to Capture One Pro - Aperture users who have been procrastinating the move to Capture One Pro might want to tackle that project this Fall. Then everything will be in order for the start of the New Year. (Or, Give Photos for macOS a Second Chance - Now that macOS Sierra is live, consider looking at Photos 2.0 and the available editing extensions for it. It's come a long way since its initial release.

IMG_1906.jpg

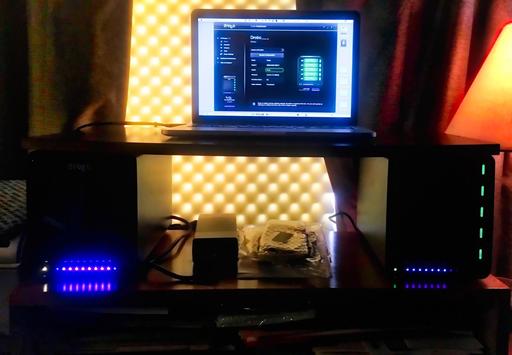
Upgrade Your Backup System - Are your hard drives beginning to budge at the seams? Maybe it's time to research new hardware and update your archiving system.

Make 12 Fine Art Prints - The ultimate backup system is committing a dozen of your finest images from the last year to paper. Printing is a great off-season project. And the level of satisfaction that you'll experience is off the charts.

Digitize Negatives and Slides - Since you can't be out taking pictures, how about leveraging images that you've already captured? By digitizing selecting film shots, you can put that work to use.(Maybe even add them to your upgraded photo management system...)

Catalog Your Photo Gear - Most likely, you've added a few items since your last inventory. Maybe this is the year you'll finally create that gear inventory system.

These are all projects that you can initiate, then work on them as you have time. But the most important part is getting started.

In the News

New MacBook Pro 13-inch and 15-inch likely announced by the end of October. If you're ready to update your laptop, you might want to hang on just a couple more weeks. Word on the street is that we'll see an announcement soon, and considering that there hasn't been a substantial update since Spring of 2015, this one could be good. The top rumored feature is the OLED touch bar being referred to as the Dynamic Function Row. We also might see Touch ID, Thunderbolt 3, and of course, lots of upgrades under the hood.

Drobo Dairies

So, once you've backed up your Capture One Catalogs to a new Drobo 5Dt, can you run them straight off the drive? The answer is yes!

How to Up Your Instagram Game, 16 Tips from Chris Burkard (2M Followers)

via Petapixel

Here are five of my favorites from this cool article by Chris.

  • Focus on telling a great story, write a great caption
  • Add a location to your photo for higher engagement
  • If you comment, most people will check out your account
  • Only use relevant hashtags
  • Use editing apps like VSCO & Snapseed

Follow Us on Apple News for iOS Devices

I'm happy to announce that The Digital Story, The Nimble Photographer, and theAnalogstory are all available on the Apple News App for iOS devices. Just click on the following links on your iPhone or iPad, then save us to your Favorites.

Updates and Such

I'll be announcing the 2017 TDS Workshop season by the end of October. And I have to tell you, this is our most exciting lineup to date. Keep eye peeled!

B&H and Amazon tiles on www.thedigitalstory. If you click on them first, you're helping to support this podcast. And speaking of supporting this show, and big thanks to our Patreon Inner Circle members.

And finally, be sure to visit our friends at Red River Paper for all of your inkjet supply needs.

See you next week!

More Ways to Participate

Want to share photos and talk with other members in our virtual camera club? Check out our Flickr Public Group. And from those images, I choose the TDS Member Photo of the Day.

Podcast Sponsors

Red River Paper - Keep up with the world of inkjet printing, and win free paper, by liking Red River Paper on Facebook.

MacPaw Creators of CleanMyMac 3 and other great software for Apple computers. Visit www.macpaw.com today.

Hedge for Mac - The fast solution for moving photos and videos from memory cards to drives, or drives to drives for that matter. Learn more at Hedge for Mac.

The Nimbleosity Report

Do you want to keep up with the best content from The Digital Story and The Nimble Photographer? Sign up for The Nimbleosity Report, and receive highlights twice-a-month in a single page newsletter. Be a part of our community!

Want to Comment on this Post?

You can share your thoughts at the TDS Facebook page, where I'll post this story for discussion.
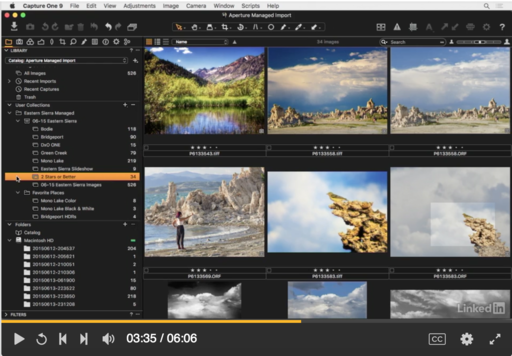
Capture One Pro has arguably the best Aperture library import tool available. You can simply open a new Capture One Catalog, go to File > Import Catalog > Aperture Library, and begin the transition from Aperture to Capture One Pro.

After doing so, how do your Aperture images look in C1? Is the library structure retained. How does the RAW processing compare?

In this 6-minute video, I show you how an Aperture library looks in Capture One Pro. And without giving away too much, I'll tell you now that the transition is pretty darn smooth.

If you've been procrastinating making the move from Aperture to Capture One Pro, this movie should provide some motivation. And since we are going into the off-season for photographers, why not make this your end of year project? Then you can start 2017 with a fresh Capture One catalog.

captureone-aperture_import.png

More Capture One Pro Tips and Techniques

Improve your skills by watching Capture One Pro Essential Training now available on lynda.com. More than 5 hours of tips, tricks, and techniques. Plus many free movies using advanced techniques.

I've also created a dedicated Capture One Pro Training page on The Digital Story. You can follow all of the tips and techniques that I publish in one convenient spot.

Thinking About Making the Transition from Aperture or Lightroom? - Download my free eBook titled, Rocky Nook's Guide to Moving to Capture One Pro. I show you the steps to create a test library, then build the foundation for a smooth transition to Capture One Pro.

Want to Comment on this Post?

You can share your thoughts at the TDS Facebook page, where I'll post this story for discussion.