November 2019 Archives

If you have a co-worker, friend, or family member who loves photography, and you want to give them a holiday gift, something nice, but without spending more than $50 (and less if you can!), what do you do? How about this... Here's a sure-fire list of ideas that you can get delivered quickly enabling you to show up at the event with treasure in hand.

The recipient will first be impressed by your photography prowess, and second delighted with the item itself. Take a look and see what you think.

ultrapod.jpg

Pedco UltraPod Lightweight Camera Tripod - UltraPods are the best. They are light, compact, yet quite sturdy. And you can easily stash one in any camera bag, purse, or backpack for stabilized picture taking on the go. They're perfect for group shots (that you want to be in), night exposures, long exposures, video recording, and time-lapse photography. And if all of that wasn't good enough, you can get an UltraPod for just $9.95!.

tenba-wrap-v2.jpg

Tenba Protective Camera Wrap - 16" - These are so clever. Wrap your camera in one and any bag becomes a camera bag. You can stash your camera in a backpack, purse, suitcase... you name it, and it will be safe and accessible. This Tenba wrap features smooth interior lining of water-repellent silicone-coated rip-stop nylon with velcro corners and a soft knit, velcro-compatible fabric that allows it to be rolled, folded, or wrapped into many configurations. This smart camera or lens accessory will only set you back $17.95!.

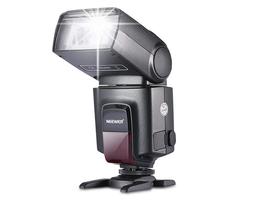
neewer-flash.jpg

Neewer TT560 Flash Speedlite for Canon, Nikon, Panasonic, Olympus, Pentax, and Other Cameras with Standard Hot Shoe - The cool thing about this flash is that it works on practically any camera that has a hot shoe, so you don't have even know what they shoot with. There are 8 steps of manual power output, making it perfect for off-camera portraits and home studio lighting. There isn't automated flash exposure, but that isn't an issue for many types of photography. And the best part is, this is quality gear for only $26.

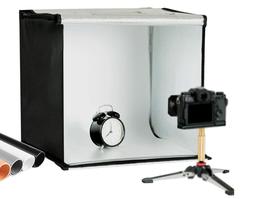
folding-Studio.jpg

SUNCOO 16" Portable Shooting Tent with LED Light with 4-Color Background - It's easy to set up and use. (So you can keep it folded and stashed in the closet when not needed.) The bright, reflective material on the side walls provides ample light for photographing small to medium size items, and from a variety of angles as well. Perfect for eBay sellers and ETSY creators. It's suitable for both DSLR and smartphone shooting. And you can score this portable, foldable studio for only $49.99!.

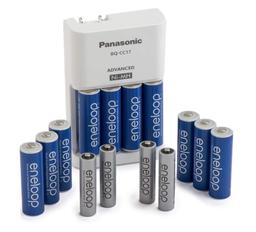
rechargable-battery.jpg

Panasonic Eneloop Power Pack with 10 AAs, 4 AAAs, and Advanced Battery Charger - What photographer (or anyone else for that matter) doesn't need rechargeable batteries? And these are some of the best. Not only do they maintain 70 percent of their charge after 10 years (when not in use), you can recharge these cells up to 2,100 times. They are perfect for flashlights, electronic flashes, camera motor drives, LED lighting, and more. This entire kit will rock anyone's world, and you can get everything for only $42.88!.

This is your opportunity to go beyond "the gift card" into territory once thought far too mysterious for any non-photographer. Have a great holiday season, and enjoy those whom you get to share it with.

There are product links in this article that contain affiliate tags. In some cases, depending on the product, The Digital Story may receive compensation if you purchase a product via one of those links. There is no additional cost to you.

You can share your thoughts at the TDS Facebook page, where I'll post this story for discussion.

This is The Digital Story Podcast #715, Nov. 26, 2019. Today's theme is "Photographer's Gift Guide - 2019 Edition" I'm Derrick Story.

Opening Monologue

Photographers aren't the easiest bunch to buy for, that is, unless you have a fully-vetted gift guide at your disposal. And that's exactly what I'm going to share with you today - 5 items ranging from affordable to well, slightly more than that, each and every one will be a delightful surprise for the visual artist in your life, even if that person is you.

Photographer's Gift Guide - 2019 Edition

Feeling a little stumped for gift ideas this holiday season? Take a gander at this list.

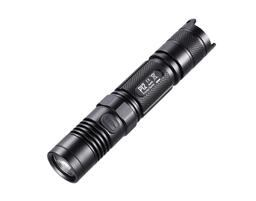
LED-Flashlight.jpg

  • Nitecore P12 LED Tactical Pocket Flashlight ($42) - Built for durability, the light features an aluminum housing with a Type III hard-anodized black finish that resists scratching and corrosion. It is O-ring sealed to be IPX8-rated submersible to 6.6' and impact-resistant to 5'. A textured diamond pattern is machined into the handle to provide a sure grip, and there is a removable tactical ring that fits on the handle for use with a 'cigar-style' two-handed pistol grip. Using separately sold Nitecore mount and remote switch accessories, it can be used as a weapon light. The light can run on 1 x 18650 or 2 x CR123 li-ion rechargeable, or 2 x CR123 disposable batteries. There is reverse-polarity protection that prevents damage to the light's circuitry if the batteries are put in incorrectly.
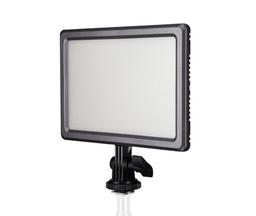
  • Light-Panel.jpg

  • Nanlite LumiPad 11 Bi-Color Soft LED Panel ($49) - Handy for use on or off-camera, the LumiPad 11 Bi-Color Soft LED Panel from NanLite is a versatile 6.5 x 4.5 x 1.4" light source with solid control features at a price point that makes it a good choice for both part-time and full-time shooters. Its wide beam spread, and soft output are well-suited for portrait, wedding, group video, and photography, while its thin 1.4" profile allows placement where larger lights can't go. The light has color that's CRI-rated at 95 for accurate rendering and variable from 3200 to 5600K to meet any ambient light challenge or to blend in seamlessly with other fixtures. Light intensity is variable from 0 to 100%, while the fixture's quiet air-cooling is an asset, especially in sound-sensitive situations. The LumiPad 11 is ready for worldwide use via an optional 110-240 VAC power adapter, but it can also run on separately-purchased batteries when mains power is unavailable via its NP-F battery plate.
  • SanDisk 500GB Extreme Portable USB 3.1 Type-C External SSD ($89) - Designed for saving and editing high-resolution photos and videos, the 500GB Extreme Portable USB 3.1 Type-C External SSD from SanDisk provides users with up to 500GB of storage for their creative content work, as well as a 10 Gb/s USB 3.1 Type-C interface, which is also known as USB 3.1 Gen 2 and delivers read speeds of up to 550 MB/s. Additionally, this SSD is IP-55 rated and features resistance against water, dust, and shock. It can withstand a water flow of up to 30 kPA for 3 minutes, 1500 g of shock, and 5 gRMS of vibration @ 10-2000 Hz. It can also withstand drops of up to 6.5' on a concrete floor and temperature extremes, with operating temperatures ranging from 32 to 113�F and storage temperatures ranging from -4 to 158�F.
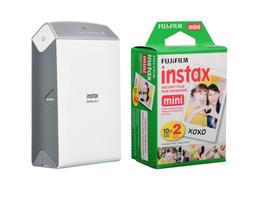
  • Fujifilm-Printer.jpg

  • FUJIFILM INSTAX SHARE Smartphone Printer SP-2 with Instant Film Kit (Silver) ($94) - The silver FUJIFILM INSTAX SHARE Smartphone Printer SP-2 allows you to print photos shot with a smartphone or tablet using FUJIFILM's free downloadable INSTAX SHARE app for Android and iOS. Each print measures 2.4 x 1.8" with up to 320 dpi resolution and prints in approximately 10 seconds. A reprint button lets you make additional copies. Choose from several templates and filters, and upload your images to social networking sites. The SP-2's battery recharges in approximately 90 minutes. This twin pack of FUJIFILM INSTAX Mini Instant Film contains 20 sheets of instant color film that is compatible for use with the INSTAX Mini series of cameras.
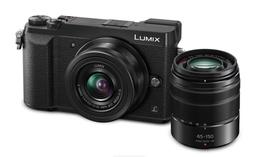
  • Lumix-MFT-Camera.jpg

  • Panasonic Lumix DMC-GX85 Mirrorless MFT Digital Camera with 12-32mm and 45-150mm Lenses (Black) ($448) - This is a deal with $550 in savings making it more than half off. Complementing the imaging attributes (16MP sensor with dual stabilization), the camera also incorporates both a 2.76m-dot electronic viewfinder as well as a 3.0" 1.04m-dot touchscreen LCD, which has a tilting design to better enable working from high and low angles. Built-in Wi-Fi is also integrated into the design, which facilitates wireless image transferring and remote camera control from linked smartphones or tablets.
  • dji-mavic-mini.jpg

  • DJI Mavic Mini ($399) -The Mavic Mini from DJI is a compact drone that offers professional-quality results with no restrictions. Thanks to its small size, the Mavic Mini can fly where larger drones are legally not permitted, or where a drone license is required. This freedom of flight is combined with a stabilized 3-axis gimbal and sophisticated flight modes, which can achieve up to 12MP images, 2.7K Quad HD videos, and complex cinematic shots with just a touch in the DJI Fly app.
    Another advantage of the Mavic Mini's size is that it can stay in the air longer. The Mini drone features up to 30 minutes of flight time on a full battery charge. The included controller is designed to work with Android and iOS smartphones, letting you easily fly the drone while maintaining a low-latency HD video feed from the gimbal from up to 2.5 miles away. To help get started, DJI includes a flight tutorial in the DJI Fly app, making the Mavic Mini an ideal drone solution for beginners to professionals alike.

How I Became a 40mm Lens Guy

There's something about 40mms that's just perfect for me. I have a bit more breathing space for composing than I do with a 50mm optic. Yet, it's not too wide like I often experience with 35mm lenses. It's just right for this street photographer kind of guy.

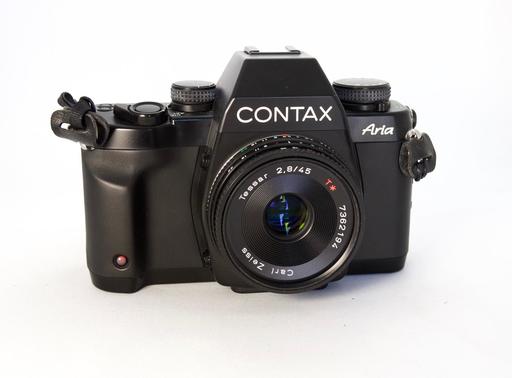
But this revelation didn't come to me overnight. It evolved over years, beginning with a lens that wasn't 40mm at all: the Zeiss Tessar 45mm f/2.8 for my Contax film camera. I wanted this lens because it was a super compact pancake that would travel nicely on my Contax Aria. I loved it from the beginning, even though it wasn't the fastest at f/2.8, or quite as wide as a true 40mm. I still shoot with it today.

You can read the entire article here to see all the optics that I'm currently a fan of.

New Details for Our Upcoming LA Street Photography Experience

This 3-day event on March 13-15 explores classic Los Angeles locations and architecture. Our excursions will take us as far west as Venice Beach, as well as famous movie spots and the back streets of this fascinating Southern California area.

Our HQ will be in a cozy Santa Monica neighborhood, not far from the iconic Santa Monica Pier and the Metro Rail station. From there we'll ride the rail into the heart of LA urban culture, making stops along the way to explore. We will also spend a day photographing Venice Beach with all of its So Cal charm and charisma. What a dream for urban explorers!

You will learn new techniques for safe and effective street photography, how to capture the vibe of great architecture, and enjoy some classic California cuisine along the way.

Olympus Educator, Mike Boening, is our co-instructor. Those of you who have worked with Mike at our SF Street Photography events know how much he brings to the table. Not only is he an official Olympus Educator, he's an accomplished street photographer, and he's going to bring gear for you to test and learn about.

If you want to join Mike and me this coming March, just visit the information and registration page, or go to www.thenimblephotographer.com and click on the Workshops link, or go to the Olympus site - no matter how you get there, Mike and I are looking forward to working with you this coming Spring.

Do You Have a Film Camera that Needs a Good Home?

Over the last year, I've received donations from TDS members who have film cameras that need a good home. What I do is inspect the items, repair and clean as I can, then list them in TheFilmCameraShop where I can find a good home for them. If you're interested in donating, please use the Contact Form on TheNimblePhotographer site. And thanks for you consideration!

Updates and Such

Inner Circle Members: A big thanks to those who support our podcast and our efforts!

B&H and Amazon tiles on www.thedigitalstory. If you click on them first, you're helping to support this podcast. (The Digital Story is supported by its audience. When you purchase through links on our site, we may earn an affiliate commission.) And speaking of supporting this show, and big thanks to our Patreon Inner Circle members:

Affiliate Links - The links to some products in this podcast contain an affiliate code that credits The Digital Story for any purchases made from B&H Photo and Amazon via that click-through. Depending on the purchase, we may receive some financial compensation.

And finally, be sure to visit our friends at Red River Paper for all of your inkjet supply needs.

See you next week!

More Ways to Participate

Want to share photos and talk with other members in our virtual camera club? Check out our Flickr Public Group. And from those images, I choose the TDS Member Photo of the Day.

Podcast Sponsors

Red River Paper - Keep up with the world of inkjet printing, and win free paper, by liking Red River Paper on Facebook.

Skillshare is an online learning community with thousands of classes for creators, entrepreneurs, and curious people everywhere. Get two months of learning for free by visiting www.skillshare.com/tds.

The Nimbleosity Report

Do you want to keep up with the best content from The Digital Story and The Nimble Photographer? Sign up for The Nimbleosity Report, and receive highlights twice-a-month in a single page newsletter. Be a part of our community!

Want to Comment on this Post?

You can share your thoughts at the TDS Facebook page, where I'll post this story for discussion.

How I Became a 40mm Lens Guy

PB250339.jpg

There's something about 40mms that's just perfect for me. I have a bit more breathing space for composing than I do with a 50mm optic. Yet, it's not too wide like I often experience with 35mm lenses. It's just right for this street photographer kind of guy.

But this revelation didn't come to me overnight. It evolved over years, beginning with a lens that wasn't 40mm at all: the Zeiss Tessar 45mm f/2.8 for my Contax film camera. I wanted this lens because it was a super compact pancake that would travel nicely on my Contax Aria. I loved it from the beginning, even though it wasn't the fastest at f/2.8, or quite as wide as a true 40mm. I still shoot with it today.

PB250336.jpg How it all started: The Zeiss 45mm Tessar on my Contax Aria.

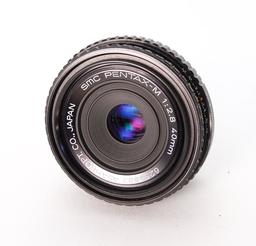
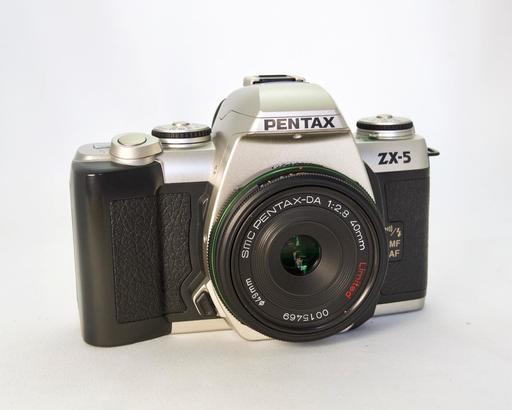
The good experience (and photos!) with the Zeiss, led me to the doorstep of the Pentax 40mm f/2.8. There are two versions: the older Pentax-M manual focus model, and the newer Pentax-DA autofocus version. After some research, I learned that the AF version works great on full frame cameras as well. You've got to be kidding me! This was too good to be true. But it is. So I use it for both film photography on the ZX-5, and for digital work on the Pentax KP digital body.

What a beautiful optic! I love the width of composition I can achieve with the 40mm focal length, not to mention how compact the lens is. The only drawback, if you consider it one, is the maximum aperture of f/2.8. The journey continues, but what a lovely discovery these two lenses were. Again, I use them both today.

PB250340.jpg The Pentax 40mm-DA on a film Pentax ZX-5. This lens works wonderfully on both my analog and digital cameras.

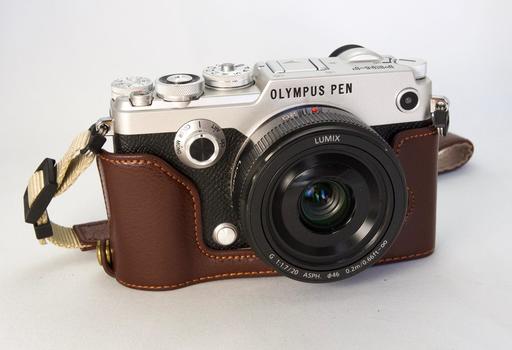
About this time, I wanted something similar for my Micro Four Thirds digital bodies. And that's when I found the Panasonic Lumix G 20mm f/1.7 II ASPH. lens that now lives on my Olympus PEN-F. And I'm not exaggerating when I write, "lives there." The 20mm optic paired with a MFT sensor gives me that 40mm effective focal length that I love, but with a fast f/1.7 maximum aperture. Add to that the super-handy Olympus 2X doubler mode, I can switch to 80mm with just the press of a button. And as you would imagine, the images this tandem produces are beautiful!

PB250346.jpg Olympus PEN-F with Panasonic 20mm f/1.7 prime.

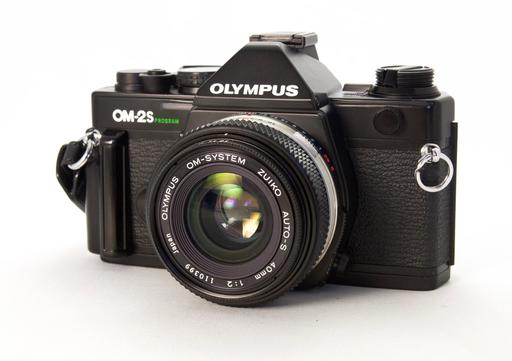
Speaking of Olympus, I then discovered a lens that I didn't even know existed: the OM-40mm f/2.0 manual focus prime. I had read that it was very popular with journalists in the 35mm film days, and I can see why. It's super compact, fast, and sharp. And when you pair it with an OM camera, such as my OM-2S Program, you have an extremely nimble package that's a great street shooter.

These are a bit hard to find, but I scored a very nice one from a photographer in England. It is now my go-to lens for all of my OM cameras, and I particularly like it on the OM-2S. I hardly ever shoot with anything else.

PB250345.jpg Olympus OM-2S Program with Olympus Zuiko 40mm f/2.0 pancake prime.

And this leads me to the lens that I've yet to secure, but want badly: the Voigtlander Ultron 40mm f/2 SL IIS Aspherical Lens for Nikon F. Typically, I have the Nikon 50mm f/1.8 on my Nikon FG, FA, and FM cameras. But after falling in love with the 40mm focal length for my other shooters, the 50mm now just seems too confining.

So I'm saving up for this final 40mm in my collection. I can see it mounted on my black FG while I explore urban landscapes all across the planet. I'll let you know if I ever get my hands on the Voigtlander. That will be a happy day indeed.

The thing I like best about those 40mm optics is that I don't have to carry anything more than my camera with the one lens. I can shoot portraits, urban, landscape, and close-ups, all with the same nimble kit.

I still have, and use, other focal lengths for my professional work and for assignments that require wider, longer, or faster. But when it's a Sunday afternoon with just a favorite camera, it's the 40mm that's mounted on it.

There are product links in this article that contain affiliate tags. In some cases, depending on the product, The Digital Story may receive compensation if you purchase a product via one of those links. There is no additional cost to you.

You can share your thoughts at the TDS Facebook page, where I'll post this story for discussion.

Whether it's a cherished photo from a family album or an artistic image captured on expired film, you can easily breath life into the picture while still retaining the unique qualities of analog photography. And the best part is if you're a Mac user, you already have the app to do so.

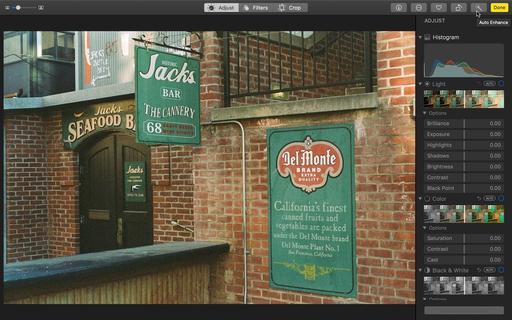
Original-Film-Shot-1600.jpg Del Monte Plant No. 1 captured in expired Kodak Gold 200 with a Nikon FM and Nikon Series E 50mm f/1.8 lens. I like the shot, but it was just a bit too off-color for my tastes. Photo by Derrick Story.

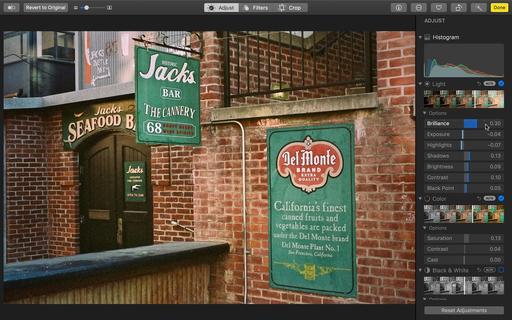
Finished-Editing-1600.jpg After just a few clicks in Photos for macOS, I found a sweet spot between the original image and one that I much prefer, but still retaining the original film feel.

Once the image is digitized, here are the 3 steps.

  • Auto Enhance - Photos does a very good job of analyzing film images and applying light-handed corrections to them. I always start with Auto Enhance (what looks like a magic wand), then fine tune from there.
  • White Balance - I prefer using White Balance with the eye dropper to Cast correction. I think WB is better suited to film. I select the Temp/Tint option in the WB popup menu, then click the dropper on a neutral tone area. You can adjust to taste from there.

  • Improve Detail - Definition is great for enhancing midtone contrast and sharpness. If you feel the image needs a bit more, then apply Sharpen as well.

At this point, you should be in great shape for sharing or making a print or two. If you want to keep fiddling, then take a look at the Retouch Brush for any dust spots, Vignette for directing the viewer's eye, and Noise Reduction if you want to tone down the grain a bit.

Your finished product will still have that lovely analog feel to it, but will be fine tuned to your tastes.

Coming Soon! Look for my training on LinkedIn Learning and lynda.com titled, Photos for macOS Catalina and iPadOS that shows you all the amazing things you can do with this new software. Hope to release this title in late November/early December. In the meantime, you can watch Photos for macOS Mojave right now. It will provide you with the info you need for making great slideshows!

You can share your thoughts at the TDS Facebook page, where I'll post this story for discussion.

This is The Digital Story Podcast #714, Nov. 19, 2019. Today's theme is "Luminar 4 - One Redesign Too Many?" I'm Derrick Story.

Opening Monologue

This week launched with a bang as Luminar 4 hit the streets early Monday morning. And even thought it's too early to judge if it's going to be a runaway success or roadkill, the redesigned Edit module has many version 3 users steering for the exits. We'll take a closer look today and try to determine if this is just a mere fender-bender or will result in a total disaster. Hope you enjoy the show.

Luminar 4 - One Redesign Too Many?

The minute I opened my first picture to edit in Luminar 4, I knew that comments that would immediately surface after its public release.

To be perfectly honest, Skylum chose to fix something that wasn't broken (the Edit module) and ignore the thing that really needed work (the Library module). My prediction is that this will not be a popular release with Luminar 3 users, many of whom will be angry and disappointed all at the same time.

003-AI-Structure-1600.jpg

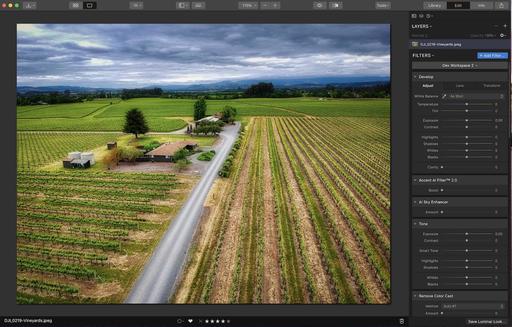
So, what potentially has gone wrong here. While ignoring the under-powered Library module all together, they chose to redesign the Edit module, and as part of that process eliminate the flexibility of Workspaces. What this means is that the adjustment filters must remain in their pre-assigned categories and can't be grouped to individual needs.

To potentially offset this misstep, Skylum did introduce new filters and improved a few existing ones. Here's an overview of those.

  • New AI Sky Replacement filter
  • New AI Skin Enhancer filter
  • New Portrait Enhancer
  • New Smart Contrast
  • New AI Structure Filter
  • Improved LUT Mapping/li>
  • Improved Golden Hour Filter
  • Improved Denoise Filter
  • Improved Adjustable Gradient Filter

That's a lot of new stuff, and I was impressed by the AI filters. They're smart, and for the most part, work as advertised.

But I think existing users are going to start to run out of patience with Skylum's seemingly whimsical approach to UI design. In addition to the new AI filters, what Luminar 4 needed was a big step forward with the Library. And that just didn't happen.

And since Luminar 3 is Catalina compatible on the Mac platform, there's really no compelling reason to upgrade unless you feel the need for the new AI filters.

It appears that Skylum needs to recalculate their direction with future updates of Luminar if they want to hold on to their existing audience.

Luminar 4 is available now for $89 for new users and as a $69 upgrade for those who already own a license.

New Details for Our Upcoming LA Street Photography Experience

This 3-day event on March 13-15 explores classic Los Angeles locations and architecture. Our excursions will take us as far west as Venice Beach, as well as famous movie spots and the back streets of this fascinating Southern California area.

Our HQ will be in a cozy Santa Monica neighborhood, not far from the iconic Santa Monica Pier and the Metro Rail station. From there we'll ride the rail into the heart of LA urban culture, making stops along the way to explore. We will also spend a day photographing Venice Beach with all of its So Cal charm and charisma. What a dream for urban explorers!

You will learn new techniques for safe and effective street photography, how to capture the vibe of great architecture, and enjoy some classic California cuisine along the way.

Olympus Educator, Mike Boening, is our co-instructor. Those of you who have worked with Mike at our SF Street Photography events know how much he brings to the table. Not only is he an official Olympus Educator, he's an accomplished street photographer, and he's going to bring gear for you to test and learn about.

If you want to join Mike and me this coming March, just visit the information and registration page, or go to www.thenimblephotographer.com and click on the Workshops link, or go to the Olympus site - no matter how you get there, Mike and I are looking forward to working with you this coming Spring.

Souping Up My Olympus E-M5 Mark II to Feel More Like an E-M1X

I wanted to do some extended shooting with my Olympus OM-D E-M5 Mark II, so I dug out the HLD-8 Power Battery Holder, which adds a second battery. After getting both parts attached, I experienced a noticeable Deja Vu moment. The rig felt a lot like the OM-D E-M1X that I had recently tested.

Since I hadn't used this older kit for a while, I had forgotten how wonderful the Power Battery Holder felt and operated. It provides shutter buttons with rotating collars in both horizontal and vertical positions, plus two additional function buttons for the vertical grip. There's even a second dial in the vertical position, so you have twin dials regardless of the orientation. The additional BLN-1 battery holder is much more accessible than the port on the bottom of the camera. And you gain a headphone jack as well. It's very comfortable and balanced in both positions. Why didn't come back to this long time ago?

Do You Have a Film Camera that Needs a Good Home?

Over the last year, I've received donations from TDS members who have film cameras that need a good home. What I do is inspect the items, repair and clean as I can, then list them in TheFilmCameraShop where I can find a good home for them. If you're interested in donating, please use the Contact Form on TheNimblePhotographer site. And thanks for you consideration!

Updates and Such

Inner Circle Members: A big thanks to those who support our podcast and our efforts!

B&H and Amazon tiles on www.thedigitalstory. If you click on them first, you're helping to support this podcast. (The Digital Story is supported by its audience. When you purchase through links on our site, we may earn an affiliate commission.) And speaking of supporting this show, and big thanks to our Patreon Inner Circle members:

Affiliate Links - The links to some products in this podcast contain an affiliate code that credits The Digital Story for any purchases made from B&H Photo and Amazon via that click-through. Depending on the purchase, we may receive some financial compensation.

And finally, be sure to visit our friends at Red River Paper for all of your inkjet supply needs.

See you next week!

More Ways to Participate

Want to share photos and talk with other members in our virtual camera club? Check out our Flickr Public Group. And from those images, I choose the TDS Member Photo of the Day.

Podcast Sponsors

Red River Paper - Keep up with the world of inkjet printing, and win free paper, by liking Red River Paper on Facebook.

Skillshare is an online learning community with thousands of classes for creators, entrepreneurs, and curious people everywhere. Get two months of learning for free by visiting www.skillshare.com/tds.

The Nimbleosity Report

Do you want to keep up with the best content from The Digital Story and The Nimble Photographer? Sign up for The Nimbleosity Report, and receive highlights twice-a-month in a single page newsletter. Be a part of our community!

Want to Comment on this Post?

You can share your thoughts at the TDS Facebook page, where I'll post this story for discussion.

Luminar 4 Review - The Focus Is on AI

Most folks who follow Skylum have known that Luminar 4 has been in the works for some time. We've seen teasers for the new AI-powered tools and probably even seen posts about pre-order offers.

But only when you download the real thing and begin to work on a picture do you realize that this is a much different animal. And depending on how you felt about Luminar 3 (personally, I liked it a lot), will color your opinion about version 4, especially in Edit mode.

Redesign of the Editing Side Panel

001-Lum4-Edit-Mode-1600.jpg Edit Mode in Luminar 4. Photo by Derrick Story.

Edit-Mode-Normal-Lum3-1600.jpg Editing Mode in Luminar 3.4.1, which is compatible with macOS Catalina. Photo by Derrick Story.

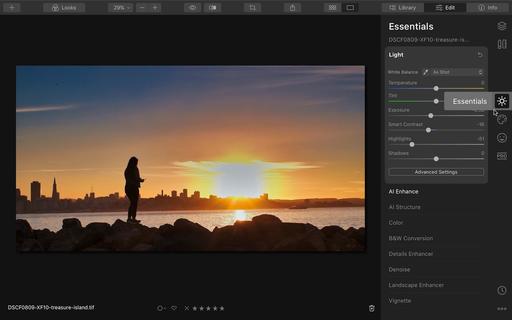
Other than the addition of new adjustment sliders that Skylum calls Filters, the redesigned Editing Side Panel is the thing that really jumps out at you. All of the Filters are now permanently seated within 5 categories: Essentials, Creative, Portrait, Pro, and Legacy.

When I write "permanently seated," I'm not kidding. You will need to memorize where your favorite filters are in order to keep a smooth workflow. For example, one of my favorite filters is the Orton Effect. I use it for many different types of images. It's now located in the Portrait category. I can't move it to Essentials or Pro, and I can't create my own workspace with just the filters that I like. (Workspaces are gone, BTW.)

Newcomers to Luminar probably won't give this much thought. But those who have been using it regularly are in for an adjustment. I'll be curious to see what the reaction is from existing users. Generally speaking, software companies want to avoid radical UI changes from version to version. Just ask Adobe about that.

The Tools (Crop, Erase, Clone) have been moved from the top Editing Toolbar to the Editing Side Panel. This makes sense to me, and I like the placement of each in the Sidebar. All of the major editing functions are now in one location. A simplified Crop button does still reside in the top Toolbar, but I'm guessing that Skylum did that so you could access it in Library mode as well.

Interesting New AI Filters

AI SKY REPLACEMENT

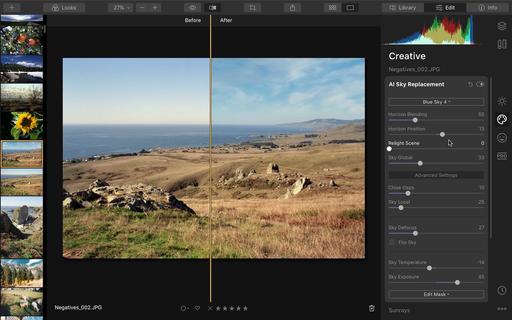
Whether or not you're a fan of artificial intelligence for image editing, some of these new filters are worth experimenting with just to see what can be done these days. A good place to start is with the AI Sky Replacement filter found in the Creative category.

002-AI-Sky-Replacement-1600.jpg AI Sky Replacement Filter - The original sky is on the left and the AI new sky is on the right. Photo by Derrick Story.

This filter couldn't be easier to use. And that's saying something for how powerful it is. Open an image with a bland sky, go to the creative category and click on the AL Sky Replacement title. The panel will open to a "sky selection" menu and a handful of sliders. I recommend clicking on Advanced Settings to reveal even more sliders. They're all useful.

You can choose from the abundance of sky images that are preloaded in the app, or you can point Luminar to your own sky shots. (This might be a good reason to start collecting more of those as opportunities present themselves.) Once you make your selection, Luminar knows where to put it. You can then play with the various sliders to get the enhancement exactly the way you want.

One word of caution: make sure the direction of lighting in the sky matches the lighting on the ground. There are a lot of sharp-eyed photographers out there who will call out a mismatch. Avoid that, and you can have a lot of fun with this creative filter.

AI STRUCTURE

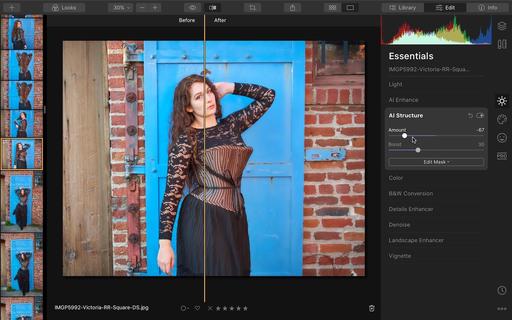
This is potentially a very useful filter because you can not only increase the structure in an image, but you can decrease it as well.

003-AI-Structure-1600.jpg AI Stucture is found in the Essentials category. Photo by Derrick Story.

A natural use is for portraits because the artificial intelligence helps protect skin detail while giving you the ability to enhance the environment. In my testing, the skin tones were protected when you increased structure. But if you decreased structure, the skin tones were softened as well.

I think I'm fine with this programming decision. But I think it would be best if the skin were not affected at all, and let the photographer address that with the other tools in the app. That being said, it's a very useful adjustment, especially if applied with restraint. I like it a lot.

New Portrait Tools

A common request from Luminar users was for better portrait adjustment tools. Luminar 4 should check that box. It contains an entire panel of interesting stuff for our people pictures.

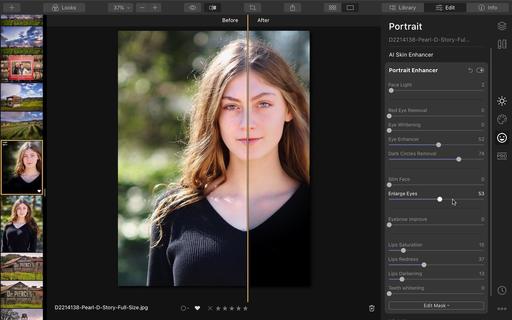
004-Portrait-Tools-1600.jpg The Portrait Enhancer panel contains a dozen tools for adjusting your people shots. Photo by Derrick Story.

The Portrait category leads off with AI Skin enhancer that does precisely what you would expect. Move a slider and the skin looks better. Check the box next to AI Skin Defects Removal (I may have selected a different name for this), and blemishes are whisked away as well.

Next in line is Portrait Enhancer. Here you have a collection of a dozen sliders that range from enhancing eyes, to adding more color to lips, to brightening teeth. Everything worked as advertised. Again, I advise showing restraint, however.

And finally, there's High Key and Orton Effect, which aren't new, but now reside here.

The Library and Stuff

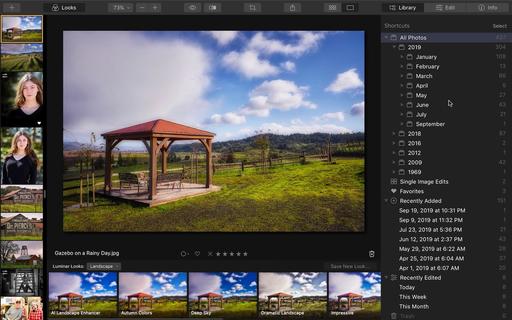
With all the changes in Luminar 4, I was surprised to see that the Library was virtually untouched.

005-Library-1600.jpg The Library view in Luminar 4. Photo by Derrick Story.

The Skylum team seems to be placing all their bets on the AI technology for image adjustment and hoping the existing library doesn't get in the way. Since many Lightroom and Photos for macOS photographers use Luminar as a plugin/editing extension (where there library is a non-issue), then focusing on AI-powered tools seems like a good call.

However, if Luminar wants to gain ground as a standalone photo management/enhancement application, Skylum at some point will have to improve the functionality of the Library.

On a positive note (that I believe is related to this), Luminar 4 still supplies plugins for Photoshop, Lightroom, and Aperture, and an Editing Extension for Photos for macOS. That's a great call! I'm not sure what this means for the future of Luminar Flex, however.

Performance

On my 2014 MacBook Pro running Mojave, Luminar 4 had reasonable performance. In Preferences, I set aside 10 GB for caching, and I allowed Luminar to tap the graphics processor (a new preference option). There were some hiccups, but for the most part, the application was steady. It also ran well on my 2017 iMac.

There's still room for improvement on the performance front. But I feel like Luminar 4 is going in the right direction.

Side Notes

One of my favorite filters, Image Radiance, is no longer available. However, the Mystical Filter, in the Creative Group, feels a lot like Image Radiance. Golden Hour, Denoise, and the Adjustable Gradient filters have all been reworked and improved.

After I upgraded my Luminar 3 library to Luminar 4, I was able to open it again in Luminar 3. Not surprisingly, the edits I made in Luminar 4 weren't visible in Luminar 3, but all of the images were there.

Bottom Line

Photographers new to Luminar will most likely be impressed with its cornucopia of intelligent adjustments and its ease of use. And for a relatively modest investment of $89 for first-time customers, it's a good value.

Those who like Luminar 3, either as a standalone app or a plugin, might want to keep an open mind when considering investing $69 for an upgrade to Luminar 4. On one hand, some of the new tools such as AI Sky Replacement and AI Structure could be worth the price of the upgrade alone. On the other, however, those fundamental changes to the editing interface might be frustrating, while the Library module received no love at all.

The good news is, there's a 7-day trial version available, so you can decide for yourself.

There are product links in this article that contain affiliate tags for Skylum products. The Digital Story may receive compensation if you purchase a product via one of those links. There is no additional cost to you.

You can share your thoughts at the TDS Facebook page, where I'll post this story for discussion.

As a photographer, I think it's important to document the world around me. And when something big happens, even more so. Here's a recent example from the fires in Northern California last month. Let me take a few steps back.

Once we were allowed back home after the mandatory evacuation for the Kincade Fire, we spent the first week getting our lives in order. But once the daily rhythm returned, it was time to explore the neighborhood with camera in hand.

chalk-hill-2048.jpg The entrance to Chalk Hill Winery. Fujifilm XF-10. Photo by Derrick Story.

The first place I wanted to see was Chalk Hill Winery, just north of our house. At the peak of things, they had the fire bearing down on them as it traveled south from Windsor. Even though there were major burn areas at the winery (such as the entrance as shown above), fire fighters managed to protect the big structures. Chalk Hill released this statement about the close call:

""From all of Foley Family Wines, we would like to extend a sentiment of extreme gratitude for the heroic efforts of all first responders in fighting the Kincade fire. With one winery located in Geyserville [Foley Sonoma], and three on Chalk Hill Road [Lancaster, Roth and Chalk Hill], we certainly feared for the worst. We are relieved and grateful to report that, although a few of our properties suffered damage to non-essential buildings and equipment, all employees are accounted for and safe while our wineries escaped major damage."

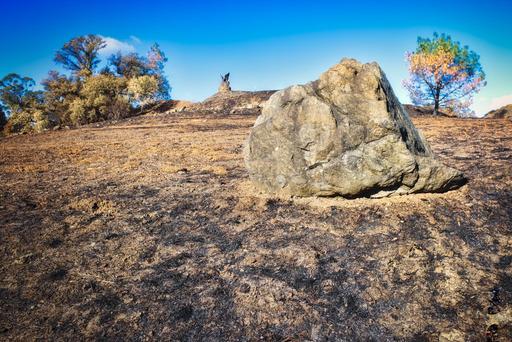
Just down the road and heading South back to my place, I saw a number of homes that had been saved. Some of them had burn areas all around, but the structures themselves were intact. These were incredible testaments to the tenacity of the fire fighting crews.

PB150737-v2.jpg Home spared from the fire. Notice the burned trees directly behind the house (that is not Fall color!) and the scorched area out front to the right. Olympus PEN-F with 14-42mm zoom. Photo by Derrick Story.

Further South on Faught Road, not far from Shilo Regional Park, there was an area where the trees were cut down to create a fire break. Some of them were burning at the time.

IMG_5468.jpg Trees cut to create a fire break. iPhone X in panorama mode. Photo by Derrick Story.

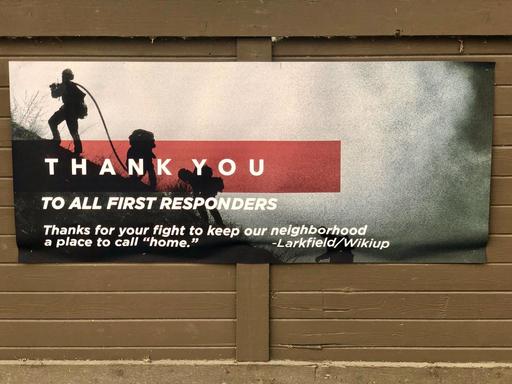
In the neighborhoods that were saved, there are signs everywhere thanking the first responders for their courageous efforts. We saw reports that showed how fighters would line up their trucks nose to tail to draw a line to protect a neighborhood. People who live here understand how good these professionals are at their jobs.

IMG_5450.jpg Neighborhood Thank You Sign. iPhone X. Photo by Derrick Story.

I keep a visual diary with notes using Day One Classic that's loaded on my Mac, iPad, and iPhone. One of the things that I like about keeping the diary is that it motivates me to get out and photograph the world around me, plus keep track of day to day milestones and family.

As much as I love travel photography and assignment work, documenting my personal life and the world outside my front door is just as satisfying. That being said, I hope I won't need to take any more post-fire pictures for a long, long time.

You can share your thoughts at the TDS Facebook page, where I'll post this story for discussion.

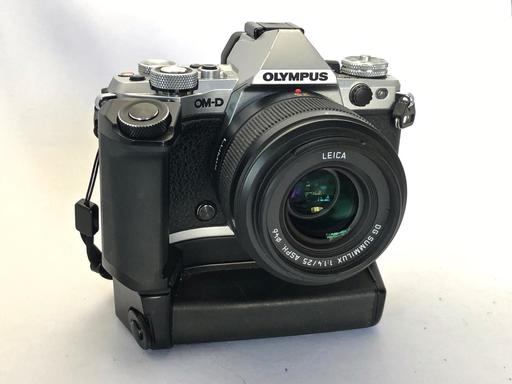
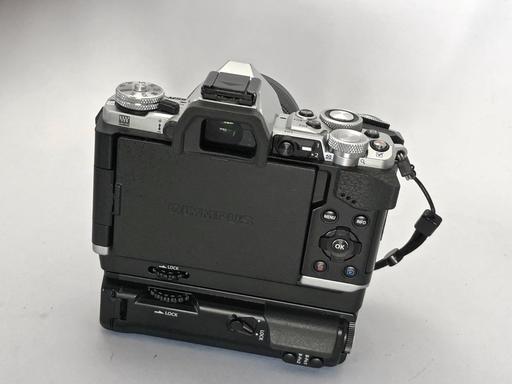
I wanted to do some extended shooting with my Olympus OM-D E-M5 Mark II, so I dug out the HLD-8 Power Battery Holder, which adds a second battery. After getting both parts attached, I experienced a noticeable Deja Vu moment. The rig felt a lot like the OM-D E-M1X that I had recently tested.

IMG_5453.jpg Olympus OM-D E-M5 Mark II with the HLD-8 Power Battery Holder.

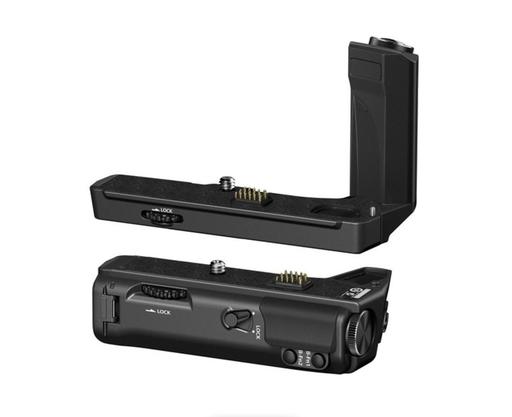
Since I hadn't used this older kit for a while, I had forgotten how wonderful the Power Battery Holder felt and operated. It provides shutter buttons with rotating collars in both horizontal and vertical positions, plus two additional function buttons for the vertical grip. There's even a second dial in the vertical position, so you have twin dials regardless of the orientation. The additional BLN-1 battery holder is much more accessible than the port on the bottom of the camera. And you gain a headphone jack as well. It's very comfortable and balanced in both positions. Why didn't come back to this long time ago?

both-parts.jpg The two-piece kit is quite versatile. You can use just the grip without the battery holder, gaining extra comfort and the headphone jack on the left end. Or you can use them together for even more functionality.

As far as I can tell, we won't have the same option with the OM-D E-M5 Mark III that's offering the more basic ECG-5 Grip without battery holder. Those are nice, but it isn't as versatile as the HLD-8 kit.

If you have an E-M5 Mark II that you shoot with, you can purchase the HLD-8 for $279. In the camera's menu system, you can prioritize battery usage so the BLN-1 in the grip is tapped first, leaving the cell in the camera for backup use. You can also program the vertical function buttons. It really changes the camera.

IMG_5455.jpg

By no stretch of the imagination does a $279 purchase make your trusty E-M5 Mark II an E-M1X. But I have to say, it feels similar. And I think I'm going to stick with this going forward for my E-M5.

There are product links in this article that contain affiliate tags. In some cases, depending on the product, The Digital Story may receive compensation if you purchase a product via one of those links. There is no additional cost to you.

You can share your thoughts at the TDS Facebook page, where I'll post this story for discussion.

This is The Digital Story Podcast #713, Nov. 12, 2019. Today's theme is "Which Photo Software Should You Use?" I'm Derrick Story.

Opening Monologue

For many photographers, the quest for the right photo management software continues. You would think, now that we're two decades into the digital age, that the dust would have settle. But if anything, the landscape is more cloudy than ever. On today's podcast I share insights from our photography community on what they're using and why. I hope you enjoy the show.

Which Photo Software Should You Use?

As part of my job, I have to be somewhat software agnostic. That doesn't mean that I don't have my favorites. But I try to discuss as many viable applications as possible. Because, quite honestly, one of them might be best for you.

For a while there, it looked like things had settled in to Lightroom, Aperture, and iPhoto. But then Apple turned over the cart, and we seemed to be right back where we started.
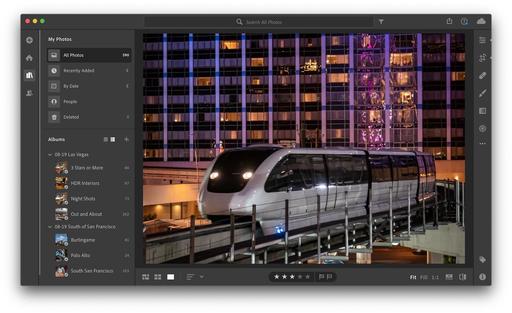
lightroom-lv.jpg

This did, however, open the door for new software to make the scene that might have otherwise received no attention. And now we have many choices.

I polled our Inner Circle members, they shared what apps they're using now. Here's the list in defending order.

  • Photos for macOS - 30 votes
  • Adobe Lightroom Desktop Version - 26 votes
  • Other - 20 votes
  • Adobe Lightroom, Creative Cloud Version - 19 votes
  • Adobe Photoshop, with or without Bridge - 15 votes
  • Capture One Pro - 15 votes
  • OnOne Suite - 9 votes
  • DxO PhotoLab - 6 votes
  • Exposure X5 - 1 vote

I think Charles sums up the position of many photographers these days: "I primarily us Lightroom Classic to manage and edit my images. I use Photoshop if and when the image requires PS's advanced editing capabilities. Apple's Photos app is used primarily to share images with my Apple centric family. While Lightroom (formerly Lightroom CC) gets used mostly so I can check what's going on in the Creative Cloud. I also use Lightroom Mobile, Luminar and Aurora HDR. Since I've been a Lightroom user since its first beta, I don't think I'll ever change as long as Adobe keeps up its current rate of advancing the platform."

Andrew adds: "Lightroom Classic is my go to now but I use Capture Pro for my my Fuji pictures. I still miss the organisational abilities of Aperture. My workflow is built around Lightroom now and that is my biggest barrier to change. I think things like Luminar are interesting from a processing perspective but it's difficult to find a time to experiment. Lightroom CC and Photos I mainly use to support mobile devices."

Andrew, a former Aperture user, writes: "Nothing has quite replaced Aperture. However, Capture One meets most of my needs although the catalogue isn't quite there. I think Photos is better than many people think and good enough for most. Plugins cover the gap in process. Luminar's catalogue features are pretty basic at the moment, but it's a great plugin."

And finally, Rob chimes in: "I am sticking with LR /PS. A lot of images are in it and I know them well enough for what I do. I do use Luminar and photolab ( they do the best noise reduction ). Luminar I use but via the flex plugin. I find it too slow for culling.
Not mentioned but I do like LR mobile on my iPad and it's ability to synchronize with LR desktop. I can do edits and share easily enough that way.
I just tried PS for the iPad. Very disappointed. How can you release a product without refine edge ? For now on the iPad I am sticking with affinity on the iPad.

I then went over to our TDS Facebook page where I asked the question: ""Which Photo Software Should You Use?" - And I want your input. What do you love/hate about the photo software that you're using now."

Lawrence wrote: "My current software suite is Lightroom for catalog management along with light editing (can't say I love it, but I've stuck with it because of the tagging/collections/rating I've done there over the years. I also use Luminar for heavier editing but I am VERY disappointed that they made a big deal out of Libraries, but then quietly dumped supporting import of Lightroom Libraries). I'm also not thrilled with their move into compositing with sky removal. And lastly, I use a series of other tools as plugins to Lightroom (Excire visual search, ON1 B&W conversion, TopazLabs DeNoise AI)"

Jim added a very interesting comment: "I use Lightroom Classic. I did switch fully to Lightroom CC because I love the idea of having my images in the cloud (backed up locally of course) because I want to move to a mobile only workflow doing all my editing and management on the iPad. It's so much more convenient for travel! I was very pleased with Lightroom Cc but then I discovered a big issue. The mobile applications (phone and iPad) actually store a smart preview of EVERY image and there is no limit on how much space it will use on your mobile device. I confirmed with Adobe that it will consume 100% of device capacity if needed. That was a show stopper that caused me to switch back. None of the other Adobe competitors will work for me because none of them offer desktop, mobile and cloud support. Only Adobe offers all three. I hope one of the others like Skylum one day hits all three!"

I think Peter's comment is interesting: "After many years I've been looking for alternatives to LR. Currently using ON1 as my default and like it. Started to develop a rhythm with it. I like that it doesn't rearrange my file structure. The raw processing works fine for me. HDR module is pretty useless IMO, but that's not a deal breaker. Lots of options to fine tune images to get to my vision. I really wanted to like Luminar, but haven't been able to zero in on a workflow I can get my head around. Did get Aurora, their stand alone HDR software to try out. We'll see. Will go back and try brackets that failed in ON1 and see what Aurora gives me. Retraining my brain to new software is a painful process. Actually have to think about what I'm doing."

And finally, Bob adds:" I currently use LR, with Aurora, Luminar, PS, NIK and a few others when LR falls short. I have a lot invested in LR as a DAM, that getting me to switch off of it would require a huge jump in capabilities to go through the effort. Overall, I feel Adobe is abandoning the LR+PS photographers in favor of pursuing their cloud strategy that does NOT work for me."

So where does that leave us? If you prefer the Adobe ecosystem, there are advantages to using Lightroom + Lightroom Mobile + Photoshop as needed. iPhone photographers and Apple fans should definitely revisit Photos and its substantial bullpen of Editing Extensions. Tethered shooters, RAW aficionados, and those who don't care about having a companion mobile app might want to consider Capture One Pro. And if not of these work for you, there's still the OnOne suite, DxO PhotoLab, Luminar with Libraries, and a handful of others.

Skillshare for Photographers

Skillshare-1024.jpg

Skillshare is an online learning community with thousands of classes for creators, entrepreneurs, and curious people everywhere. You can take courses in photography, videography, audio production - you name it, they've got it. So whether you're picking up a new skill for your day job, figuring out your next side project, or pursuing a long-time passion, Skillshare has classes for you.

The photography courses are amazing. One that I recommend is "Documentary Photography: Capturing Places and People" by National Geo photographer Ami Vitale. She is both a great photographer and a compelling personality. And this is just one of many top notch titles on Skillshare.

Join the millions of students already learning on Skillshare today with this special offer for TDS listeners: Get 2 months free. That's right, Skillshare is offering The Digital Story community 2 months of unlimited access to thousands of classes for free. To sign up, go to skillshare.com/tds.

And a big thanks to Skillshare for sponsoring this show!

Don't Stop with Portrait Mode - Make Your iPhone Shots Even Better

You can read the entire TDS article here complete with step-by-step illustrations.

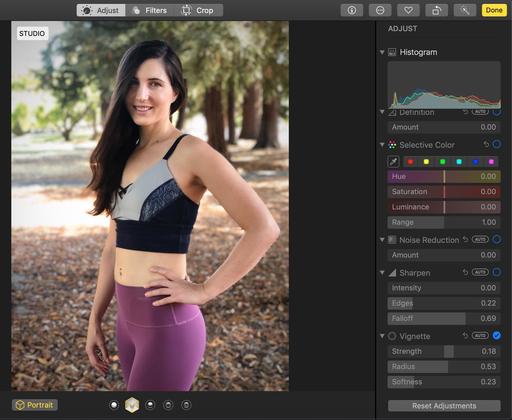
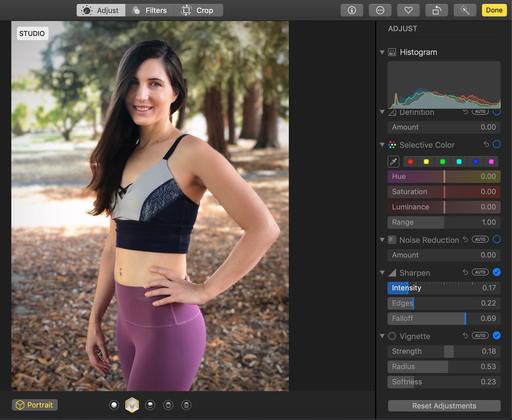
Portrait mode on current iPhones is incredible. Just open the Camera app, slide the options to Portrait, and shoot away. And as impressive as the results initially look, you can make them even better with just a few clicks. Here's how.

  • Choose the best lighting scheme.
  • Improve skin color.
  • Add a soft vignette.
  • Don't forget a dash of sharpening.

Now, thanks to iOS 13 and iPadOS, all of these techniques can be applied on the iPhone and iPad as well, with the exception of White Balance. When in Photos for mobile devices, use the Warmth and Tint adjustments instead.

Our LA Street Photography Experience is Coming this March

This 3-day event on March 13-15 explores classic Los Angeles locations and architecture. Our excursions will take us as far west as Venice Beach, as well as famous movie spots and the back streets of this fascinating Southern California area.

You will learn new techniques for safe and effective street photography, how to capture the vibe of great architecture, and enjoy some classic California cuisine along the way.

Olympus Educator, Mike Boening, is our co-instructor. Those of you who have worked with Mike at our SF Street Photography events know how much he brings to the table. Not only is he an official Olympus Educator, he's an accomplished street photographer, and he's going to bring gear for you to test and learn about.

If you want to join Mike and me this coming March, just visit the information and registration page, or go to www.thenimblephotographer.com and click on the Workshops link, or go to the Olympus site - no matter how you get there, Mike and I are looking forward to working with you this coming Spring.

Updates and Such

Inner Circle Members: A big thanks to those who support our podcast and our efforts!

Podcasting Skills Course - Big thanks to everyone who attended our Podcasting Skills Course this past Saturday. I really enjoyed sharing all of those gems with you.

B&H and Amazon tiles on www.thedigitalstory. If you click on them first, you're helping to support this podcast. (The Digital Story is supported by its audience. When you purchase through links on our site, we may earn an affiliate commission.) And speaking of supporting this show, and big thanks to our Patreon Inner Circle members:

Affiliate Links - The links to some products in this podcast contain an affiliate code that credits The Digital Story for any purchases made from B&H Photo and Amazon via that click-through. Depending on the purchase, we may receive some financial compensation.

And finally, be sure to visit our friends at Red River Paper for all of your inkjet supply needs.

See you next week!

More Ways to Participate

Want to share photos and talk with other members in our virtual camera club? Check out our Flickr Public Group. And from those images, I choose the TDS Member Photo of the Day.

Podcast Sponsors

Red River Paper - Keep up with the world of inkjet printing, and win free paper, by liking Red River Paper on Facebook.

Skillshare is an online learning community with thousands of classes for creators, entrepreneurs, and curious people everywhere. Get two months of learning for free by visiting www.skillshare.com/tds.

The Nimbleosity Report

Do you want to keep up with the best content from The Digital Story and The Nimble Photographer? Sign up for The Nimbleosity Report, and receive highlights twice-a-month in a single page newsletter. Be a part of our community!
IMG_0682.jpg

Want to Comment on this Post?

You can share your thoughts at the TDS Facebook page, where I'll post this story for discussion.
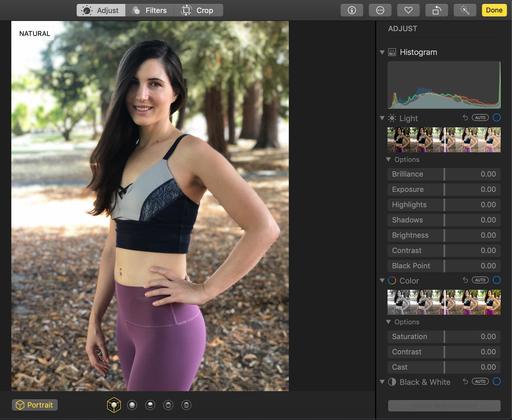
Portrait mode on current iPhones is incredible. Just open the Camera app, slide the options to Portrait, and shoot away. And as impressive as the results initially look, you can make them even better with just a few clicks. Here's how.

001-Original-Portrait.jpg The original photo is good. But we can make it better.

If you have iCloud enabled (and why wouldn't you?), your picture is automatically saved to Photos on the Mac and your other iOS devices. With just a few clicks in Photos, you can take that good image to then next level.

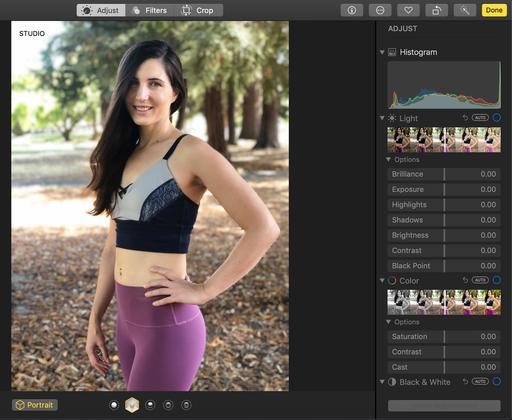
002-Switch-to-Studio.jpg Choose the right lighting scheme. I captured in Natural, but I think Studio looks better.

Regardless of which lighting scheme you captured in, you have the option of switching in Photos. In this case, I think the Studio lighting scheme is more flattering. (Notice the options displayed at the bottom of the image.)

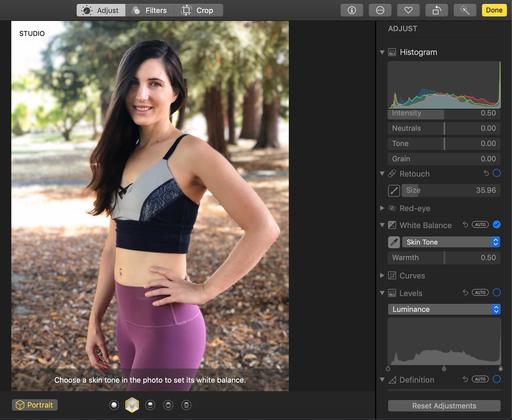
003-Adjust-Skin-WB.jpg Improve skin coloring.

iPhones are generally pretty good with image color. That being said, I've found that there's room for improvement as well. Because we took this portrait in the shade, her coloring was still a bit cool.

I selected White Balance in Photos for macOS, choose Skin Tone from the popup menu, and enabled the eye dropper. I then clicked on her face to adjust the white balance for her particular skin tones in this environment. They looked much better afterward.

004-Soft-Vignette.jpg Adding a soft vignette puts more emphasis on the subject.

One trick that many portrait photographers use is to add a soft vignette to put more emphasis on the subject. The technique is to start with full Strength, adjust the Radius and Softness, then back off Strength until the vignette isn't detectable to viewer. However, even as a subtle effect, it makes a noticeable improvement in the image. (Here I only needed about 20 percent strength for this portrait.)

005-Sharpening.jpg Finally, just a bit of sharpening to clean things up.

The last step is add a dash of sharpening as well. Move the Intensity slider (don't worry about Edges and Falloff - they are fine where they are) to about 20 percent. You don't want to over-sharpen portraits, just restore crispness to the overall image.

If you're in Photos for macOS, press the M key to see your before and after. Using Photos in iPadOS, while still in editing mode, just tap on the image to see the original version.

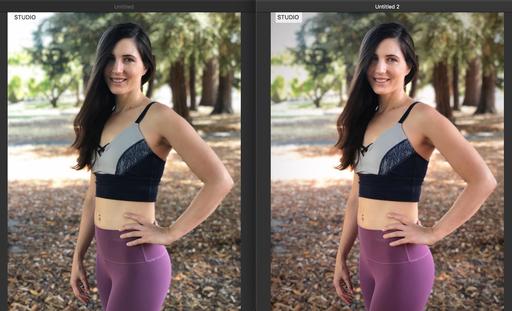
side-by-side.jpg Side-by-Side: A good portrait gets even better. Photos by Derrick Story.

Now, thanks to iOS 13 and iPadOS, all of these techniques can be applied on the iPhone and iPad as well, with the exception of White Balance. When in Photos for mobile devices, use the Warmth and Tint adjustments instead.

Portraits captured with iPhones are truly impressive thanks to computational photography. But the artist in you can take them to the next level. Your subjects will thank you.

And stay tuned for my upcoming training on LinkedIn Learning and lynda.com titled, Photos for macOS Catalina and iPadOS that shows you all the amazing things you can do with this new software. Hope to release this title in November. Stay tuned! In the meantime, you can watch Photos for macOS Mojave right now. It will provide you with the info you need for making great slideshows!

You can share your thoughts at the TDS Facebook page, where I'll post this story for discussion.

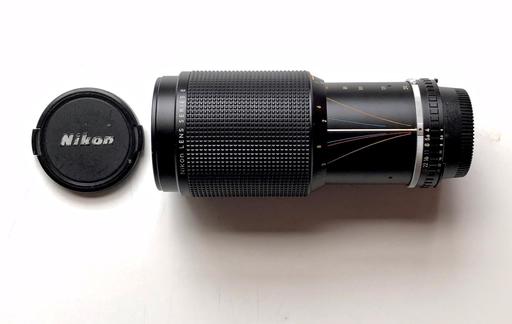
I test a lot of lenses as part of my work running the TheFilmCameraShop. Many of the optics that I sell are purchased to adapt to mirrorless cameras, as well as mounted on their originally-intended film bodies. And the one thing I've learned is that you actually have to take pictures with a lens to determine its usefulness. Don't be fooled by minor front glass imperfections.

IMG_5443.jpg

Case in point: I recently got my hands on a Nikon Series E 70-210mm f/4 manual focus zoom. I had read that the 70-210 was one of the sharpest members of the Series E family. Unfortunately, there was a ring of light haze/fungus beneath the front objective. And there were some additional light hazing around the edges as well.

Typically, this isn't an optic that I can sell in the shop. Most photographers run for the exit as soon as they hear the terms "fungus" or "haze." So this looked like an optic for my personal use.

The good news was that the back of the lens was pristine. My experience has been that the integrity of the back glass is more important than the front optics when it comes to image quality.

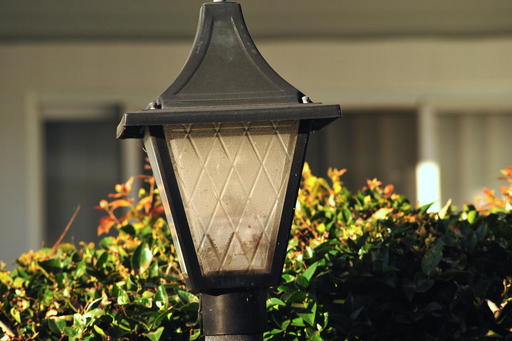
So, I mounted the zoom on my Nikon D700 that I use for testing glass. Here's an image from that series of test shots.

DSC_8669-70-210-test.jpg

The pictures look terrific - great sharpness, good color, and no weirdness that I could detect. I also have some film images at the lab captured with a Nikon FM that I anticipate will shine as well.

My point is this: Adapting vintage glass to mirrorless cameras is a blast. And you can get some great deals, especially if there's some light fungus in the front. As long as the back elements are clean, I wouldn't let a little dust or discoloration deter me. Take the big discount, and go have fun.

You can share your thoughts at the TDS Facebook page, where I'll post this story for discussion.

This is The Digital Story Podcast #712, Nov. 5, 2019. Today's theme is "5 Gear Recommendations for Peace of Mind While Traveling" I'm Derrick Story.

Opening Monologue

After nearly two weeks away from home, and sometimes under truly bizarre conditions, I leaned heavily on my gear to keep me productive and sane while on the road. On today's show, I discuss five important items that helped me accomplish that goal. You may find some of them surprising. But these are all battle tested and ready for action.

5 Gear Recommendations for Peace of Mind While Traveling

When you're packing for a trip, you may think that everything is going to go perfectly, and you don't need to worry about getting stuff done on the road.

IMG_5360.jpg

But if you've spent any amount of time traveling, you know that things rarely go perfectly, and in fact, they can go horribly wrong. The good news is, that being prepared for such situations isn't such a painful exercise. And to do so while keeping it light is even better! Take a look at these gear suggestions for the prepared, happy, nimble photographer.

  • A High Quality Compact Camera - It's ironic to me that compacts have been suffering at the hands of smartphone cameras. But for serious photographers, a versatile, dependable compact allows us to capture a wider variety of shots, yet keep it light, while on the road. Depending on your shooting style, I recommend Olympus TG-6, Canon G5X Mark II, and the Sony RX100 Mark IIV. One footnote about your nimble compact, USB charging is a big plus!
  • Modern Tablet - Laptops are fine when everything is normal and you're sitting comfortably at the dining room table with home WiFi. But when you're dealing with the unexpected challenges of the road, a tablet is where it's at. My iPad mini 5 running iPadOS and with 4G LTE cellular connectivity was a beast on the road. Everything from true web browsing, to article publishing, to text messaging, to image editing, to watching movies on Netflix was handled effortlessly by this compact powerhouse. If I'm going to stay productive on the road, an iPad is required equipment.
  • Ring Doorbell - The $99 Ring Video Doorbell with HD Video was critical for peace of mind when I'm thousands of miles away from home. Not only does it keep track of simple things such as when the pet sitter arrives and leaves, but it notifies me of unexpected package delivery, suspicious activity outside, and in my most recent case, the physical safety of my neighborhood. Fire maps and news reports are one thing, but actually looking at your front porch in real time is a magnitude better.
  • WakaWaka Power+ Light and Charger - I have tried many, many portable chargers over the years, and my favorite remains: the WakaWaka Power+. I like it because it is so incredibly light and compact, yet it provides a 3000 mAh rechargeable battery, 1050 mWatt 22% Sunpower cell, and 2 LEDs (110 lumen/Watt), yet weighs less than 200 grams. I always have one of these in my backpack. It will charge my iPhone, AirPods, and Apple Watch regardless of where I am. PS: don't forget your cords!

  • Vanguard Havana 48-Backpack - I have tested more backpacks over the years than I care to count. Many of them I liked. But the Vanguard Havana 48-Backpack has become my trusty companion on the road. It's affordable at $103, non-photo looking, roomy, and protects my cameras, tablet, and laptop with ease. And most importantly, it has extra room that I invariably need when on the road.

One of the cornerstones of nimble photography is traveling light enough to have your gear with you when moving from Point A to Point B. If you have too much stuff, it becomes burdensome. Yet you want to be prepared for the unexpected.

Every minute that I spent preparing for the last trip paid me back with interest. Technology plus planning can be a powerful combination.

Welcome Skillshare to the TDS Podcast Community

Skillshare-1024.jpg

Skillshare is an online learning community with thousands of classes for creators, entrepreneurs, and curious people everywhere. You can take courses in photography, videography, audio production - you name it, they've got it. So whether you're picking up a new skill for your day job, figuring out your next side project, or pursuing a long-time passion, Skillshare has classes for you.

I'm looking at a course right now about removing background noise from audio recordings, since that's a situation that I run into every now and then. And there's plenty of other topics to help me stay on top of my game. And that's the goal isn't it? Keep getting better.

Join the millions of students already learning on Skillshare today with this special offer for TDS listeners: Get 2 months free. That's right, Skillshare is offering The Digital Story community 2 months of unlimited access to thousands of classes for free. To sign up, go to skillshare.com/tds.

And a big thanks to Skillshare for sponsoring this show!

Adobe fulfills its promise: Photoshop on iPad is officially here

You can read the entire DP Review article here.

Photoshop on iPad relies largely on the same underlying code, but tweaks a few things to account for the more touch-based input method the iPad offers. Like the desktop version of Photoshop, Photoshop on iPad offers full PSD support so working on projects between multiple devices shouldn't be a problem and new projects created on Photoshop on iPad will automatically be saved to Adobe Creative Cloud so you can pick back up on your computer if need be.

As previous reports from beta testers noted, not all of Photoshop's features are present in the current version of Photoshop on iPad. In Adobe's own words, it focused on bringing 'common tasks and workflows that we know will be useful for most Photoshop users.' Specifically, Adobe has included basic adjustments, brushes, cloning, spot healing, cropping, eyedropper, masking, layers and a few other features.

I downloaded it on to my iPad mini 5, and it ran fine. The app recognized my Creative Cloud subscription (Lightroom/Photoshop $9.99 a month), and logged me right in.

I did some work with the healing brush, and the results were good.

Our LA Street Photography Experience is Coming this March

This 3-day event on March 13-15 explores classic Los Angeles locations and architecture. Our excursions will take us as far west as Venice Beach, as well as famous movie spots and the back streets of this fascinating Southern California area.

You will learn new techniques for safe and effective street photography, how to capture the vibe of great architecture, and enjoy some classic California cuisine along the way.

Olympus Educator, Mike Boening, is our co-instructor. Those of you who have worked with Mike at our SF Street Photography events know how much he brings to the table. Not only is he an official Olympus Educator, he's an accomplished street photographer, and he's going to bring gear for you to test and learn about.

If you want to join Mike and me this coming March, just visit the information and registration page, or go to www.thenimblephotographer.com and click on the Workshops link, or go to the Olympus site - no matter how you get there, Mike and I are looking forward to working with you this coming Spring.

Updates and Such

Inner Circle Members: A big thanks to those who support our podcast and our efforts!

Podcasting Skills Course - The course date is scheduled for November 9, 2019. Registration is open now at www.thenimblephotographer.com.

B&H and Amazon tiles on www.thedigitalstory. If you click on them first, you're helping to support this podcast. (The Digital Story is supported by its audience. When you purchase through links on our site, we may earn an affiliate commission.) And speaking of supporting this show, and big thanks to our Patreon Inner Circle members:

Affiliate Links - The links to some products in this podcast contain an affiliate code that credits The Digital Story for any purchases made from B&H Photo and Amazon via that click-through. Depending on the purchase, we may receive some financial compensation.

And finally, be sure to visit our friends at Red River Paper for all of your inkjet supply needs.

See you next week!

More Ways to Participate

Want to share photos and talk with other members in our virtual camera club? Check out our Flickr Public Group. And from those images, I choose the TDS Member Photo of the Day.

Podcast Sponsors

Red River Paper - Keep up with the world of inkjet printing, and win free paper, by liking Red River Paper on Facebook.

Skillshare is an online learning community with thousands of classes for creators, entrepreneurs, and curious people everywhere. Get two months of learning for free by visiting www.skillshare.com/tds.

The Nimbleosity Report

Do you want to keep up with the best content from The Digital Story and The Nimble Photographer? Sign up for The Nimbleosity Report, and receive highlights twice-a-month in a single page newsletter. Be a part of our community!

IMG_0682.jpg

Want to Comment on this Post?

You can share your thoughts at the TDS Facebook page, where I'll post this story for discussion.

Add a Dash of Juxtaposition for Fun

Absolutely we want to come away with meaningful photographs when traveling. Those iconic images add depth to the history of our experiences. But mixing in a little fun adds breadth as well.
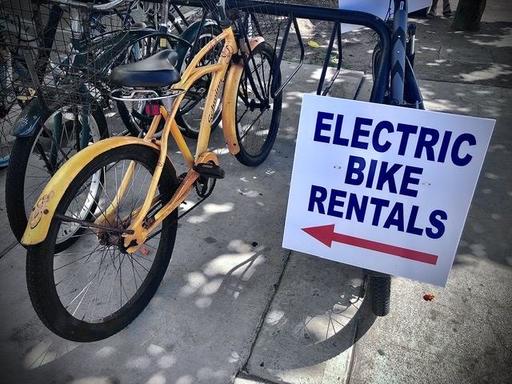
90CAB4BB-BD6A-452C-876E-2C545DF6457B.jpeg Signs that miss the mark are one of my favorite juxtapositions. Photo by Derrick Story.

Many of my humor shots are captured with the iPhone, often when I'm not even thinking about photography. I'm just observing life, and there it is!

That being said, I do think that you have to have the awareness in the back of your mind to begin with. In other words, "I'm not looking for funny shots, but yet I am." Does that make sense? For me it feels like a motion sensor tuned to the ironic.

One last thought: If you do post on social, these are often perfect for engagement. For most folks, the world is plenty serious already. Adding a smile to the day is a gift indeed.

You can share your thoughts at the TDS Facebook page, where I'll post this story for discussion.