January 2009 Archives

michel_bricteux_pa.jpg

Gather ye things together and come witness the terrific collection of images for December's photo assignment, "Group Shot." You can see them all in the Dec. 08 Photo Assignment Gallery. This is quite a collection.

The February 2009 assignment is "Street Shot." Start working on your contribution now. Details can be found on the Submissions page. You can submit photo assignment pictures up to 600 pixels in the widest direction. Please follow the instructions carefully for labeling the subject line of the email for your submission. It's easy to lose these in the pile of mail if not labeled correctly. For example, the subject line for next month's assignment should be: "Photo Assignment: Feb. 2009." Also, if you can, please don't strip out the metadata. And feel free to add any IPTC data you wish (These fields in particular: Caption, Credit, Copyright, Byline), I use that for the caption info.

Good luck with your February assignment, and congratulations to all of the fine contributors for December. It's an excellent collection of images.

Photo by Michel Bricteux.


twitter.jpg Follow me on Twitter

-


Now Available! The Digital Photography Companion. The official guide for The Digital Story Virtual Camera Club.

  • 25 handy and informative tables for quick reference.
  • Metadata listings for every photo in the book
  • Dedicated chapter on making printing easy.
  • Photo management software guide.
  • Many, many inside tips gleaned from years of experience.
  • Comprehensive (214 pages), yet fits easily in camera bag.

Technorati Tags: , ,

iPhoto '09 as Your Geotagging Tool?

ilife_09.png

It's quite possible that iPhoto '09 may turn out to be the easiest way to geotag images for most hobbyist photographers. You don't have to worry about having a camera that tags at capture. Instead, it's very easy to add the information once your images are in iPhoto using the new Places functionality. (And I mean very easy.)

The key to success for me was: once you tag the image in iPhoto, could you export it with that location data? Since geodata is stored in the EXIF, you can't just write to those fields like you can with IPTC metadata (such as your copyright). I had been frustrated with tools such as Maperture, which do a good enough job of tagging while working in Aperture, but when you export the images, the geodata doesn't travel with them.

iphoto_gps_export.jpg

iPhoto '09 fixes that. When you export a geotagged image, be sure to check the box labeled "Include Location information." iPhoto then writes the geodata to the EXIF during export. You end up with a nicely geotagged image that you can share anywhere. I've tested this, and so far, I'm very pleased. I'll follow up with more on this in future posts.

See My Other Posts on Geotagging

First Look at Jobo photoGPS Device and Software

Update to Geotagging Workflow, Including Jobo photoGPS

Finding a Reasonable Geotagging Workflow


twitter.jpg Follow me on Twitter

-


Technorati Tags: , , ,

Image metadata in iPhones

primer-banner.gif

In my film days, I loved fine art B&W prints. I didn't necessarily like the process of producing the prints, particularly working with chemicals, but I did enjoy the final product. I'm in love again, this time making B&W prints via inkjets. The final product looks beautiful, but now I get to bypass the noxious chemicals and work at my desk. It really does feel like the best of both worlds.

This is the first installment of a series on B&W inkjet printing. Today, I have some great starter information to point you to, including recommendations for paper stock. Then, in upcoming installments, I put some of these practices to work on standard inkjet printers such as the Epson R2400.

B&W Printing Primer

As I mentioned in my podcasts, I've been working with Red River Paper, a faithful sponsor of The Digital Story. They recently published an excellent Primer on B&W Printing that covers printers, papers, software, ink, and lots of resources. It's perfect for getting started in this endeavor.

Paper Options

The type of paper you put your image on has a big influence on how it will look. Here's a good paper selection overview for B&W printing that will help you make the right choice for the effect you want to achieve.

A Word About Software

I always start with a color image, usually one that was captured in Raw, then convert a version of it to B&W. This allows me to record all of the information the camera has to offer, and have complete control over the grayscale conversion.

I prefer to work with software that allows me to make virtual copies of the color image. This enables me to try different techniques without cluttering up my hard drive with multiple copies of an image. Aperture and Lightroom both have this ability, plus they both have terrific tools for converting to monochrome and fine tuning the image.

Get Your Tools Together

If you're interested in B&W printing, then read the primer, get your printing supplies together, and decide which software you want to use to manage the project. Then stay tuned for more information here on producing great B&W images from your inkjet. If you have immediate questions or comments, feel free to post them at the end of this article.


twitter.jpg Follow me on Twitter

-


Sponsor Note

Red River Paper -- Try the $7.99 Sample Kit.

Technorati Tags: , ,

ilife_09.png

Now that iPhoto '09 is shipping, I thought that I'd take a moment to address the question, "What to do about iPhoto?" Should you upgrade to the latest version? If you're just setting up iPhoto for the first time, what should you know? And if you want to migrate from iPhoto to a professional photo management application, what's the best way to go? I tackle these questions and more in this week's podcast.

Monthly Photo Assignment

About Face is the January 2009 Photo Assignment. Think about creative ways to make a portrait. It doesn't always have to be the "smiling into the camera" composition. You can read more about how to submit on our Submissions page. Deadline for entry is Jan. 31, 2009.

Listen to the Podcast

Now that I've piqued your curiosity, it's time to listen to today's audio show titled, "What to do About iPhoto?" You can download the podcast here (29 minutes). You can also subscribe to the podcast in iTunes

The Digital Story podcasts are available for direct download from Apple iPhones. I've created a special mobile download page here. Just load the page in Safari, browse the podcast line-up, and click on the one you want to listen to.

Want to share photos and talk with other members in our virtual camera club? Check out our new Flickr Public Group. It's a blast!


twitter.jpg Follow me on Twitter

-


Podcast Sponsors

SiteGrinder lets you take ownership of your websites. Effortlessly output pages right from Photoshop.

Red River Paper -- Try the $7.99 Sample Kit.

Add Magic to Your Slideshows -- FotoMagico presentations are so amazing that your audience will be asking how you did it.


psc_cover_web.jpg

Learn what photographers need to know to organize and edit their images with Photoshop CS4. Take a look at The Photoshop CS4 Companion for Photographers. It fits in your laptop bag and is very easy on your wallet.


Technorati Tags: , , , , ,

e-30_lcd.png

The Olympus E-30 12.3 MP DSLR has brought back a feature I haven't worked with since the film days: true multiple exposure capability. And unlike the film days, with the E-30's Live View functionality, it's much easier to compose your multiple exposure compositions because the previous exposure serves as an overlay while you compose the next. You can combine up to 4 exposures into a Jpeg or Raw file. That's right, the E-30 will build a Raw file for you based on multiple exposure information. After testing this feature, I found this to be a huge asset.

Let's start with a simple 2-shot multiple exposure I captured at Schulz Museum in Santa Rosa, CA. I super imposed my favorite Schulz character, Woodstock (he was a writer after all!) on to a sign with the Schulz logo and museum information. Using Live View, it was simple to make the two-image composition.

woodstock_original.jpg

The challenge I had with multiple exposures in the past, was there was always an element in the shot that I wanted to change. But since the image was already committed to film, there wasn't much I could do about it. Now, thanks to the ability to capture Raw, I have much more flexibility once I return to the computer. The main thing I wanted to do with this image, other than bump the contrast and saturation, was to tone down the top feathers on Woodstock's head because I found them distracting against the logo as shot. (See above image.)

woodstock_schulz_museum.jpg

I first made my global adjustments in Adobe Camera Raw 5.2 (using the workflow I recommend in my book, The Photoshop CS4 Companion for Photographers.) Then I opened the image in Photoshop CS4, and created a new layer for cloning. I completely cloned out the feathers that were on top of the logo, then decreased the opacity for that layer until the image looked the way I wanted. The entire post production process was less than 15 minutes. In part, because the hard work of combining the images was taken care of at capture. All I had to do was a little touch up work.

You can also keep a catalog of images on the xD card in the camera (yes the E-30 has xD and CF card slots) and use them as a stock library for overlays. So you don't even have to create the multiple exposure on the spot. You can sit in the comfort of your home and play with the images you have on the E-30 to create entirely new works of art.

There are many features on the Olympus E-30 that I like, but the ability to combine images -- either at capture or in Play mode -- helps make the E-30 one of the most creative capture tools I own.

Woodstock multiple exposure captured with an Olympus E-30 DSLR with a 12mm-60mm f/2.8-4.0 Olympus zoom, 1/125th at f/5.6.

Also see my article on the SoftFocus Art Filter function in the Olympus E-30.


twitter.jpg Follow me on Twitter

-


Technorati Tags: , , , , ,

jobo_photogps.jpg

After learning that the Mac software wasn't ready yet for the Jobo photoGPS Geo Tagging Flash Shoe, I decided to upload VMware Fusion on my MacBook and set up a Windows Vista "guest." I then downloaded the latest version of the photoGPS software and connected the device via the bundled USB cord.

The first thing that I learned is that you have to configure the photoGPS device with the software before you can actually use it. So the shoot that I did last week wasn't on the device. I clicked on the "Configure Device" button, waited a few seconds, and was informed that the device was ready to go.

I went outside and snapped a few pictures (in Jpeg format) with the photoGPS mounted in the hotshoe of my Canon 5D Mark II. This time, when I hooked up the photoGPS to the computer, there was data available. I downloaded the data from the device, copied the pictures from my camera to the computer hard drive, then clicked the "Match Photos" button. The photoGPS software had no problem matching the geodata to the images. Each picture was tagged with "Lat/Long/Alt" plus street address (no number, but street, city, state, country), and nearby Points of Interest, which I thought was pretty cool.

I then opened the Jpegs in Apple Preview and Apple Aperture. All of the data was there, including the POIs added to the caption field for each shot. I thought this was pretty cool. In either application, I could look at a map view to see exactly how accurate the data was. For two of the three images, the geodata was very accurate, within 3 meters. The third image was less so, about 10 meters off the mark.

I judge the performance to be reasonable for a $175 hardware/software solution. I like how the photoGPS mounts in the hot shoe and stays out of my way. And even though the Windows version of the software isn't handsome, it does work well. This is not a device for pinpoint accuracy. But if you can live with a 5-10 meter range, then it does provide you with lots of information.

In my next test, I'll shoot Raw only, and we'll see what happens.


twitter.jpg Follow me on Twitter

-


Technorati Tags: , , , , , ,

If Shooting an Event, Use a Shot List

shot_list.png

I've been working with clients on an upcoming wedding in February, and once again I'm amazed at how many issues have surfaced while collaborating on the shot list. After two weeks of back and forth, it's a different event than had originally been portrayed.

This is why I am such a proponent of shot lists for event photography. It is the best tool for discovering client expectations and seeing what is actually going on in their head. Many shooters have asked me, "Can't you simply discuss the wedding with the client?" You can, and you should. But don't let those conversations be your blueprint for the event.

First, there is no record of what you agreed upon. After the wedding is over, and they are complaining about a shot you missed, it's your word against theirs, and that's not a situation you want with a client. People sometimes "think" they told you something, but don't actually verbalize it.

A shot list is also your opportunity to fine tune the timing of the shoot. If the client, for example, lines up 20 group shots after the ceremony, but only provides 15 minutes between the end of the ceremony and the start of the reception, you need to intervene and suggest alternatives. I usually go three rounds of working out the shot list with clients, and most of that time is spent smoothing out the flow of the day.

Once everyone is satisfied with the contents and timing of the shot list, make sure the clients get a final copy and approve it. Also make sure that all of your assistants (and you) have it in your pocket during the event. I have one assistant assigned to checking off items during the course of the event. In the end, this leads to a less nerve-racking shoot for you and more satisfied clients.

If you need a starting point for a wedding shot list, you can download a sample shot list here. I highly advise you use a shot list for every event.


twitter.jpg Follow me on Twitter

-


Technorati Tags: , , , ,

"Praying Mantis" - Grab Shot 167

francine_kunkel_gs.jpg

"I've heard you should have a connection with your subject," writes Francine Kunkel. "Well that certainly was the case with this praying mantis in my garden. His little head and big eyes followed my movements as I bent and knelt to get the right angle. I almost expected him to smile."

Francine captured this garden portrait with a Canon PowerShot SX10 IS at 1/250 with an aperture of 5.0, and ISO set to 80.

If you have a candid you'd like to share, take a look at our Submissions page, then send us your Grab Shot. We'll try to get it published for you on The Digital Story.

And you can view more images from our virtual camera club in the Member Photo Gallery.


twitter.jpg Follow me on Twitter

-


Now Available! The Digital Photography Companion.
The official guide for The Digital Story Virtual Camera Club.

  • 25 handy and informative tables for quick reference.
  • Metadata listings for every photo in the book
  • Dedicated chapter on making printing easy.
  • Photo management software guide.
  • Many, many inside tips gleaned from years of experience.
  • Comprehensive (214 pages), yet fits easily in camera bag.

Technorati Tags: , , , , , ,

fototimer.png

FotoTimer made by Mac About Town, provides a nifty self-timer for your iPhone. In fact, it's better than many of the self-timers built into dedicated digital cameras. You can set the delay for 2, 5, 10, or 20 seconds. This $1.99 program available from the iTunes App Store will help you capture sharp images with the iPhone. Just set it down, set the timer, stand back, and let it record the image. For anyone who enjoys photography with their iPhone, I would consider this app essential.


twitter.jpg Follow me on Twitter

-


Technorati Tags: , , , ,

canon_xs1_iso.jpg

ISO 1600 is the new 400. The evolution of digital technology is changing the way we capture light. In this podcast, I provide a refresher course in managing your ISO settings. Things have changed, and they've changed for the better.

Monthly Photo Assignment

About Face is the January 2009 Photo Assignment. Think about creative ways to make a portrait. It doesn't always have to be the "smiling into the camera" composition. You can read more about how to submit on our Submissions page. Deadline for entry is Jan. 31, 2009.

Listen to the Podcast

Now that I've piqued your curiosity, it's time to listen to today's audio show titled, "ISO." You can download the podcast here (27 minutes). You can also subscribe to the podcast in iTunes

The Digital Story podcasts are available for direct download from Apple iPhones. I've created a special mobile download page here. Just load the page in Safari, browse the podcast line-up, and click on the one you want to listen to.

Want to share photos and talk with other members in our virtual camera club? Check out our new Flickr Public Group. It's a blast!


twitter.jpg Follow me on Twitter

-


psc_cover_web.jpg

Learn what photographers need to know to organize and edit their images with Photoshop CS4. Take a look at The Photoshop CS4 Companion for Photographers. It fits in your laptop bag and is very easy on your wallet.


Technorati Tags: , , , , ,


Sponsor Notes...

SiteGrinder lets you take ownership of your websites. Effortlessly output pages right from Photoshop.

Red River Paper -- Try the $7.99 Sample Kit.

Add Magic to Your Slideshows -- FotoMagico presentations are so amazing that your audience will be asking how you did it.

jobo_photogps.jpg

I'm moving forward on this geotagging project on two fronts. One task is to geotag everthing I've already shot in 2009. On the second front, I want to use a GPS device to create data while I'm in the field.

For the GPS device, I decided to give the Jobo photoGPS Geo Tagging Flash Shoe a try because of its small size and ability to stay out of the way in the hotshoe of my camera. The Amazon listing, and everywhere else I looked, said that the Mac software would be ready by the end of 2008. So I naively expected it to be in the box with the photoGPS.

What I did find in the box was a link on a CD to a mailing list that would notify me when the Mac software was ready. No timeframe is listed. Just sign up for the list, and we'll let you know. OK, not so great.

I'm going to hold off reviewing this device until I actually incorporate it into my workflow. At the moment, I'm probably going to have to try the Windows version of the bundled software to learn more about it. Note to Jobo: It's 2009.

The second part of the project is going a little better. I've decided to try Maperture for the images already in my Aperture library. This plug-in is free and easy to use. Ubermind provides a nifty screencast to provide a hands-on overview of the product. I'm still getting to know Maperture, and will have more details about it after further testing. But my first impression is good.

I should have another update sometime next week. Once I get everything working to my satisfaction, I'll also record a podcast on geotagging. More soon.


twitter.jpg Follow me on Twitter

-


Technorati Tags: , , , , ,

janis_krums_photo.png

What a great story! I was reading the Amazing Coverage of U.S. Airways Rescue story on PDN and thinking about how citizen journalism is having an impact on our nation's news reporting. The U.S. Airways Flight 1549 crash and rescue in the Hudson River has to be one of the top stories of 2009, and the iconic image of the rescue was capture with an iPhone. If there ever was an argument for, "the best camera is the one you have with you," this is it.

According to PDN writer Jim Davidson: "The star of the early coverage is a Florida tourist named Janis Krums of Sarasota, Florida, who was on one of the ferry boats in the Hudson River in New York when the plane crashed. Krums posted a photo from his iPhone, Twittered about the crash and did an interview with MSNBC."


twitter.jpg Follow me on Twitter

-


macworld_logo.png

Macworld Magazine just published an article I've been working on for a while, Five Adobe CS4 goodies for photographers. In the piece, I talk about some unexpected helpers found in the bundled Bridge CS4 and Adobe Camera Raw 5. Things like Review Mode, Collections, and the Targeted Adjustment Tool can really make your workflow smoother. This piece is a quick read and provides a nice overview.

On O'Reilly Media, I just published Networked Printers and Speakers with AirPort WiFi that shows how I configured my new WiFi network to accommodate several printers and provide remote-controlled music throughout my 2-story studio. It's a lot of fun if you enjoy network tomfoolery.


twitter.jpg Follow me on Twitter

-


psc_cover_web.jpg

Learn what photographers need to know to organize and edit their images with Photoshop CS4. Take a look at The Photoshop CS4 Companion for Photographers. It fits in your laptop bag and is very easy on your wallet.


Technorati Tags: , , , , , , , , , ,

rayflash_comparison.jpg

Now that the price of a Ray Flash ring flash adapter has been lowered to $199.95, I thought you might enjoy this video by John Ricard on the Strobist site where John films a model shoot comparing the $200 Ray Flash adapter to a $1,000 ring light. Plus, it's educational to watch how John sets up the model shoot and evaluates the results.


twitter.jpg Follow me on Twitter

-


Technorati Tags: , , , ,

jobo_photogps.jpg

It all started with iPhoto '09 and "Places." If I was going to teach the application properly in my Lynda.com trainings and in iPhoto The Missing Manual, then I was going to have to get serious about geotagging.

As I researched accessories for my Canon 5D Mark II and the Canon G9, I discovered that there wasn't really an affordable, convenient geotagging solution for these cameras. After much debate, I finally settled on trying the Jobo photoGPS Geo Tagging Flash Shoe device for $175. It is both Mac and PC compatible, and seems to allow a reasonable workflow for adding GPS data to my images, both Raw and Jpeg.

Once I get the device and fine tune the workflow, I'll report back here. In the meantime, if you have any tips, please post a comment.


twitter.jpg Follow me on Twitter

-


Technorati Tags: , , , ,

moscone_center_sf.jpg

Digital photography was a centerpiece topic at Macworld SF. In this podcast, I review the trends and conversations I experienced while teaching at the event, and when talking with other photographers. I learned a great deal about what to expect in the coming months, and share that in this broadcast.

Photo of Moscone Center by Derrick Story, captured with an iPhone.

Monthly Photo Assignment

About Face is the January 2009 Photo Assignment. Think about creative ways to make a portrait. It doesn't always have to be the "smiling into the camera" composition. You can read more about how to submit on our Submissions page. Deadline for entry is Jan. 31, 2009.

Listen to the Podcast

Now that I've piqued your curiosity, it's time to listen to today's audio show titled, "Macworld from a Photo Perspective." You can download the podcast here (28 minutes). You can also subscribe to the podcast in iTunes

The Digital Story podcasts are available for direct download from Apple iPhones. I've created a special mobile download page here. Just load the page in Safari, browse the podcast line-up, and click on the one you want to listen to.

Want to share photos and talk with other members in our virtual camera club? Check out our new Flickr Public Group. It's a blast!


twitter.jpg Follow me on Twitter

-


psc_cover_web.jpg

Learn what photographers need to know to organize and edit their images with Photoshop CS4. Take a look at The Photoshop CS4 Companion for Photographers. It fits in your laptop bag and is very easy on your wallet.


Technorati Tags: , , , , ,


Sponsor Notes...

SiteGrinder lets you take ownership of your websites. Effortlessly output pages right from Photoshop.

Red River Paper -- Try the $7.99 Sample Kit.

Add Magic to Your Slideshows -- FotoMagico presentations are so amazing that your audience will be asking how you did it.

dcviews.png

You can catch up on most of the photo announcements from CES in one spot: dcviews.com. Recent products from Kodak, Sony, Samsung, Casio, Olympus, Canon and more are listed on the home page. When you want the new blurb, just click on the item and the news box at the top updates. You can get the full story too if you want it.

It's an easy way to catch up if missed the action at CES (like those of us who were at Macworld).


twitter.jpg Follow me on Twitter

-


Technorati Tags: , , ,

yerba_buena_derrick_story.jpg

One of my favorite weeks of the year is in early January when I teach at Macworld in San Francisco. I lead a two-day workshop in Aperture, a Mac Lab for Photoshop CS4, numerous sessions, and joined Rick Smolan on stage for State of the Art of Digital Photography.

What a great place to have a new DSLR to test. At night, when walking back from my last event, I would mount my Sigma 50mm f/1.4 EX DG HSM prime lens and test the limits of the Canon 5D Mark II.

One night I passed by the Yerba Buena water feature behind Moscone North Hall. This is a great place to relax and enjoy the San Francisco skyline after a long day. I've always liked the water feature here, in part for its beauty, and in part for its soothing sound. On Wednesday night, I decided to photograph it.

I set the camera on the ledge in self-timer mode. I kept the ISO low at 200, and used Aperture Priority mode at f/16 to get as much depth of field as possible. The resulting exposure was 10 seconds. I then adjusted the color and tone a bit in Aperture on a MacBook Pro.

After my first week of shooting, I'm very much enjoying the Canon 5D Mark II, and I will miss San Francisco until my next extended stay here.

Photo of Yerba Buena water feature by Derrick Story, Jan. 2009


Now Available! The Digital Photography Companion. The official guide for The Digital Story Virtual Camera Club.

  • 25 handy and informative tables for quick reference.
  • Metadata listings for every photo in the book
  • Dedicated chapter on making printing easy.
  • Photo management software guide.
  • Many, many inside tips gleaned from years of experience.
  • Comprehensive (214 pages), yet fits easily in camera bag.

Technorati Tags: , , , , ,

Testing Media Manager plugin

That was easy; this thing works great
The Digital Photography Companion

New Polaroid Digicam that Prints too

pogo_digicam.jpg

Want your printer and camera to be the same device? Then take a look at Polaroid PoGo Instant Digital Camera. Imaging Resource reports:

"It's not the first time we've featured a digital camera with built-in printer on this news page - in fact, over the years there have been quite a few... with dimensions of 4.7" x 3.0 x 2.0", though, the Polaroid PoGo instant digital camera would certainly rank among the smallest."

Starting in March 2009, you can pick up the camera for around $200 and a pack of film for about $5. Sounds perfect for parties!


twitter.jpg Follow me on Twitter

-


Technorati Tags: , , ,

iphoto_09.png

I wasn't surprised that Apple announced iPhoto '09 as part of its $79 iLife '09 suite of applications, but I didn't anticipate some of its new features. Others I did.

Adjust Panel Improvements

In the "not too surprised" category, an enhanced Adjust panel was definitely in order. By most standards, iPhoto '08 wasn't providing the editing control that even some novices were looking for. That being said, the iPhoto '09 additions are still rather modest. A new Definition slider that allows us to bump up midtone contrast with a dash of sharpening is indeed welcome. It's one of my favorite sliders in Aperture, as well as its Adobe cousin, Clarity in Lightroom and Adobe Camera Raw. I'm not sure people will understand exactly what is going on with Definition, but I think they will like the results they see in their photos.

adjust_panel.png

Instead of adding a Vibrancy slider, as we have in Aperture, iPhoto '09 instead gives us a checkbox labeled "avoid saturating the skin tones" for the Saturation slider. This is a user-friendly way to introduce the functionality that is essentially Vibrancy in Aperture. What remains to be seen, however, is the underlying algorithm in the iPhoto Saturation slider. Is it the old style "saturate everything evenly" or the more modern "increase the saturation more for less saturated hues" that we find in Vibrancy? If we get the new technology with the simplified slider adjustment, then this is definitely an improvement.

Finally, adding "detect edges" to the Retouch Brush is another nice feature that makes it easier to make corrections with a round brush tip in an angular world. Much thanks!

Faces

At the top of the "surprised" category is Faces. iPhoto uses face detection and face recognition technologies to help us organize our collections by people. It's similar to Events that lets us group by timestamp. We have to help iPhoto by providing confirmation when it groups a series of photos together. As we provide more feedback, it returns more possibilities, and becomes more precise. We can then use these collections in a variety of ways.

This feature looks smart and well thought out. I can't wait to try it to see if it lives up to its potential.

Places

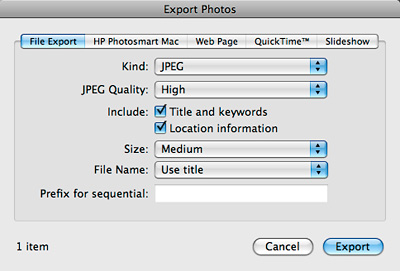
Places is the feature that I'm most excited about. Basically, it lets us organize our shots, and find them, based on location. If you have a GPS-enabled camera, such as an iPhone 3G, then iPhoto will use the coordinates added to the EXIF data to automatically assign the photo to a location. If you don't have such a camera, then you can instruct iPhoto to add the location data after the picture is loaded into the library.

What's nice about Places is that you can easily find images based on their location. You can type an area you're searching for, and all of the corresponding photos appear. Or you can use the new column browser to narrow your search quickly, such as US, California, SF, Moscone Center. Once you see Places in action, I think you'll agree this is truly a useful tool.

Odds and Ends

You can now upload directly to Facebook and Flickr from iPhoto, but you really could before via third party tools. So this is nice, but not ground breaking. The Themed Slideshows are also attractive. And the fact that you can create them in iPhoto and play them on your iPhone is a great idea. And I like the Travel Books feature too, that lets you show your trip on a map using the Places information.

Bottom Line

iPhoto is part of iLife, and you can buy the entire upgrade suite for $79. That's one of the best deals in software. You will need Leopard to run these applications however. Apple is easing that upgrade pain by offering the Mac Box Set for $229, and it includes the new iLife, new iWork, and Leopard Mac OS X. That's 40 percent off the price of them bought individually.

I think iPhoto '09 will be a crowd pleaser. I would upgrade for Places alone, with the other goodies adding to the fun. Apple will begin shipping iLife '09 later this month.

In the meantime, I'm going to start preparing to record an updated video tutorial on iPhoto '09 for Lynda.com later this month, and of course start working on the next iPhoto Missing Manual.


twitter.jpg Follow me on Twitter

-


Technorati Tags: , , ,

Some of the most interesting portraits are captured from unique angles. In this podcast I explore portrait photography beyond the forward-facing pleasant smile variety. "About Face" is also the theme for the Jan. 09 Photo Assignment. Speaking of which...

Monthly Photo Assignment

About Face is the January 2009 photo assignment. Think about creative ways to make a portrait. It doesn't always have to be the "smiling into the camera" composition. You can read more about how to submit on our Submissions page. Deadline for entry is Jan. 31, 2009.

Listen to the Podcast

Now that I've piqued your curiosity, it's time to listen to today's audio show titled, "About Face - Revisting Portraits." You can download the podcast here (21 minutes). You can also subscribe to the podcast in iTunes

The Digital Story podcasts are available for direct download from Apple iPhones. I've created a special mobile download page here. Just load the page in Safari, browse the podcast line-up, and click on the one you want to listen to.

Want to share photos and talk with other members in our virtual camera club? Check out our new Flickr Public Group. It's a blast!


twitter.jpg Follow me on Twitter

-


psc_cover_web.jpg

Learn what photographers need to know to organize and edit their images with Photoshop CS4. Take a look at The Photoshop CS4 Companion for Photographers. It fits in your laptop bag and is very easy on your wallet.


Technorati Tags: , , , , ,


Sponsor Notes...

SiteGrinder lets you take ownership of your websites. Effortlessly output pages right from Photoshop.

Red River Paper -- Try the $7.99 Sample Kit.

Add Magic to Your Slideshows -- FotoMagico presentations are so amazing that your audience will be asking how you did it.

"Ice Sculpture" - Grab Shot 165

ice_sculpture_gs.jpg

"As I was returning home this morning from exercising my dogs," writes Jane Ruhsenberger, "I noticed this tiny (about 3/4" tall) ice sculpture on top of my garbage can."

Jane used her Canon G9 set to ISO 100 to capture this miniature work of art. The image stabilizer did its job because her shutter speed was 1/6 of a second with an aperture of f/5.

If you have a candid you'd like to share, take a look at our Submissions page, then send us your Grab Shot. We'll try to get it published for you on The Digital Story.

And you can view more images from our virtual camera club in the Member Photo Gallery.


twitter.jpg Follow me on Twitter

-


Now Available! The Digital Photography Companion.
The official guide for The Digital Story Virtual Camera Club.

  • 25 handy and informative tables for quick reference.
  • Metadata listings for every photo in the book
  • Dedicated chapter on making printing easy.
  • Photo management software guide.
  • Many, many inside tips gleaned from years of experience.
  • Comprehensive (214 pages), yet fits easily in camera bag.

Technorati Tags: , , , , , ,

5d_markii_top.jpg

I received the Canon 5D Mark II yesterday and have had a chance to get to know this latest full-sensor DSLR in Canon's lineup. By now, most folks know about the big changes with the body. The 21-megapixel resolution and HD movie recording are the headliners. But there are some other more subtle improvements that I really like.

Finally, a Real Battery Status Indicator

I've wondered for years why Canon cameras didn't do a better job of reporting on the remaining battery charge. My far less expensive Sony compact told me more about the battery than my expensive DSLR body. But no more!

The 5D Mark II now sports a Battery Info screen that shows me remaining capacity in perecent, shutter count, and recharge performance. It also lists the actual battery model number and where it's located (grip or internal). It's terrific!

Intelligent Auto Rotate

Previously, we only had two options for Auto Rotate. Either you turned it off so you could utilize the entire LCD for verticals, but then had to rotate the images yourself on the computer. Or you could turn it on for rotating on the computer, but then had to look at verticals using the short side of the LCD.

Well, now there's a third option that lets you turn on rotation for the computer only. That way I can see verticals long ways on my camera LCD but have them correctly orientated on the computer. I'm very thankful for this improvement.

Live View Feedback on Kelvin Color Temperature Settings

We've been able to set Kelvin color temperature for some time, but it was always a shot in the dark. Now, thanks to Live View, I can activate my White Balance menu, go to Kelvin, rotate the dial, and get visual feedback on each temperature setting. When it looks right, I stop. This is faster than using Custom White Balance, and a big improvement for working quickly in the field.

Focus Magnification in Live View

When you're in Live View mode, you press the AF-ON button to focus the camera. If you set the AF mode in the menu to Live Mode, then you have the option to increase the magnification of the focus area to 5X or 10X by pressing the magnifying glass icon when focus is activated.

This will help you nail a particular element in your composition. When you're ready to return to normal view, just press the magnifying button again.

Silent Shooting

Another great feature thanks to Live View is Silent Shooting mode. You'll find the option in the Live View set up menu. By using Mode 1 and turning off the "beep" confirmation, you can capture images at a fraction of the noise level that we traditionally endure with DSLR bodies. This is perfect for certain occasions such as wedding vows.

More Features in the Future

I'll continue to pass along tips that I learn using the Canon 5D Mark II in future posts. Happy New Year!


twitter.jpg Follow me on Twitter. I'll be posting live from Macworld Expo everyday next week.

-


Technorati Tags: , , , , ,