September 2009 Archives

"Transport" challenged this month's contributing photographers to capture the world on the move. We have terrific images featured in this member gallery.

The October 2009 assignment is "Feet." Start working on your contribution now. Details can be found on the Member Participation page. You can submit photo assignment pictures up to 600 pixels in the widest direction.

Please follow the instructions carefully for labeling the subject line of the email for your submission. It's easy to lose these in the pile of mail if not labeled correctly. For example, the subject line for next month's assignment should be: "Photo Assignment: October 2009." Also, if you can, please don't strip out the metadata. And feel free to add any IPTC data you wish (These fields in particular: Caption, Credit, Copyright, Byline), I use that for the caption info.

Photo by David Bream. You can read more about how David captured this shot, plus see all of the other great images on the August 09 Gallery page.

Good luck with your October assignment, and congratulations to all of the fine contributors for September. It's a great collection of images.


twitter.jpg Follow me on Twitter

-


Now Available! The Digital Photography Companion. The official guide for The Digital Story Virtual Camera Club.

  • 25 handy and informative tables for quick reference.
  • Metadata listings for every photo in the book
  • Dedicated chapter on making printing easy.
  • Photo management software guide.
  • Many, many inside tips gleaned from years of experience.
  • Comprehensive (214 pages), yet fits easily in camera bag.

Technorati Tags: , ,

image_capture_icon.jpg

I've always been a big fan of the free application Image Capture, but with the release of Snow Leopard, new life has been breathed into this handy tool for photographers. In my latest Macworld article, Eight Amazing Image Capture Tricks, I show you how it can complement just about any workflow on the Mac.

What's interesting about the Macworld piece is that I had originally written it for Leopard. Even with the previous release of Mac OS X, I found Image Capture a noteworthy utility. But Snow Leopard brought about some major improvements.

  • You can control your WiFi connected scanners from any Snow Leopard Mac on your network. I've tested this with two multifunctional printer/scanners -- the HP C6380 and the older HP C8100. And it's not limited to rudimentary controls. Featured tasks include putting multiple photos on the flatbed and having them scanned into separate files, image adjustments, and even sharpening. Plus you can scan to a variety of formats. I use it all the time now for signed documents converted to PDFs.
  • I also like multiple device control for my various cameras and iPhone. I can set iPhoto to open for one device, and Aperture for another... or nothing at all. Very handy.
  • Another cool feature is network sharing of images on a device. So if I plug my iPhone into a computer downstairs, I can grab images off it from a Snow Leopard Mac upstairs.

If you haven't looked at Image Capture in a while, I encourage you to read the Macworld article and take it for a spin.


twitter.jpg Follow me on Twitter

-


The Lensbaby Composer ($270) is the latest in a line of special effects lenses that allow you to blur out areas of an image while maintaining relative sharpness in other parts. In this week's show, Derrick Story interviews Stephanie Scheetz who has been experimenting with the Lensbaby on an Olympus E-520 with live view functionality.

Listen to the Podcast

You can also download the podcast here (27 minutes). Or better yet, subscribe to the podcast in iTunes.

"Doll Arms" by Stephanie Scheetz. Captured with a Lensbaby Composer on an Olympus E-520 DSLR. Click on image to zoom.

Monthly Photo Assignment

Simple is the Sept. 2009 Photo Assignment. My original thought was the power that comes from a simple composition, with as few elements as possible. But you might find another twist on this month's theme. You can read more about how to submit on our Member Participation page. Deadline for entry is Sept. 30, 2009.

More Ways to Participate

Want to share photos and talk with other members in our virtual camera club? Check out our Flickr Public Group. It's a blast!


twitter.jpg Follow me on Twitter

-


Podcast Sponsors

SiteGrinder lets you take ownership of your websites. Effortlessly output pages right from Photoshop.

Red River Paper -- Try the $7.99 Sample Kit.

Add Magic to Your Slideshows -- FotoMagico presentations are so amazing that your audience will be asking how you did it.


Technorati Tags: , , , , ,

PhotoPlus Expo 2009: Are You Going?

One of my favorite US photography shows is right around the corner: PhotoPlus Expo 2009 in New York City, October 22-24. This event is a terrific blend of a vibrant expo hall and intelligent conference sessions. You can download an overview of the conference sessions in PDF format to see who is speaking on what. There are also more than 200 companies on the current exhibitor list, comprising a virtual who's who in the photography world.

I'll be hanging out in the expo hall too, working in the Lowepro booth (#818). I've signed on as their Photography Evangelist, and this will be my first event with them.

If you're attending the show, I'd like to say hi. You can find me by coming by the Lowepro booth, or arranging a meeting ahead of time. Leave a comment here if you're interested in a quick hello. I'll have a pocket full of TDS D-Ring keychains for all of our virtual camera club members. Just mention that you listen to the podcast to get one. I'll also be twittering my whereabouts while in NYC. You can follow me at twitter.com/Derrick_Story.

Hope to see you in New York on Oct 22!


twitter.jpg Follow me on Twitter

-


canon_7d.png

We're learning more about the Canon EOS 7D every day, including this hands-on report with a pre-production model by Luminous Landscape.

Camera characteristics that folks agree upon include its rugged build, solid feel, 19-point cross sensor autofocus system, 8 fps shooting speed, 24 fps HD video capture, 100 percent viewfinder, and a built-in wireless flash transmitter. All great stuff and wildly tempting for the travel photographer.

What we're still waiting for is a definitive ruling on the 7D's image quality. Michael Reichmann wasn't comfortable giving us a ruling in his Luminous Landscape article because he was working with a pre-production model. And more broadly speaking, we just don't have enough data from production models. So we'll just have to wait and see.

B&H, Amazon, and Adorama are all accepting orders, but as far as I know, no one is shipping units yet in the US. But as photographers start posting their opinions in real world use, I'll certainly keep you posted here.


twitter.jpg Follow me on Twitter

-


"Colorado Rainbow" - Grab Shot 186

"There's a lot to be said for being in the right place at the right time and having your camera with you," writes Mark Castleman." I saw this striking rainbow in the South Park of Colorado, about 10 miles east of Fairplay. I took it with my K10D and a Sigma 17-70mm lens at ISO 100, 1/350 at f/5.6. Yes, it really was that bright; I'm not that good with Photoshop."

Photo by Mark Castleman. Click on image to zoom to larger size.

If you have a candid you'd like to share, take a look at our Submissions page, then send us your Grab Shot. We'll try to get it published for you on The Digital Story.

And you can view more images from our virtual camera club in the Member Photo Gallery.


twitter.jpg Follow me on Twitter

-


Technorati Tags: , , ,

5d_markii_top.jpg

The Canon 5D Mark II is an excellent tool for creating instructional videos in high definition. We've been using this DSLR to record our Creative Output tutorials featuring Stephanie Scheetz. After publishing the latest episode, Shrink Plastic Jewelry, I thought you might enjoy a peek behind the scenes to see how we manage these filmmaking projects.

On average for a 5-minute movie, we spend a half day planning, another 4 hours shooting, then the better part of a day in post production and publishing. So we figure about 2 days work for me behind the camera and in front of the computer, and 1 day for Stephanie to prepare the project and to be the talent.

Parts List

Our goal is to keep the production process as simple as possible. My feeling is, the easier the movies are to make, the more we will produce. Here's what we use.

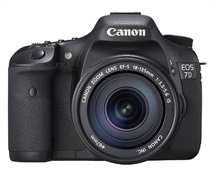
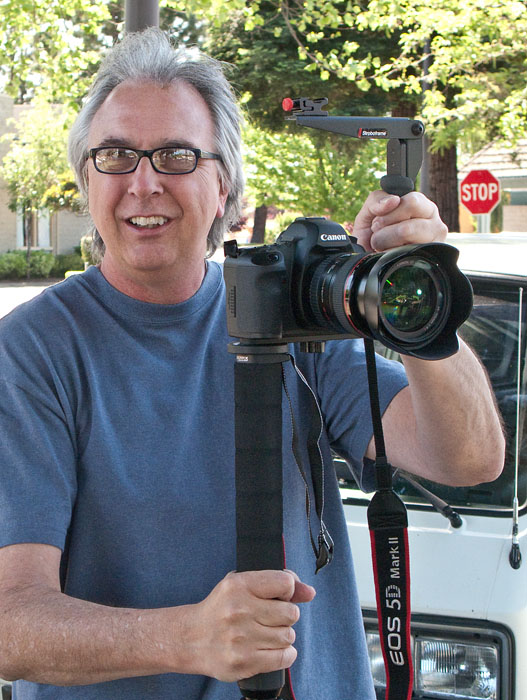
  • Stock Canon 5D Mark II with 24-105mm f/4 IS lens
  • Audio Technica lapel mic
  • iMovie '09 for cutting and adding transitions
  • Adobe SoundBooth for cleaning up audio
  • BoinxTV for adding lower thirds and production effects
  • QuickTime Pro for various mini-steps

If you're already dabbling with movie making, you've learned there are many different ways to accomplish the same goals. I'm showing you this method as a point of interest. Take from it what works for you, and adjust accordingly.

Recording with the 5D Mark II

Video capture has become much more manageable since Canon released the Firmware update that allows me to manually set shutter speed, aperture, and ISO. Previously, having to rely on auto exposure settings was a real problem for us. Because when Stephanie would hold up a bright object, the camera would be fooled by its luminosity and dim the overall exposure. Now I can lock-in the settings for the overall scene without worry about exposure shift during recording.

I typically shoot on a tripod or monopod with the Canon 24-105mm L IS zoom lens. If we take the camera off the tripod for handheld shots, as we did for the kitchen scenes in Shrink Plastic Jewelry, the image stabilizer becomes very important. IS is vital for handheld scenes. They are just too shaky without it.

After trying a few different methods, I've settled on using the ExpoDisc for my white balance setting. In part, I like it because I can establish a good custom white balance setting in mixed lighting.

We capture in full HD (1920x1080) even though the published movies are served via YouTube at lower resolution (1280x720). I do this because all of my options are open up the road. For example, if we decided to publish this content on a DVD, I would want full HD resolution for more compelling playback on HDTV screens.

It's very important to record at the best quality possible in terms of exposure, white balance, focus, etc., because as your compress your movies for web publishing, degradation always happens. I'm very careful in post production, and still there's more loss than I like.

Audio Capture

Sound recording has been the most challenging part of this project. The audio input jack for the 5D Mark II isn't high quality, and you can't control audio directly with the camera. We've had the best results using a wireless lapel mic (an affordable Audio Technica model). Even so, I always seem to have hiss as a byproduct. To control this, I've been processing the audio in Adobe SoundBooth to reduce unwanted noise and increase the DB a bit.

Many movie makers record the audio with a separate device then sync it with the video in post production. This is a great way to go if you're using Final Cut Pro of some other high end software. We keep things a bit simpler, so I try to get the best audio possible as part of the original movie file.

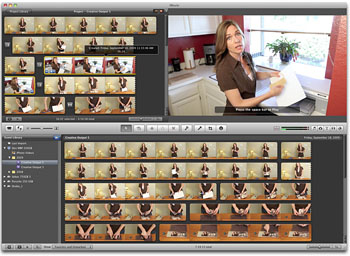
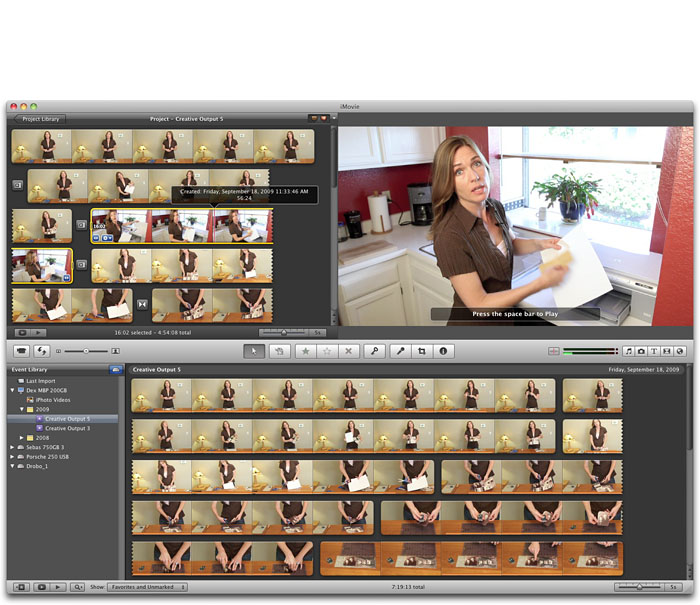
iMovie for Initial Production

For ease of use, it's hard to beat iMovie for organizing the scenes, trimming them, and adding transitions. On my Snow Leopard MacBook Pro plugged into a 23" Cinema Display, iMovie can handle the 1920x1080 files from the Canon 5D Mark II. Some folks have had problems with this. We published a good article by Kip Beatty titled, Managing Canon 5D Mark II HD Video in iMovie '09 that should be helpful for those having problems with the large files in iMovie.

Once the initial cuts are made and transitions added, I export a sampled down version of the movie (1280x720) using the Apple Intermediate Codec to retain as much quality as possible for the next step.

Clean the Audio

I usually want to clean up the audio a bit too. iMovie doesn't have very good controls for this, so using QuickTime, I extract the audio track as a .mov file, open it up in Adobe SoundBooth, remove noise, then use QuickTime again to add the audio track back to the video file. Make sure you delete the old audio track before adding the new one. This always works great, and I've never had any syncing problems as a result.

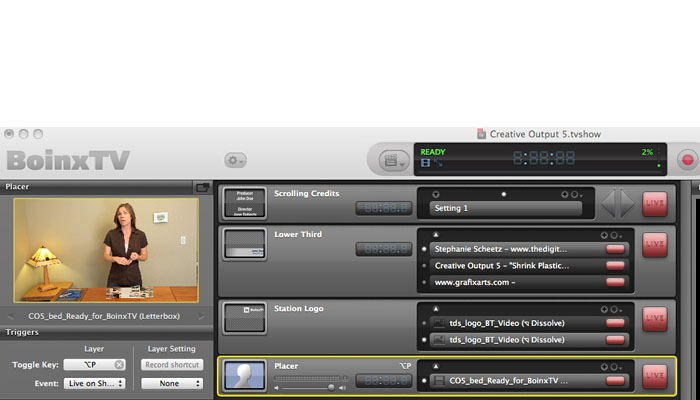
Final Touches Using BoinxTV

I love BoinxTV for final touches because it allows me to create layers for each effect, then turn them on and off while I watch the movie. I feel like the director of a television show as I enable lower third titles and graphics. I could probably do most of this work in iMovie, but it's not "live" the same way BoinxTV allows me to work. This method feels much more dynamic.

Plus, I can save my work as a BoinxTV project, switch out the main video feed, and create a new show without have to set up all the graphics and titles again.

I also use BoinxTV for the final export for YouTube. The dimensions stay the same 1280x720, but I switch to the multipass H.264 codec to keep file size down. For example, the 5-minute Shrink Plastic Jewelry episode file size was originally 1.4 GBs using the Apple Intermediate Codec, but was reduced to 42 MBs using H.264.

Archive All of Your Work

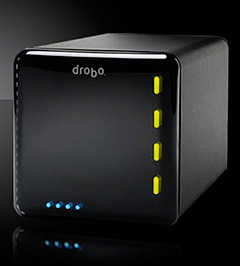
I use a Drobo hard drive array to store my original video files, the iMovie Project, the BoinxTV project, and the output along the way. This allows me to go back to any stage of the project, make changes, then output the best quality possible.

I also recommend keeping detailed notes during every step of the project. I've learned so much each time I make a movie, and I want to retain that knowledge so I can bring it into the next project. Like dreams, you always think you'll remember the details when you wake up. But you won't. So write it down.


twitter.jpg Follow me on Twitter

-


Often referred to as "shrinky dinks," shrink plastic artwork is easy to create using your own images, and inkjet printer, and a conventional oven. In this video tutorial, Stephanie Scheetz shows you how to print your pictures on the special plastic surface, then bake them into beautiful jewelry. You even get to peer inside the oven as the transformation happens before your eyes. This is episode 5 of the ongoing Creative Output series on The Digital Story.

If you want to find out more about the media Stephanie is using to create the shrink plastic jewelry, visit the Grafix web site. You can see more examples of this technique by checking out her post titled, Shrink Plastic Charms.

Other Creative Output Projects with Stephanie

Stephanie has many more creative output projects waiting for you. Just visit our Creative Output section, right here on The Digital Story. Some examples are:

Stencil Art from Photos (Video Tutorial)

Make a Custom Notebook Using Your Images (Video Tutorial)

Make a Custom Photo Gift Bag (Video Tutorial)

Buckle-Up Frame Present for Dad on Father's Day

A Time to Remember - Make Your Own Photo Clock

Packing Tape Transparencies

Technorati Tags: , , , , , , , , ,

Macintosh Computer Expo Coming on Oct. 3

The Mac Computer Expo is coming to Petaluma, CA on Oct. 3, 2009 featuring 10 speakers and a couple dozen vendors. The free event is celebrating its silver anniversary, entertaining Mac enthusiasts for over two decades.

In addition to Tom Negrino, Dori Smith, Jim Heid, and a host of other Mac luminaries, I'll be presenting two sessions focusing on iPhoto. My afternoon session, How to Set Up an iPhoto Referenced Library, shows you how to establish a library of master images on an external hard drive, then point iPhoto, Aperture, Lightroom, and Bridge to that same set of masters. This eliminates the problem of migrating your iPhoto library to other applications, plus it frees up your Mac's hard drive. You have to see this demo to believe it.

Vendors include Griffin, O'Reilly Media, Ambrosia, Microsoft, Parallels, Intuit, and many more. I'll be signing books at the O'Reilly booth after each of my sessions. So if you want your book signed, bring it along. O'Reilly will also have my latest titles on sale (at a discounted price) in the booth.

If you're within striking distance of the North Bay on Oct. 3, then check out this speaking schedule and make your plans. It's a great way to spend a Saturday, and the price is right (free!).


twitter.jpg Follow me on Twitter

-


If you're running a Mac and haven't upgraded to Photoshop CS4 yet, then I have good news for you. You can get the latest version of Adobe Camera Raw (5.5) with all the current profiles, and the CS4 version of Bridge, with the just-announced Photoshop Elements 8 for the Mac, and you can get it for $79. (According to the official press release, "Adobe Photoshop Elements 8 for Mac will be available in Oct. 2009." You can have Adobe notify you when it's available.) As part of the deal, you get Adobe's latest merge technologies included the new Photomerge Exposure.

One of the reasons I think this is exciting is because the Bridge CS4/ACR workflow is so powerful. If you really look at what's there, you only need Photoshop or Photoshop Elements for the finishing touches on your best photos. I wrote an entire book on this approach.

You can hear all about it in my interview with Bob Gager podcast. Bob is the Elements product manager for Adobe.


Master Adobe Camera Raw 5.5 and Bridge CS4

psc_cover_web.jpg

Get the most out of Adobe Camera Raw 5.5 and Bridge CS4. The Photoshop CS4 Companion for Photographers lays out the entire workflow that you can master in just a day. It fits in your laptop bag and is very easy on your wallet. And it works with Photoshop Elements 8 for the Mac too!


twitter.jpg Follow me on Twitter

-


Adobe just announced Photoshop Elements 8 for Mac and Windows. On the Mac side of the equation, you get the latest Adobe technology plus Adobe Camera Raw 5.5 and the CS4 version of Bridge. That means you'll have access to all of the current Raw file profiles available from Adobe. This is a big deal if you have a new DSLR. On the Windows side, the Organizer has been greatly improved and includes lots of helpful automated tools. You also get ACR 5.5 for Windows. I sat down at Adobe HQ with product manager Bob Gager to discuss the ins and outs of Elements 8. It's a terrific conversation, and I think you'll enjoy listening to it.

Photoshop Elements 8 will be available from Adobe.com for $99. And you can take advantage of a $20 rebate lowering the price to $79.

Listen to the Podcast

You can also download the podcast here (27 minutes). Or better yet, subscribe to the podcast in iTunes.

Bob Gager, Photoshop Elements 8 Product Manager. Click on image to zoom.

Monthly Photo Assignment

Simple is the Sept. 2009 Photo Assignment. My original thought was the power that comes from a simple composition, with as few elements as possible. But you might find another twist on this month's theme. You can read more about how to submit on our Member Participation page. Deadline for entry is Sept. 30, 2009.

More Ways to Participate

Want to share photos and talk with other members in our virtual camera club? Check out our Flickr Public Group. It's a blast!


twitter.jpg Follow me on Twitter

-


Podcast Sponsors

SiteGrinder lets you take ownership of your websites. Effortlessly output pages right from Photoshop.

Red River Paper -- Try the $7.99 Sample Kit.

Add Magic to Your Slideshows -- FotoMagico presentations are so amazing that your audience will be asking how you did it.


Technorati Tags: , , , , ,

virtual_photo_studio.png

There's always more to learn in Photoshop. I just came across a terrific article on Virtual Photography Studio titled, 21 Photoshop Tutorials And Resources. They provide links to excellent articles that show you how to create HDR images, build effects, make stunning backgrounds, retouch portraits, create 3D effects, and more. If you're looking to improve your Photoshop chops, you may want to keep this resource in your back pocket.


twitter.jpg Follow me on Twitter

-


Drobo Field Test - 18 Months Later

drobo_web.jpg

I've been using a Drobo for about a year and a half, and it's worked wonderfully. So I was interested to see this published report on Photography Gadgets titled, Drobo Experience Report: Going strong after 18 months. This post covers the setup, usage, pros, and cons. If you've been considering a Drobo as a backup for your media, I think you'll find this report useful.


twitter.jpg Follow me on Twitter

-


I was reading news stories online and stumbled across this photo. What's wrong with it? I'm sure the photographer didn't notice that the subject is lined up with the background so it appears he has Martian antenna.

But, then, as you look closer, it gets even more interesting. Is this a Photoshop job? The lighting on the subject is coming from both sides. It doesn't look the same as the lighting on the background. If that's the case, then someone actually placed the subject there... on purpose? Hmmm... Figure that one out. Looks a little passive aggressive to me.


twitter.jpg Follow me on Twitter

-


One of the types of photography that definitely became more accessible with the digital age is infrared. Now you can modify an old DSLR, or simple add an IR filter to an unmodified version, and experiment with this dramatic style of capture.

In the article 20 Stunning Infrared Photographs, Nate Jelovich shows us examples that can be used for inspiration. Even if you're not considering trying your own hand at this approach, I'm sure you'll enjoy these images.


twitter.jpg Follow me on Twitter

-


Good Tutorial on Slow Sync Flash

phototuts_logo.png

Taking control of your flash changes your images from ho-hum snapshots to works of art. I just found a solid tutorial that covers different methods for balancing flash output with ambient light. In the article, How to Use Flash With a Slow Shutter to Create Motion and Ghosts by Cameron Knight on PhotoTuts, you'll learn how to adjust your lighting to create far more interesting effects than you would ever get in auto-everything mode. It's definitely worth a read.

And don't forget, this week's TDS podcast is on Backlit Portraits.


Now Available! The Digital Photography Companion. The official guide for The Digital Story Virtual Camera Club.

  • 25 handy and informative tables for quick reference.
  • Metadata listings for every photo in the book
  • Dedicated chapter on making printing easy.
  • Photo management software guide.
  • Many, many inside tips gleaned from years of experience.
  • Comprehensive (214 pages), yet fits easily in camera bag.

Tripod Adapter for your iPhone

Now you can steady those videos and group shots captured with your iPhone thanks to the Blur Tripod for the iPhone. For only $14.99 US (plus $5 shipping and handling), you get the adapter that enables you to mount the iPhone on any tripod. They also provide a mini tripod that fits easily in your pocket.

The Blur tripod itself is 5" long (6.5" extended) and 3⁄4" in diameter. The tripod adapter is 2" wide, 1.5" tall, and 0.8" thick weighing in at about 2 ounces (60 grams). The adapter works on any standard tripod. The pads on the inner surface of the Blur adapter cushion the iPhone, yet provide a snug and secure fit. Blur states that the pads will not scratch the screen.

You can order the kit directly from the Blur site.

iPhone App Reviews and Camera Phone Tips

Yahoo! Releases Official Flickr App for iPhone

A Look Inside Shutterfly for iPhone

Flickr Tip: Manage Permissions During Mobile Workflow

Cropulater Brings Picture Cropping to the iPhone

Panorama 2.1 for the iPhone

FotoTimer Provides Self-Timer for the iPhone

HP iPrint App Makes Printing Easy from iPhone or iPod touch

True Photo App for iPhone: CameraBag


twitter.jpg Follow me on Twitter

-


Backlit portraits can be dramatic and beautiful, especially if you know how to set up your camera. In this show, I explain three sure-fire techniques for great backlit portraits.

The normal progression I go through when working outside with these types of shots is this:

  • First, I position the model with the sun shining on her hair, then take a few test shots. This helps me evaluate the lighting.
  • Then I switch to spot meter mode and take an exposure reading off her face.
  • I'll often try adding light via reflectors or using natural reflection from the surroundings.
  • If none of these techniques work the way I want, I'll then use fill flash. I might use fill flash also if I'm covering an event and have to work quickly.

The sample you see here uses the walkway to bounce light up into the model's face. She is kneeling down to be closer to the reflected surface, and to add variety to the poses we experimented with during the shoot.

Photo by Derrick Story using a Canon 5D Mark II with a 70-200mm f/2.8 L IS zoom lens.

Listen to the Podcast

You can also download the podcast here (21 minutes). Or better yet, subscribe to the podcast in iTunes.

Monthly Photo Assignment

Simple is the Sept. 2009 Photo Assignment. My original thought was the power that comes from a simple composition, with as few elements as possible. But you might find another twist on this month's theme. You can read more about how to submit on our Member Participation page. Deadline for entry is Sept. 30, 2009.

More Ways to Participate

Want to share photos and talk with other members in our virtual camera club? Check out our Flickr Public Group. It's a blast!


twitter.jpg Follow me on Twitter

-


Podcast Sponsors

SiteGrinder lets you take ownership of your websites. Effortlessly output pages right from Photoshop.

Red River Paper -- Try the $7.99 Sample Kit.

Add Magic to Your Slideshows -- FotoMagico presentations are so amazing that your audience will be asking how you did it.


Technorati Tags: , , , , ,

ps_cs4_180.jpg

Final versions of Photoshop Camera Raw 5.5, Photoshop Lightroom 2.5 and DNG Converter 5.5 are available for download at www.adobe.com/downloads/updates. The updates add Raw file support for five new camera models: the Nikon D300s, Nikon D3000, Olympus E-P1, Panasonic DMC-FZ35, and Panasonic DMC-GF1.

The updates are also available using the Adobe Updater that's under the Help menu in Bridge or Photoshop. Camera Raw 5.5 update is available as a free download for existing customers of Photoshop CS4, Photoshop Elements 7, Premiere Elements 7 and Photoshop Elements 6 for Mac. Lightroom users only have to launch Lightroom 2.4, and it will let you know that 2.5 is available with a link to the Adobe Downloads page where you can grab it for free.

Other Articles on Photoshop CS4

30 Days of Free Photoshop CS4 - Here's What to Explore

"Top 10 Photoshop CS4 Features" - Digital Photography Podcast 144


twitter.jpg Follow me on Twitter

-


psc_cover_web.jpg

Learn what photographers need to know to organize and edit their images with Photoshop CS4. Take a look at The Photoshop CS4 Companion for Photographers. It fits in your laptop bag and is very easy on your wallet.


Technorati Tags: , , , , ,

"Wrigley Field" - Grab Shot 185

"On our way to the Chicago Diner for dinner," writes Rick Brandt, "we happened to get off at the Wrigley Field stop on Chicago's CTA line. Being a baseball fan and this being the first time I ever saw Wrigley in-person, I was compelled to walk the perimeter of the ballpark and take a few shots. This was several hours after a Saturday afternoon game had ended and there wasn't a whole lot going on. The shots I was getting reflected such--very tourist-like."

"Then I saw this group of sailors heading for the corner. I backed up a bit to frame up the famous sign and leave room for the sailors to walk through the frame, and made the photograph. I recorded the shot with a Canon G9. Post-processed it with Aperture and Nik Software's Viveza and Color Efex Pro."

Photo by Rick Brandt. Click on image to zoom to larger size.

If you have a candid you'd like to share, take a look at our Submissions page, then send us your Grab Shot. We'll try to get it published for you on The Digital Story.

And you can view more images from our virtual camera club in the Member Photo Gallery.


twitter.jpg Follow me on Twitter

-


Technorati Tags: , , ,

It's Time for Aperture 3

aperture_icon.png

On Feb. 12, 2008, Apple released Aperture 2. Now, more than a year and a half later, it's time for Aperture 3. Here's why I think we'll see the next generation by the end of 2009.

  • iLife 09, which was a massive undertaking by Apple, is now signed, sealed, and delivered. There are shared resources within Apple for iPhoto and Aperture, so it's difficult for them to release both products within a short time span.
  • Snow Leopard is already at 10.6.1. You can bet that Aperture 3 is going to leverage technologies within the latest operating system. So, Snow Leopard had to hit the streets before Aperture 3. Now that it's on the prowl, the cage door is swinging open.
  • Lightroom 3 is around the corner. Chances are good that we'll see Lightroom 3 in the not-too-distant future. You just know that Apple wants to have Aperture 3 out first.
  • The grumble effect. Once we get deep into the product cycle, users start grumbling about an update. Whether it's coincidence or not, when the complaining reaches a certain pitch, we usually see a release. Not sure if this is chicken or egg, but the grumble effect is in force right now.

So, assuming that I'm right and we'll see Aperture 3 by the end of the year, what's it going to have? I wish I knew. My guess is that we'll see some of the technologies introduced in iPhoto '09, plus some new things that we aren't even imagining right now. I'm assuming we'll have more localized edits, better speed, and continued integration with other Apple technologies. I'm confident that it will be a solid release.

And I can't wait to try it.

More Aperture Tips and Techniques

To learn more about Aperture 3, check out my Aperture 3 Essential Training on Lynda.com. Also, take a look at our Aperture 3 Focus Section. Tons of free content about how to get the most out of Aperture.


twitter.jpg Follow me on Twitter

-


When I first saw the 17" x 22" prints that emerged from the original Epson 3800, I was impressed. I wanted to cover my walls with big pictures. Seriously, it made my current 13" x 19" enlargements look like snapshots.

Now Epson has announced that it will ship the new Stylus Pro 3880 in October. Estimated price will be between $1,300 and $1,500, depending on configuration. Aside from its impressive output, the footprint for the 3880 isn't much bigger than many 13" printers. That means you could probably swap out your existing unit and put the 3880 in its place.

Other highlights include: exceptional B&W output, no swapping ink cartridges for matt and glossy surfaces, handles cut paper sizes from 4 x 6 up to 17 x 22, includes USB 2.0 and 10/100 BaseT Ethernet connectivity, and it automatically maintains print heads and nozzles.

If you're looking to move up from a 13" printer, the Epson Pro 3880 has to be a serious contender.


twitter.jpg Follow me on Twitter

-


flicker_app.png

It's official. Yahoo! just released Flickr 1.0 for the iPhone. And after a few hours of testing, I have to say it was worth the wait.

When you first launch the software on the iPhone, you're greeted with a Ken Burns styled slideshow. If you're not logged in, the images are pulled from the Flickr pool. If you are logged in, the pictures are from your contacts. They look great and it's an innovative splash screen.

Once you've logged in to your account, click on the "You" button to access your photostream, sets, and favorites. I particularly like the way the sets are handled. They are well-displayed with easy-to-read labels. Go back to the main screen, and you can check out recent activity on your site and uploads from your contacts. If you want to share one of your photos, that's easy too. Either take a picture with your iPhone or upload one from your existing camera roll.

You can also search for images, comment on shots by others, and tag photos. Performance was good on both the 3G network and WiFi. Just be careful, you can easily lose track of time while browsing the immense Flickr collection of images.

For the best viewing experience of your search results, tap on a photo once to see detail about it, then tap on it again to enter presentation mode. Here you can swipe from image to image or rotate to landscape orientation for a better look at horizontal pictures.

Flickr 1.0 is a free download in the iTunes App Store. It requires iPhone OS 3.0 or later.

Flickr Essential Training

More Articles About Flickr

Flickroom Brings Lightroom "Look and Feel" to Your Flickr Photostream

Flickr and iPhone 3GS are Great Companions

iPhone App Reviews and Camera Phone Tips

A Look Inside Shutterfly for iPhone

Flickr Tip: Manage Permissions During Mobile Workflow

Cropulater Brings Picture Cropping to the iPhone

Panorama 2.1 for the iPhone

FotoTimer Provides Self-Timer for the iPhone

HP iPrint App Makes Printing Easy from iPhone or iPod touch

True Photo App for iPhone: CameraBag


twitter.jpg Follow me on Twitter

-


mini_lighting_studio.png

A "mini" photo studio is a handy way to shoot small product shots for sale on eBay and Craig's List, documenting items for insurance records, illustrating articles and reports, and publishing pictures on web sites. One of the advantages of these micro studios is that you can leave them set up for quick shots when you need them.

They don't have to be expensive either. For example, you can get this Digital Concepts Ps-101 Portable Lighting Studio on Amazon for $27.49 that includes the diffusion box and a couple of lights. You can even build one yourself. Strobist has a great "how to" article for building a DIY $10 Macro Photo Studio.

In this podcast I give you a handful of useful tips for getting the best shots possible from your mini studio. It's a lot of fun!

Listen to the Podcast

You can also download the podcast here (24 minutes). Or better yet, subscribe to the podcast in iTunes.

Monthly Photo Assignment

Simple is the Sept. 2009 Photo Assignment. My original thought was the power that comes from a simple composition, with as few elements as possible. But you might find another twist on this month's theme. You can read more about how to submit on our Member Participation page. Deadline for entry is Sept. 30, 2009.

More Ways to Participate

Want to share photos and talk with other members in our virtual camera club? Check out our Flickr Public Group. It's a blast!


twitter.jpg Follow me on Twitter

-


Podcast Sponsors

SiteGrinder lets you take ownership of your websites. Effortlessly output pages right from Photoshop.

Red River Paper -- Try the $7.99 Sample Kit.

Add Magic to Your Slideshows -- FotoMagico presentations are so amazing that your audience will be asking how you did it.


Technorati Tags: , , , , ,

Redimats for Quick Finishing Touches

REDIMAT makes presenting your pictures fast and easy with their convenient REDI-PAKS. Each kit includes 25 pre-cut mat boards, backings, and plastic bags. Starting at only $27, you're sure to find something to fit just about any budget.

Be sure to check out www.redimat.com to view everything they have to offer. And, don't forget the archival tape... you can find an excellent selection of adhesives at REDIMAT, too.

Other Creative Output Projects with Stephanie

Stephanie has many more creative output projects waiting for you. Just visit our Creative Output section, right here on The Digital Story. Some examples are:

Stencil Art from Photos (Video Tutortial)

Make a Custom Notebook Using Your Images (Video Tutorial)

Make a Custom Photo Gift Bag (Video Tutorial)

Buckle-Up Frame Present for Dad on Father's Day

A Time to Remember - Make Your Own Photo Clock

Packing Tape Transparencies

I like the concept of the micro four thirds system. Having a handful of these lenses already, I want to use them on a variety of cameras such as the Olympus E-P1 and the newly announced Panasonic GF1. In addition to some nice Olympus glass I already have, I've had fun playing with the micro four-thirds adapter that lets me mount older Zeiss lenses on new bodies.

Seems to me, however, there's a little kink in micro four thirds compatibility with the new Panasonic GF1. The GF1 does not have sensor based image stabilization like the E-P1. Panasonic has opted to put the stabilizer in the lens that way Canon and Nikon do on their DSLRs. The difference is, I never expected to mount a Canon lens on a Nikon body. The promise of the micro four-thirds "standard" (for me anyway) was the ability to share great lenses across various bodies made by different manufacturers.

Of course, technically, I can still mount an Olympus 17mm pancake lens on the GF1. But it won't be stabilized. And I don't know how well it will focus with the GF1's contrast AF detection system. And as of right now, I'm not sure if Panasonic will honor the lens correction information in the Oly 17mm firmware.

Going the other way, I've read some reader reports that using Panasonic lenses on the E-P1 seem to work well. Examples include the Panasonic 45-200mm zoom. The E-P1 also seems to read the lens correction data in the Panasonic lens firmware, which is an important benefit of the standard.

Summing up, I think the hope of interoperability between Panasonic and Olympus micro four thirds lenses is still alive. But I am concerned about the image stabilization issue. I think IS is one of the best developments in modern photography, and I prefer the sensor-based implementation of it for micro four thirds cameras. I understand that camera manufactures want to put their vision of the best product possible on the market. I just hope that Olympus and Panasonic can do so while keeping the promise of the micro four thirds standard.


twitter.jpg Follow me on Twitter

-


"Butterfly Rest Stop" - Grab Shot 184

"I captured this guy at Pilot Mountain State Park North Carolina, while on a business trip," writes Randy Martin. "He was stopping there for some R&R too. However, his trip is a lot longer than mine as he's headed for Mexico."

Randy captured this great image with a Nikon D90, Nikon DX AF-S Nikkor 55-200mm 1:4-5.6 ED lens. ISO 200, f8, 1/200.

Photo by Randy Martin. Click on image to zoom to larger size.

If you have a candid you'd like to share, take a look at our Submissions page, then send us your Grab Shot. We'll try to get it published for you on The Digital Story.

And you can view more images from our virtual camera club in the Member Photo Gallery.


twitter.jpg Follow me on Twitter

-


Technorati Tags: , , ,

If you had just a stock Mac, what would you buy to create a home photo studio? Now let's make it really interesting. If your purchases were limited to a budget of $300, then what would you do?

photo_receipt_original.jpg

That was the challenge given to me by Macworld Magazine. In the article, The $300 photographer challenge, where I try to outfit a home photo setup without going over budget.

For the challenge, I leaned heavily on the tools that are already included on a Mac: iPhoto '09, Preview, Time Machine, then focused my spending on an HP C6380 printer and an additional hard drive. It's an article worth reading, not only for what I have to say, but for the abundant reader comments who have lots of ideas of their own.


twitter.jpg Follow me on Twitter

-


When Canon unveiled the Canon 7D and three new lenses, understandably the DSLR got most of the attention. But for those of us who have existing Canon APS-sensor bodies, the new lenses, and especially the 15-85mm zoom, is a notable announcement. I think this is potentially the perfect high end all purpose glass for current Rebel owners.

At the top of the spec list is Canon's new hybrid image stabilization that compensates for both angle camera shake and shift camera shake. Canon states that its IS is effective up to four stops. By having such effective stabilization, Canon was able to keep the lens compact, sacrificing a bit on maximum aperture (3.5 to 5.6).

Next is the wonderful zooming range, 24-136mm, that allows shooters to cover most assignments without ever changing the lens. It's the perfect travel zoom for sure, and for many photographers it could be their main glass.

When the EF-S 15-85mm is released later this month, it will probably sell for around $800 US. That's the downside for Rebel owners. Many will feel it's hard to justify a standard zoom that costs as much, or more, than the camera itself. The justification is that if you can afford it, it's a lens you will have for a long time and most likely use on many cameras. I use the Canon 24-105mm f/4 as the standard lens on my 5D Mark II, and I can see me using the 15-85mm in a similar role on my Rebel T1i and other APS sensor bodies.

Oh, and did I mention... the Canon 7D looks great!

PS: In case you missed it, I recently reviewed another terrific accessory for Canon Rebel owners, the Canon Speedlite 270 EX.


twitter.jpg Follow me on Twitter

-


snow_leopard.png

Snow Leopard (OS X 10.6) promises better speed and stability. For the most part, I think Apple has delivered the goods. But I also sense that expectations might be a little high for this evolutionary release of the Mac operating system. In this podcast, I discuss my clean install of Snow Leopard from a photographer's point of view.

You might also want to take a look at my brief article, Snow Leopard Notes for Photographers. Other tidbits include Nikon's compatibility report for Capture NX2 users and HP's driver instructions for 10.6 users.

Listen to the Podcast

You can also download the podcast here (21 minutes). Or better yet, subscribe to the podcast in iTunes.

Monthly Photo Assignment

Simple is the Sept. 2009 Photo Assignment. My original thought was the power that comes from a simple composition, with as few elements as possible. But you might find another twist on this month's theme. You can read more about how to submit on our Member Participation page. Deadline for entry is Sept. 30, 2009.

More Ways to Participate

Want to share photos and talk with other members in our virtual camera club? Check out our Flickr Public Group. It's a blast!


twitter.jpg Follow me on Twitter

-


Podcast Sponsors

SiteGrinder lets you take ownership of your websites. Effortlessly output pages right from Photoshop.

Red River Paper -- Try the $7.99 Sample Kit.

Add Magic to Your Slideshows -- FotoMagico presentations are so amazing that your audience will be asking how you did it.


Technorati Tags: , , , , ,

Editor's Note -- Recently I was corresponding with TDS member Brian F Wilkie about a project he was working on. Brian had figured out how to create a unique type of photo album where he output pages with snapshots printed on them, then bound these pages together in a binder. I loved this idea and asked Brian to write a short article for us, which he kindly did. So, in his own words, here's how Brian Wilkie creates his unique output, complete with Lightroom templates so you can do the same. Thanks Brian!

Using Lightroom 2.4, a Canon Pixma Pro 9000 printer, and Red River Paper's excellent Premium Gloss DUO 8.5" by 11" letter-sized stock, I'm able to  create a handsome looseleaf bound album quickly, and fairly easily.

In Lightroom, I start with a  grid filter which gathers all images taken in a  particular year with a rating of 1 star or above. The choice of rating will vary with how hard you are on yourself and whether you want to include family snapshots as well as fine art images.  Select all of the pictures (command A), then create a collection called Album 20XX (filling in the appropriate year). Now, you can use delete to remove any images which are repetitive, virtual copies you made for different print sizes, or black and white versions. By the end of the process you will have a good idea of how big a printing task you have undertaken.

Printing

You can download a pair of print templates that make good use of the real estate on a US letter page, as long as you have a printer that can handle borderless printing. These templates provide 4 prints up at 5.5" inches by 3.67" inches on a page. I use the "rotate to fit" option so that portrait mode images are printed as large as possible, although this means that on some pages viewers will need to turn the binder on its side to see the pictures oriented correctly. I also enable Page Number under Page Options to help keep track during printing, and the Identity Plate option for my Logo. Finally, the Photo Info option is enabled using Capture Exposure Date as a template. Be careful not to be too wordy in captions or the text will wrap around and the photo size may be restricted.

Printing is done using the appropriate ICC profile downloaded from Red River Paper with Print Sharpening set to "High" and Media type to "Glossy".

The printing itself is completed in two passes. First, the User Template "4up letter+data Odd" is selected, then Print is clicked. At this point, settings options become printer and computer operating system specific. As I mentioned before, I use a Canon Pro9000 on a Mac running OS 10.5. In the print dialog box under Paper Handling, I select Pages to Print - Odd Only. I also select Page Order - Normal. Under Quality and Media I select Media Type - Glossy Photo Paper and Print Quality - High. Under Borderless Printing, I select Amount of Extension - Min. This allows the page number to be visible on the final print since Lightroom puts this in the extreme lower right corner of the page.

After the first pass, carefully flip over the set of odd pages and put them into the paper feed. The top sheet should now be the back side of page one, but careful experimentation is called for here. Select the user template "4up letter+data Even" and click Print. Now under Paper Handling change  to Pages to Print - Even Only.

All you need now is a good quality 3-hole punch. Remember, this is heavy paper stock. Then put the pages in to a quality 3-hole binder.  I use a nice leather one from the local office supply store. The end result is a good looking, well printed, and durable album. By my calculation the cost is around 28¢ per image, less if you shop around for discounted Canon ink.