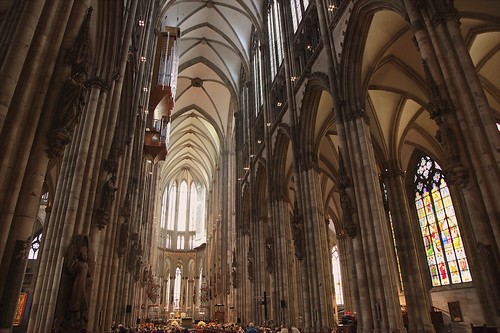
When you get off the train in Cologne, Germany, the first thing you see is the massive exterior of the Dom. But to truly appreciate its grandure, you have to go inside. Believe me, it's worth it.
Image captured with a Canon 5D Mark II and 24-105 mm L f/4 lens at 24mm. Handheld, but leaning against a wall. I processed the photo on the iPad using Photogene.
September 2010 Archives
Faster than a speeding bullet. At least that's the way it feels when traveling on the train between Cologne and Munich, Germany. As a photographer, I much prefer it to flying for a few reasons. First, it's more comfortable. You can ride in First Class on the train for about the same price as economy on a cramped plane. Second, you get to keep all of your luggage with you. No messing around with check-in or weight limitations. And third, it's an amazing view out the window.
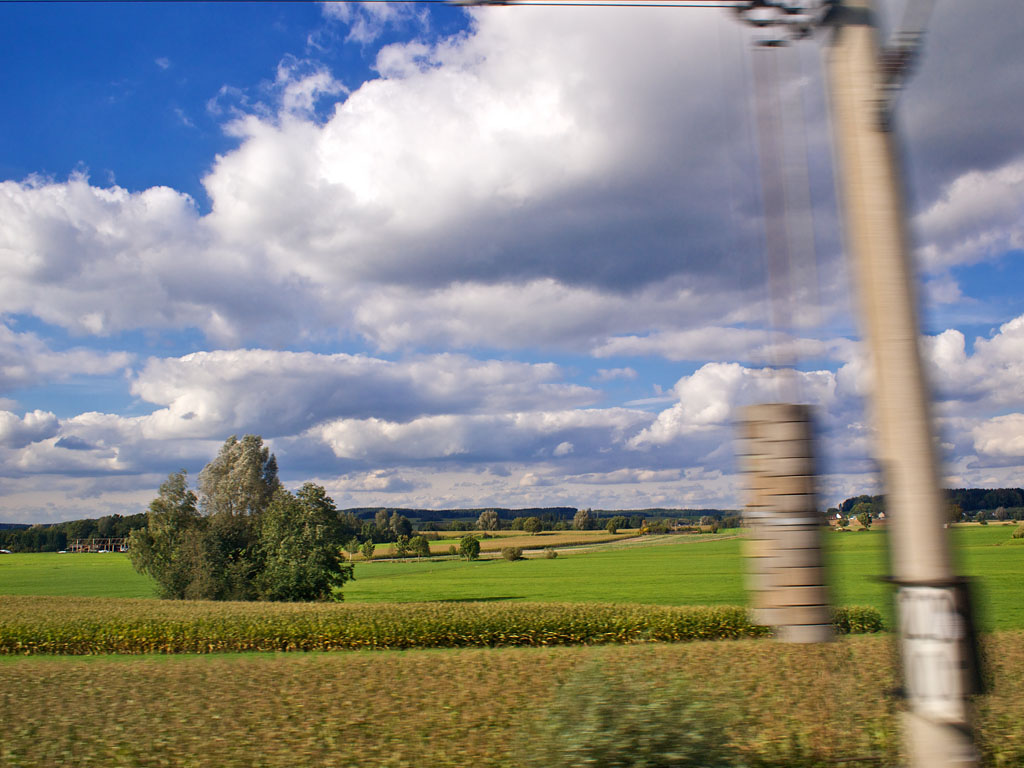 Through the window of a high speed train on the DB Bahn traveling from Cologne to Munich. Click on image for larger version.
I particularly like it when I enter Bavaria coming from Cologne. The countryside is just beautiful. I captured this fun image through the window using my Olympus E-P1 with the 17mm f/2.8 Lens.
About 3.5 hours later, I was in Munich feeling great and ready for action. Oh, and how fast is fast? Well, the train reached speeds of 180 MPH. That's fast!
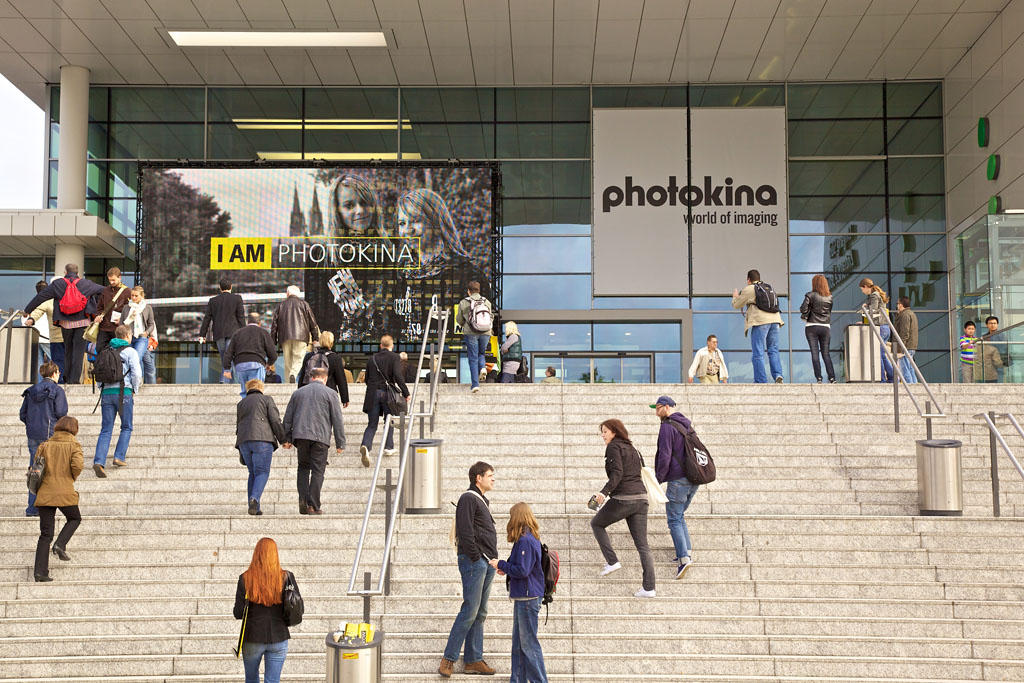
One of the best parts of photokina is that it's in Germany. During my stay here, I've had the opportunity to visit with many German photographers, artists, and businessmen. In this week's podcast, recorded in Cologne and Munich, I visit with two very interesting people.
First, we hang out in Munich at the Boinx Software headquarters and visit with my friend Oliver Breidenbach. Oliver started this software company for creatives back in the mid 1990s. And they've created great tools such as Fotomagico. They also created BoinxTV that powered the FotoTV production at photokina. I visit with Oliver and we talk about Germany, business, and software for photographers.
Next on the show is an interview from the show floor at photokina. There I talk to photographer Guido Seitz. He specializes in wedding and engagement portraits. Our conversation focuses on the art of effective wedding photography and the business differences between Germany and North America. I think you'll enjoy.
Listen to the Podcast
You can also download the podcast here (43 minutes). Or better yet, subscribe to the podcast in iTunes. You can support this podcast by purchasing the TDS iPhone App for only $2.99 from the Apple App Store.
 Guido Seitz Photography
Monthly Photo Assignment
Saturation is the September 2010 Photo Assignment. You can read more about how to submit on our Member Participation page. Deadline for entry is Sept. 30, 2010.
TDS Autumn 2010 Photography Workshop
The next TDS Photography Workshop will be Oct. 16-18, 2010. The event is sold out. But, you can place your name on the reserve list for the next workshop. Just drop me a line.
More Ways to Participate
Want to share photos and talk with other members in our virtual camera club? Check out our Flickr Public Group. It's a blast!
Podcast Sponsors
Red River Paper -- Try the $7.99 Sample Kit.
Make Your Photos Sizzle with Color! --
Technorati Tags:
digital photography, podcast, technique, Technology, The Digital Story, tips
I've been using the same disc reflectors for years, and they are still one of my favorite ways to light outdoor portraits. But while wandering the halls of photokina, I came across California Sunbounce. They've added some innovation to the traditional design.
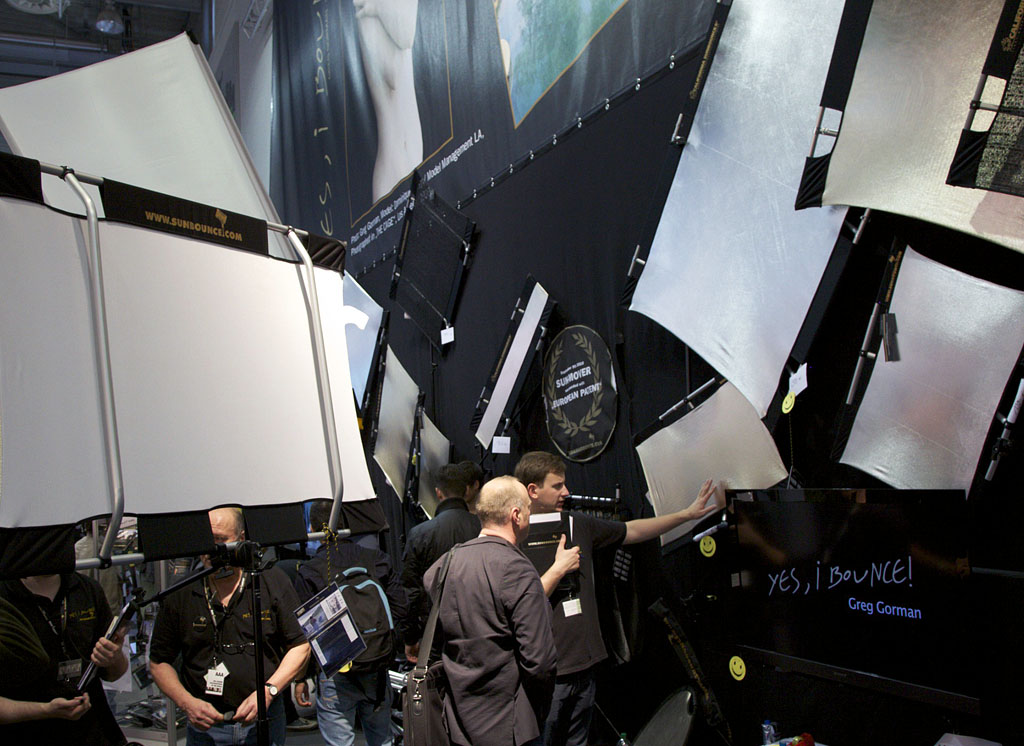
My favorite models were the ones that were rectangle with light aluminum frames and handles. They were very easy to hold, even in the awkward positions that you find yourself in at times while bouncing light. They also had an excellent collection of disc models.
If you like to bounce, you might want to take a look. After visiting the booth, I was all ready to find a model and go shoot some portraits.

Sunday is the last day of photokina here in Cologne, Germany. Tomorrow, I get on the train and head back to Munich for a few days. I will have more reporting on Oktoberfest, so keep an eye out for that.
Also, this week's podcast includes reporting on photokina featuring an interview with a German wedding photographer. You won't want to miss that. It should be live Tuesday at its normal time.
A big part of my assignment here at photokina is to create and publish short videos for Lowepro. My basic rig is the Canon EOS 5D Mark II with the EF 24-105mm f/4 L IS zoom lens and an external lapel mic. With this setup, I can record good video on the noisy, artificially lit, trade floor at photokina. Here's an example. This is a guided tour of the Lowepro Pro Roller Attache x50 narrated by Tim Grimmer.
I used an 77mm ExpoDisc to fine tune the color using the Custom White Balance setting on the 5D Mark II. With video, it really helps minimize post production by getting the sound and color right at capture. Then I can upload the content, along with the stills into Aperture for trimming and assembly.
As you can see from the illustration, this short production consists of two still photos and the HD video clip. Very simple. But often simple is good for YouTube productions, especially if they are clean.
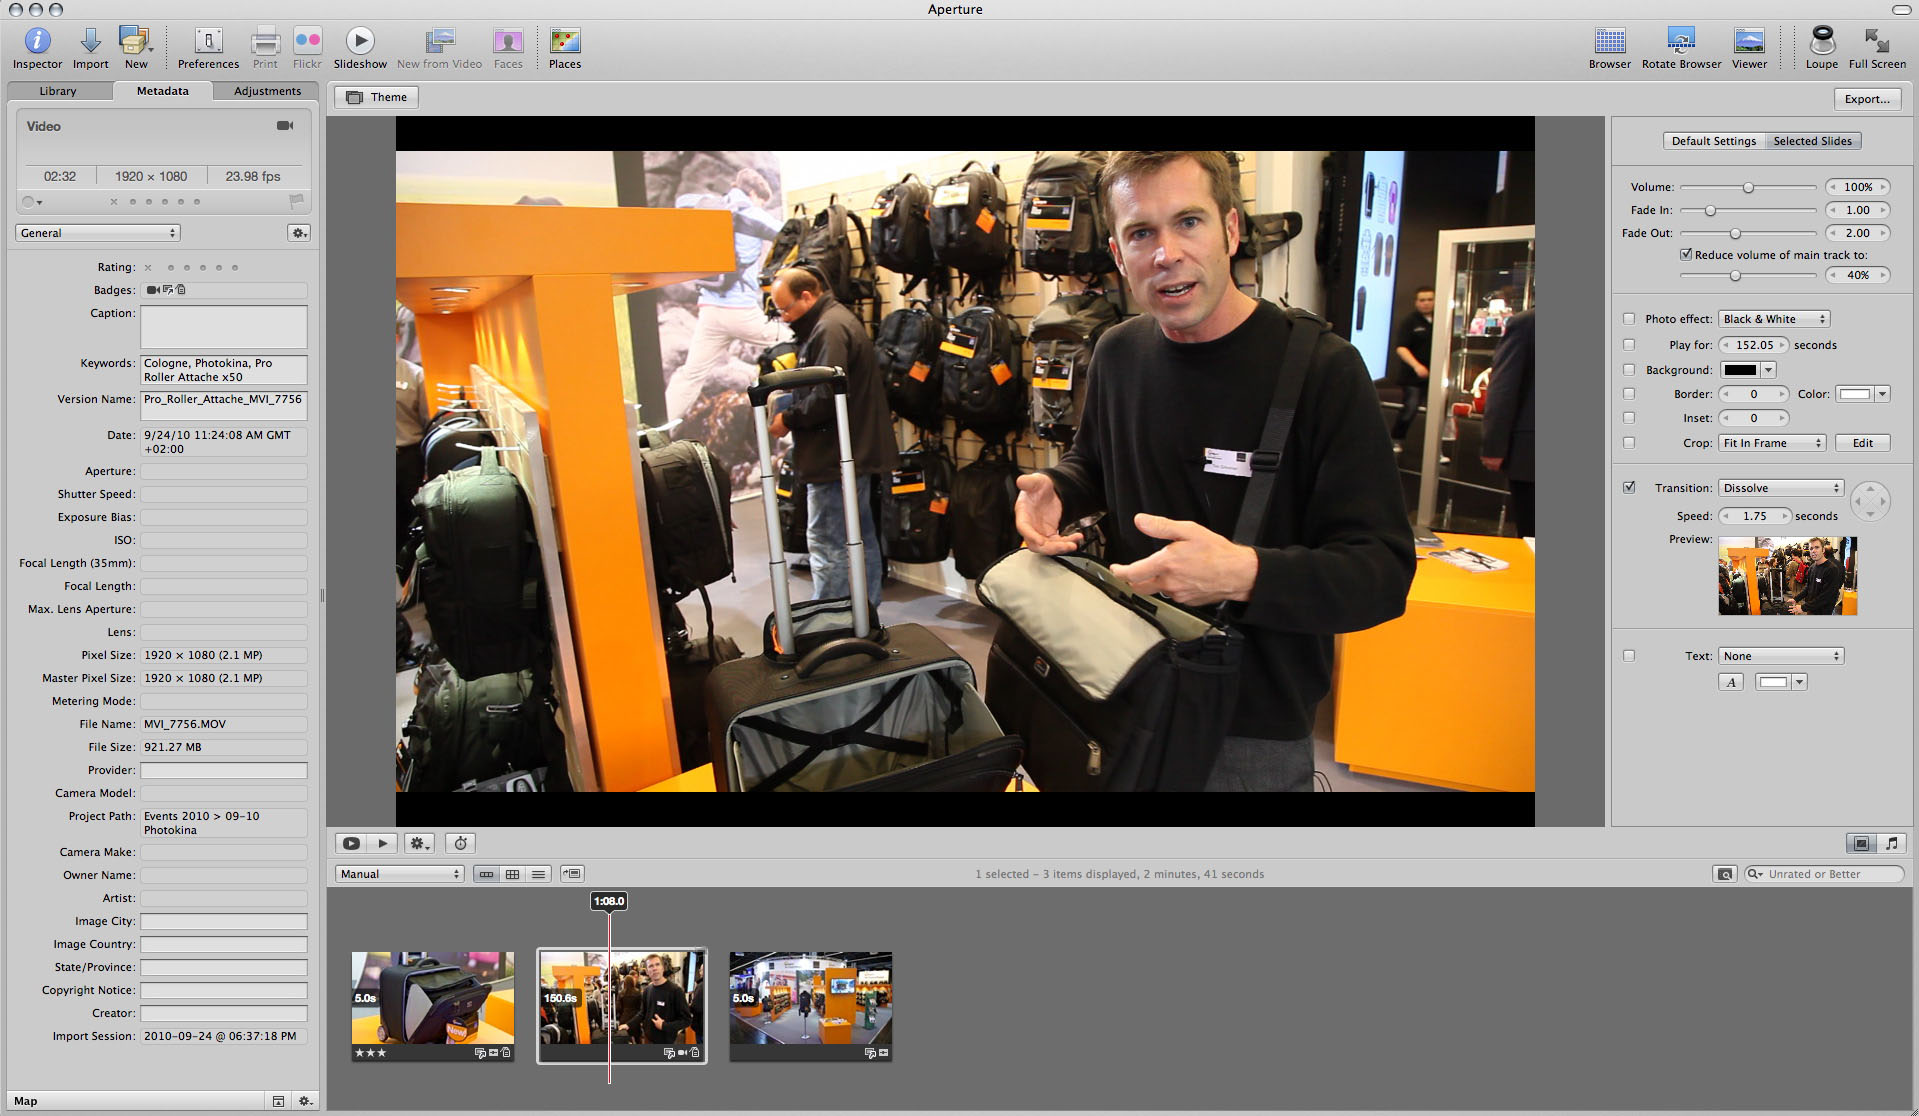 Video production in Aperture 3. Click on image for full size version.
I then export a 720p HD version directly out of Aperture and upload to YouTube. Streamlining this workflow allows me to get the sleep I need to be strong the next day, yet produce the content quickly.
And BTW... photokina is a blast!
More Aperture Tips and Techniques
To learn more about Aperture 3, check out my Aperture 3 Essential Training on Lynda.com. Also, take a look at our Aperture 3 Learning Center. Tons of free content about how to get the most out of Aperture.
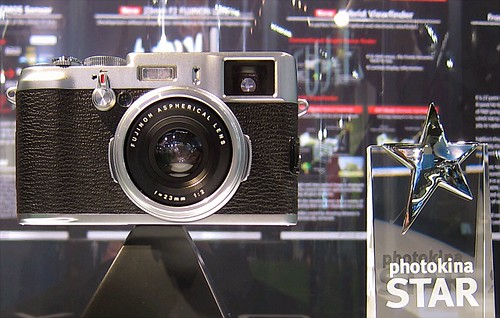
Awarded a photokina STAR award, the FinePix X100 reminds me of the finely machined cameras of the 1970s. The top level dials are all metal, the body is constructed of magnesium alloy, and the trim is leather. The camera features an APS-C CMOS sensor, 23mm (35mm equiv) f/2 Fujinon lens, and the hybrid viewfinder can switch from optical to EVF mode. Very innovative.
Fuji reps said we should see the camera in the Spring of 2011, probably for a hair less than 1000 Euros. It's a beauty.
Overall quality of product and displays has been top notch at photokina 2010. But these five items were my standouts for today. You'll notice that no prices are listed here. For some of the items, not all, if you have to ask, you probably can't afford... unfortunately that includes me too.
You can click on any of the images to view a larger version. All shots were captured with my Canon S90.
 Sigma 150mm f/2.8 APO Macro DG HSM prime lens. This is a beautiful lens for portraits and close up work. It focused smoothly, felt great, and has image stabilization.
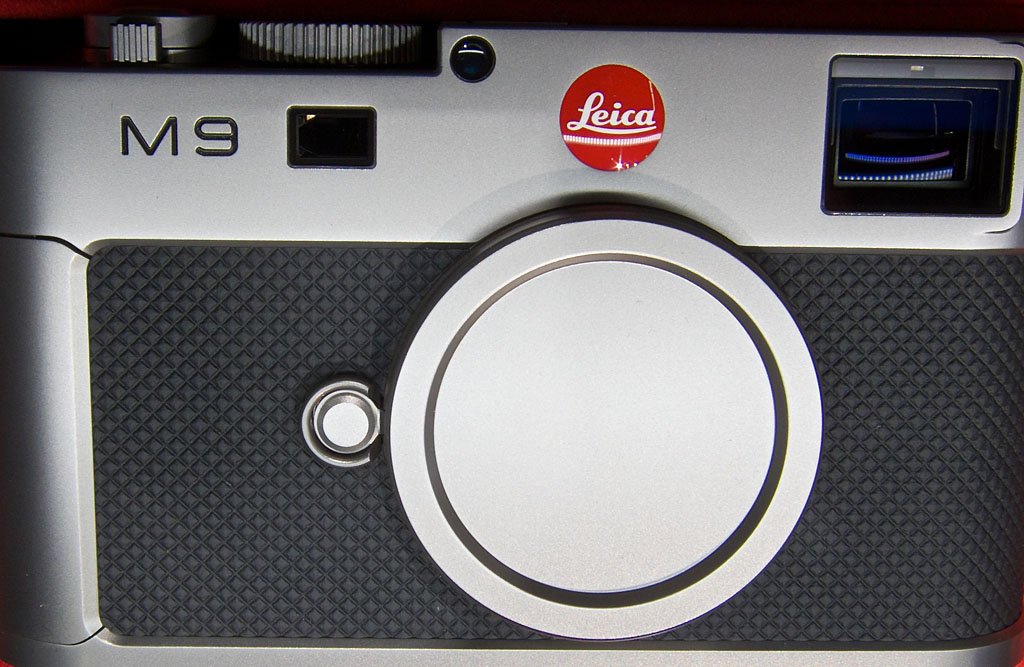 Normally I like black camera bodies. But this Leica M9 Titanium looks amazing. I think this is equipment artwork.
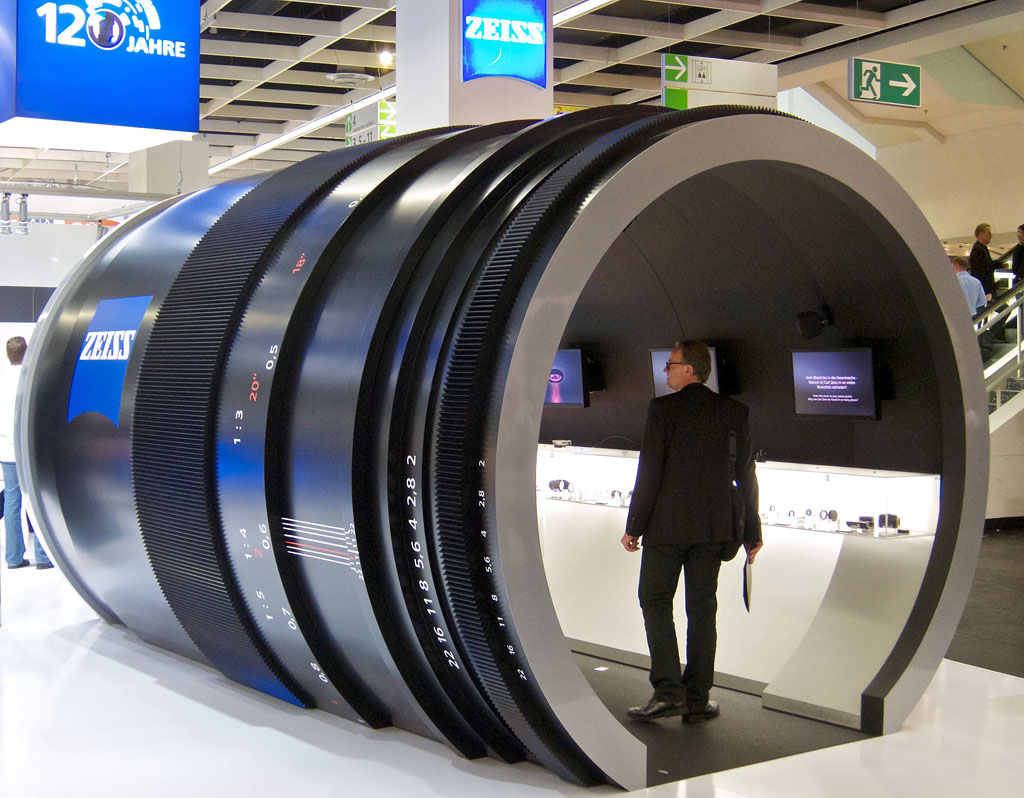 This giant Zeiss Lens barrel was one of the most clever displays I saw today. Inside was a mini museum. I thought it added fun touch to Hall 2.1, which was already one of my favorite locations.
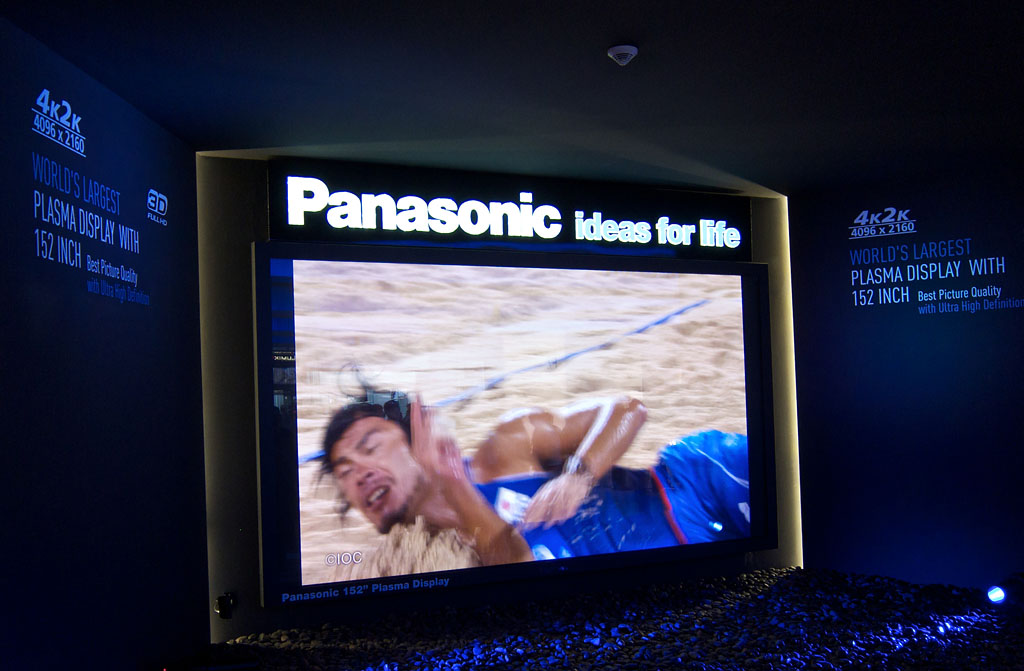 Panasonic 152 inch Plasma Display with HDTV and 3D. It was gigantic and crystal clear. If you watched 3D programming with the special glasses, it was better than your average movie theater.
 The Canon EF 300mm f/2.8L IS
 zoom is the telephoto I want. It's fast, hefty but not too big, and very sharp.
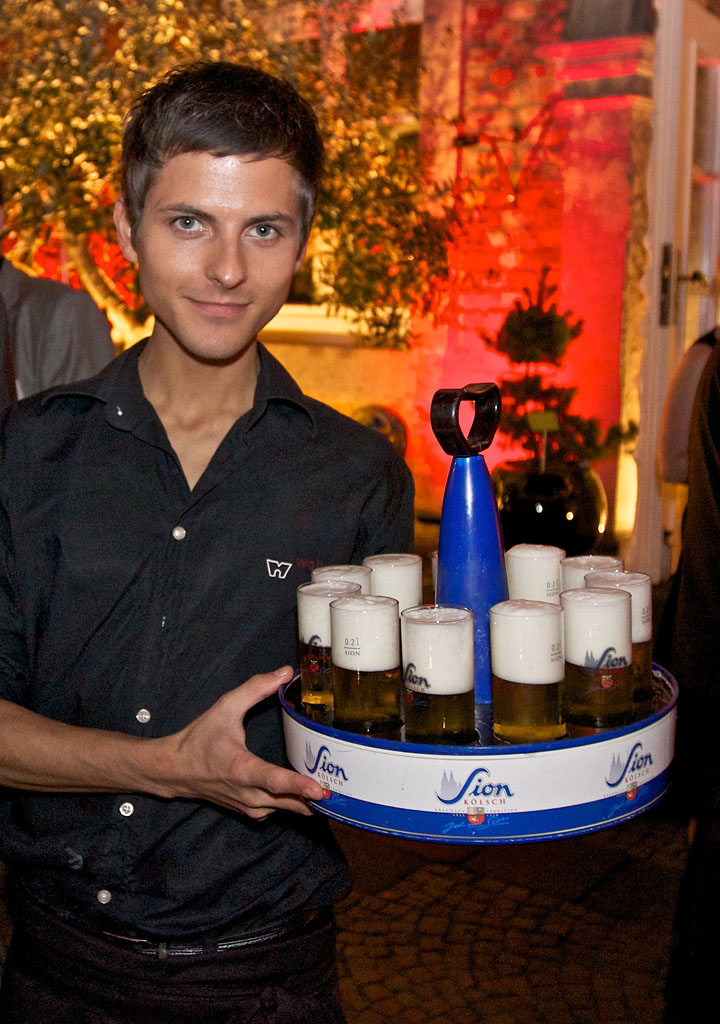
It's easy to get caught up with the "big shots": grand architecture and beautiful landscapes. But don't forget to mix in the little things too -- items such as the dinner presentation, interesting signs, and in this case, a style of beer service that I had never seen before.
I really like the straight cylinder glasses that beer is often served in here in Cologne, Germany. So when I spotted this waitperson navigating a crowd with 11 full glasses, I just had to ask for a shot (and then a beer, of course!). Maybe it was the intoxicating goodness of the delicious brew, but this turned out to be one of my favorite images of the night.
There's a lot of emphasis on equipment leading up to photokina in Cologne. And for good reason; many new announcements are made here. But what really impressed me after day one was the passion for photography that I witnessed.
 Photo by Derrick Story. Click on image for larger version.
People here just love this medium. It's both the picture and the camera. The tools and the art. Many of my discussions were framed by the desire to create better imagery. That doesn't mean we don't appreciate a finely designed camera. It's just that the conversation doesn't stop there.
I will certainly be talking about some of the new equipment that catches my eye. But first, I want to acknowledge the aesthetic eye, and that the goal is still to create photos that stir the emotions.
I thought you might like a sneak peek at what Lowepro is announcing at photokina today - the new Street & Field System. I'll talk more about it soon. For now, take a gander...
Munich, Germany -- They call them "beer tents." But they are actually huge structures that hold thousands of beer drinking customers. In the center is an elevated bandstand that fuels the party, sometimes to a fevered pitch.
 View in the HB tent from the elevated bandstand during Oktoberfest. Click on image for larger version.
I was already in a daze when I arrived on Sunday evening. Having left San Francisco early Saturday morning and flown to Munich by way of Philadelphia, I hadn't slept for over 24 hours as I wandered into the HB beer tent. I had never seen so many people drinking at once. Ever.
My friend, Oliver, who lives and works in Munich, knew the manager. When we said hello, he asked if I wanted a better view. "Of course!" I said. He then led us though locked doors to stairs that took us up to the bandstand. There we were. On top of the world looking down at thousands or party-goers, immersed in the band and Oktoberfest itself.
I knew my time there would be short. I began shooting with the Canon PowerShot S90 I had in my pocket. I remembered to record a string of frames that I hoped I could stitch together for a panorama. Here's the result. A view of Oktoberfest that very few ever see. Minutes later I was waved off the bandstand by the conductor. He had had enough of me. But I had my shots, and one heck of a view that I will never forget.
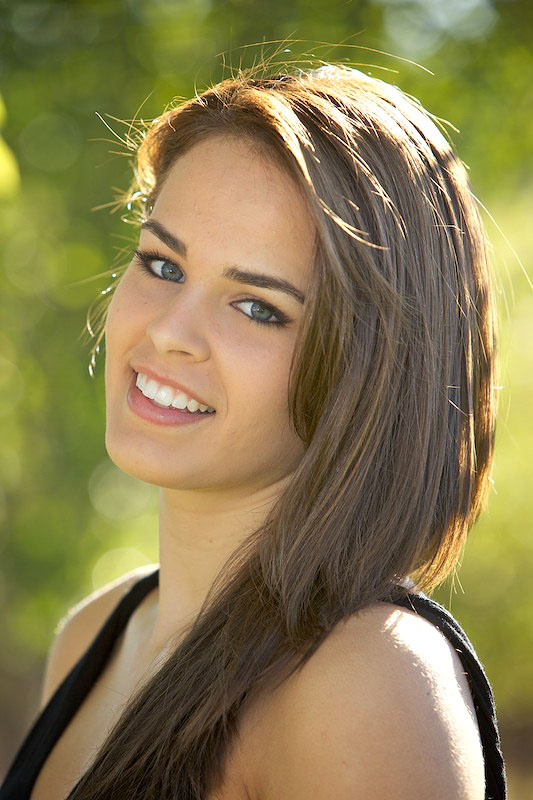
When you move the flash off the camera, it's easy to create natural-looking outdoor portraits. I like this technique because it lets me use the sun for rim lighting while I get to control the illumination of the face with my strobe.
In this example, I used a Canon Speedlite 580EX on a light stand triggered by a Canon STE2 Speedlite Transmitter
that was mounted in the hotshoe of a Canon EOS 5D Mark II
with a 70-200mm f/2.8 L zoom. I dialed the flash exposure back to -1.5 and the ambient exposure to -1.
Senior portrait shot on location using only the sun and a single off-camera flash for lighting. Click on image for larger version. Photo by Derrick Story.
I didn't use any diffusers on the flash itself, although I do angle it slightly upward and pull up the bounce flash card to slightly modify the light. I kept the 5D Mark II on a tripod so I could interact easily with my subject. The great thing about this set up is that I can work the shoot by myself without requiring assistants to hold reflectors, etc.
If you want to learn more about getting pro results from a single flash, be sure to check out my Off Camera Flash title on Lynda.com. I show you all sorts of helpful lighting techniques that are especially good for portraits.
More Off Camera Flash Tutorials
Off Camera Flash - Basic Techniques for Pro Results
Light Modifiers for Off Camera Flash
Off Camera Flash - The Single Light Portrait
"More Off Camera Flash" - Digital Photography Podcast 233
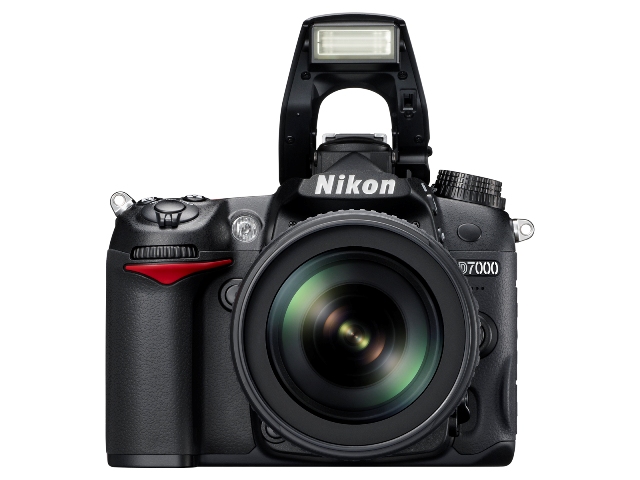
The Nikon D7000 is a camera that should have appeal to freelancers, photo journalists, and budding professionals. It combines durability ("protected by magnesium alloy top and rear covers and has durable sealing against dust and moisture") with 16.2 MPs and full HD video. Other goodies that I like include dual SD card slots, 6 fps burst mode, and an external microphone jack. And the best part is, all of these features are reasonably priced at $1,499 US.
If you're a Nikon shooter and ready to move up to a more robust DSLR body, take a look at the dpreview preview and the Chase Jarvis road test. I think Nikon found a sweet spot with the D7000.
Score one for Nikon. In a week where the two heavy hitters announced their premium compact cameras -- Nikon Coolpix P7000and the Canon PowerShot G12 -- Nikon upped Canon in one critical area: audio recording.
How ironic, right? These are cameras. They capture pictures. Yes, but they also record HD video (720p at 24 fps). And for many of us, having a device that doubles as a video recorder is a big deal. And everyone knows, except for Canon, maybe, that audio is half of video. So what am I talking about? Nikon included an external audio jack on the P7000 and Canon did not on the G12. If you want to use these devices to record video for publishing, one of them is going to give you a more professional product (Nikon P7000).
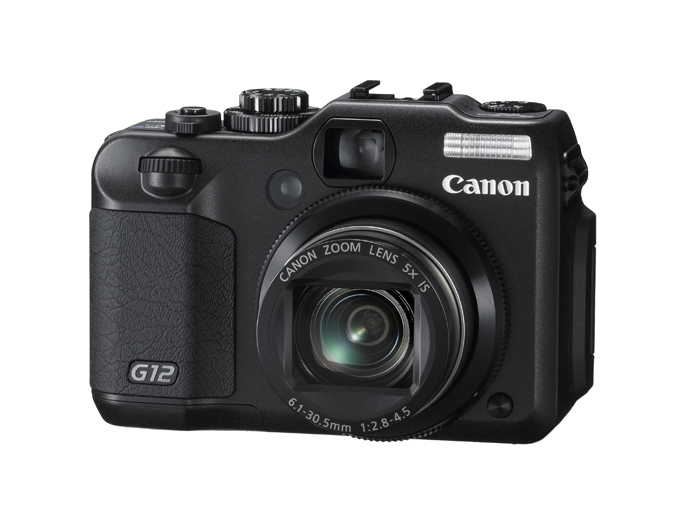
That doesn't mean that Canon slacked on the G12. The specs look great. But without external audio, I might as well stick with the Canon PowerShot S95 and save myself a few bucks, not to mention size and weight. I'll keep recording video with the 5D Mark II... for now, anyway.
In terms of photo assignment preparation, Germany is not a sunny beach on the Hawaiian Islands. At photokina, I have copious amounts of photos to shoot, gigabytes of video to record, hours or audio to capture, and lots of publishing. As much as I love my Canon S90 and iPad, I need the big guns for this trip. And I need to pack all that equipment wisely so I can move it from California, to Munich, to Cologne. This week I talk about DSLRs, fast lenses, and the Lowepro Pro Trekker 300 AWbackpack. I'm going to pack tight and fly right. Tune-in to find out how.
I've also published an article about bringing your gear on a plane, Make Sure Your Carry-On Gear Gets Onboard, if you want more information.
Listen to the Podcast
You can also download the podcast here (29 minutes). Or better yet, subscribe to the podcast in iTunes. You can support this podcast by purchasing the TDS iPhone App for only $2.99 from the Apple App Store.
Monthly Photo Assignment
Saturation is the September 2010 Photo Assignment. You can read more about how to submit on our Member Participation page. Deadline for entry is Sept. 30, 2010.
TDS Autumn 2010 Photography Workshop
The next TDS Photography Workshop will be Oct. 16-18, 2010. The event is sold out. But, you can place your name on the reserve list for the next workshop. Just drop me a line.
More Ways to Participate
Want to share photos and talk with other members in our virtual camera club? Check out our Flickr Public Group. It's a blast!
Podcast Sponsors
Red River Paper -- Try the $7.99 Sample Kit.
Make Your Photos Sizzle with Color! --
Technorati Tags:
digital photography, podcast, technique, Technology, The Digital Story, tips
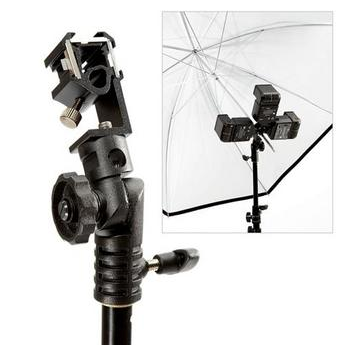
Wireless off-camera flash is terrific for location portraits and shooting on the go. But sometimes a single flash just doesn't have enough output. A simple solution is the Lastolite Triflash Bracket for $65. The bracket works with your existing light stands and umbrellas. But it allows you to mount up to three flashes on a single stand. There's the pop you're looking for.
I also read about a new version of this device called the Lastolite TriFlash Sync. It "features a built in sync system allowing the photographer to fire up to three flash guns from one triggering device. Featuring a built-in slave cell, the Lastolite TriFlash Sync can be adjusted to allow for none, 1, 2 or 3 pre flashes if required." But I haven't been able to find a dealer for this device yet. Will keep you posted if I do.
If you like this kind of stuff, be sure to check out my Off Camera Flash title on Lynda.com. I show you all sorts of helpful lighting techniques that are especially good for portraits.
More Off Camera Flash Tutorials
Off Camera Flash - Basic Techniques for Pro Results
Light Modifiers for Off Camera Flash
Off Camera Flash - The Single Light Portrait
"More Off Camera Flash" - Digital Photography Podcast 233
Successful air travel requires preparation. One of the most important details is your carry-on luggage. All of your camera gear must go onboard with you. A little preflight research will ensure that you and your lenses stay together.
Start by looking up the carry-one requirements for your airline. Take these numbers seriously because they represent the maximum size allowed onboard. If you have a big assignment, such as my upcoming trip to photokina in Germany, you'll need more gear than for a casual vacation in the Hawaiian islands.
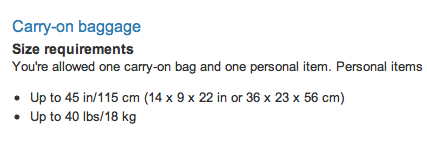 I checked the US Airways site for carry-on requirements, then compared them to my camera bag dimensions. Don't forget about the weight limit either!
Next, physically measure the bag you want to bring onboard. You can use the online specifications as a starting point, but not as the final word. I'll give you an example.
I'm taking a Lowepro Pro Trekker 300 AW to Germany because it's going to be a long, rugged trip, and I have to be prepared for a variety of assignments. On the product page, the dimensions are listed as 15.4 W x 14.2 D x 18.5 T inches. But, I removed the padded belly band and my physical measurements are 16 W x 9 D x 19 T. The big difference is the depth. Carry-on rules say 9", which I meet according to my measurements. So get our that ruler and confirm the dimensions.
Even with all of this preparation, you'll want to have a backup plan. Mine is to wear an empty photo vest onboard the plane. If nothing goes wrong, I simply fold it up and put it in the overhead compartment. But, if somehow I'm told I have to "check" my camera bag, I can pull out my most valuable gear and put it in my vest before I hand over the Pro Trekker 300. I also outfit my bag with TSA approved combination locks. They might prove just enough deterrent to the casual thief that my contents will still be there when I retrieve the bag off the luggage carousel.
My second carry-on is a slim laptop bag with a trolly sleeve that slides over the handle on my roller suitcase. My computer, hard drives, and cables go in here. I don't worry about this bag since I can slide it under the seat in front of me if necessary.
You can never prevent things going wrong while traveling by air. But with preparation, you can give yourself the best odds possible.
While we're waiting for iOS 4 for the iPad to bring us native WiFi printing, there's a handy free app available right now for folks who use HP printers. HP iPrint Photo 3 enables you to print photos in a variety of sizes -- from snapshots all the way up to A4. The software also includes easy wireless document sharing between your Mac and the iPad. Then, if you want, you can print those PDFs or text files directly from the iPad. Nifty stuff.
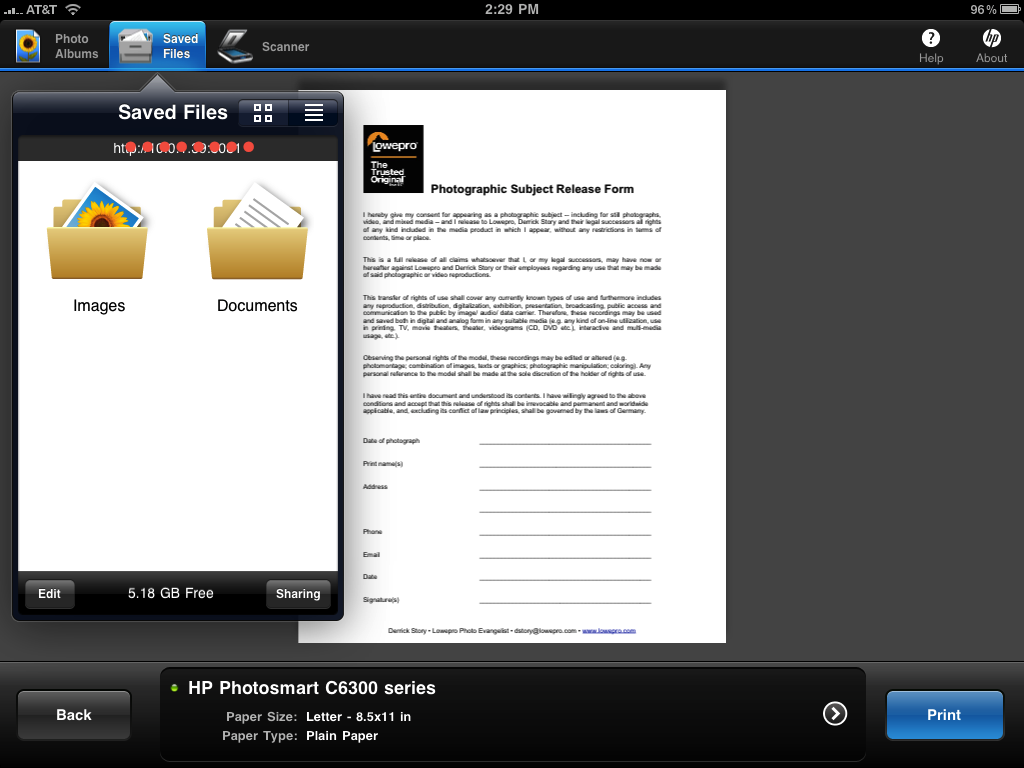 Wireless document sharing from my Mac to the iPad was a pleasant surprise with HP iPrint. All I had to do was drag my files to the server icon on my Desktop, and they instantly appeared on my mobile device for reading, storing, and printing.
I tested this application on my HP C6380 "All in One" and on the HP C8100, and it worked smoothly on both. I could print any photo on my iPad, or save PDF and text files from my Mac to the iPad for printing later. Once I have the documents stored in HP iPrint, I can output them to any compatible HP printer, regardless of where I happen to be at the moment. The first items I added were model releases, just in case I have to output extras on the road.
If you're curious about your printer and this app, here's the official list of compatible devices. If you have an HP e-All-in-One device, you can also scan documents and photos wirelessly from the device to your iPad.
There are a few basic editing tools too. If, for example, your photo isn't sitting on the paper the way you want, you can use the two-finger pinch, expand, or rotate to reposition the image. This is particularly handy for shots that have different dimensions than the paper you want to print them on. If you get stuck, there's a terrific Help menu available in the upper right corner of the application.

Out goes the built-in GPS from the P6000, in comes HD video recording (720p at 24 fps) with an external mic jack. Is Nikon ready to go head to head with Canon's G11 and Panasonic's LX5? DP Review has some good thoughts about this in their hands on preview of the Nikon P7000.
If you like what you see, you can preorder the Nikon Coolpix P7000 for $499 on Amazon.com, or from your favorite photo retailer.
How can iPad-toting photographers store large amounts of data while on the road? The folks over at HyperShop may have a solution: the HyperDrive iPad Hard Drive. About the size of a portable USB hard drive, the HyperDrive iPad is a media storage device that connects to the iPad via the Camera Connection Kit (yes, you have to have that first). Models range in capacity from 120 GBs to 750 GBs.
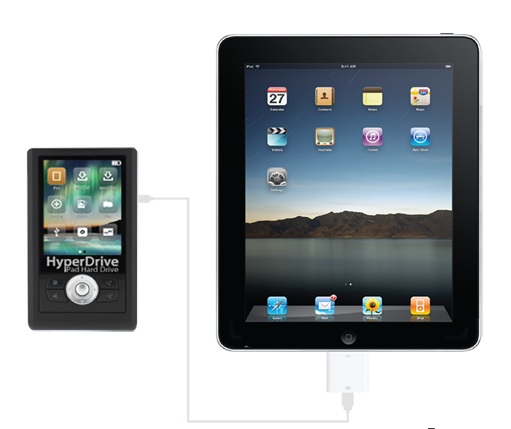
Sanho, the makers of the product, have figured out how to work around the iPad's 32 GB size limitation of external drives. With 2 memory card slots and a 3.2" color LCD, the Hyperdrive iPad can receive and store images directly from your camera's memory card. If you want to transfer or view any of the media on your iPad, then connect the device via its USB cable the the Apple Camera Connection Kit. Suddenly the iPad becomes a long term travel device thanks to this additional storage and back up.
Prices range from $299 US to $599, and you can purchase directly from the HyperDrive site.
In workshops, I often get at least one question about copyright, and how necessary it is to protect your images. My answer always begins with, "Well, I'm not s lawyer, but here's what I know..." Now, thanks to the folks at PhotoShelter, we have a real lawyer to dispense knowledgable advice.
"In the article, 5 Ways Photographers Can Protect Their Images Online, Carolyn Wright, the "photo attorney," lists five things photographers should do to protect their work. I will tell you up front that these are measures that many shooters do don't do, but I think they are good to know.
Here's an example of Carolyn's advice: "Register your copyrights to your photos. When a photo is not registered with the U.S. Copyright Office prior to the infringement (or within three months of the first publication of the photo), a copyright owner may recover only "actual damages" for the infringement (pursuant to 17 U.S.C. 504 (b)), instead of statutory damages. Courts usually calculate actual damages based on your normal license fees and/or industry standard licensing fees. You also may recover the profits the infringer made from the infringement if they aren't too speculative. Unfortunately, actual damages usually don't amount to much so that attorneys will not take your infringement case on a contingency basis."
Take a look and see what you think.
I started using graduated filters years ago when I was shooting film, inspired to try them through the work of Galen Rowell. Graduated filters were one of his "secrets" to creating those fantastic landscape images.
These days I'm no longer putting tinted glass in front of my lenses, but I still use graduated filters. The difference is, now I apply them in post production using Adobe Camera Raw. What's interesting is that the mental process hasn't changed that much from the film days. The adjustment is that now I visualize how I'm going to apply the filter in post production rather than at capture.
In this week's episode, I talk about graduated filters, old and new, and the process of visualization that I use while shooting. If you want to see a before and after comparison, take a look at my article, Graduated Filter Adjustments in Adobe Camera Raw.
Listen to the Podcast
You can also download the podcast here (34 minutes). Or better yet, subscribe to the podcast in iTunes. You can support this podcast by purchasing the TDS iPhone App for only $2.99 from the Apple App Store.
Monthly Photo Assignment
Saturation is the September 2010 Photo Assignment. You can read more about how to submit on our Member Participation page. Deadline for entry is Sept. 30, 2010.
TDS Autumn 2010 Photography Workshop
The next TDS Photography Workshop will be Oct. 16-18, 2010. The event is sold out. But, you can place your name on the reserve list for the next workshop. Just drop me a line.
More Ways to Participate
Want to share photos and talk with other members in our virtual camera club? Check out our Flickr Public Group. It's a blast!
Podcast Sponsors
Red River Paper -- Try the $7.99 Sample Kit.
Make Your Photos Sizzle with Color! --
Technorati Tags:
digital photography, podcast, technique, Technology, The Digital Story, tips
One of the most useful non-destructive editing tools in Adobe Camera Raw (as part of the Photoshop package) is the Graduated Filter. It helps us cope with contrasty scenes where we often have to choose between not blowing out our highlights or plugging up our shadows. I used the Graduated Filter on this snapshot captured in Raw with a Canon S90 compact camera.
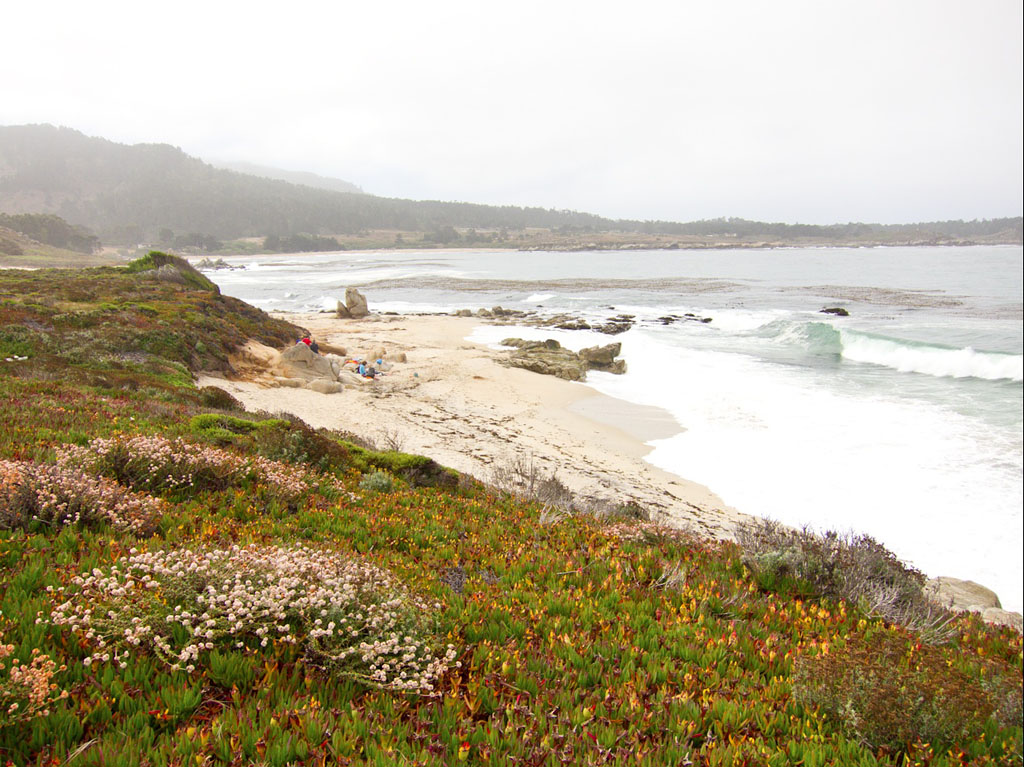
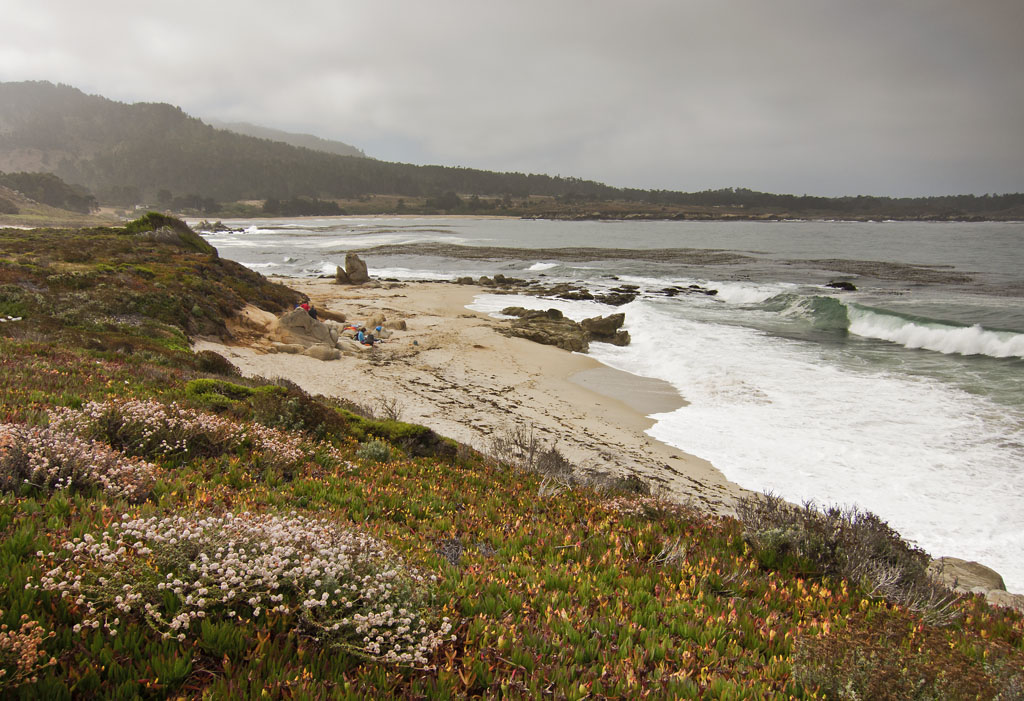 Carmel River State Beach, CA. I used the Graduated Filter tool in ACR to balance the blow out highlights in the sky and water with the properly exposed landscape foreground. Click on image for larger version.
Take the above image for example. What you see here is the finished product. But what I recorded originally with the Canon S90 is below. When I took the picture, I exposed for the ice plant foreground knowing that I was going to lose highlight detail in the overcast sky and water.
Knowing this, I shot in Raw and planned on using the Graduated Filter tool in ACR to recover those highlights in post production. I used two filters, pulling one down from the top and another (less intense) filter from the bottom up. My goal was to direct the viewer's eye to the beach, water, and ice plant in the lower 40 percent of the composition. If you want to see the difference, take a look at the original photo below.
 Original image with blown out highlights.
There's quite a difference.
If you want to use this tool, open your image in ACR (I usually go CMD-R from Bridge), and click on the fourth tool from the right in the upper tool bar. Drag the mouse from top to bottom, and just like that, you have a graduated filter adjustment that you can fine tune. It makes a tremendous difference, even in snapshots such as this. And not only is it good to help recover tones, but you can actually use multiple filters to shape the image in a way that highlights exactly what you want.
In my latest article for Macworld Magazine, Discover Preview's hidden image editing powers, I demonstrate Preview's prowess for photography. Many Mac users rely on the free application for reading PDFs, but some of those same users don't know they can:
- Adjust color and luminance
- Resample images
- Batch process
- Select components and drop out background (Smart Lasso)
- Soft proof before printing
And more. Preview is truly a hidden gem. You might want to check out the article then revisit the application.
If you've been following the TDS podcasts lately, you know that I've been talking about Blurb books and our newest site feature, Blurb Book Page of the Month. We opened entries in August, and I'm happy to announce our first featured artist, David Bream. You can read all about his project in the article, August 2010 Featured Book Page - David Bream, "Window Seat".
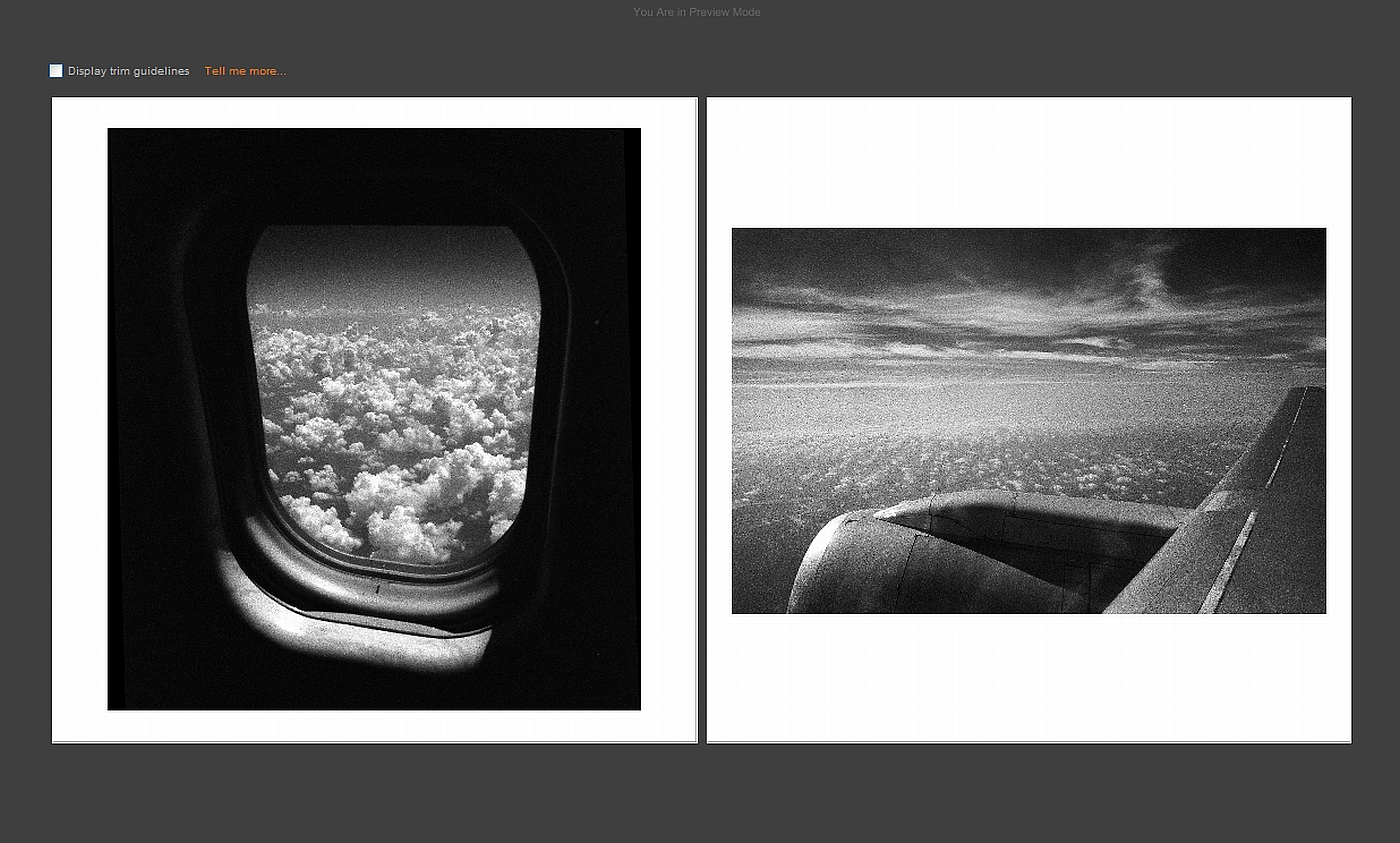 From the Blurb book, "Window Seat" by David Bream. (Click on image to see larger version.)
Seasoned TDS members might recognize David's name. He's been a regular participant in our monthly Photo Assignments. At first, David was hesitant to try the book thing:
"I listened to your podcast regarding making a book, dismissed the idea, rethought it, and decided to give it a try. I downloaded the software, and spent the next 3 hours making my first small sampler booklet, which I received about a week ago. I could not believe the high quality of both the color and black-and-white printing, and the speed with which the book was printed and delivered to me," wrote David.
If you're like David, and want to experiment with this medium, we have just the opportunity for you. This is a monthly feature, and we're already receiving submissions for Sept. 2010. If you want to learn how to share your work, visit Win by Entering "Blurb Book Page of the Month" for all the details. Hope to see your work in our inbox soon!
photokina comes around every two years, and in three weeks it will be here again. Arguably, it's one of the largest photography tradeshows in the world, attracting thousands to Cologne, Germany. This year, I will be among them.
I'm traveling to Europe on assignment for Lowepro, as part of my Photography Evangelist job. I'm packing up a Canon 5D Mark II, Olympus E-P1, lighting, microphones, and lenses in my Pro Trekker 300 AW. I'll be shooting stills, recording video, and publishing on the new Lowepro blog... and here too, of course.
Starting on September 21, I'll post a "photokina shot of the day" here on TDS. I'll definitely be focusing on new gear announcements, but I won't be limiting my coverage to equipment. People and events are also interesting, and at times they may upstage the hardware.
If you have a hot tip for the show, or for Cologne, please send me email. I think this is going to be an interesting week, both for me in Cologne, and hopefully for you too as you read about the activities and announcements there.
And if you're not already following me on Twitter, now might be a good time to click the button.
Promotions


![]()


Subscribe


