October 2011 Archives

iPhone 4S on a Gymbl Tripod

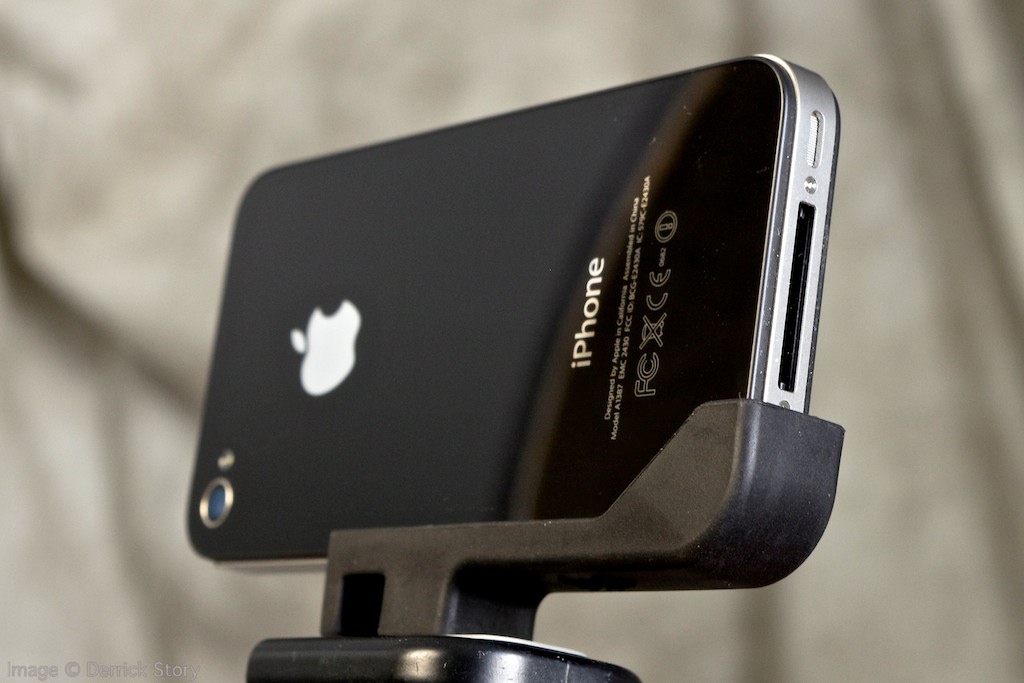
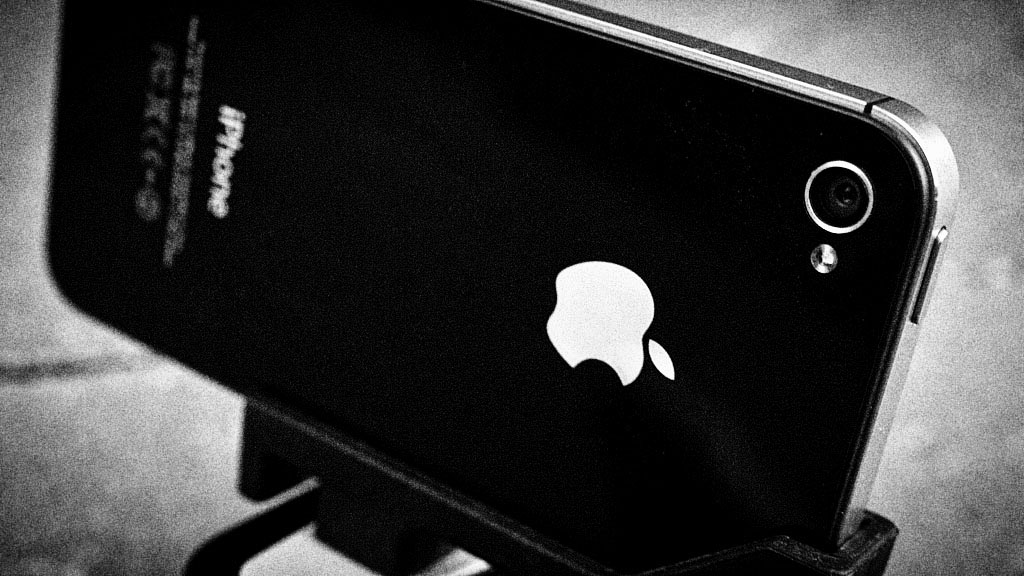
I just spent a week on the road with the Gymbl case and tripod for my iPhone 4S. It's a clever combination of a hard case that protects the iPhone, and includes a low-profile mount to attach the tripod/stand in a jiffy. The two pieces work together great, and they add little bulk or weight to you pockets.

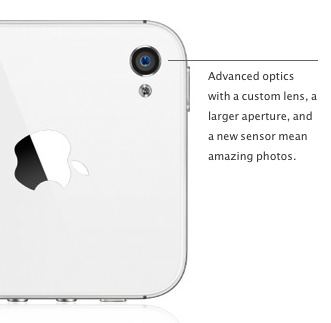
The case itself is rigid plastic that covers the back and edges of the iPhone. There are beveled openings for the camera lens, flash, lock slider, volume buttons, earphone jack, power button, dock connector and speakers. You shouldn't have to remove the phone from the case unless you have a special need for it to be unencumbered.

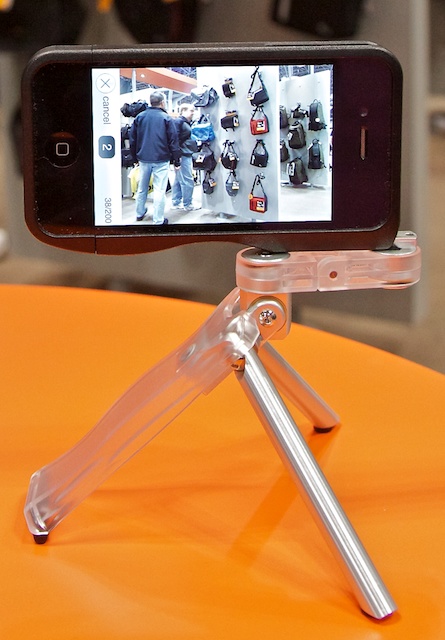
The Gymble tripod/stand is Swiss Army knife in design. At first it looks very simple. But then you realize that it includes a regular tripod socket (for a standard set of sticks), and its own mount that provides for a wild variety of positions. Be sure to take a look at the Gymbl site to see all the possibilities. You might miss one otherwise.

I used it as a tripod to record this time lapse movie at PhotoPlus Expo. But I found other uses for the Gymbl too. When taking a coffee break, for example, I could position my iPhone at a comfortable viewing angle to read the daily news or check email. It also works as a secure grip for recording handheld video.

The Gymbl costs about $69,and that includes both the durable case and clever tripod/stand. The metal and high tech plastic components are nicely machined and well-designed. The tripod itself is very light and easily slips in any pocket.

If you use your iPhone for photography, video, and reading, you'll probably find that the Gymbl provides value for your investment. If you don't use these functions often, the price is high for just the case (which would be the component you regularly use when the tripod is still at home.)

Nimbleosity Rating: 3.5 out of 5

(rating would climb to "4" if the price were $20 less).


The Digital Story on Facebook -- discussion, outstanding images from the TDS community, and inside information. Join our celebration of great photography!


Time Lapse Boogie with iPhone 4S

You could call it: "time lapse photography made easy." I mounted an iPhone 4S on a Gymbl tripod and launched the Joby Gorillacam app to make this 1-minute recording of Friday morning at PhotoPlus Expo just as the doors were opening.

The video consists of 328 frames played at 6 frames per second. I used the Pro version of QuickTime Player 7 to take the individual frames from the iPhone and make the movie. The images were automatically sent to my Mac using Photo Stream.

iPhone 4S with Gymbl Tripod iPhone 4S mounted on a portable Gymbl tripod.

While still in QuickTime 7, I added a royalty free music soundtrack as the finishing touch. I think the boogie beat goes great with the time lapse images.


The Digital Story on Facebook -- discussion, outstanding images from the TDS community, and inside information. Join our celebration of great photography!


Eating Big in New York City

I saw this served across from me at Trattoria Dell'Arte, 900 7th Ave (between 56th and 57th st) in New York City. I think it qualifies for a Man vs Food episode.

Crazy Meal (Not Mine Though!)

In case you've never seen this dish before, it's Veal Parmigiana. And no, he did not finish the meal. So in this case, food won!

I'm heading out for Day Two of PhotoPlus Expo. If you're in town, come by and see me. I should be around the Lowepro booth most of the day. My class on Revenue Streams is Saturday morning also.


The Digital Story on Facebook -- discussion, outstanding images from the TDS community, and inside information. Join our celebration of great photography!


pro_messenger_200_aw.jpg

It looks like that comfy soft canvas bag from a previous era, but the new Lowepro Pro Messenger 200 AW camera bag is anything but old fashioned.

What feels like canvas is actually a high-tech fabric that is lighter, more weather resistant, and wears longer than traditional fibers. The 200 AW can accommodate a 70-200mm f/2.8 lens on body, and still have room for other lenses, accessories, and an iPad.

I've been using the Pro Messenger 200 AW for a while, and I've come up with an alternative way to pack the bag by creating a false bottom with one of the dividers. Here's how that works.

If you like shoulder bags for you gear, and find the tactile sensation of a canvas-like fabric appealing, then take a look at the Pro Messenger 200 AW. It's available for preorder from B&H Photo for $189.95.


The Digital Story on Facebook -- discussion, outstanding images from the TDS community, and inside information. Join our celebration of great photography!


Don't Over Polarize

When working in clear air, especially in the mountains, keep an eye on your sky when using a polarizing filter. Believe it or not, you can overdo it and ruin your shot.

High Sierra Lake I had to back off the polarizer in this shot to get a consistent blue in the sky. Other images in this series didn't fare as well.

The tendency for many photographers using a rotating polarizer is to crank it all the way for the most intense effect. The problem at times can be that the effect isn't applied evenly across your image. The result can be a splotchy blue sky that is very difficult to fix in post production.

Look out for this phenomenon when working in the mountains. You might find that you get the best photograph with just a little polarization.


Find great deals at the TDS Photography Store on Amazon.


The Passionate Photographer

In his latest book, The Passionate Photographer,Steve Simon presents 10 steps toward becoming great. For example, in Step 3, Work It: Don't Give Up on the Magic, he writes, "Your first shot is your starting point. Give yourself a variety of options. It's a game of inches. Slight movements have dramatic effects on your final image, altering the juxtaposition of foreground subjects with background elements and the horizon." Each step is explained from a variety of approaches and illustrated with numerous images.

This is not a book for the beginning photographer still learning the camera. The Passionate Photographer is for shooters ready to take the next step. With its mix of inspiration and perspiration, Steve Simon challenges you to get better.

I'd keep this book in mind for the passionate photographer in your life. It would be a great holiday gift.


Find great deals at the TDS Photography Store on Amazon.


Two big topics this week! I'm heading out to PhotoPlus Expo in New York and will talk about what's going on at that event. It's one of my favorite photography gatherings. Then I'll spend some time discussing the Pentax K-5 DSLR that I've been testing. It's quite a camera, and I have lots to say about it. In fact, I'm going to visit the Pentax folks in NY at PhotoPlus to see if I can get a few more lenses for testing. All this, and more, in this week's TDS podcast.

Listen to the Podcast

You can also download the podcast here (30 minutes). Or better yet, subscribe to the podcast in iTunes. You can support this podcast by purchasing the TDS iPhone App for only $2.99 from the Apple App Store.

Monthly Photo Assignment

Side Lighting is the Oct. 2011 Photo Assignment. You can read more about how to submit on our Member Participation page. Deadline for entry is Oct. 31, 2011.

TDS Nov. Aperture Workshop

I've organized an Aperture Workshop on Nov. 12th and 13th. Signups are in progress now. If you want a registration form, or just more information, drop me a line. BTW: We include a professional model shoot as part of this workshop. Just saying...

More Ways to Participate

Want to share photos and talk with other members in our virtual camera club? Check out our Flickr Public Group. And from those images, I choose the TDS Member Photo of the Day.

Podcast Sponsors

Red River Paper -- The $7.99 Sample Kit is back! And with free shipping.

Make Your Photos Sizzle with Color! -- SizzlPix is like High Definition TV for your photography.

Need a New Photo Bag? Check out the Lowepro Specialty Store on The Digital Story and use discount code LP20 to saven 20% at check out.


Technorati Tags:
, , , , ,


Pentax K-5 DSLR in the Elements

I packed a Pentax K-5DSLR on a recent trip to the Eastern Sierra to test its ruggedness and picture quality. In short, it impressed me on both counts.

Pentax K-5 Pentax K-5 with Cokin Graduated Filter. Photos by Derrick Story. Click on image for larger size.

On the very first day I found myself in the rain at 9,000 feet at Sonora Pass in Northern California. I had to protect the other cameras I had with me. But with the K-5 in hand, I marched out into the hostile environment and shot pictures for about 20 minutes.

Sonora Pass in the Rain In these hostile conditions I could march out into the environment with the Pentax K-5 in hand.

In terms of performance, good conditions or not, this camera has some excellent specs: 16.3 APS-C image sensor, useable ISO from 80-3200, 7 fps burst mode, 1080p video, 3" LCD with 921,000 dots, 100% field of view optical viewfinder, body-based shake reduction system, both Pentax PEF Raw files and Adobe DNG capture, and in-camera HDR.

Here's one of my favorite photos from the trip captured handheld at twilight with the Pentax K-5.

outside_bridgeport_k5 Twilight landscape capture with the Pentax K-5 and and kit 18-55mm zoom. Click on image for larger size.

You can get this camera and lens for Pentax K-5$1,350 US. And for your investment, you get a serious camera for outdoor work. I'll be writing a bit more about the Pentax K-5 in coming weeks, including a full review on Macworld Magazine.


Find great deals at the TDS Photography Store on Amazon.


Morning Walk with the Olympus PEN Mini

I love the morning light. So as I'm heading out the door, I usually grab a camera for my walk. Today, I had the Olympus PEN E-PM1with the 17mm f/2.8 prime lens. I love this combination because it is very compact, yet produces great results.

Waning Sunflower in Morning Light

Eggs Chickens Lemons Figs

Morning Ride

I'll have the PEN Mini with me on my trip to Photo Plus Expo this week. If you see me there, please say hi!


Find great deals at the TDS Photography Store on Amazon.


Art and Soul

The first time I saw Brian Smith shoot, I realized how he makes those compelling portraits. Brian is like a sculptor. And with his camera he chips away all distracting elements until he discovers the essence of his subject.

You can experience this for yourself by getting your hands on a copy of Art & Soul, a stunning collection of portraits and thoughts by well-known actors, musicians, and filmmakers. Brian teamed up with editor Robin Bronk to portray the thoughts and images of dozens of stars sharing their views on the importance of art. The book was created in partnership with the Creative Coalition, and a portion of the proceeds will support their nonprofit programs.

Anne Hathaway photographed by Brian Smith Anne Hathaway photographed by Brian Smith

Now here's the truly amazing part. You can purchase this book on Amazon for $26 with free shipping. And it's a lot of book: 13" x 10.5", 256 pages, over 4 pounds.

I recommend it not only for all portrait photographers, but for anyone who loves the arts and admires those who create it. Art & Soul is inspiritional reading. You may want to buy two copies: one for the artist in your life, and the other for you.


Find great deals at the TDS Photography Store on Amazon.


Make Your Own Photo Thank You Cards

Red River Thank You Card

Want to say "Thank You" to that office coworker who went the extra mile, school volunteer who helped your kids, or hair cutter who made you look spectacular? Hand them a personalized photo card that you designed and produced yourself.

One size that I think is particularly attractive is the 5.5" x 4.25" A2 card produced by Red River Paper. There are six surfaces available in this size: 1 glossy, 3 mattes, and 2 specialty. Red River also offers plenty of help so you can set up your inkjet printer to produce these mailable works of art. For the finishing touch, put your cards in envelopes or clear top boxes.

And remember, the holiday season is right around the corner. Choose a handful of your favorite photographs and print a stack of cards to have on hand. Not only will the recipients be impressed with your artistic prowess, many will be flattered that you've shared your work with them.


Red River Paper -- The $7.99 Sample Kit is back! And with free shipping.

Glif Tripod Adapter for iPhone 4

It's as light as a feather and as snug as a glove, and it mounts your iPhone to a tripod or serves as a stand. It's the Glif for the iPhone 4/4S. I keep one in my shirt pocket when I'm out and about. I use the Glif for making movies as well as watching them. For $20, it will kick-start your photography with your new iPhone.


Find great deals at the TDS Photography Store on Amazon.


PhotoSync Import

Now, more than ever, your iPhone photos need to be incorporated into your photography workflow. With the 8 MP camera in the iPhone 4S, you have print-worthy images of important events that should be properly cataloged.

In iOS 5, Apple introduced Photo Stream to help with this situation. I'll cover the ins and outs of this technology in a future post. But for those who need a bit more control over sync between iPhone and computer, or for iOS 4 users, there's a terrific app $1.99 called PhotoSync that I have found invaluable for managing my iPhone photos.

PhotoSync easily moves images from the iPhone to a dedicated folder on my Mac. I then import those pictures into an Aperture library. On import I can add more metadata to the images and organize them as well.

Here are the steps.

  • Install PhotoSync on the iPhone and Mac.
  • Launch PhotoSync on the iPhone.
  • Choose images to sync. (First time sync all, then just new shots in the future.)
  • Select which device to sync to. You choose your computer, iPad, iPod Touch, or another iPhone.
  • If PhotoSync is active on the receiving device, it will show up in the list of destinations on your iPhone.
  • Upload the photos from the iPhone to the Mac.
  • Open Aperture and choose Import.
  • Ensure that the "Do not import duplicates" box is checked.
  • Click Import and enjoy working with your images.

Aperture Import of PhotoSync Images The Aperture Import dialog for my iPhone images. Click on image for larger size.

I don't maintain just one Aperture library. I have many that I use for different purposes. One of those libraries is dedicated to my mobile photography. This workflow, using PhotoSync, makes it easy to keep my iPhone pictures safe, and available for use.

More Aperture Tips and Techniques

My next Aperture Workshop is Nov, 12-13, 2011 in Santa Rosa, CA. Write me if you're interested in attending.

To learn more about Aperture 3, check out my Aperture 3 Essential Training on Lynda.com. Also, take a look at our Aperture 3 Learning Center. Tons of free content about how to get the most out of Aperture.


The Digital Story on Facebook -- discussion, outstanding images from the TDS community, and inside information. Join our celebration of great photography!


The upgraded camera is one of the major features of the iPhone 4S. But does it have enough horsepower to be your everyday compact camera? In this podcast I review the specs and features of the iPhone 4S camera, then talk about how it performed in my testing. Plus you'll learn tidbits such as the ISO range, shutter speeds available, how its HDR works, and more.

Also be sure to check out iPhone 4S Camera Pros and Cons that has some good supplemental infomation in easy to absorb list form.

Listen to the Podcast

You can also download the podcast here (32 minutes). Or better yet, subscribe to the podcast in iTunes. You can support this podcast by purchasing the TDS iPhone App for only $2.99 from the Apple App Store.

Monthly Photo Assignment

Side Lighting is the Oct. 2011 Photo Assignment. You can read more about how to submit on our Member Participation page. Deadline for entry is Oct. 31, 2011.

TDS Nov. Aperture Workshop

I've organized an Aperture Workshop on Nov. 12th and 13th. Signups are in progress now. If you want a registration form, or just more information, drop me a line. BTW: We include a professional model shoot as part of this workshop. Just saying...

More Ways to Participate

Want to share photos and talk with other members in our virtual camera club? Check out our Flickr Public Group. And from those images, I choose the TDS Member Photo of the Day.

Podcast Sponsors

Red River Paper -- The $7.99 Sample Kit is back! And with free shipping.

Make Your Photos Sizzle with Color! -- SizzlPix is like High Definition TV for your photography.

Need a New Photo Bag? Check out the Lowepro Specialty Store on The Digital Story and use discount code LP20 to saven 20% at check out.


Technorati Tags:
, , , , ,


iPhone 4S Camera Pros and Cons

Apple's latest iPhone comes equipped with an overhauled camera that sports many useful features. Even though I give it an overall "thumbs up," I do have a few nits with this pocketable point and shoot. Here's my list of pros and cons.

iPhone 4S Camera

Pros

  • Operates more like a camera. Press Home button twice to reveal camera icon. This helps photographers respond quickly to photo opps. Volume button doubles as shutter release. Fast focusing and reasonable shutter lag. Overall, an enjoyable picture taking experience.
  • Increased resolution with 8 MP backside illuminated sensor. Improved dynamic range too. Movies now at full HD (1080p).
  • Improved 5-element f/2.4 lens.
  • Useful HDR option that helps photographers tame harsh, contrastly light.
  • Responsive AE/AF lock puts exposure and focus control in the hands of the shooter.
  • Close focusing allows iPhone to serve as a mini scanner to record information faster than typing.
  • Handy editing controls (rotate auto enhance, red eye removal, and cropping) allow for quick clean up while reviewing images. Cropping tool is non-destructive. You can return to a cropped image, choose crop again, and recrop a different way. (Thanks Erik Wessel-Berg for that tip.)
  • Excellent image quality for a mobile phone.

with_hdr_iphone_4s.jpg With HDR turned on, you can better tame harsh, contrasty light.

no_hdr_iphone_4s.jpg You really notice a difference in this type of light when HDR is turned off.

Cons

  • Lens is at the bottom of camera when using the volume button as the shutter release. Much better to have the lens closer to shutter button.
  • Lack of burst mode is puzzling given the horsepower this camera has under the hood.
  • White balance tends to be on the warm side, which is great for people pictures, but would like to have a simple control, such as "normal," "warmer," "cooler."

Bottom Line

Highly recommended mobile phone camera. The iPhone 4S takes good pictures, is fun to operate, and responds quickly. Take advantage of the increased resolution and use the cropping tool to tidy up your images before sharing them with others. I love the HDR option for taming contrasty days.

I've also published the podcast, "iPhone 4S Camera, Ready for Prime Time?", where I delve in to the specs and features of this device. I talk about how the ISO and shutter speeds work together, more on the HDR function, how to choose spot metering instead of pattern, and more.

Nimbleosity Rating: 4.5 (out of five possible)

More Nimble Photographer Articles

Review: Filterstorm Pro for the iPad

Revisiting a Wireless Workflow from Camera to iPad

Minimal Folio for iPad: Truly Useful Portfolio and Presentation App

Return of the Nimble Photographer

Nik Software Brings Its Magic to the iPad with Snapseed


The Digital Story on Facebook -- discussion, outstanding images from the TDS community, and inside information. Join our celebration of great photography!


Capturing the Action at Safari West

One of the events during the TDS Oct. Photography Workshop was a visit to Safari West for a morning of wildlife photography.

I Have My Eye on You "I've got my eye on you."

To maximize this experience, we had our own photographer-guide (Adrian) and our own safari vehicle to explore to 400 acre wilderness teaming with birds and African wildlife. After the shoot, we enjoyed a lunch in the beautiful outdoor environment before heading back to the studio to process our work. Since TDS Headquarters is only 20 minutes from Safari West, we keep our travel time to a minimum. This keeps the day focused on photography.

I Have Something to Say I have something to say... but I forgot what it was."

Once back at the studio, the photographers had 90 minutes to sort, edit, and prepare their work for the portfolio presentation on the big screen. I look forward to this show every day because the images are outstanding.

I'm planning to return to Safari West next year for the Action Photography Workshop in June 2012. If you've always wanted to try your hand at this, get your name on the reserve list. There's an easy-to-complete form on the Workshops page.


The Digital Story on Facebook -- discussion, outstanding images from the TDS community, and inside information. Join our celebration of great photography!


How to Make Flowing Water Beautiful

Flowing Water - Sierra

Water is one of my favorite photo subjects, in part because there are so many things you can do with it. Recently I photographed a mountain stream in the Eastern Sierra of California. For this image, I wanted the water soft and dreamlike.

Start with the camera mounted on a tripod to steady the shot. I prefer exposures around 2 seconds. At that interval, the water is softened, but not overly dreamy. To create this long exposure, I put the camera in Aperture Priority mode and stop the aperture down to f/16. I then add a polarizer to give me another 2 stops of density. If I'm working in early morning light, this will usually provide the shutter speed I'm looking for. One important tip, make sure you're not in Auto ISO. Set the camera manually to its lowest ISO setting. Then use the self-timer or a remote release to take the shot. You don't want to jar the camera when making the exposure.

These images can be real eye-catchers when showing off your landscape work.


Find great deals at the TDS Photography Store on Amazon.


On the Road with the Olympus PEN Mini

While packing for my Eastern Sierra trip, I put the Olympus PEN E-PM1in my camera bag along with a couple DSLR bodies. Why? Because I wanted something small and quick to document the moments of my adventure. The PEN Mini is perfect for that.

Eastern Sierra Sky

For example, while driving north in Highway 395 yesterday morning, I noticed this crazy sky. I pulled the Vanagon off to the side of the road, grabbed the Mini, and captured this shot. The camera is extremely responsive. (Here's an earlier post that covers some of my favorite specs.) And to be honest, it is truly enjoyable to work with. I left the 17mm f.2.8 pancake lens on the body making the entire package pocketable.

I've shot with PENs since their introduction. And I have to say that this little guy is my favorite to date. In my opinion, it embodies the true spirit of the original PEN: petite, capable, and ready to go on a moment's notice.


Find great deals at the TDS Photography Store on Amazon.


Bridgeport at Dusk

Bridgeport at Twilight

No, it's not HDR. I used a Cokin A 121 Neutral Grad filter on a Pentax K-5 with stock 18-55mm zoom. The Cokin filter helped me balance the sky and foreground. More on this technique once I return from the Eastern Sierra and am not working on an iPad in the woods :)

I recorded this on my way out the door to the Sierra to shoot fall color. On this short road trip I'll be testing a Pentax K-5 and an Olympus PEN Mini, and a few other goodies that you'll see in upcoming articles. I talk about these preparations in this show, plus the events of the past week, and still more stuff. So much to talk about. I hope you join me.

Listen to the Podcast

You can also download the podcast here (31 minutes). Or better yet, subscribe to the podcast in iTunes. You can support this podcast by purchasing the TDS iPhone App for only $2.99 from the Apple App Store.

Monthly Photo Assignment

Side Lighting is the Oct. 2011 Photo Assignment. You can read more about how to submit on our Member Participation page. Deadline for entry is Oct. 31, 2011.

TDS Nov. Aperture Workshop

I've organized an Aperture Workshop on Nov. 12th and 13th. Signups are in progress now. If you want a registration form, or just more information, drop me a line. BTW: We include a professional model shoot as part of this workshop. Just saying...

More Ways to Participate

Want to share photos and talk with other members in our virtual camera club? Check out our Flickr Public Group. And from those images, I choose the TDS Member Photo of the Day.

Podcast Sponsors

Red River Paper -- The $7.99 Sample Kit is back! And with free shipping.

Make Your Photos Sizzle with Color! -- SizzlPix is like High Definition TV for your photography.

Need a New Photo Bag? Check out the Lowepro Specialty Store on The Digital Story and use discount code LP20 to saven 20% at check out.


Technorati Tags:
, , , , ,


I'm a big fan of what Nik Silver Efex Pro 2can do for my B&W photography, so when I heard that they've just released Color Efex Pro 4 for color work, I wanted to give it a try.

Color Efex Pro 4 Project in Process Project in process with 4 filters active. Click on image for larger version. Photo by Derrick Story, shot in Kauai.

Essentially, this software provides a set of 55 customizable photo filters that you can combine in just about any imaginable way. When you build a set of filters that results in a look you want to repeat, save them as a recipie to apply to other shots.

As with Silver Efex Pro 2, there are plenty of sliders to tailor the intensity of highlights, shadows, contrast, color, etc. And, as you'd expect, control points are available to fine tune a specific area.

I combined four filters on this shot from Kauai to create a look I had always had in my mind for this image, but hadn't been able to achieve. My workflow went like this.

  • Make basic image adjustments in Aperture 3 to the master Raw file.
  • Choose Color Efex Pro 4 from the Photos > Edit with Plug-in menu.
  • Click on the Landscape filter grouping in the left column.
  • Choose a filter that looks appropriate and preview its options by clicking on the variations icon to the right of the filter name (see illustration).
  • Pick a variation I want, then tweak to taste.
  • Click the Add Filter icon in the right column to add another effect to the image (if you don't use Add Filter, then the next effect you choose replaces the previous one).
  • Repeat process until I've added the right amount of filters and adjusted them for the look I want.
  • Click on Save Recipe in the right column to save my settings. Give the recipe a name.
  • Click the Save button in the lower right corner to process the image and send the Tiff file back to Aperture,

Original Tree Image from Kauai Here's the original tree image in Aperture before working on it in Color Efex Pro. The shot is fine, but it doesn't have the Jurassic Park mood that I wanted.

Just like with any Edit plug-in in Aperture, you're adding another image to your library. I like to stack them together to keep things organized. Color Efex Pro 4 works with Adobe Lightroom and Photoshop also. So, regardless of your preferecne for image editing software, you can use these filters.

A few of the other features I like in Color Efex Pro 4 include a zooming tool, compare mode, choice of background shade, and history browser. There are two editions of the software available from the Nik site: Standard (26 filters) $99.95 or Complete (55 filters) for $199.95. Works great on both Macs and Windows machines. If you own a previous version, you can upgrade to the Compelte Edition for $99.95. And if you purchase Color Efex Pro 3.0 or the Complete Collection on or after August 7, 2011 you are eligible for a free upgrade to Color Efex Pro 4.

Bottom line: I was able to learn the software quickly by watching a couple videos on Nik's On Demand Video Training page, then put these effects to work on my images. The visual nature of the interface makes it easy to create the look you want. It's not for every image, in part because I don't want to fill up my Aperture library with large Tiff files. But for that special shot you want to get just right, Color Efex Pro 4 can get you there quickly.

More Aperture Tips and Techniques

My next Aperture Workshop is Nov, 12-13, 2011 in Santa Rosa, CA. Write me if you're interested in attending.

To learn more about Aperture 3, check out my Aperture 3 Essential Training on Lynda.com. Also, take a look at our Aperture 3 Learning Center. Tons of free content about how to get the most out of Aperture.


The Digital Story on Facebook -- discussion, outstanding images from the TDS community, and inside information. Join our celebration of great photography!


The new Olympus PEN E-PM1, known as the "Mini" is exactly that. It's smaller than what I used to call a compact camera, such as the Canon G11. Yet, the Mini sports a 3" LCD, shoots at 5 fps, has an AP2 accessory port, captures 1080p video with stereo sound, and records 12 MP Raw or Jpeg files. Plus, it accepts interchangeable lenses.

Olympus PEN E-PM1 with Swiss Army Knife Olympus PEN Mini, 17mm f/2.8 lens, with Swiss Army Knife

The focusing on the current PENs is wickedly fast. And to be honest with you, I don't mind the streamlined look with a minimum of dials and buttons. In part this works for me because Olympus improved the menu system. It's actually easy to use.

I'm going to be putting the PEN Mini through its paces over the coming weeks. I'll certainly have more to report. But for starters, I wanted to show you just how darn petite this beauty is.

Street price for the Olympus PEN Mini with 14-42mm zoom is $499 US.


Find great deals at the TDS Photography Store on Amazon.


One More Thing, Thanks Steve

If it hadn't been for Steve Jobs, you probably wouldn't be reading these words right now. Yes, I've always been a writer. But I've had many stretches where I had to do other things to pay the bills. Oddly enough, they all involved the Mac.

Steve Jobs, 2003

Steve Jobs, 2003

In the late 80s, I was hired as a graphic artist using PageMaker on a 9" screen. Along the way, I learned every nuance of deploying Macs in the workplace. My next gig, happily, was a writing job. But as part of the deal, I had to maintain a network of Macs for a communications dept. I didn't get that position because of my prose. It was because I was the best Mac person among the applicants.

Years later, when I walked in to O'Reilly Media (called O'Reilly & Associates in those days), I had a PowerBook 1400 under my arm. It was the only Mac laptop in the building. Shortly thereafter, over half the computers there were Macs, including the one used by Tim O'Reilly. This momentum allowed me to launch Mac DevCenter. My words had never seen such a large audience.

Things continued to improve. I started writing for Macworld Magazine, was on the faculty for Macworld Expo, and wrote my first book chapters for David Pogue in "iPhoto: The Missing Manual." Not long after, I was recording my words for lynda.com. My first title? "Aperture Essential Training." Every time Apple invented something new, my career surged forward.

I was working on my Mac when I got the news. Steve Jobs had passed away. I wasn't ready for that.

A fellow writer, Glenn Fleishman wrote, "I've never been this sad about the passing of someone I didn't know." I felt the same way.

The thing is, I have no idea what my life would have been without Steve Jobs. His insanely great company helped a teenage poet from Southern California make a living doing what he loves. And I'm not the only one.

When I look at my fortunate career, I only have one regret: I never got to thank the man who helped me so much. It's true, I didn't know Steve Jobs. But he changed my world.

iPhone 4S Camera

As I mentioned yesterday, Apple announced my next camera during their special event today. I had a good feeling that they were going to put some muscle into this upgrade. And in all honesty, they exceeded my expectations.

Let's start with the lens. The 4S has five optical elements with a maximum aperture of f/2.4. Glass is so important to picture quality, and I'm happy to see this type of attention paid to a "camera phone." Plus, having the wider aperture helps in low light situations.

They've also beefed up the infrared filter to help improve color. Then Apple added the A5 chip with an image signal processor that's fairly robust for a camera of this nature. The picture taking experience is also improved. You can now activate the camera directly from the Home button, and it is more responsive once you do, including less shutter lag. It might actually feel like a real camera. Use the volume button to trip the shutter if you wish.

The backside illuminated sensor now supports 8 megapixels of resolution. This gives you a bit more latitude for cropping, especially since you're working with a fixed lens that has a moderately wide 35mm focal length.

Other goodies include face detection, HDR, 1080p video (at 30 fps), and a nifty editing app for basic adjustments. And of course this all works with the 3rd party apps that have been delighting us to this point.

I'll write a full review of the iPhone 4S camera as soon as I get my hands on it. But based on the specs I see, I think it will be an excellent photographic tool.


Find great deals at the TDS Photography Store on Amazon.


Do you know the varying degrees of warming filters in your white balance presets? Have you tried WB bracketing? Have you figured out how to adjust the color in real time using your camera's LCD screen? These are a few of the tips that I share in this week's podcast. Listen in!

Listen to the Podcast

You can also download the podcast here (25 minutes). Or better yet, subscribe to the podcast in iTunes. You can support this podcast by purchasing the TDS iPhone App for only $2.99 from the Apple App Store.

Monthly Photo Assignment

Side Lighting is the Oct. 2011 Photo Assignment. You can read more about how to submit on our Member Participation page. Deadline for entry is Oct. 31, 2011.

TDS Nov. Aperture Workshop

I've organized an Aperture Workshop on Nov. 12th and 13th. Signups are in progress now. If you want a registration form, or just more information, drop me a line. BTW: We include a professional model shoot as part of this workshop. Just saying...

More Ways to Participate

Want to share photos and talk with other members in our virtual camera club? Check out our Flickr Public Group. And from those images, I choose the TDS Member Photo of the Day.

Podcast Sponsors

Red River Paper -- The $7.99 Sample Kit is back! And with free shipping.

Make Your Photos Sizzle with Color! -- SizzlPix is like High Definition TV for your photography.

Need a New Photo Bag? Check out the Lowepro Specialty Store on The Digital Story and use discount code LP20 to saven 20% at check out.


Technorati Tags:
, , , , ,


iphone_camera.jpg

For many, Apple's announcement of the 5th generation iPhone is the next step in mobile communications. For me, it's my next camera.

The history of iPhone photography is a condensed chapter in the big book of digital imaging. With the first iPhone, we had a 2-megapixel camera with very few controls... much like our early compacts a decade ago. But now, with the latest unveiling of Apple's smartest of smart phones, we'll have a camera that can stand on its own 3 feet with most dedicated compacts. (Well, granted that you've found a way to mount it on a tripod.)

My point is, that we'll have legitimate megapixels, robust image processing, and a variety of software to choose from. It's a real camera. Plus, it includes GPS, cellular connectivity, WiFi, Bluetooth, razor sharp screen -- and it even makes phone calls.

I'm sure I'll enjoy hearing about the wonders of iOS 5 and the increased horsepower under the hood of the new iPhone. But what I really want to do is go take pictures and see how they look in Aperture. Tuesday is new camera day.


The Digital Story on Facebook -- discussion, outstanding images from the TDS community, and inside information. Join our celebration of great photography!


For the Aug. '11 Photo Assignment, TDS shooters experimented with various surfaces exploring the theme Reflection. The imagery in this gallery is beautiful. And which one will be the SizzlPix Pick of the Month? (These will look great Sizzled!)

Ruth Cooper for Reflection

Recent SizzlPix winners include: Richard Lucic for June 2011, True Grit, and Matthew Rampton for July 2011, Smoke. Congratulations to both.

Participate in This Month's Assignment

The Oct. 2011 assignment is "Side Lighting." Start working on your contribution now. Details can be found on the Member Participation page. Deadline is Oct. 31, 2011.

Please follow the instructions carefully for labeling the subject line of the email for your submission. It's easy to lose these in the pile of mail if not labeled correctly. For example, the subject line for this month's assignment should be: "Photo Assignment: Oct. 2011." Also, if you can, please don't strip out the metadata. And feel free to add any IPTC data you wish (These fields in particular: Caption, Credit, Copyright, Byline), I use that for the caption info.


Photo by Ruth Cooper. (Click on it to see enlarged version.) You can read more about how Ruth captured this shot, plus see all of the other great images on the Aug. 2011 Gallery page.


Good luck with your Oct. assignment, and congratulations to all of the fine contributors for August.


twitter.jpg Follow me on Twitter

-


Now Available! The Digital Photography Companion. The official guide for The Digital Story Virtual Camera Club.

  • 25 handy and informative tables for quick reference.
  • Metadata listings for every photo in the book
  • Dedicated chapter on making printing easy.
  • Photo management software guide.
  • Many, many inside tips gleaned from years of experience.
  • Comprehensive (214 pages), yet fits easily in camera bag.

Technorati Tags: , ,