April 2016 Archives

Macphun has created a new Editing Extension for Photos users, and it's a blast. Filters for Photos is a quality, editable, effects app that allows you to apply a variety of filters, then edit them with an easy to use masking tool. And if that wasn't good enough, the download is free.

03-Comparing-web.jpg 
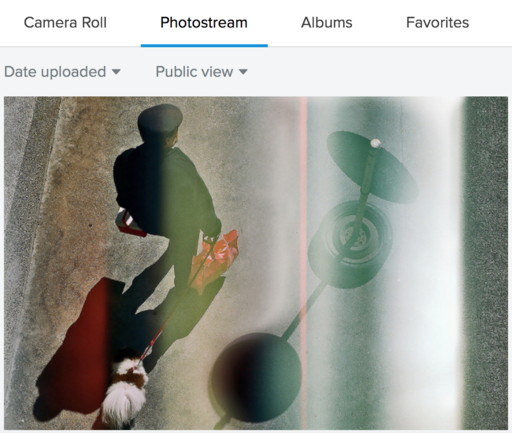
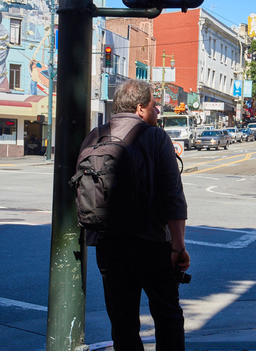
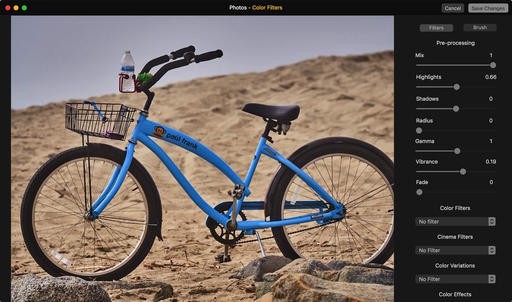
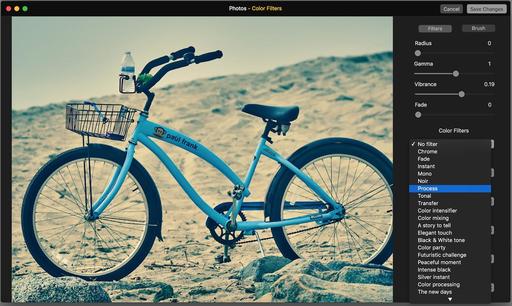
An array of interesting filters to choose from. Images by Derrick Story.

When you first download the app, you get 15 filters. If you opt-in for their mailing list, you'll receive another 15 filters (they're automatically added to the app) for a total of 30. You can use the app as a standalone, or enable it as an Editing Extension for Photos for OS X (System Preferences > Extensions > Photos > Filters for Photos).

When you first load an image, it appears in the browser with thumbnails of the filter options below. Simple click on the effect you want, and it's applied. You can use the contextual sliders to adjust further. Or, click on the Mask button and paint the effect specifically where you want it. The masking toolset has everything you need, and it's easy to use.

masking-in-filters.jpg 
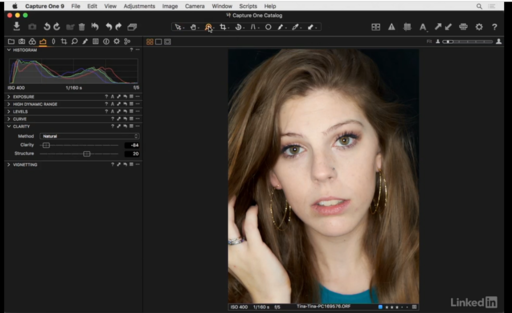
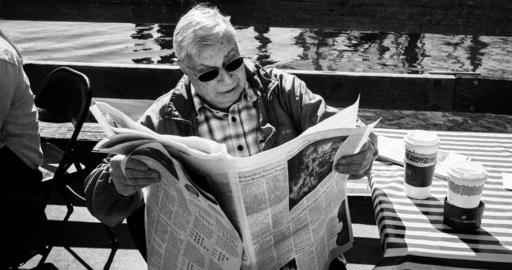
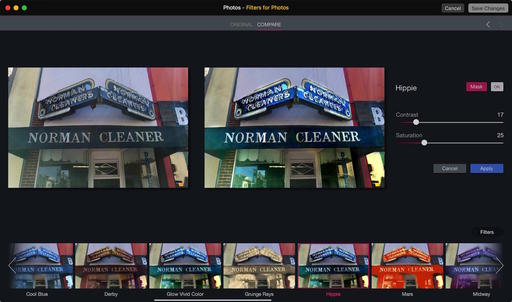
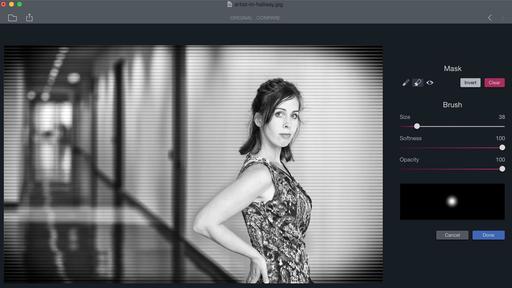
The masking tool is easy to use and powerful.

After just a half an hour or so of playing with Filters for Photos, I was quite comfortable applying and editing the effects. And if you're using it as an Editing Extension, which I recommend, then the image is integrated into your Photos for OS X library, and the work is totally non-destructive.

Filters for Photos is a fun app that belongs in the toolbox for any Mac photographer.

Coming Soon: The Apple Photos Book for Photographers

PhotosPromo-1.jpg

I've been working on a guide to Photos for OS X that's written for photographers who want to use this application at a high level. I cover workflow, iCloud integration, and editing... at the enthusiast level.

We're releasing the eBook version soon, then will go to print after Apple announces its updates to the app at WWDC. This is an exciting, ongoing project that I think you'll want to be a part of. And you can join me every step of the way via the signup page we've created. This is going to be fun...

Master Photos for OS X

(It's More Powerful than You Think)

For hands-on tutorials, be sure to take a look at Photos for OS X Essential Training on lynda.com. I cover everything you need to know to get the most from this surprisingly powerful image management application.

More Help and Insights on Photos for OS X

Don't forget about the Photos for OS X Special Feature Section on The Digital Story. It's a roundup of tutorials, videos, and articles focused on helping you master Apple's latest photo management software. You can also find it under Photography in the top nav bar.

Want to Comment on this Post?

You can share your thoughts at the TDS Facebook page, where I'll post this story for discussion.

When you learn the difference between Flickr's Camera Roll and its traditional Photostream, the offer of 1TB of free online storage makes more sense. Here's why.

camera-roll-vs-photostream.png

The Camera Roll can be configured to automatically backup every image you capture with a Flickr-connected device. The images remain private, however, so the public doesn't see the 36 versions of a daisy that you photographed in a moment of artistic inspiration.

Instead, you choose which of those 36 versions you like best, then publish it in your Photostream by making it public. It's similar to the process of shooting a roll of film, then deciding which frame gets enlarged to a print... except much cheaper with Flickr. Here's a short movie that explains these differences.

So now, 1TB of free online storage makes more sense. You can configure Flickr to receive all of your smartphone, tablet, and WiFi-connected camera shots, then decide later which ones to publish. I cover the entire workflow in my new lynda.com training, Sharing Photos with Flickr.

If you haven't looked a Flickr for a while, you may want to watch some of these movies, then revisit your account. There are many practical, helpful tools in the modern Flickr, and it's wildly cost effective.


Sharing Photos with Flickr is a deep dive into this venerable online photography platform, focusing on how to best use its tools with a Mac or Windows computer. I show you how to configure Flickr to automatically backup your images, organize them, and share your favorites with friends, family, and the entire online universe. This training will show you how to best take advantage of Flickr's 1TB of free online storage and its comprehensive set of imaging tools.

Want to Comment on this Post?

You can share your thoughts at the TDS Facebook page, where I'll post this story for discussion.

Photographers with mirrorless gear haven't had the wide selection of high quality hand straps that their DSLR counterparts have enjoyed. Spider aims to change that with the SpiderLight Hand Strap, just launched on KickStarter.

Spider-P4262161.jpg

The SpiderLight Hand Strap is specifically designed for smaller camera bodies like Fuji X-T1, SONY a7's/7II's, and Olympus OMD, just to name a few. It can work with a wide variety of models thanks to the smart adapters included in the kit. Essentially, the adapters provide the correct angle for the grip, overcoming the one-size-fits-all challenge that often leads to a less than perfect fit.

Spider-P4262167.jpg

The bottom of the grip is secured via the camera's tripod socket. I think the SpiderLight works best in tandem with a removable plate to hold it in place. If you never use a tripod, then you can use the screw and washer combination that's included in the kit.

The reason why I like the tripod plate better is because the camera sits flat on a table when not mounted on your sticks, thanks to the flatness of most tripod plates. (The SpiderLight screw, that you have to use if you don't have a plate, protrudes a bit from the bottom of the camera.) Plus, you always have a strap attached to the camera when working on a tripod. And the SpiderLight doesn't hang down and get in the way. I think it's a terrific accessory for tripod users.

The strap itself is very comfortable. The lining against your hand is soft, and the strap material appears very durable. The shape of the strap hugs your hand, creating a sense of confidence while shooting. You can choose from a variety of colors for the detail that lines the edges of the SpiderLight.

Spider-P4262156.jpg

Currently, you can get one for your mirrorless camera for as little as $30 via their KickStarter. I think the SpiderLight is a wonderful accessory for tripod mounted cameras and for video work. It brings much greater stability to these smaller cameras. It will, however, take up a little more room in the camera bag because of its molded shape. But that's also what helps make it so darn comfortable in use.


Nimble Photographer Logo

The SpiderLight Hand Strap has a high Nimbleosity Rating. What does that mean? You can learn about Nimbleosity and more by visiting TheNimblePhotographer.com.

This is The Digital Story Podcast #529, April 26, 2016. Today's theme is "How to Be the Influencer." I'm Derrick Story.

Opening Monologue

Within every social group, there are influencers for different areas. There's the restaurant expert, wine connoisseur, computer nerd, fitness fanatic, and yes, the photography guru. Chances are good that you're the imaging influencer in your world. And today's show discuses how to be effective in that role.

How to Be the Influencer

I spent the last weekend at a father/son event at the University of Santa Clara where my son is a member of Sigma Pi. The fraternity boys plan a weekend full of activities to show their dads a good time.

Over the two days, there's lots of casual conversation that sooner or later leads to our personal interests. In my case, this was accelerated as soon as I pulled out my OM-D E-M5 Mark II to capture a few memories. "What kind of camera is that?" For some reason, I was surprised that everyone didn't already know. Then I realized, I was just anointed the photography influencer for my group.

As such, there are a few things to keep in mind. Here are a few tips to help you influence effectively.

girl-dog-park.jpg

  • Listen First, Talk Later - If you're going to help someone with their photography questions, you actually have to hear their queries first.
  • Don't Be a Fan Boy - Yes, we all love our choice of camera and photo management software. But what works for us might not be the right fit for someone else. Draw on your extensive photographic knowledge and try to recommend things that work for the other person.
  • Don't Offer Too Many Choices - I learned long time ago that when someone asks for a camera recommendation, they want my favorite, not a top ten list.
  • Help Them with the Things They Don't Ask - You're probably not going to get too many questions about backup, for example, but you can really help them out by offering a easy to use solution.
  • Don't Dis Their Current Approach - As part of the conversation, you'll probably hear about their current choices and approaches. Stay positive and don't dis what they're already doing. Frame your recommendations as improvements, not overhauls.

In the News: New Cameras Supported by Digital Camera RAW Compatibility Update 6.19

Here's the list of new cameras that have RAW files supported by Photos for OS X, Preview, and Aperture:

  • Fujifilm X-E2S
  • Fujifilm X70
  • Leica S (Typ 007)
  • Leica X-U (Typ 113)
  • Nikon D5***
  • Nikon D500***
  • Panasonic LUMIX DMC-ZS60 / DMC-TZ80
  • Sony Alpha ILCE-6300
  • Sony Alpha SLT-A68

SanDisk iXpand Flash Drive for iOS Devices

SanDisk wants to expand the storage capability of mobile photographers and with the new SanDisk iXpand Flash Drive. This device plugs directly into the Lightning port of iPhones and iPads, providing between 16 and 128GBs of external memory - perfect for photographers who want to travel light.

The devices uses the free iXpand Drive app, which has a camera function, allowing users to shoot and save photos or videos directly to the drive instead of on their iPhone or iPad. The app also provides the option to automatically back up content from social networking sites, as well as play back music within the app.

App Camp for Girls

We launching App Camp For Girls Orange County at Rancho Santa Margarita Intermediate School August 8-12, and a Phoenix camp July 25-29. App Camp For Girls seeks to address the gender imbalance in technology professions by inspiring middle-school age girls with a broad introduction to the process of app development, from brainstorming and designing ideas to building and pitching their apps. We believe that the experience of creating an app that runs on a device in one week can spark the enthusiasm that will propel girls to pursue further tech education. More information and signup at appcamp4girls.com.

Updates and Such

Eastern Sierra Reservation Forms Went Out - I sent out the workshop reservation forms to the Reserve List this weekend. If you were on the list and didn't get a form, please send me an email. The Eastern Sierra photography workshop begins Thursday evening, Oct. 20 and runs through Sunday, Oct. 23rd. If you want to get on the next round reserve list, then go to the TDS Workshops page and use the Send Me Info form to get on the list.

Out of Chicago Update - The debut of The Nimble Photographer Workshop sold out on Friday, June 24. Because there is a wait list, we've added a second workshop on Thursday June 23. I hope you can join me in Chicago this coming June. There's still time for Early Bird pricing.

And finally, be sure to visit our friends at Red River Paper for all of your inkjet supply needs.

See you next week!

More Ways to Participate

Want to share photos and talk with other members in our virtual camera club? Check out our Flickr Public Group. And from those images, I choose the TDS Member Photo of the Day.

Podcast Sponsors

Red River Paper - Keep up with the world of inkjet printing, and win free paper, by liking Red River Paper on Facebook.

ImageFramer Take your photos to the next level with ImageFramer. Visit www.apparentsoft.com today.

MacPaw Creators of CleanMyMac 3 and other great software for Apple computers. Visit www.macpaw.com today.

The Nimbleosity Report

Do you want to keep up with the best content from The Digital Story and The Nimble Photographer? Sign up for The Nimbleosity Report, and receive highlights twice-a-month in a single page newsletter. Be a part of our community!

Want to Comment on this Post?

You can share your thoughts at the TDS Facebook page, where I'll post this story for discussion.

sandisk-ixpand.png

SanDisk wants to expand the storage capability of mobile photographers and with the new SanDisk iXpand Flash Drive. This device plugs directly into the Lightning port of iPhones and iPads, providing between 16 and 128GBs of external memory - perfect for photographers who want to travel light.

The devices uses the free iXpand Drive app, which has a camera function, allowing users to shoot and save photos or videos directly to the drive instead of on their iPhone or iPad. The app also provides the option to automatically back up content from social networking sites, as well as play back music within the app.

Basic features include:

  • Free up space on your iPhone by moving photos and videos to your iXpand flash drive
  • Automatically back up photos and videos from your camera roll
  • Automatically back up your contacts
  • Watch popular video formats3 on your iPhone or iPad
  • Designed with a flexible connector to fit through most iPhone cases
  • High-speed USB 3.0 transfer to and from your computer
  • Secure file storage across your computer, iPhone and iPad
  • Videos automatically saved to the drive if captured from within the iXpand Drive app

The iXpand Flash Drive includes a one-year limited warranty in the United States. It's available in 16GB, 32GB, 64GB, and 128GB capacities, with MSRPs of $49.99, $69.99, $89.99 and $129.99, respectively. The drive is compatible with iPhone 6s, iPhone 6s Plus, iPhone 6, iPhone 6 Plus, iPhone 5s, iPhone 5c, iPhone 5, iPad Pro (12.9-inch), iPad Air 2, iPad Air, iPad mini 4, iPad mini 3, iPad mini 2, iPad mini and iPod touch (5th generation) running iOS 8.2 or later.

The Nimbleosity Report

Do you want to keep up with the best content from The Digital Story and The Nimble Photographer? Sign up for The Nimbleosity Report, and receive highlights twice-a-month in a single page newsletter. Be a part of our community!

Want to Comment on this Post?

You can share your thoughts at the TDS Facebook page, where I'll post this story for discussion.

The Clarity and Structure tools in Capture One Pro allow you to adjust both fine and coarse detail in your images. There are different algorithms to choose from, so you can use "Natural" for portraits and "Neutral" for objects. And because the sliders are centered positioned, you can both increase and decrease the effect, depending on your subject.

In this training video, I show you how to use Clarity and Structure for both objects and for portraits. I review the different modes so you can see exactly how to get the effect you want for your images.

More Capture One Pro Tips and Techniques

Improve your skills by watching Capture One Pro Essential Training now available on lynda.com. More than 5 hours of tips, tricks, and techniques. Plus many free movies using advanced techniques.

clarity-in-c1.png

I've also created a dedicated Capture One Pro Training page on The Digital Story. You can follow all of the tips and techniques that I publish in one convenient spot.

Thinking About Making the Transition from Aperture or Lightroom? - Download my free eBook titled, Rocky Nook's Guide to Moving to Capture One Pro. I show you the steps to create a test library, then build the foundation for a smooth transition to Capture One Pro.

Want to Comment on this Post?

You can share your thoughts at the TDS Facebook page, where I'll post this story for discussion.

SF-P4151868.jpg

Participants in the TDS SF Street Photography Workshop logged many miles over the course of 3 days. On Friday alone, we worked from North Beach all the way up to Fort Point. Many of the shooters commented that they had walked 10 miles by the end of the day. Fortunately, we were using street-savvy Lowepro bags to protect and transport our gear.

Some of the photographers used the new Slingshot Edge 150 AW ($64), a sling that can hold a mirrorless body and a couple of lenses. Plus, a mini tablet will fit in a zippered front pocket. Interior areas and the adjustable divider system organized and protected their cameras and lenses, while smaller accessories were stored in the front. The Edge helped keep the load from getting too heavy, yet protected the gear our shooters needed.

SF-P4151872.jpg

Participants who wanted to have a bit more kit used the larger Lowepro backpacks. These were particularly handy for larger DSLRs and their more bulky lenses.

I was relying on one of my favorite urban bags, the StreetLine SH 140 that I had fallen in love with during an assignment in Austin, Texas. I had my Olympus OM-D E-M5 Mark II and Contax G1 cameras in the StreetLine, along with an iPad and personal items for the day. I could work quickly out of the sling, and it never tired my shoulders, even over the course of climbing hills and exploring the streets of the city.

I think one of the keys to both our survival, and our ability to record hundreds of images over the course of three days, was having properly packed bags that allowed us to bring what we needed, but didn't add too much bulk as we navigated busy urban environments.

SF-P4151949.jpg

If you want to learn more about finding the right carrying solution for your adventures, jump over to lowepro.com for a look-see.

Want to Comment on this Post?

You can share your thoughts at the TDS Facebook page, where I'll post this story for discussion.

This is The Digital Story Podcast #528, April 19, 2016. Today's theme is "Handling Harsh Light." I'm Derrick Story.

Opening Monologue

I've had people walk up to me when I was working and remark, "Oh, it's such a beautiful, bright day for photography. You must be thrilled." And I'm thinking, "How the heck am I going to control this contrast?" Yes, indeed, harsh lighting conditions are a tough challenge for photographers. And that's the focus of today's show.

Handling Harsh Light

The reality is that we don't always have control of when we have to take pictures. Your niece's birthday parties, weddings, travel photography, and events all seem to place us in the middle of the day with camera in hand.

Since these situations are often unavoidable, how does one still capture compelling images? Well, I have a few tips that should help.

Koch-3.jpg Switching to monochrome is one method to handle contrasty lighting conditions. Photo by Mitchell Koch from the TDS SF Street Photography Workshop.

  • Switch to Monochrome Mode - Nearly every digital camera has a B&W mode, and many are quite customizable. Monochrome images can thrive in contrasty light where color shots don't.
  • Experiment with Infrared - This option works in both color and B&W. IR shots look great on a bright, sunny day.
  • Don't forget about Fill Flash - A fill light from the front can eliminate unflattering shadows, dark eyes, and help even out hotspots.
  • Use a Diffuser - If it's good enough for SI photographers shooting bikini-clad models on a sunny Caribbean beach, we can use it too. Fabric diffusers makes harsh sun flattering for portraits.
  • Built-In Camera Filters - Most mirrorless cameras have an array of built-in filters and effects, many of which look great in contrasty light.

The Digital Story Photography Podcast Debuts on Google Play Music

Starting this week, podcasts on Google Play Music in the US and Canada will begin rolling out on Android and be available on the web. The rollout on Android devices will be gradual, so users may not see podcast content on the Google Play Music app immediately.

Among those in the first wave is The Digital Story Photography Podcast. We're thrilled to be on the Google Play Music platform.

April 24th is World Pinhole Day

I saw The Phoblographer stating: "April 24th is World Pinhole Day-a day for all pinhole photographers to get out there and shoot in celebration of the old school format! Right here in NYC, The Phoblographer is teaming up with Lomography for our very own World Pinhole Day Celebration with a cool photowalk. If you've never shot pinholes, have shot them and want to do them in a more social space, then sign up!

Contax 137MD Winner

Congratulations to Kathleen C. who commented on "A Most Beautiful Break": "Very pleasing tones! I am kicking myself for having thrown out about 40 rolls of film in a "spring cleaning" accident about a year ago. Good stuff, too. Fuji velvia (ouch), Kodak Portra, Fuji Superia, T-Max, etc. I thought at the time I would never go back to film. Now, I can't get my mind off of the challenge of applying everything I have learned over the last few years with digital photography to film. I was shooting in auto mode when I was a film shooter..." Kathleen, please click on the Contact Us link at the bottom of the page for theAnalogstory.com.

Updates and Such

And finally, be sure to visit our friends at Red River Paper for all of your inkjet supply needs.

See you next week!

More Ways to Participate

Want to share photos and talk with other members in our virtual camera club? Check out our Flickr Public Group. And from those images, I choose the TDS Member Photo of the Day.

Podcast Sponsors

Red River Paper - Keep up with the world of inkjet printing, and win free paper, by liking Red River Paper on Facebook.

ImageFramer Take your photos to the next level with ImageFramer. Visit www.apparentsoft.com today.

MacPaw Creators of CleanMyMac 3 and other great software for Apple computers. Visit www.macpaw.com today.

The Nimbleosity Report

Do you want to keep up with the best content from The Digital Story and The Nimble Photographer? Sign up for The Nimbleosity Report, and receive highlights twice-a-month in a single page newsletter. Be a part of our community!

Want to Comment on this Post?

You can share your thoughts at the TDS Facebook page, where I'll post this story for discussion.

Harsh Light is All Right

We spent the mid part of Saturday in Sausalito for the TDS SF Workshop. The weather was beautiful for tourists, but not ideal for photographers. So what do you do when you want to take pictures in harsh, contrasty conditions?

I have three tricks to recommend. First, fill flash can help offset nasty shadows for portraits. If you have an off-camera cord or wireless communication, you can even position the fill light at exactly the right angle.

I think shooting infrared is also a terrific option. It thrives in contrasty lighting. And the one that I'm going to show you now is using a built-in camera effect. In this case I'm using the Key Line Art Filter on my Olympus OM-D. I saw a watercolor greeting card in one of the shops, and thought, "I can do something like that right now!"

SF-Day2-P4162073.jpg

SF-Day2-P4162076.jpg

SF-Day2-P4162018.jpg

SF-Day2-P4162022.jpg

SF-Day2-P4162040.jpg

I capture these in RAW+Jpeg, so I have the "regular" images too without the effects. For the Jpegs, I use the Large/SuperFine setting to get as many pixels as possible. And with photos like this, you can make your own fine art greeting cards. You can get the scored blank cards, envelopes, and everything else at Red River Paper's Card Shop.

So, on a bright sunny day, I put on my sun block and keep taking pictures. I could care less about harsh light.

Want to Comment on this Post?

You can share your thoughts at the TDS Facebook page, where I'll post this story for discussion.

Under the Bridge

Like any photographic subject, the more angles you explore, the more variety of shots you can capture.

This becomes particularly important with mature subjects, such as the Golden Gate Bridge, that is photographed hundreds of times a day. During the TDS SF Street Shooting Workshop, we went under the bridge for a different perspective. Here are a few of the images.

SF-P4141860.jpg

SF-P4151928-web.JPG

SF-P4151941-web.JPG

SF-Workshop-web.JPG

In addition to playing with different perspectives, also consider working with different filters and exposures. For example, two of these shots were made using Art Filters on an Olympus OM-D mirrorless camera. I shoot RAW+Jpeg, so even with the filtered shots, I have a straight RAW version that I can work with in my photo management app.

Many of us have mature subjects in our worlds. Revisit one and explore how you can create fresh images from an old friend.

The Nimbleosity Report

Do you want to keep up with the best content from The Digital Story and The Nimble Photographer? Sign up for The Nimbleosity Report, and receive highlights twice-a-month in a single page newsletter. Be a part of our community!

Want to Comment on this Post?

You can share your thoughts at the TDS Facebook page, where I'll post this story for discussion.

in-aperture-exile.png

Recently, David Grover, business support for Phase One, and myself got together for a conversation about moving from Aperture to Capture One Pro. This falls into line with my thinking that C1 is the logical transition from Aperture for professional and demanding enthusiast photographers.

This one-hour video, that you can watch for free, covers topics such as:

  • Similarities between the two photo management applications.
  • Differences and things I miss from Aperture.
  • New tools in C1 that I wish I had had in Aperture.
  • Tips for new Capture One users.
  • Resources for making the move from Aperture to Capture One.

If you're interested in these topics, you might want to spend your lunch break with us. It's a good conversation that I hope you'll find helpful.

More Capture One Pro Tips and Techniques

Improve your skills by watching Capture One Pro Essential Training now available on lynda.com. More than 5 hours of tips, tricks, and techniques. Plus many free movies using advanced techniques.

I've also created a dedicated Capture One Pro Training page on The Digital Story. You can follow all of the tips and techniques that I publish in one convenient spot.

Thinking About Making the Transition from Aperture or Lightroom? - Download my free eBook titled, Rocky Nook's Guide to Moving to Capture One Pro. I show you the steps to create a test library, then build the foundation for a smooth transition to Capture One Pro.

Want to Comment on this Post?

You can share your thoughts at the TDS Facebook page, where I'll post this story for discussion.

This is The Digital Story Podcast #527, April 12, 2016. Today's theme is "Are Your Pictures Too Perfect?" I'm Derrick Story.

Opening Monologue

Photographers tend to be obsessed with perfection. Many discussions I read focus on the sharpest lens, the best image sensor, and the most extreme low light capability. But as part of that quest for the best, do we lose the feeling? Today's top story explores image perfection and its side effects.

Are Your Pictures Too Perfect?

I was reading an article titled, In Defense of Steve McCurry (Petapixel, Allen Murabayashi) where the author cited a critical comment about McCurry's new book, India. The comment was by New York Times Magazine photography critic, Tegu Cole, who wrote about McCurry, "Here's an old-timer with a dyed beard. Here's a doe-eyed child in a head scarf. The pictures are staged or shot to look as if they were. They are astonishingly boring." Later, Cole suggests that the perfectness of McCurry's photos somehow invalidates them - also slyly suggesting that McCurry's 1 million Instagram followers is proof of the eye candy nature of his images. Cole's criticism might also imply that the entirety of National Geographic photography is boring and "too perfect."

This got me thinking about the pursuit of perfection, and how it might lead to an absence of emotion. Here are a few points to consider.

  • Wrong side of the brain - When we become obsessed with the technical details, we may find ourselves stuck on the wrong side of the brain.
  • Viewers respond to images that make them feel something. Generally speaking, they don't care about the technical details of a photograph as much as they do about its content.
  • Photographers sometimes hide behind tech. Instead of stretching our artistic capabilities, we take an easy way out by pursuing technical perfection.
  • We forget to seek feedback. Instead of presenting a handful of images to a viewer and asking for comments, we think we know the best photos and move forward accordingly.

Contax137MD-P3040829.jpg

theAnalogstory.com Debuts with Camera Giveaway for Film Photography Day

In celebration of Film Photography Day, we're giving away one Contax 137MD film camera with a 50mm lens. All you have to do is visit theAnalogstory.com and click on the red announcement banner across the top of the site. That will lead you to the page that spells out the details.

What, you didn't know about theAnalogstory.com? That's because it's brand new. Its focus is film photography in the digital age. And with contributions by photographers who have rediscovered film, plus a Camera Shop, Tech Specs, and more, my hope is that you'll find inspiration there too.

Film Photography Day was started by the good folks over at Lomography.com. You might want to wander over and take a look at their microsite too.

Mounting Old Lenses on New Cameras

This piece ties into both themes of today's show: disrupting the perfection of digital photography and enjoying the classic optics of analog gear. So I wanted to revisit the practice of dusting off one of your favorite optics from the film days, finding an adapter to mount it to your digital camera, and exploring the imagery you can create with than tandem.

Updates and Such

In Aperture Exile? Easing the change to Capture One, with guest Derrick Story - I'll be the special guest on an upcoming Capture One Pro webinar on April 13 at 9:00 AM PDT. The webinar is free, and you can sign up here.

Eastern Sierra Reservation Forms Went Out - I sent out the workshop reservation forms to the Reserve List this weekend. If you were on the list and didn't get a form, please send me an email. The Eastern Sierra photography workshop begins Thursday evening, Oct. 20 and runs through Sunday, Oct. 23rd. If you want to get on the next round reserve list, then go to the TDS Workshops page and use the Send Me Info form to get on the list.

And finally, be sure to visit our friends at Red River Paper for all of your inkjet supply needs.

See you next week!

More Ways to Participate

Want to share photos and talk with other members in our virtual camera club? Check out our Flickr Public Group. And from those images, I choose the TDS Member Photo of the Day.

Podcast Sponsors

Red River Paper - Keep up with the world of inkjet printing, and win free paper, by liking Red River Paper on Facebook.

ImageFramer Take your photos to the next level with ImageFramer. Visit www.apparentsoft.com today.

MacPaw Creators of CleanMyMac 3 and other great software for Apple computers. Visit www.macpaw.com today.

The Nimbleosity Report

Do you want to keep up with the best content from The Digital Story and The Nimble Photographer? Sign up for The Nimbleosity Report, and receive highlights twice-a-month in a single page newsletter. Be a part of our community!

Want to Comment on this Post?

You can share your thoughts at the TDS Facebook page, where I'll post this story for discussion.

Why would you care about theAnalogstory.com? After all, you're perfectly happy with your digital camera. Or are you?

theanalogstory-debut-cover-web.jpg

Have you had the sense that your images are all starting to look the same? Or that maybe you've lost your artistic edge as a photographer? I know I was feeling that. So back in December 2015, I took the challenge to start shooting film to see if that approach would elevate the entire body of my work.

And it did. And I began to notice the changes quickly.

I'm not an extremist who advocates that you flush your iPhone down the toilet and ditch your digital on craigslist. In fact, just the opposite. I believe that the integration of analog photography with digital workflows completes us. We now, literally, can choose the right tool for the project at hand.

I have never been happier as a photographer as I am now. I depend on my nimble mirrorless kit to help me publish online and satisfy clients' needs. My iPhone is an invaluable tool that records metadata for the analog shots, and quickly captures and shares images with others. I will never give up my digital cameras.

But exploring life with a film camera in hand on Sunday morning walks, bike rides, and strolls downtown has added an element of excitement and creativity to my work. I feel like a real photographer again. I'm approaching my images in a more thoughtful way. And I love working the controls on the camera.

I believe that the integration of analog and digital photography is the next big step. And I want to do everything that I can to share that journey with you.

Come by and browse theAnalogstory.com. We have viewpoints and images from film shooters, quickie tips, spec sheets, a Camera Shop, and links to related articles throughout the Web.

And if you have a passion for film, share your story with our audience. Send your post (approx. 500 words or less) with up to 6 images to theAnalogstory@gmail.com, and I'll read it. I promise. And if you want to see what others have shared, take a look at the Viewpoint section of the site.

I hope to see you there...

Want to Comment on this Post?

You can share your thoughts at the TDS Facebook page, where I'll post this story for discussion.

I was just reading an Fstoppers review titled, The Funky Bokeh King: the Zenit Helios 40-2 85mm f/1.5. After looking at the pictures that the author created with the optic, I started thinking about exotic glass again.

the_swirly_bokeh_king._fstoppers_reviews_the_zenit_helios_40-2_85mm.jpg Fstoppers tests the Zenit Helios 40-2 85mm f/1.5.

We've seen similar offerings from Lensbaby, Lomography, and others, so clearly there's some interest in this category. Why?

My theory is that digital photography has become so precise, so perfect, that visual artists are craving something different. In part, this has fueled the renewed interest in film. But another way to go is to adapt old lens designs to your modern digital camera.

You probably have a few candidates in your closet right now. And there certainly are a plethora of inexpensive adapters on the market to mount just about any hunk of glass to any mirrorless or DSLR.

So if you're starting to feel that your images are all looking the same, think about an old lens... Then see what you can create.

The Nimbleosity Report

Do you want to keep up with the best content from The Digital Story and The Nimble Photographer? Sign up for The Nimbleosity Report, and receive highlights twice-a-month in a single page newsletter. Be a part of our community!

Want to Comment on this Post?

You can share your thoughts at the TDS Facebook page, where I'll post this story for discussion.

From Aperture to Capture One Pro

Aperture users still contemplating their next move may want to read my guest post on the Phase One blog titled, Smooth transition from Aperture to Capture One Pro 9.

P8075103-bricks-n-stairs1900-1-1419x946.jpg

I write a bit about why I chose C1, then delve into the test library concept for those who prefer a smooth ride from one photo management app to another. There's also a 35-percent off coupon code for the book, "Capture One Pro 9, Mastering Raw Development, Image Processing, and Asset Management" by Sascha Erni. Not a bad deal at all!

More Capture One Pro Tips and Techniques

Improve your skills by watching Capture One Pro Essential Training now available on lynda.com. More than 5 hours of tips, tricks, and techniques. Plus many free movies using advanced techniques.

I've also created a dedicated Capture One Pro Training page on The Digital Story. You can follow all of the tips and techniques that I publish in one convenient spot.

Thinking About Making the Transition from Aperture or Lightroom? - Download my free eBook titled, Rocky Nook's Guide to Moving to Capture One Pro. I show you the steps to create a test library, then build the foundation for a smooth transition to Capture One Pro.

Want to Comment on this Post?

You can share your thoughts at the TDS Facebook page, where I'll post this story for discussion.

Panasonic-DMC-GX85.jpg

Panasonic just announced the DMC-GX85 mirrorless camera ($799 with 12-32mm f/3.5-5.6 lens) that features new 5-Axis Dual I.S. (Image Stabilizer).

They write: "The LUMIX GX85 incorporates the new 5-axis Dual I.S.(Image Stabilizer) for more effective suppression of blur. Combining an O.I.S. (Optical Image Stabilizer, 2-axis) and a B.I.S.(Body Image Stabilizer, 5-axis), the 5-axis Dual I.S. compensates for larger movement which was conventionally uncontrollable, making it possible to use 4-step slower shutter speed. By making the most of both O.I.S and B.I.S., it is highly beneficial not only in wide angle but also in telephoto and in the adverse situations such as at nighttime or with one-hand shooting."

"The 5-axis Dual I.S. works in both photo and motion picture recording including 4K video. Panasonic LUMIX G DSLM (Digital Single Lens Mirrorless) Cameras offer a wide variety of digital interchangeable lenses and most of them will comply with this 5-axis dual I.S. in LUMIX GX85 and the B.I.S. compensates for the camera movement even when a lens without O.I.S. is used."

Other highlights include:

  • 16MP Live MOS Sensor
  • 2.76m-Dot 0.7x Electronic Viewfinder
  • 3.0" 1.04m-Dot Tilting Touchscreen LCD
  • UHD 4K Video Recording at 30/24 fps
  • Built-In Wi-Fi Connectivity
  • ISO 25600 and 10 fps Shooting with AF-S
  • DFD AF System, 4K Photo Modes

All of this tech is packed into a handsome, compact package. Personally, I like that Panasonic is offering dual-image stabilization more often these days. I think it's an excellent option, and it allows us to more easily use both our Panasonic and our Olympus lenses.

The Lumix DMC-GX85 will go on sale at the end of May for $799.99 with a 12-32mm F3.5-5.6 collapsible kit zoom.


Nimble Photographer Logo

The Lumix DMC-GX85 has a high Nimbleosity Rating. What does that mean? You can learn about Nimbleosity and more by visiting TheNimblePhotographer.com.

Want to Comment on this Post?

You can share your thoughts at the TDS Facebook page, where I'll post this story for discussion.

This is The Digital Story Podcast #526, April 5, 2016. Today's theme is "Is Aperture Priority the Ultimate Exposure Mode?" I'm Derrick Story.

Opening Monologue

Of all the exposure modes, I think Aperture Priority offers the best convergence of control and convenience. I like it because it keeps my head in the composition game without killing my creativity. In fact, I'm a far more expressive photographer in Aperture Priority mode. We lead off today's show with a closer look why.

Is Aperture Priority the Ultimate Exposure Mode?

Practically every camera offers Aperture Priority. You set the f/top and the camera sets the shutter speed. It's so simple, yet shooting in this mode is bound to improve your pictures. Here are some reasons why.

Austin-PEN_F-P1250023.jpg

  • Controlling Depth of Field. This is the biggie. Not every composition should have a soft background, nor should it be sharp from front to back. What works best for your subject?
  • Lens Performance. Most of my SLR optics are best at 5.8 to 11. But my Micro Four Thirds lenses are ideal at f/4 and not stopped down.
  • Keeps You In Touch with Your Camera. Have you ever drifted off while shooting without any idea of what's going on with your camera?
  • Natural Vignetting. Many lenses, especially those without in-camera correction, will vignette slightly wide open. You can use this to your advantage for portraits.
  • Motivates You to Shoot With Primes. As you get more hooked on Aperture Priority shooting, primes become more desirable because of their wider latitude of exposure settings.

In the News

Fujifilm releases several camera and lens firmware updates - covered by DP Review.

In addition to the X-Pro2 firmware update we reported on last week, Fujifilm has released a number of firmware updates for several lenses and camera bodies: the X-Pro1, X-Pro2, X-M1, X-E1, X-A1, and X-A2, as well as the XF 50-140mm F2.8 and XF 100-400mm F4.5-5.6 R LM OIS WR lenses. Changes and firmware versions vary based on model, but most camera body updates simply add support for a focus limiter function on the XF 100-400mm F4.5-5.6.

Member Quotes of the Week

Intelligent comments culled from The Digital Story Facebook page.

In regard to last week's Facebook Post: "Choosing to Go It Alone," we had some terrific comments, and I want to share them with you now.

Charles wrote: "Good for you Derrick and the best of luck. Although I switched to digital about a dozen or so years ago, I spent more years as a film photographer (Kodachrome 25, 64, and the 'high speed' 200) and will happily follow the analogue story."

Chris added: "I'm now in a position to start scanning my slides they're from back in 1981 onwards my latest love is a 1950s Mamiya 6 folder - film photography is FAR from gone! Bring it on Big D."

John kicked in: "I recently had my Nikon FE2 refurbished. My first camera was an oatmeal box pinhole. I miss the smell of chemicals and the feel of working under a red tinged light. Looking forward to seeing what you create!"

And finally Andrew wrapped it all up by commenting: "Good luck with this new venture. My film camera collection keeps growing. Your new site is probably going to do nothing to stop that trend."

Post your thoughts on our Facebook page. Believe me, I read them. Also, we have a question going on Facebook right now: "If you had to pick one film camera from the past, that you craved, but couldn't afford, what would it be?"

Editing Extensions Update

There's been another rush of editing extensions recently added to the Mac App Store. If you haven't checked lately, just enter "Editing Extension" in the search field. My current count of legitimate extensions is about a dozen. I just reviewed Color Filters on TDS. I really like it a lot. And don't forget about my lynda.com training, Photos for OS X Essential Training.

Updates and Such

In Aperture Exile? Easing the change to Capture One, with guest Derrick Story - I'll be the special guest on an upcoming Capture One Pro webinar on April 13 at 9:00 AM PDT. The webinar is free, and you can sign up here.

Eastern Sierra Reservation Forms Went Out - I sent out the workshop reservation forms to the Reserve List this weekend. If you were on the list and didn't get a form, please send me an email. The Eastern Sierra photography workshop begins Thursday evening, Oct. 20 and runs through Sunday, Oct. 23rd. If you want to get on the next round reserve list, then go to the TDS Workshops page and use the Send Me Info form to get on the list.

And finally, be sure to visit our friends at Red River Paper for all of your inkjet supply needs.

See you next week!

More Ways to Participate

Want to share photos and talk with other members in our virtual camera club? Check out our Flickr Public Group. And from those images, I choose the TDS Member Photo of the Day.

Podcast Sponsors

Red River Paper - Keep up with the world of inkjet printing, and win free paper, by liking Red River Paper on Facebook.

ImageFramer Take your photos to the next level with ImageFramer. Visit www.apparentsoft.com today.

MacPaw Creators of CleanMyMac 3 and other great software for Apple computers. Visit www.macpaw.com today.

The Nimbleosity Report

Do you want to keep up with the best content from The Digital Story and The Nimble Photographer? Sign up for The Nimbleosity Report, and receive highlights twice-a-month in a single page newsletter. Be a part of our community!

Want to Comment on this Post?

You can share your thoughts at the TDS Facebook page, where I'll post this story for discussion.

For only $5, you can add an exhaustive (but easy to use) collection of filters to your Photos for OS X app. The editing extension is called Color Filters for Photos, and it's worth a look.

pre-process.jpg

Like any Editing Extension, the easiest route is to purchase and download from the Mac App Store. In this case, Colors will only set you back $4.99. Once the download is complete, go to System Preferences > Extensions > Photos and turn on Color Filters. Now you're ready to have fun.

Open an image in Photos for OS X, then press the Return key to go to editing mode. At the bottom of the list on the right side, click on Extensions, and choose Color Filters from the popup menu.

color-filter-applied.jpg

In the Color Filters interface, you're presented with some nice pre-processing adjustments, such as highlights and shadows. Then you can move down to the filters themselves. There are six different sets, each with a healthy list of options. Just mouse over the different items on the list, and you'll see your image temporarily transformed with the filter. Find one you like, and click on it. The filter is applied. Click the Save Changes button to return to Photos.

Just like anything else in Photos, this process is totally non-destructive. While in Edit mode, you can press the M key to see the unedited version of the image, or choose Revert to Original to remove the effect altogether.

Color Filters is a well-coded, well-designed application. The performance is snappy, and the effects are terrific. Seems like a must-have investment for any Photos for OS X photographer.

Master Photos for OS X

(It's More Powerful than You Think)

For hands-on tutorials, be sure to take a look at Photos for OS X Essential Training on lynda.com. I cover everything you need to know to get the most from this surprisingly powerful image management application.

More Help and Insights on Photos for OS X

Don't forget about the Photos for OS X Special Feature Section on The Digital Story. It's a roundup of tutorials, videos, and articles focused on helping you master Apple's latest photo management software. You can also find it under Photography in the top nav bar.

Want to Comment on this Post?

You can share your thoughts at the TDS Facebook page, where I'll post this story for discussion.