June 2016 Archives

One of the new features in Capture One Pro 9.2 is called Create Albums From... It's something that former Aperture users will appreciate, because it allows you to choose a group of thumbnails, right-click on them, and put those shots in an album, on the fly.

For the most part, the tool works well, although I am going to suggest a tweak that I hope they incorporate in future updates. But first, let's see how it works now.

create-album.jpg

Using "Create Albums From"

second-dialog.jpg

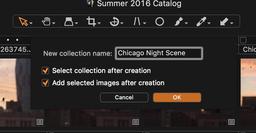
Select a group of thumbnails and right-click on them to reveal the popup menu command, Create Albums From. Then choose Selection. You'll see a second dialog box that gives you two choices: "Add selected images after creation" (which seems unnecessary to me, since that's the point of the whole thing) and "Select collection after creation," which opens the album after you make it.

At this point, I expected Capture One to put the new album inside the project I was working in. But instead, it places it at root level. So there's one more step of dragging the new album into the project. Not a big deal, but I think we should have the option to put the new album in its parent project. Maybe in the next update...

Overall, however, this feature is a timesaver. And it's available right now if you update to Capture One Pro 9.2. Being able to create albums on the fly makes it much easier for us to work with sub-groups of images while we're organizing our catalog.

More Capture One Pro Tips and Techniques

Improve your skills by watching Capture One Pro Essential Training now available on lynda.com. More than 5 hours of tips, tricks, and techniques. Plus many free movies using advanced techniques.

I've also created a dedicated Capture One Pro Training page on The Digital Story. You can follow all of the tips and techniques that I publish in one convenient spot.

Thinking About Making the Transition from Aperture or Lightroom? - Download my free eBook titled, Rocky Nook's Guide to Moving to Capture One Pro. I show you the steps to create a test library, then build the foundation for a smooth transition to Capture One Pro.

Want to Comment on this Post?

You can share your thoughts at the TDS Facebook page, where I'll post this story for discussion.

This is The Digital Story Podcast #538, June 28, 2016. Today's theme is "Chicago Takeout." I'm Derrick Story.

Opening Monologue

During my week in Chicago, I've learned a lot of things, talked with many people, and have taken many, many pictures. For those of you who joined me here, you know it was a rich, memorable experience. For those who couldn't make it, I have a takeout order for you. And that's the focus of today's show.

Chicago Takeout

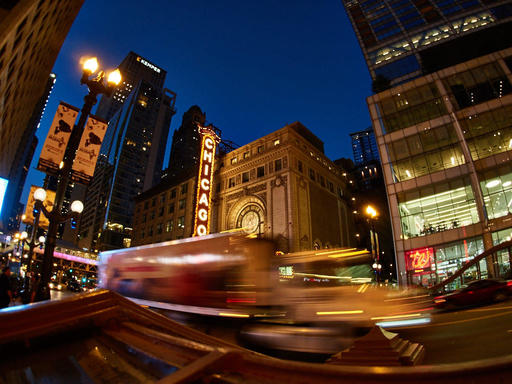
I have an hour left before I have to check out of the Travel Lodge on Wabash in downtown Chicago. You'll hear the grinding wheels of the train in the background as it rolls by my window. And I'm sure housekeeping will tap tap tap on my door at least once.
Chicago-P6243380.jpg

But before they reclaim the room for the next visitor to this great city, I want to share a few of my favorite moments from my week teaching at Out of Chicago.

  • The State of Mirrorless - Olympus, Panasonic, Sony, and Fuji were all sponsors and here showing their wares. But what really impressed me is that nearly all of the speakers and a large percentage of the attendees were carrying mirrorless cameras. Mirrorless is alive and well, and it's thriving in urban photography.
  • Packed Sessions for "Beyond the Pixel, Your Photography as Art" - I thought that my talks on going from digital capture to inkjet print would go over well, but I had not ideal that I would pack a double classroom, not once, but twice during the conference. I began the story with a silver gelatin print that I had made in 1988, and described my journey with printing. I then walked through a demo for making fine art greeting cards with Lightroom or with Photos for OS X.
  • The Nimble Photographer Workshop - I debuted this workshop in Chicago because I wanted to see how a one-day event would go. Based on my experience, I will be repeating this workshop in the future. My favorite parts where "What's in my Bag" by participants, and the MacGyver session.
  • Film is not Dead - I totally enjoyed conversation after conversation where someone was telling me how they dug out their film camera from the closet and are planning shoots with it. Everyone one of them said that theAnalogstory was their inspiration.
  • Midwest Photographers - Of all the great things that happened this week, meeting dozens of members of our virtual camera club who work and shooting in Illinois, Minnesota, Wisconsin, Michigan, Iowa, Indiana, Kentucky, and throughout the heartland of our country, was the biggest thrill of all.

In the News

The 'Warm-to-Cold Fader' Puts Color Temperature Control Onto a Filter via PetaPixel.

If you like to physically control as many of the settings on your camera as possible, the ICELAVA Warm-to-Cold Fader is right up your alley. This neat little lens accessory puts color temperature control onto a variable filter you simply twist to adjust.

Color temperature isn't something we think about much these days, given how easily it's adjusted in post (you ARE shooting RAW right?). But having a physical filter that lets you warm up or cool down your image gradually could definitely come in handy.

Hedge Adds Log Files

We have some great news to share today. Next to releasing Hedge 1.3.2 with some small improvements and fixes, we also have a bigger thing coming: Transfer Logs.

Transfer Logs Beta - We've been working hard the last few weeks to add a new Feature to Hedge Beta: the much-requested log files. Now it's also possible to see which files were copied, when they were copied, and what the source and destination hashes are. Give Hedge 1.4ß a go. Let us know what you think, so we can make it even better!

Free Test Ride - Not sure how much Fast Lane and the other Premium features will help you? We now have a week-long license available for you. Yep, it's free.

Keep these three things in mind...

  • Hedge is the fastest app for importing and backing up media on macOS.
  • Import multiple sources to multiple destinations, at the same time.
  • Every file copied by Hedge is cross-verified with the original.

There's a free version and a premium version. Use this URL, hedgeformac.com/tds and save 20 percent off the price of the pro version that provides the full Hedge experience with Fast Lane copies, unlimited simultaneous transfers, plus NAS and RAID support.

New lynda Title

We've just released, Flickr Mobile: Sharing Photos Anywhere. I had so much fun recording these movies, working only with my iPhone, iPad and Android tablet. It was a true nimble-rush. And I think you'd enjoy watching this training.

Fujifilm Instax Printer SP-2

Fujifilm Instax Printer SP-2.

Updates and Such

Just Released!: The Apple Photos Book for Photographers

You can get your eBook copy of The Apple Photos Book for Photographers for $15 by using the checkout coupon: APPLE15. That saves your 5$ off the price.

And finally, be sure to visit our friends at Red River Paper for all of your inkjet supply needs.

See you next week!

More Ways to Participate

Want to share photos and talk with other members in our virtual camera club? Check out our Flickr Public Group. And from those images, I choose the TDS Member Photo of the Day.

Podcast Sponsors

Red River Paper - Keep up with the world of inkjet printing, and win free paper, by liking Red River Paper on Facebook.

MacPaw Creators of CleanMyMac 3 and other great software for Apple computers. Visit www.macpaw.com today.

Hedge for Mac - The fast solution for moving photos and videos from memory cards to drives, or drives to drives for that matter. Learn more at Hedge for Mac.

inkdot Metal Prints Brilliant, affordable, and archival. Visit ink dot.com/metal-prints today.

The Nimbleosity Report

Do you want to keep up with the best content from The Digital Story and The Nimble Photographer? Sign up for The Nimbleosity Report, and receive highlights twice-a-month in a single page newsletter. Be a part of our community!

Want to Comment on this Post?

You can share your thoughts at the TDS Facebook page, where I'll post this story for discussion.

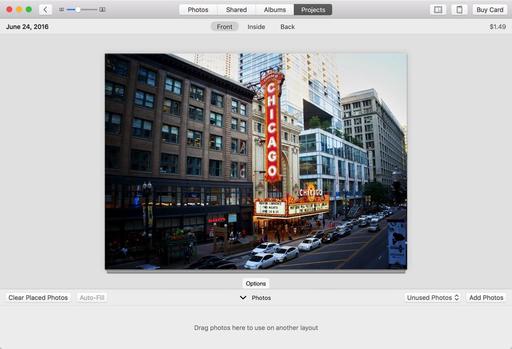
I've been printing fine art greeting cards for years. But the process has never been easier than lately using Apple's Photos app.

card-layout.jpg

In addition to integrating these projects with my overall Photos library, I have dozens of stylish templates to choose from. And since Photos saves each card that I make as a project, I can easily reopen it, reprint it, or change the photo all together.

I write about this process in my latest book, The Apple Photos Book for Photographers, which you can download right now. But I'll also share the basic steps right here so you can create your own works of art at home with an inkjet printer.

Creating a Fine Art Greeting Card with Apple Photos

I use Red River Paper because it offers a wide selection of card stock at very affordable prices. (Plus you can get envelopes and ink there too.)

For this project I'm using one of my favorites, 60 lb. Polar Matte double-sided 7" � 10" (catalog #1958). It's a bright paper with a nice tooth that feels good in the hands. Your cards will look and feel like works of art.

The reason why you want to go with 7" � 10" paper is because it folds down to a standard 5" � 7" card - the same dimensions that Apple uses for its folded pieces. In a pinch, you could cut down a larger sheet if necessary. But the Red River cards are also scored in the middle, which makes folding so much easier and professional looking.

As for printing instructions, I'll remind you that what appears in the dialog box is based on the print driver. So what you see on your computer might look different than what I'm showing here. Hopefully, you'll be able to take this information and adjust accordingly.

10-14-PrintDialog.jpg

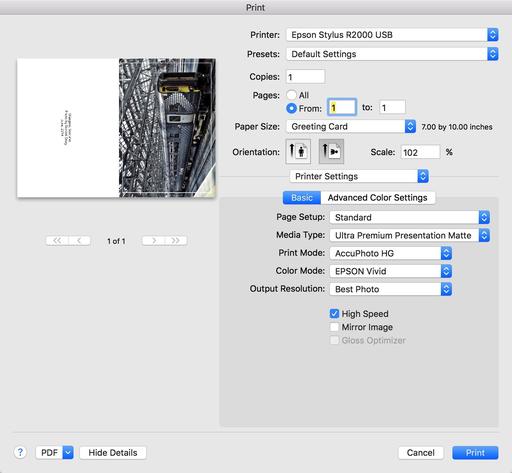
Instead of clicking on the Buy Card button, go to File > Print. You should see something like in the figure above. If you're seeing far less information on your computer, click on the Show Details button at the bottom of the dialog. That should expand the dialog box.

Since I'm only printing the outside of the card (I like to leave the inside blank for a personal message), I choose "Print from 1 to 1." Then we get to paper size. Chances are very good that you're not going to have a 7" � 10" option in this popup menu. But what you will have there is a Manage Custom Sizes option at the bottom. Choose that, and make your own preset. I named mine Greeting Card. The computer will remember the 7" � 10" preset you just created. So you only have to do this the first time.

After you have the paper size right, the card should look pretty good in the preview window. Mine came up just a tad short on the edges. So I set scale for 102 percent. That fixed the problem perfectly.

Now all that's left are the printer settings. You can add those in the popup that's labeled Layout. Click on it, and choose Printer Settings from the list. The most important part is having Media Type set correctly. In my case, the printer needs to know that I'm using matte paper. Check your settings one more time, then print!

Watching the card slowly emerge from the printer is the closest thing we have in digital photography to seeing an image magically appear in a tray of developer. Both are exciting. Let the card cure for an hour or so at room temperature before folding - that is, unless it's one of those emergency jobs you're making as you head out the door to an anniversary party. Then fold and go!

As you're sitting there in the car with the card in your hand, you might feel a little something. Let it wash over you and enjoy it. That's the feeling of being an artist.

The Apple Photos Book for Photographers

For photographers who are more than just casual snapshooters, or who are making the transition from Aperture or iPhoto, The Apple Photos Book for Photographers shines a light on the sophistication of this app and the ecosystem it taps into. Available as an eBook now, and coming to print later this year.

Get it for $15 using checkout code APPLE15!

Want to Comment on this Post?

You can share your thoughts at the TDS Facebook page, where I'll post this story for discussion.
Apple RAW Update 6.20 adds compatibility for 9 new cameras for its Photos app and system wide on Mac OS X. The new cameras are (including the PEN-F):

  • Canon EOS-1D X Mark II
  • Canon EOS 80D
  • Canon EOS Rebel T6 / 1300D / Kiss X80
  • Canon PowerShot G7 X Mark II
  • Panasonic LUMIX DMC-GF8
  • Panasonic LUMIX DMC-GX7 Mark II / GX80 / GX85
  • Panasonic LUMIX DMC-ZS100 / TZ100 / TX1
  • Sony Cyber-shot DSC-RX10 III
  • Olympus PEN-F

olympus-pen-f.jpg

RAW files from these cameras can be processed natively on Mac OS X. For a complete list on cameras supported, see Apple Support Document

The Apple Photos Book for Photographers

For photographers who are more than just casual snapshooters, or who are making the transition from Aperture or iPhoto, The Apple Photos Book for Photographers shines a light on the sophistication of this app and the ecosystem it taps into. Available as an eBook now, and coming to print later this year.

Get it for $15 using checkout code APPLE15!

For hands-on tutorials, be sure to take a look at Photos for OS X Essential Training on lynda.com. I cover everything you need to know to get the most from this surprisingly powerful image management application.

Want to Comment on this Post?

You can share your thoughts at the TDS Facebook page, where I'll post this story for discussion.

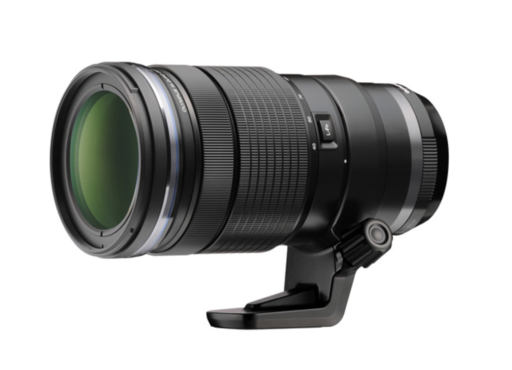
To tell you the truth, I'm still astounded every time I mount the Olympus ED 40-150mm f/2.8 PRO Lens to my OM-D E-M5 Mark II and look through the viewfinder. I'm suddenly placed right in the middle of whatever action I'm photographing.

Prune-Packers-P6192926.jpg College Baseball in Healdsburg, CA - ISO 800, 1/1250th, f/5.6 - Photos by Derrick Story.

The 40-150mm focal length mounted on the E-M5 Mark II gives me an effective view of 80-300mm. I then set the file format to Jpeg Super Fine, and use the digital doubler to increase the magnification to 160-600mm. And because of the outstanding 5-axis image stabilization, I can shoot handheld. Most of the time I'm leaning on a fence or railing to help me steady the shot.

Prune-Packers-P6193120.jpg

And then, when I want to shoot candids, I can back everything off, shoot at 40mms, and have a fast-focusing f/2.8 street shooting optic. So, only when I need a wide shot, do I have to change lenses.

All of this comes in a package that only weighs 31 ounces and measures 3.13" x 6.30". But once you extend the lens hood, you have a very respectable tele that measures up against any of the other rigs on the ball field.

olympus-tele.png

And this is why I'm so impressed each time I use the 40-150mm. I truly have the best of all worlds. A reasonable sized, handsome optic that can deliver between 80mms and 600mms of magnification at the ball park. The focusing is fast and accurate. The quality is outstanding. What's not to like? All I need now is a dog and an ice cold beer.


Nimble Photographer Logo

This product has a high Nimbleosity Rating. What does that mean? You can learn about Nimbleosity and more by visiting TheNimblePhotographer.com.

Want to Comment on this Post?

You can share your thoughts at the TDS Facebook page, where I'll post this story for discussion.
This is The Digital Story Podcast #537, June 21, 2016. Today's theme is "Five Things that We Forget (but shouldn't)." I'm Derrick Story.

Opening Monologue

The reason I start packing my camera bag a week before a big trip is to prevent my forgetting something. I figure that over the course of 7 days of use, I'll know what's missing, and maybe just as important, what's not necessary. There are times, however, when I still come up short. And when I do, these are the 5 items that typically I forgot to bring.

Five Things that We Forget (but shouldn't)

Ironically, over half the time it's not camera that I forget to pack in my shoulder bag. Let me explain.

hit-the-road.jpg

  • Business Cards - This is one of the most common forgotten items, not only by me, but by those I come in contact with on the road. Business cards are vital on the road for photographers, especially when we promise someone a photo that we captured of them.
  • Pain Reliever - They take up so little space, can be so important while traveling, and yet when I reach for them, they are often not there. I keep my pain reliever pills in a Compact Flash card case. It takes up oh so little space, yet is a godsend when needed.
  • Joby Micro Tripod - I love the JOBY Micro Tripod that takes up virtually no room, but can stabilize my mirrorless cameras. It costs on $21, but is worth 10 times more on the road.
  • Card Readers - Yes, my Mac has a built in card reader and I can send images wirelessly from my camera to my iPhone. And yet, there always seems to be a problem with this while traveling. I carry both the Lightening SD card reader and a Lexar micro SD reader. And they each have saved me numerous times.
  • Polarizer - I finally broke down and bought a polarizer for each of my active camera bags. It seemed when I had only one, it was always in the other bag. This is the most useful filter for both digital and analog photographers.

What items would you add to this list? Please share them on our TDS Facebook page.

In the News

This Simple Plugin Lets You Post to Instagram Directly from Lightroom via PetaPixel.

The LR/Instagram plugin does exactly what you think it does: it lets you post images to Instagram directly from Lightroom. No need to export and use some third party Web client or get the photo onto your smartphone.

Once you install the plugin and authorized your Instagram account (or several accounts), you're good to go. Simply drag the photo into the publish collection that matches the IG account you want to post to, fill in caption and tags, have the plugin crop or pad your photo to fit Instagram's parameters, and hit Publish.

The LR/Instagram plugin is 100% free to download and try, the makers simply ask that you show your support by registering it for $10 from Lightroom Plugin Manager if you like it. It's compatible with Lightroom CC/3.0 and higher, and works for both Windows (XP or later) and Mac OS X (10.7 or later).

inkdot Metal Prints

  • Printed on a gloss white metal surface creating a stunning vibrancy and depth to your images.
  • Metal print are printed using a process that infuses your image into the white coated aluminum, which creates a depth you simply cannot get with traditional printing techniques.
  • Our metal prints come ready to hang right out of the box. Each print comes with a mounted hanging unit on the back and special hanging hook. No drilling or hammering required, simply push the pin through the wall and hang.
  • Metal prints are water, scratch and UV resistant, ensuring your memories stay as gorgeous as they day you got them.
  • Quick turnaround, orders ship in 1-2 days.

You can learn more by visiting ink dot.com/metal-prints. You can get a 12" x 12" print for $65. And sizes go all the up to 30" x 40".

New lynda Title

We've just released, Flickr Mobile: Sharing Photos Anywhere. I had so much fun recording these movies, working only with my iPhone, iPad and Android tablet. It was a true nimble-rush. And I think you'd enjoy watching this training.

New Hasselblad Camera Announcement

On June 22 Hasselblad is rumored to announce a new camera that most likely will be mirrorless and contain a 50MP CCD full frame sensor. You can watch the lifestream of the announcement by going to this link.

Updates and Such

Just Released!: The Apple Photos Book for Photographers

You can get your eBook copy of The Apple Photos Book for Photographers for $15 by using the checkout coupon: APPLE15. That saves your 5$ off the price.

And finally, be sure to visit our friends at Red River Paper for all of your inkjet supply needs.

See you next week!

More Ways to Participate

Want to share photos and talk with other members in our virtual camera club? Check out our Flickr Public Group. And from those images, I choose the TDS Member Photo of the Day.

Podcast Sponsors

Red River Paper - Keep up with the world of inkjet printing, and win free paper, by liking Red River Paper on Facebook.

MacPaw Creators of CleanMyMac 3 and other great software for Apple computers. Visit www.macpaw.com today.

Hedge for Mac - The fast solution for moving photos and videos from memory cards to drives, or drives to drives for that matter. Learn more at Hedge for Mac.

inkdot Metal Prints Brilliant, affordable, and archival. Visit ink dot.com/metal-prints today.

The Nimbleosity Report

Do you want to keep up with the best content from The Digital Story and The Nimble Photographer? Sign up for The Nimbleosity Report, and receive highlights twice-a-month in a single page newsletter. Be a part of our community!

Want to Comment on this Post?

You can share your thoughts at the TDS Facebook page, where I'll post this story for discussion.
Flickr Mobile goes well beyond just taking pictures with your smartphone. The workflow extends to using your WiFi-connected camera too. The images that you capture with that device can be automatically backed up to your Flickr Camera Roll.

wifi-transfer.jpg

There are a couple things I like about this workflow. First, I'm not limited to using a smartphone for my photography. In the case of this demo, I have a Panasonic LUMIX GM5 connected to my iPhone running the Panasonic app. So I can use all of my Olympus and Panasonic lenses to get exactly the shot I want.

When I transfer the images wirelessly from the GM5 to the iPhone, Flickr sees them and automatically backs them up to my Flickr Camera Roll. This leads to the second thing that I like, which is automatic redundancy. At this point, I have the images on the camera's memory card, the iPhone itself, and online with Flickr. I didn't have to think about any of this. It just happens. Here's a video demonstrating the process from my Flickr Mobile: Photo Sharing Anywhere online training.

These images are also available for sharing online. When they're first uploaded to the Flickr Camera Roll, they're marked as private. So only I can see them. But for the shots that I want to share via my Photostream, I simply change the image from private to public, and it's instantly available to the world.

This is a great workflow for travel. It works with any WiFi camera and Android or iOS device, as long as there is WiFi available.

More Flickr Tips and Techniques

If you want to master Flickr on your mobile device, check out Flickr Mobile: Photo Sharing Anywhere. Desktop users might be interested in Sharing Photos with Flickr. Of course the platforms work well together too, and I discuss how you can integrate all of your devices to create a seamless photography workflow.

Want to Comment on this Post?

You can share your thoughts at the TDS Facebook page, where I'll post this story for discussion.
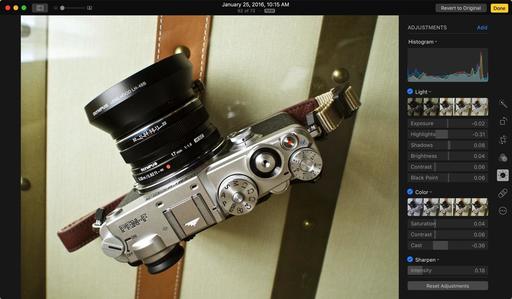
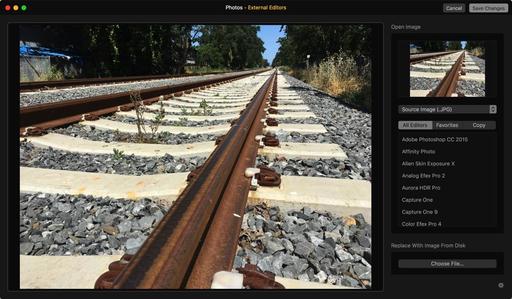
The 1.1 version of External Editors, a must-have 99-cent editing extension for Photos, continues to drive this application in the right direction.

External-Editors.jpg Version 1.1 of External Editors brings a new interface and nice improvements.

When I first wrote about the app in February, it didn't have a mechanism for handling RAW file transport. But version 1.1 features many refinements, including being able to convert RAW files to Jpegs or Tiffs in the extension itself.

This leads to many possible workflows. The one I've been using goes like this for RAWs.

  • In Photos, duplicate the RAW file and name it as an external edited version.
  • Open the duplicated RAW in External Editors and use the Convert To command to change it to Tiff or Jpeg.
  • Send it to the processor of your choice and edit.
  • Save the file and return to Photos.

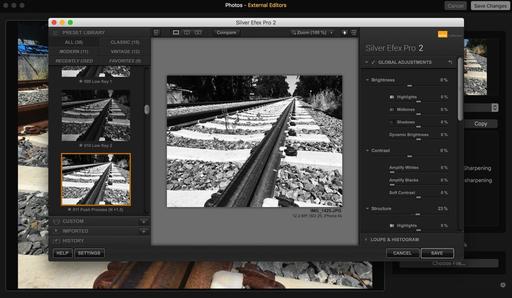
silver-efex-photos.jpg Silver Efex Pro 2 running with External Editors and Photos.

The edited Tiff or Jpeg will be positioned next to your original RAW in the Photos library. You have other workflow options, such as Replace with Image from Disk. It's worth playing with to find the sequence that works best with you. Because the bottom line is this: Exernal Editors opens up all of your image editing tools to your Photos library.

The Apple Photos Book for Photographers

For photographers who are more than just casual snapshooters, or who are making the transition from Aperture or iPhoto, The Apple Photos Book for Photographers shines a light on the sophistication of this app and the ecosystem it taps into. Available as an eBook now, and coming to print later this year.

Get it for $15 using checkout code APPLE15!

And dont forget... For hands-on tutorials, be sure to take a look at Photos for OS X Essential Training on lynda.com. I cover everything you need to know to get the most from this surprisingly powerful image management application.

Want to Comment on this Post?

You can share your thoughts at the TDS Facebook page, where I'll post this story for discussion.

If you're looking to up your mirrorless game, you might want to take a look at the Panasonic Lens Sale at B&H Photo.

panasonic-promo.png

Nine very nice optics with discounts between $50 and $200. The timing could be perfect if you're planning a photo vacation this summer. And if you're an existing B&H customer, check your e-mail inbox (or promotions tab) for an note titled "B&H Exclusive: Panasonic Lens Promotion Total Savings up to $350." They've sweetened the pot even more. That super-special offer ends on June 18.

The Nimbleosity Report

Do you want to keep up with the best content from The Digital Story and The Nimble Photographer? Sign up for The Nimbleosity Report, and receive highlights twice-a-month in a single page newsletter. Be a part of our community!

Want to Comment on this Post?

You can share your thoughts at the TDS Facebook page, where I'll post this story for discussion.

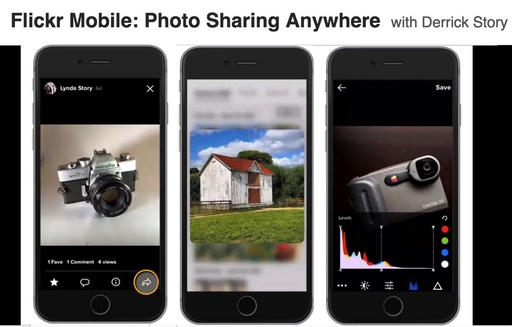
Flickr on the desktop is useful. But firing it up on your iPhone or Android device is a blast! And I show you why in my latest lynda title, Flickr Mobile: Photo Sharing Anywhere.

flickr-mobile-overview.jpg

In this title, you can learn to use the mobile version of Flickr to shoot and enhance photos, share them, and explore photos taken by other community members. The app is available for iOS and Android and offers the same great features as the Flickr website, in a compact form you can take on the go. Here's a overview movie that will show you the highlights.

In all honesty, I think this is one of the most enjoyable titles I've recorded lately. I think you'll really have a good time watching it.


More Flickr Tips and Techniques

Sharing Photos with Flickr is a deep dive into this venerable online photography platform, focusing on how to best use its tools with a Mac or Windows computer. I show you how to configure Flickr to automatically backup your images, organize them, and share your favorites with friends, family, and the entire online universe. This training will show you how to best take advantage of Flickr's 1TB of free online storage and its comprehensive set of imaging tools.

And if you prefer using an iOS or Android device for your Flickr experience, you definitely must take a look at Flickr Mobile: Photo Sharing Anywhere. It's fun and informative.

Want to Comment on this Post?

You can share your thoughts at the TDS Facebook page, where I'll post this story for discussion.
This is The Digital Story Podcast #536, June 14, 2016. Today's theme is "macOS Sierra for Photographers." I'm Derrick Story.

Opening Monologue

Last week I wrote a piece on The Nimble Photographer titled A Moment of Truth for Photos. My feeling was that Apple had to step up to the plate with something interesting for this app. And indeed they have. We'll focus on Photos and other photography goodies in macOS Sierra on today's show.

macOS Sierra for Photographers

Apple announced macOS Sierra during Monday's WWDC keynote address. The latest operating system has a number of goodies for photographers. Here are the highlights.

  • Live Photos Editing - The Live Photo Editing API allows third-party editing extensions to apply edits to an entire Live Photo, while retaining the motion and sound of the original Live Photo.
  • Photos-for-Sierra.jpg

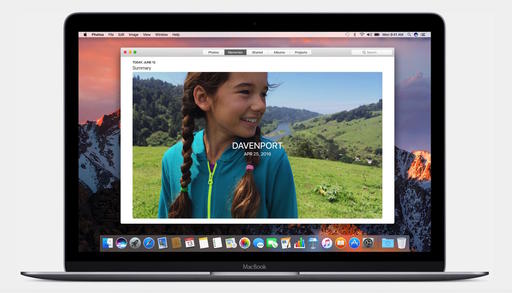
  • Memories - You've spent years capturing moments worth remembering. Now Photos can turn them into unforgettable experiences called Memories. And powerful new technologies make Photos even better at face recognition, let you display all your photos on a world map, and even allow you to search your photos by the objects and scenery in them. A new Memories tab appears along with the Photos, Shared, Albums, and Projects tab. In Memories, Photos for Mac automatically makes slideshows and collections of photos based on events, people, places, and more.
  • Brilliance Tool - Perfecting your photos like a pro is now even easier with the new Brilliance tool, which pulls in highlights and adds contrast to enhance details throughout your images.
  • Copy and Paste Between Devices - Continuity across your Apple devices also gets better in macOS Sierra. With Universal Clipboard, the contents of your clipboard are available across all your Apple devices via iCloud. You can easily copy and paste text, images, photos and video between your Mac and your iPhone and iPad.
  • Search Based on Objects and Scenery
  • Better iCloud Integration - Seamless integration with iCloud makes everything from your Desktop and Documents folder available on your iPhone and iPad so you always have access to the files you need.
  • Optimized Storage - Optimized Storage frees up space when your Mac starts getting full by storing infrequently used items in iCloud and reminding you to delete used app installers, and even clearing out duplicate downloads, caches, logs and more. Federighi showed a Mac with 20GB of free storage space; after running Optimized Storage, the amount of free space expanded to 150GB.

Rocky Nook's Guide to Travel for Photographers

I have open on my iPad right now Rocky Nook's Guide to Travel for Photographers, a free eBook just waiting for you to download.

And as a cool bonus (because I do have major connections at Rocky Nook, we're giving away 3 travel book bundles to our listeners who download "Travel for Photographers." The bundle includes: Architectural Photography, Street Photography, and The Traveling Photographer.

If you download the eBook, you will be automatically entered to win the travel bundle. Rocky Nook will randomly select the three winners next Monday, and I will announce on Tuesday's show.

Using Hedge to Improve Your Lightroom Experience

Because many users feel that Lightroom is slow on import, they are turning to Hedge for Mac because of its speed. If you're on the road, speed and reliability what counts. Then you can take care of your Lightroom when you come back home. This is particularly important for wedding and event photographers who need to protect their images and work quickly.

Keep these three things in mind...

  • Hedge is the fastest app for importing and backing up media on macOS.
  • Import multiple sources to multiple destinations, at the same time.
  • Every file copied by Hedge is cross-verified with the original.

There's a free version and a premium version. Use this URL, hedgeformac.com/tds and save 20 percent off the price of the pro version that provides the full Hedge experience with Fast Lane copies, unlimited simultaneous transfers, plus NAS and RAID support.

Out of Chicago - The Nimble Photographer Workshop Thursday June 24th

Over the course of the day, we'll explore the gear, techniques, and philosophy that enable nimble photography. You'll learn how to lighten your load and expand your creativity. We'll then put these ideas into practice and go out shooting. And finally, nimbleosity applies to post production too. Derrick will show you ways to minimize your time in front of the computer and increase your efficiency.

We have a couple seats open. You can sign up here. You can choose the workshop only, or signup for the entire conference.

Updates and Such

Just Released!: The Apple Photos Book for Photographers

You can get your eBook copy of The Apple Photos Book for Photographers for $15 by using the checkout coupon: APPLE15. That saves your 5$ off the price.

And finally, be sure to visit our friends at Red River Paper for all of your inkjet supply needs.

See you next week!

More Ways to Participate

Want to share photos and talk with other members in our virtual camera club? Check out our Flickr Public Group. And from those images, I choose the TDS Member Photo of the Day.

Podcast Sponsors

Red River Paper - Keep up with the world of inkjet printing, and win free paper, by liking Red River Paper on Facebook.

MacPaw Creators of CleanMyMac 3 and other great software for Apple computers. Visit www.macpaw.com today.

Hedge for Mac - The fast solution for moving photos and videos from memory cards to drives, or drives to drives for that matter. Learn more at Hedge for Mac.

The Nimbleosity Report

Do you want to keep up with the best content from The Digital Story and The Nimble Photographer? Sign up for The Nimbleosity Report, and receive highlights twice-a-month in a single page newsletter. Be a part of our community!

Want to Comment on this Post?

You can share your thoughts at the TDS Facebook page, where I'll post this story for discussion.
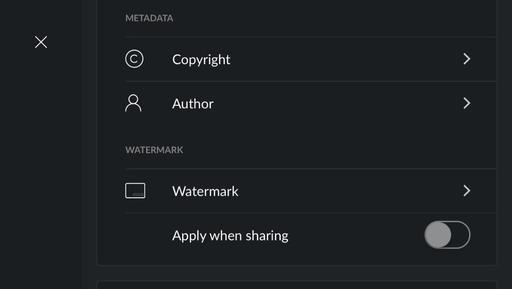
DxO continues to refine their ONE Camera with Firmware Update 1.4. Among the list of goodies, one that really caught my eye was adding author copyright to each image's metadata.

copyright-screen.jpg DxO ONE shooters can now set up automatic inclusion of their copyright, author info, and even watermark to their images.

I updated the DxO ONE via my iPhone. The procedure was simple and fast. In general, I have to say that the software interface for the camera is one of my favorite aspects of it. It's so easy to use. And these days, it's quite powerful too.

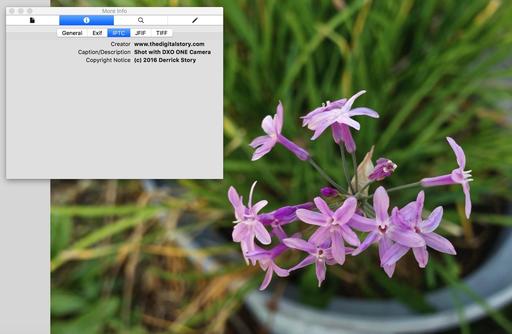
After the firmware update, I added my copyright and www.thedigitalstory.com for the author info. After all, I want people to know how to get a hold of me. I then opened the image in Photos for OS X and ran the picture through the DxO ONE editing extension for fine tuning. I exported the shot to my desktop and opened it in Preview.

Copyright-DxO.jpg

The Get Info window displays all of the information that I entered in the settings for my DxO ONE. This is a wonderful addition to an already full-featured camera.

The DxO ONE is available for $439, featuring a 1" sensor and excellent feature set.

Want to Comment on this Post?

You can share your thoughts at the TDS Facebook page, where I'll post this story for discussion.
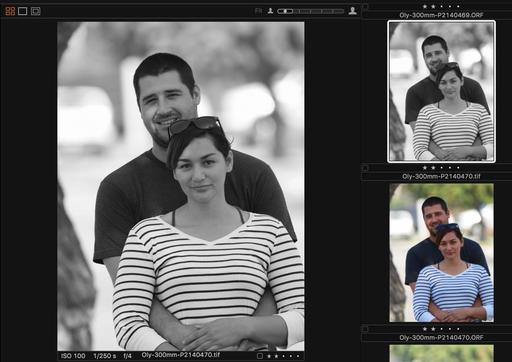
Just because you left Aperture or Lightroom behind, that doesn't mean that you have to abandon your favorite plugins too. I've been using Silver Efex Pro with Capture One, and the two get along just fine. This also works for other apps/plugins too.

What you might not realize is that, even though you've been using Sliver Efex Pro 2 as a plugin, there's an app in your Applications folder: Applications > Nik Collection > Silver Efex Pro 2.app. Capture One Pro can connect with that app using the Edit With command: Control-Click > Edit With > Silver Efex Pro 2.

01-Edit-With.jpg Start with the Edit With command in Capture One Pro.

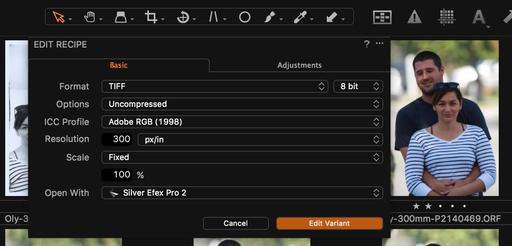
Going this route allows you to set up an Edit Recipe, where you can choose between Tiff or Jpeg, color space, resolution, and scale. A new file is created from the original RAW, and it is sent to Silver Efex for work. Here's how to do it.

02-Adjust-SilverEfex.jpg

The Actual Steps

  • In Capture One Pro, start with a RAW file. By doing so, the original image will stay protected.
  • Right-click on the RAW file and select Edit With...
  • Set up the job to your liking, including selecting Silver Efex from the Open With popup menu (see the top illustration). You can choose any of the apps that appear here.
  • Click on the Edit Variant button.
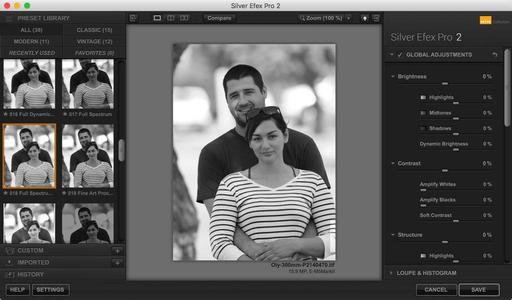
  • Adjust your image in Silver Efex, then click on the Save button.
  • The new Jpeg or Tiff will be returned to your Capture One Pro library.

Tiff-Returned-to-C1P.jpg File retured to Capture One Pro and placed alongside the original.

I've just stared playing with this workflow, so I'm sure there's more to learn. But this should get you pointed in the right direction is you want to continue to use your favorite plugins with Capture One Pro.

More Capture One Pro Tips and Techniques

Improve your skills by watching Capture One Pro Essential Training now available on lynda.com. More than 5 hours of tips, tricks, and techniques. Plus many free movies using advanced techniques.

I've also created a dedicated Capture One Pro Training page on The Digital Story. You can follow all of the tips and techniques that I publish in one convenient spot.

Thinking About Making the Transition from Aperture or Lightroom? - Download my free eBook titled, Rocky Nook's Guide to Moving to Capture One Pro. I show you the steps to create a test library, then build the foundation for a smooth transition to Capture One Pro.

Want to Comment on this Post?

You can share your thoughts at the TDS Facebook page, where I'll post this story for discussion.

Instagram-iOS.jpg

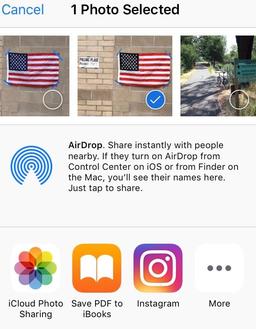
At last, Instagram will now be available in the Share menu for iOS devices, allowing users to send a picture directly from Photos and other iPhone apps to Instagram. Version 8.2 adds this feature, along with bug fixes and performance improvements.

I just tested this capability on my iPhone 6S, and it worked well. I opened an image in Photos for iOS, tapped the Share icon, scrolled all the way to the right, and tapped on More to add Instagram to my list of Share applications. I then selected the Instagram icon. The Instagram option will stay in the Share menu once you've added it.

I was able to write a caption, but there were no editing options. So if you like to use Instagram's filters and adjustment tools, then you'll want to post the old fashioned way. But if you're fine with the image as is, then you can save time via the new Share capability.

The Apple Photos Book for Photographers

For photographers who are more than just casual snapshooters, or who are making the transition from Aperture or iPhoto, The Apple Photos Book for Photographers shines a light on the sophistication of this app and the ecosystem it taps into. Available as an eBook now, and coming to print later this year.

Want to Comment on this Post?

You can share your thoughts at the TDS Facebook page, where I'll post this story for discussion.
This is The Digital Story Podcast #535, June 7, 2016. Today's theme is "To RAW or Not." I'm Derrick Story.

Opening Monologue

Many years ago I was giving a digital photography talk and was covering the scenarios where I thought shooting RAW was appropriate. A voice from the back exclaimed, "But why wouldn't you shoot RAW all the time?" My answer was a simple, "Why sir, I don't do anything all the time." Now years later, my opinion remains unchanged.

To RAW or Not

I have three capture modes that I usually choose from: RAW only, RAW+Jpeg, and Jpeg only. Today we're going to play a little guessing game. I'm going to put forth a shooting scenario, then pause and let you guess which capture mode I would use for that situation. Then I'll give you the answer and tell you why.

PC160499_DxO (1).jpg

  1. Auto race at a speedway
  2. High school senior portrait
  3. Wedding for hire
  4. Executive portraits for a commercial client
  5. Son's birthday party
  6. Family reunion
  7. European vacation
  8. Weekend backpacking trip
  9. Fall color in the Eastern Sierra
  10. Semi-pro baseball game

Answers: 1)Jpeg, 2)RAW, 3)RAW+Jpeg, 4)RAW, 5)Jpeg, 6)Jpeg, 7) RAW+Jpeg, 8)RAW, 9)RAW+Jpeg, 10)Jpeg

In the News

Magnum signed square print sale returns for third year as reported by DP Review.

Signed or estate stamped prints for $100 from over 60 Magnum photographers and artists will be available for a limited time, from 9am EST on Monday 6 June until 11pm Friday 10 June 2016, here: shop.magnumphotos.com

Magnum's Square Print sale is back, offering up museum-quality signed prints for just $100 each. Upwards of 70 prints are on sale from photographers like Martin Parr, Alex Webb, Rene Burri, Eve Arnold, Tim Heatherington and many more. Each photographer contributed an image that plays on a theme of 'The More or Less Decisive Moment(s)'.

The 6x6" prints are available for five days only, starting now through 11pm ET on Friday, June 10 at shop.magnumphotos.com.

Robust Backups with Hedge

I've been using Hedge for Mac for backing up my recent shoots. Essentially what I've been doing, is as soon as I get to my computer, I insert the memory card, run Hedge, and backup its entire contents to an external drive.

Then, when it's time to decide if the images go into Capture One Pro, Photos for OS X, Lightroom, or somewhere else, I just import them from the external drive. Once the shots are in two places, I'm free to erase the cards. Hedge is the software that makes this entire process so easy.

  • Hedge is the fastest app for importing and backing up media on OS X.
  • The simplest interface you'll find, yet very powerful under the hood.
  • It's built with video, photo and audio in mind.
  • Import multiple sources to multiple destinations, at the same time.
  • Hedge's Fast Lane is the fastest copy/verification engine you'll find.
  • Optimized for files 100 MB and larger, it's even faster than Finder.
  • Every file copied by Hedge is cross-verified with the original.
  • Full support for NAS, RAID and uploading to cloud providers.
  • Use Scripts to sort, transcode, rename, tag your media after import.
  • There's a free version and a premium version. Use this URL, hedgeformac.com/tds and save 20 percent off the price of the pro version that provides the full Hedge experience with Fast Lane copies, unlimited simultaneous transfers, plus NAS and RAID support.

    Do You Have a Film Story to Share?

    If you love film photography and would like to be featured on theAnalogstory.com, just send me a few paragraphs and up to six film-based pictures to theanalogstory@gmail.com. And if you have been over there lately, there's tons of great content.

    Updates and Such

    Just Released!: The Apple Photos Book for Photographers

    You can get your eBook copy of The Apple Photos Book for Photographers for $15 by using the checkout coupon: APPLE15. That saves your 5$ off the price.

    And finally, be sure to visit our friends at Red River Paper for all of your inkjet supply needs.

    See you next week!

    More Ways to Participate

    Want to share photos and talk with other members in our virtual camera club? Check out our Flickr Public Group. And from those images, I choose the TDS Member Photo of the Day.

    Podcast Sponsors

    Red River Paper - Keep up with the world of inkjet printing, and win free paper, by liking Red River Paper on Facebook.

    MacPaw Creators of CleanMyMac 3 and other great software for Apple computers. Visit www.macpaw.com today.

    The Nimbleosity Report

    Do you want to keep up with the best content from The Digital Story and The Nimble Photographer? Sign up for The Nimbleosity Report, and receive highlights twice-a-month in a single page newsletter. Be a part of our community!

    Want to Comment on this Post?

    You can share your thoughts at the TDS Facebook page, where I'll post this story for discussion.
A week from today many of us will be watching the WWDC keynote on our Apple TVs. Most folks will be listening for what's new in their favorite area of technology. For myself, I'm keenly interested in the next chapter of digital photography with Apple tools.

In many ways, I feel like we've been putting together a jigsaw puzzle the last couple years. The evolution of iPhone cameras, iOS photography apps, iCloud, and Mac-based software have all been spread out on a table while we try to figure out how to assemble them.

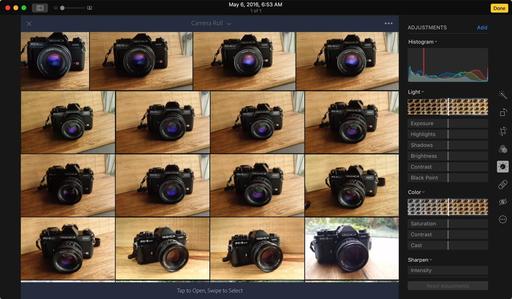
photos-for-osx-edit.jpg

The missing piece has been Photos for OS X. Although a lovely application in its own right, it's hardly the Aperture/iPhone replacement that enthusiast photographers were hoping for... at least at first.

The emergence of Editing Extensions has provided much-needed functionality for adjusting our pictures. And depending on which extensions you have available on your Mac, you can do everything from retouching a portrait to creating an HDR landscape. Add robust iCloud connectivity, and the pieces are truly beginning to make sense.

So what's missing? What I and many others will be hoping for on Monday, June 13 is improved digital asset management. Simply marking a picture as a favorite isn't adequate. If Photos for OS X is ever going to become that software that's it's capable of, then Apple needs to address the front end of post production.

It's then next chapter that I want to write for my book. And if Apple provides that missing piece, the picture that we've been hoping to see should be worth the wait.

The Apple Photos Book for Photographers

For photographers who are more than just casual snapshooters, or who are making the transition from Aperture or iPhoto, The Apple Photos Book for Photographers shines a light on the sophistication of this app and the ecosystem it taps into. Available as an eBook now, and coming to print later this year.

Want to Comment on this Post?

You can share your thoughts at the TDS Facebook page, where I'll post this story for discussion.

How I Use Flickr

Flickr remains an important component in my online photography presence. But how I use this platform has changed over the years.

dancing-ladies.jpg "The Dancing Ladies" by Derrick Story. Shared on the TDS Flickr page

When I first signed up long time ago, there weren't the variety of options for photo sharing that exists today. For example, there was no Instagram. I mention that particular service for a reason, because I love Instagram. Yet, my embracing it did not replace my activity on Flickr; it augmented it. And that's the story I tell in the following video: How my use of Flickr has evolved to where it stands today.

In general, that's what I like about new technology... such as Instagram compared to Flickr. It helps me fine tune my workflow. Instead of forcing one tool to meet all of my needs, I can tap the strengths of a handful of tools to create a better experience.

Take a look at my video titled, Tips for Using Flickr, and see what you think. How can you leverage these tools to create the best photo experience possible for you?


More Flickr Tips and Techniques

Sharing Photos with Flickr is a deep dive into this venerable online photography platform, focusing on how to best use its tools with a Mac or Windows computer. I show you how to configure Flickr to automatically backup your images, organize them, and share your favorites with friends, family, and the entire online universe. This training will show you how to best take advantage of Flickr's 1TB of free online storage and its comprehensive set of imaging tools.

Want to Comment on this Post?

You can share your thoughts at the TDS Facebook page, where I'll post this story for discussion.
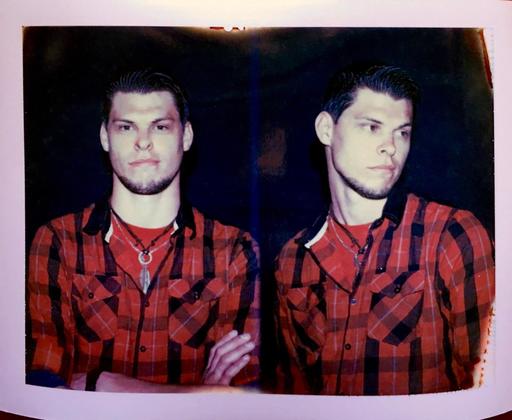
In addition to the Polaroids I want to digitize, I have lots of snapshots that I'd like to share online. I haven't done much of that in the past because, quite honestly, it was just too much hassle. But now, I have a simple workflow using my iPhone and Photos, that has changed all of that.

Chris Polaroid Portrait.jpg "Chris" by Derrick Story with a Polaroid MiniPortrait 203 Passport Camera.

First, I scan the print with the iPhone 6S and the Unfade app for iOS. This gives me an excellent source file that is semi-corrected too.

The image is automatically saved to my iCloud account, so it's there waiting for me on my Mac. I open it in Photos for OS X and apply the Enhance tool in the Edit menu. If I need to do more, I can use one of my favorite Editing Extensions such as Pixelmator Retouch or BeFunky.

The adjusted image is saved back to iCloud and is available on all of my iOS and Mac OS X devices. From there, I can share at will. The entire process takes about 5 minutes.

Do You Like Film?

Take a look at theAnalogstory - Film Photography in the Digital Age. We cover great 35mm cameras, personal stories from film photographers, quick tips, and even a camera shop. Stop by, won't you?

Want to Comment on this Post?

You can share your thoughts at the TDS Facebook page, where I'll post this story for discussion.
Apple Photos Book Cover.jpg

Do you think that Photos for OS X is some lightweight app just for iPhone-toting snapshooters? You're wrong. And I explain why in my latest guide, The Apple Photos Book for Photographers.

Photos for OS X has two things that neither Aperture nor iPhoto ever had: Amazing iCloud integration and a far more sophisticated architecture for third party software.

Let's address the later first. I'm not talking about roundtripping. Editing Extensions don't require creating bulky Tiff files to send to outside applications. You stay within the Photos ecosystem when applying advanced techniques such as HDR, B&W, skin softening, etc., even to the point that you can undo the changes from the editing extensions in Photos itself. You can even see the before and after in your Photos editing environment.

As for iCloud integration, it's amazing. Work on an image in Photos for OS X or Photos for iOS, and the changes are propagated to the other devices automatically. Backup is handled for you. The flexibility and response time is incredible.

So how do you take features like this and integrate them into a photography workflow? That's just one of the many topics I address for photographers in this book.

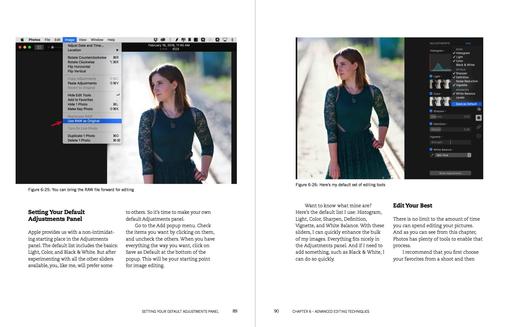
Photos-Book-Spread.jpg

So who is this for? Any shooter who likes the Apple ecosystem, wants powerful simplicity in their software, and enjoys using tools designed by great developers such as Macphun, DxO, and Affinity.

The Apple Photos Book for Photographers takes you on a journey into the world of photography like you've never read in a software guide before. I open chapters with anecdotes about my experiences as they pertain to the subject at hand. I cover the tools and techniques that help you simplify your workflow without giving up craftsmanship or creativity. You're going to love this ride.

We're releasing the eBook version right now. And you can get it for only $15 if you use Coupon Code APPLE15 at checkout. The print book will be out later this year. Start your journey now and explore what Photos for OS X can do for your photography.