March 2006 Archives

History of Photoshop

Photoshop Look Back

Adobe shipped Photoshop 1.0 in February 1990. The story of one of the original "killer apps" begins in Ann Arbor, Michigan (USA) with a college professor named Glenn Knoll. Glenn was a photo enthusiast who maintained a darkroom in the family basement. He was also a technology aficionado intrigued by the emergence of the personal computer. His two sons, Thomas and John, inherited their father's inquisitive nature. And the vision for future greatness began with their exposure to Glenn's basement darkroom and with the Apple II Plus that he brought home for research projects.

What follows is one of the most interesting sequence of events in software history. When I was editor for a defunct online site called Web Review in 2000, I worked with Adobe to publish a "look back" at the development of Photoshop to celebrate its 10-year anniversary. The article was a big hit.

But the folks who took over Web Review did the unthinkable and actually took many of its pages off the Internet, including the Photoshop article. Fortunately I was able to reconstruct it and posted it on Story Photography. It became the most popular page on the site. In fact, if you Google "Photoshop History," that article will be the #1 result.

Even thought I've refocused Story Photography to concentrate on weddings and portraits, I've kept all of the original pages intact online with their original urls. I'll be pointing to some of them on occasion from here. Seems appropriate that I start with my article titled, From Darkroom to Desktop—How Photoshop Came to Light. Take a look at it. I think you'll enjoy the story.

Technorati Tags:

Lightroom and Aperture

What happens when you get three gregarious photographers together for chat about the state of digital photography including some of its most popular tools? Harris Fogel dares to enter these waters as he interviews authors Peter Krogh, Derrick Story, and Mikkel Aaland -- all at the same time in San Francisco.
You can listen for yourself by visiting Mac Edition Radio and firing up this 20-minute interview. You can enjoy it right there in your browser, or download the piece and put it on your iPod. Either way, I'm sure you're going to like this conversation.

Just in case you're not familiar with these authors, Peter Krogh wrote the The DAM Book: Digital Asset Management for Photographers, Mikkel Aaland wrote Photoshop CS2 Raw, and Derrick Story's latest books are iPhoto 6: The Missing Manual and the Digital Photography Pocket Guide, 3rd Ed.

Technorati Tags: ,

Grab Shot 24 - "Shipwreck"

Shipwreck

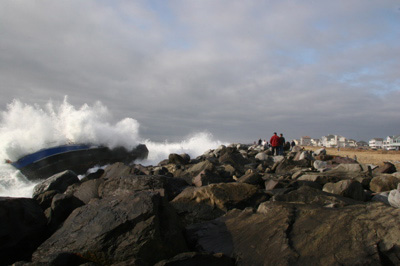
"This shipwreck occurred in Ocean Shores, WA," said Jordan Matthiesen. "I took the photo early in the morning on the day of the wreck. We were told that the captain had fallen asleep at the wheel and the ship crashed into the rocks. He made it out OK, but what a terrible loss!"

Jordan captured this shot with a Canon 20D. The ISO was set to 400 with the camera in shutter priority mode, 1/200th of a second. The focal length was set to 22mm.

If you have an interesting candid you'd like to share, take a look at our Submissions page, then send us your Grab Shot. If we publish it, you'll receive an ultra cool custom carabineer keychain.

Technorati Tags: ,

Rider

Where do you draw the line when taking pictures of strangers on location? Do you always need permission first? Is a model release necessary for every shot that includes a person? What's the difference between assertive and obnoxious?

During my last trip to Mexico, I had a good conversation with photographer-friend Ben Long that addressed these very topics. We were taking pictures in villages on the outskirts of Puerto Vallarta and found ourselves discussing what's appropriate and what isn't.

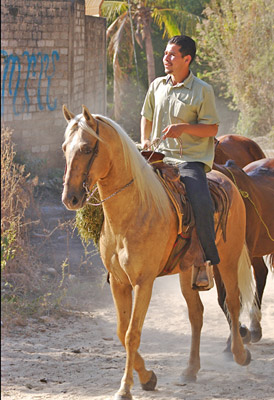
For example, the photo of the young man riding a horse was a situation where he knew I was taking photos of him. At one point he even smoothed his hair. I never asked formal permission, but did make eye contact before I took the shots. Since he is recognizable in this composition, I would not use this photo for commercial purposes. I didn't get a model release. But I am comfortable using this picture for teaching and reporting.

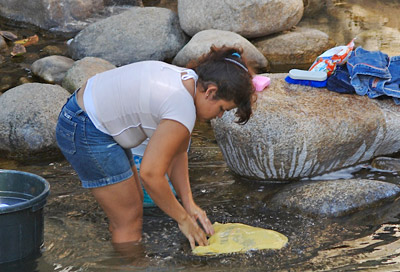
The second picture, below, is of a woman washing clothes in a stream. I was on the other side of the water with a steep grade between us. I was not able to interact with her during the shoot. Even though she is not recognizable by my definition, I would not use this shot for commercial purposes either. Technically, I believe I could. But I would be more comfortable with a model release. So, I'll use this image for teaching and leave it at that.

Washing Clothes

I have no absolute rules on this subject. I've included these images as part of the discussion. Keep them in mind as you listen to Ben and I talk about our adventures in Mexico.

Listen to the Podcast

Now that I've piqued your curiosity, it's time to listen to today's audio show titled, "Street Shooting Etiquette." You can download the podcast here (22 minutes).

Technorati Tags: , ,

ChronoPhoto 1.4

Even though I use Photoshop CS2, Elements 4, Aperture, Lightroom, and iPhoto 6, I like to play with new digital photography applications that are fun and useful. ChronoPhoto 1.4 is a joy to use and is the latest addition to my photography toolbox.
There are times when I have a folder of images that I simply want to view; they could be working files of mine or something that someone else has shared with me. I don't necessarily want to add them to my Aperture or iPhoto libraries, I just want to enjoy the shots, look at the EXIF data, and maybe play a quick slideshow. This is where ChronoPhoto shines. It lets you work with a batch of pictures and stays out of your way while doing so. No long term commitment here, just a good time.

And get this... it works as well with RAW files as JPEGs. ChronoPhoto uses Dave Coffin's dcraw engine to provide RAW support for over 200 cameras. Basically ChronoPhoto decodes the images on the fly and lets you view their thumbnails and enlargements. The rendering of the images is absolutely gorgeous. You'll feel like a better photographer just by using this application. Plus you get loads of EXIF data for reference, and can add comments and mark your images too.

ChronoPhoto keeps track of the originals on your hard drive. So you store your pictures where you want to store them. It has a "comparison" window called the Panorama that lets you look at specific photos together, then note your favorites with the marking pen. Simple, but effective.

There are a couple of gotchas. I couldn't get the transitions option to work for the slideshows, so only basic cuts were available. Plus the slideshow doesn't automatically take you back to your thumbnails page after it runs; you have to hit the ESC key to do that. Other than those two minor nits, everything else ran smoothly.

You can download ChronoPhoto 1.4 and try it free for 30 days. If you like it, you can buy it for $20 online. The company, Trois Bambous, is based in France, as is their distributor. My U.S. Visa card worked for purchase, but the Mastercard would not. Something to keep in mind when you're ready to buy. ChronoPhoto is for Mac OS X only.

Technorati Tags: ,

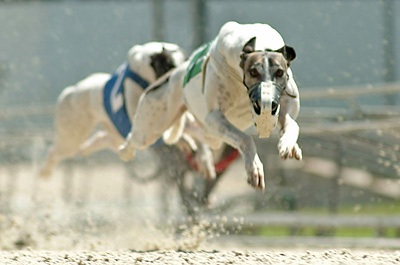
Sushi with Greyhound

"On a lunch break we took sushi to go and went to a nearby park," said Jan Boelsche. "Friends of mine brought their dog that had a great time being chased by us throughout the meadow. After that, everyone was a bit exhausted."

Jan captured this shot with a Sony DSC T3.

If you have an interesting candid you'd like to share, take a look at our Submissions page, then send us your Grab Shot. If we publish it, you'll receive an ultra cool custom carabineer keychain.

Technorati Tags: ,

Sunrise and High Dynamic Range

SF Morning HDR

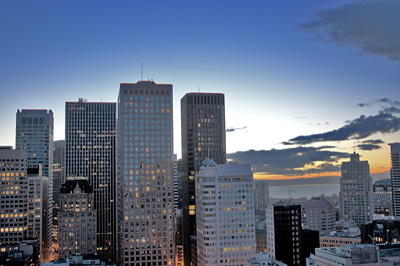
We've been talking a lot about night shooting recently, but morning light can be just as exciting. During a recent stay in San Francisco, I left my curtains open just in case there was a notable sunrise. Sure enough, early in the morning, someone slammed their door in the room next to me and I was awake. I looked out the window and saw this scene. Even though I wasn't really ready to get out of bed yet, I grabbed my camera and went to work.

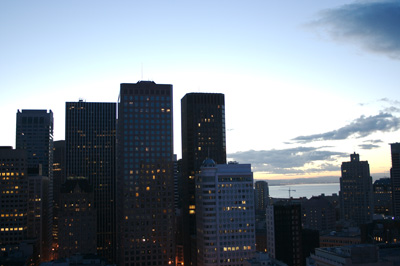
The picture, as it is displayed above, is how my eyes saw the scene. As we all know, how our eyes take in the world and how our camera captures it can be two different things. In order to record the image as I saw it, I used a technique called HDR -- High Dynamic Range. I'll be talking more about it in future posts and podcasts. But to give you and idea about how the camera saw the world, here's a "straight" shot without using HDR magic.

SF Morning Straight

Needless to say, there's quite a difference. More to come...

Technorati Tags:

Section of Panorama

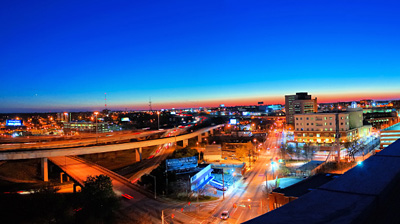
Here's a section of a full panorama that Seth Grad photographed on the roof of his office in downtown Atlanta. He stitched the shots together using Pixtra. His lens was set to 18mm (1.5x sensor), and he used a tripod.

"Another useful tip for shooting panoramics (especially at night)," says Seth, "is to use exposure lock or manual settings for exposure. If you have the time, you can spot meter a few areas of the scene and pick one exposure. Be careful not to use a very bright or dark area. Then, using exposure lock or manual settings, make sure the same exposure is used throughout the scene."

To get a feel for the breadth of his panorama, here's the full length of the image:

Full Pano

Great work Seth!

If you have an interesting candid you'd like to share, take a look at our Submissions page, then send us your Grab Shot. If we publish it, you'll receive an ultra cool custom carabineer keychain.

Technorati Tags:

New Pano, Broken Comments

SF Bay Panorama

In my latest podcast, I discuss how much fun panoramas are with digital cameras and great stitching software... stuff you probably have at your fingertips right now.

I've posted a new panorama of the San Francisco Bay that I took yesterday on my way back from a business meeting in Silicon Valley. I was attracted to the giant cloud mass that positioned itself right over downtown San Francisco. This panorama was composed with a Canon Digital Rebel XT, lens at 18mm, polarizer, and only three frames handheld (no tripod).

On an unrelated note, I've noticed that the Comments field on The Digital Story posts has been sending everything to the Junk folder. If you've posted a comment recently, and had it not show up, that's what's going on. (My apologies because reader comments are very important to this community.) I should have it fixed by the end of today. Will let you know once everything is working again.

Technorati Tags: ,

"Killer Panoramas" - Podcast 24

Burney Falls, CA

Digital panoramas are a great way to broaden the width of your lens, add resolution to your final print, and better convey the feeling of the location. By following just a few simple techniques, you can begin creating your own panoramas today.

The concept is to shoot a series of images with your digital camera, then stitch them together on the computer. At first, this might sound like a daunting task. But today's stitching software is so good that the procedure is almost automatic. I've been using Adobe's Photomerge software that's part of Photoshop Elements 4, which first came out for Windows, but now there's a Mac version too. (BTW: Photomerge is also part of Elements 3 on both platforms.) I also like the Photostitch software that comes bundled with Canon cameras.

To use Photomerge, simply put the series of images you want to stitch together in a folder. Then open Photoshop Elements and choose: File > New > Photomerge.

Photomerge as Part of Elements

Direct Photomerge to your series of images, then follow the prompts. Before you know it, you'll have your own stunning panorama. You can apply this technique to indoor photos too, such as this image I captured inside Grand Central Station in New York with a 2-megapixel Canon Digital Elph compact camera.

Grand Central Station, NYC

Listen to the Podcast

Now that I've piqued your curiosity, it's time to listen to today's audio show titled, "Killer Panoramas." You can download the podcast here (28 minutes).

Technorati Tags: , ,

Ben Long's Aperture Library Spanner

Aperture Library Spanner

"By default, Aperture's library is confined to a single volume. Consequently, when that volume fills up, you can't add any more images to your library," writes Ben Long on his Complete Digital Photography site. "However, using a little Unix trickery, it's possible to span the Aperture library across multiple volumes to extend your storage. The Aperture Library Spanner is a simple app that will automatically span your library across multiple volumes."

Here's a little background on this nifty tool that Ben is offering for free. We were hanging out in San Francisco on St. Patrick's Day talking about photography over beers. In passing, and quite innocently, Ben mentioned how to span Aperture volumes by setting up a few commands in the Terminal app. I said that a lot of people would use this if it had a nice user interface. Ben replied, "I could do that!" And he did. This is one of the reasons I'm such a strong advocate of photo buddies. By having someone to kick around ideas with, you'll explore things that you might not have considered otherwise.

Thanks to Ben putting together the Aperture Library Spanner, we have two techniques for coping with large libraries. I posted a piece on How to Manage a Large Aperture Library on a PowerBook and Ben's Aperture Library Spanner. In other words... shoot as many pictures as you want!

Technorati Tags: ,

Stunning City Night Scenes

SF Night Scene

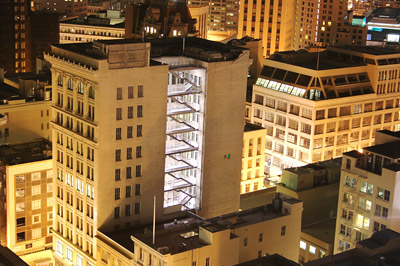
Cityscapes at night are one of my favorite subjects. It's difficult, however, to get a good angle without having to shoot through glass. Most hotels in San Francisco only let you open your window or sliding glass door part way for ventilation. On my last trip, however, I had a sliding glass door on the 22nd floor that opened all the way. A venerable night-shooting pot of gold.

I pulled my UltraPod II out of my backpack and strapped it to the floor lamp that I had positioned in front of the open sliding glass door. I set my Canon Rebel XT to ISO 200, turned on the self-timer, put the Exposure Compensation to +1, composed, and pressed the shutter. I captured quite a few compelling nightscapes in that session.

If you enjoy night shooting too, always pack your portable tripod and test the windows in your hotel room. Use great caution to ensure that your shirt pocket is empty so you don't accidently drop anything to the ground below. Work quickly and safely, and you can get some great shots.

Technorati Tags: , ,

Aperture Preferences

I've been using Aperture on a 17" PowerBook, and my biggest challenge hasn't been performance, but disk space. Storing hundreds and hundreds of RAW files on a measly 80GB internal hard drive is insane. Even if I cleaned off my iTunes music, video clips, applications, documents, and the OS itself, I'd still run out of room. I had to find a solution, and fast. So, I did.

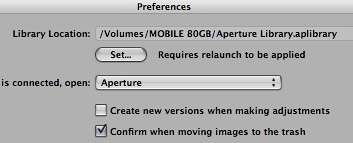
My approach was to carry with me a 80GB LaCie 80GB Portable External Hard Drive that was slim enough to fit unobtrusively in my laptop case. I then copied my Aperture Library on to the mobile drive and removed it from my PowerBook's internal disk (I recommend that you back up your Aperture Library to at least one other drive before deleting from your laptop). You can instruct Aperture to read the library on the mobile drive by going to its Preferences (Aperture > Preferences) and pointing the application to the new library location. You'll have to relaunch Aperture for the change to take effect.

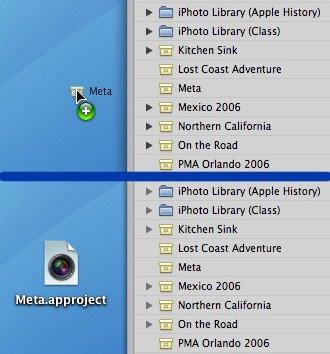
OK, so now you've relieved the pressure off your internal drive, but you've also created an 80GB ball and chain that's necessary to run Aperture. Or is it? One of the lesser-know features of Aperture is the ability to drag and drop entire projects out of the master library. You can use this to your advantage while working on a big assignment. Drag a project out of your master library (from the mobile drive) to your laptop's internal drive. If it's a large project, this will take a minute or two to copy.

Drag Project

Now quit Aperture, disconnect the mobile drive, and relaunch Aperture. Since the designated Aperture library isn't available (it's on the disconnected mobile drive), Aperture will create a brand new library on your PowerBook internal drive. Simply drag your project into Projects column in Aperture, and you can continue working on it just as if it were in your master library. Once you've finished with the project, you can copy it back into your Master library on your mobile drive (replacing the older version of it).

There are variations of this technique, but this should get you headed in the right direction.

Technorati Tags: , ,

Grab Shot 21 - "Snow Scene"

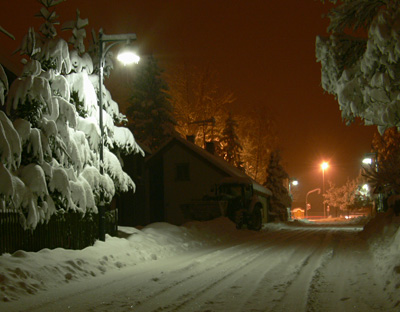
Snow Scene

"I love night shots," said Oliver Breidenbach. "Recently, we had a surprise snow storm resulting in the heaviest snow since the beginning of weather records [in Germany]. I had to wade through 2 feet of snow to get out of the house and onto the street to make these shots with my new Panasonic Lumix DMC-FZ30. Looking at these pictures help me remember the feelings that I had when I shot them."

Oliver recorded the shot with a 4-second exposure at f-6.3 with the ISO set at 80.

If you have an interesting candid you'd like to share, take a look at our Submissions page, then send us your Grab Shot. If we publish it, you'll receive an ultra cool custom carabineer keychain.

Technorati Tags: ,

Photo Web Site

A well-designed website to show off your photography is an effective store front for photographers. In this podcast, I discuss the importance of having a web presence, for amateurs as well as professionals. The process of assembling your images for online publication has similar benefits to putting together a print portfolio. It forces you to cull your best work and think about your strengths and weaknesses as a craftsman and an artist.

I then cover a few tips for building a site quickly. Today's web tools make this process much easier than a few years ago. I recently redesigned my Story Photography web site in just 3 hours using Apple's new iWeb application. I wrote about this experience in the post titled, Putting iWeb to the Test. You might want to read this post, no only for my description of the process, but also because there are lots of comments, pro and con, about iWeb as a Web building application.

Giles Turnbull also posted a good overview of three Mac web builder tools in his article, Mac OS X Web Builder Face-Off. Windows users have some solid options too. The leading contender is time-tested Dreamweaver 8, but it's a pricey $399 -- probably more than you want to spend. But fear not, you can get NVU, an open source web authoring tool for free. It's available for download for Windows, Linux, and Mac platforms.

Listen to the Podcast

Now that I've piqued your curiosity, it's time to listen to today's audio show titled, "Build Your Own Photo Web Site." You can download the podcast here (33 minutes).

Technorati Tags: ,

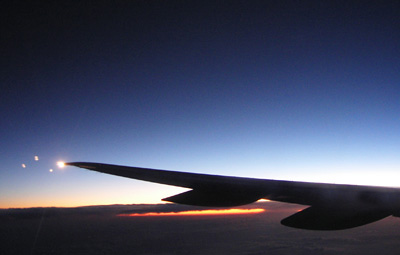
Airplane Window Sunset

A great way to pass the time while flying is to take pictures. That's why I always get a window seat if one is available. Here are a few tips to get the best shots possible.

Start by cleaning off the glass to remove smudges and hand prints left by the child that had your seat on the previous flight. Then turn off the flash; these are existing light shots only. I usually leave the white balance setting on "auto" and correct the color, if necessary, later on the computer. (BTW: one trick I've learned with daytime airplane window shots is that Photoshop's auto color correction works great on these types of images. Try it.) On digicams, I then set the focus on "infinity" or "landscape" so the sensor isn't fooled by the glass, and to prevent it from spending too much time trying to focus on clouds that don't have distinct edges.

Put the camera lens barrel right up against the glass (make sure, however, you don't have glass-to-glass contact with the front element of your lens). If you have a lens hood, use it. The idea is not to get reflections from the window in your shots. Now fire away.

I captured this image with a Contax SL 300R compact while flying from Florida to California. ISO was set to 200. Exposure was 1/4 of a second at f-2.8. I was able to get away with this long shutter speed by steadying the camera against the glass. I chose not to up the ISO to 400 because this camera gets a little noisy at that setting.

This shot is in celebration of Julianne Kost's new book, Window Seat. It's a beautiful work filled with lots of great Photoshop technique. I'll be attending a reception in Julianne's honor tonight at Adobe. Will let you know if I glean any further insights.

Technorati Tags: ,

Amber Tones

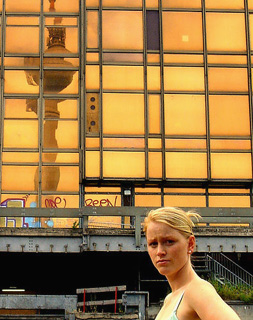
"This shot shows the intact facade of "Palast der Republik" (Palace of the Republic), an historical artifact of East German's socialistic past," said Jan Boelsche. "A few weeks ago they started to tear down the golden brown chunk of glass at the shores of river Spree, right in the heart of Berlin. Not an easy task to do -- its original architects warned the city council about the possible impact on the static balance of the whole area due to missing pressure on the underground, which consists mainly of water and sand. The girl is just disembarking from a sightseeing boat located at the landing stage opposite to the palace."

Shot with a Sony DSC T3. You can see more of Jan's work on his flickr page.

If you have an interesting candid you'd like to share, take a look at our Submissions page, then send us your Grab Shot. If we publish it, you'll receive an ultra cool custom carabineer keychain.

Technorati Tags: ,

Grab Shot 19 - "Morning Visitor"

Squirrel

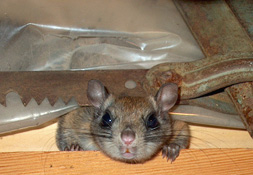
"We were staying at my brother and sister-in-laws cottage fast asleep. My oldest son woke us up about 3am saying there was a creature running around," said Rob Ternowski. "After chasing it, the 'creature' was spotted behind some plastic in a unfinished wall. It turned out to be this squirrel that we nick named Peanut."

"Peanut was caught in a live trap the next night. Seems he could not resist the allure of the peanut butter! He was released but was back again. Come to find out, my brother in law had been feeding him for a while now and had not told his wife..."

This picture was taken with a HP 618.

If you have an interesting candid you'd like to share, take a look at our Submissions page, then send us your Grab Shot. If we publish it, you'll receive an ultra cool custom carabineer keychain.

Technorati Tags: ,

First 2006 Wedding Posted

Wedding

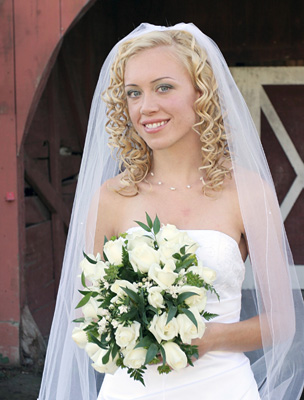
I just posted the first wedding gallery of the season. I used Apple's Aperture to manage the RAW files that I shot with my Canon 5D. For most of the wedding, I used the Canon EF 24-105mm f-4 IS lens, with and without flash. My assistant, Paige Green used a Canon 20 D with 85mm f-1.8 or 28-70mm f-2.8 L lens. She shot mostly existing light.

The online gallery was generated right out of Aperture using its Web Gallery tool, then uploaded to a .Mac server from Aperture. Only minor photo edits, mostly cropping, were applied to the images.

I talk about wedding photography in this week's podcast if you'd like to learn more about the process.

Technorati Tags: ,

iPhoto 6

Building web pages to share photos isn't always convenient, and email attachments have varying effectiveness depending on the photo size, email client, and recipient. A new method for easily sharing your pictures is to syndicate them via RSS using the new Photocasting feature in iPhoto 6.0.2 or later.

This technique enables you to share images in one of four resolutions by simply dragging them into an iPhoto 6 album that has Photocasting enabled. You will need a .Mac account to syndicate the pictures, but anyone with an Internet connection and an RSS reader can receive your pictures automatically. And if a recipient has iPhoto 6, he or she will automatically see your images in iPhoto itself.

To enable Photocasting, all you have to do is select an album in iPhoto by clicking on it once, then choose Share > Photocasting. iPhoto will ask you what size of image you'd like to syndicate: small, medium, large, or original. You can learn more about the details of those options in my recent post, Photocasting: Serve the Right Picture Size on Mac DevCenter. For onscreen viewing, "small" seems adequate, serving up 640x480 versions of your pictures.

Once you publish, you have the option of iPhoto generating an email with subscribing instructions that you can send to everyone you want to share your pictures with. If a recipient doesn't have iPhoto 6, then you might want to recommend a free RSS reader, such as NetNewsWire Lite.

I recommend that you make this a more full-bodied experience by adding informative titles to your pictures and writing some caption material in iPhoto's comment field. Both title and comments are served with the picture. The entire package looks great in all of the RSS readers I tested.

David Pogue and I cover Photocasting in great detail in our new book, iPhoto 6: The Missing Manual. It's available on Amazon.com now as preorder.

Overall, I think Photocasting is a great way to share photos. All you have to do is drop a new image in your enabled album, and it is immediately sent out via RSS. Your fans will automatically receive the pictures when they open iPhoto 6 or their RSS reader. Very nifty!

If you'd like to see a sample Photocast, subscribe to this URL: http://photocast.mac.com/dstory/iPhoto/dex's-photocast/index.rss.

Technorati Tags: , ,

Bride

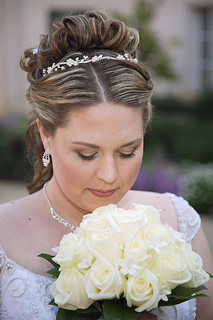
Preparation is the key to success for wedding photography. First, make sure you've gone over a shot list with the bride (and groom if he's interested) to ensure that you're on the same page, literally. You can use this shot list as a starting point. Let the bride add and subtract items as it suits her event. Help her organize the group shots so you can maintain flow throughout the day. For example, don't take all of the group shots right after the ceremony if possible. It slows down the pace too much.

Make sure your equipment is in order too. Bring a backup camera, flash, dedicated extension cord, plus lots of batteries, memory cards, and film (if film is part of the assignment). Test your setup before the actual shooting begins. This is especially important for flash photography.

If you have the time, consider attending the rehearsal the night before. This gives you the opportunity to go over the shot list one more time with the bride, scout out the location, watch the ceremony, and meet the family. Plus, customers always seem so impressed when I show up for the rehearsal. It starts the event out on a good foot.

Once the wedding is over, process you images in a timely manner. Couples like it when they can peek at their wedding pictures right after they get back from the honeymoon.

Listen to the Podcast

Now that I've piqued your curiosity, it's time to listen to today's audio show titled, "Wedding Photography Tips." You can download the podcast here (33 minutes).

Technorati Tags: , ,

Podcast

Today, I'm going to air show #22 on The Digital Story, and I've been thinking about what I've learned during this experience. Since you may be thinking about your own podcast right now, or know somebody who is going to take the leap, I thought I should share some of that knowledge.

I posted What I've Learned After 20 Podcasts on O'Reilly's Mac DevCenter (another site that I run). In that piece, I talk about the things I've learned after putting together The Digital Story audio shows. I mention that listeners are the true profits because their contributions of artistic talent, support, and ideas are the motivation that keep me going.

Just thought I should tell you that directly too...

Technorati Tags: ,

This month's Photo Assignment displays the work of 10 participants from The Digital Story community. The following shots are their interpretations of the theme, "fur." Great job with a difficult assignment.


thumbnail
Nelson Charette

Took Patches' picture in my home studio, She jumped up on my new black background. (Well so much for not having any cat hair on my background.) Shot with a Nikon D-70 at 1/25 sec f 16.0 iso 200, used to White Lightning lights.

thumbnail
Maarten Sneep

I bought a Tamron Macro lens (90 mm f/2.8, focusses to 1:1). For this shot I used an indirect flash and a tripod. Did I mention that my cat is pretty lazy, and really patient? The trouble is though, these macro lenses have a really shallow depth of view at short range, and my cat prefers to keep on breathing (I asked to hold its breath, but alas...). 1/60, ISO 400, f/4.

thumbnail
Jennifer Tofani

Well, this proved to be a tough one for me. I had a hard time coming up with an idea until I met my neighbors. Then, I needed to schedule the shoot with the teenage girl and her "Furends." The last day before the assignment deadline, I was able to get them all still together for this sweet moment. Meet Radha (the teenager), Chota the rat, and Koonti the Rabit. A sweet trio.
Camera RAW, Lens 18-70mm, 1/25 at f/4, ISO 800, Nikon D70

thumbnail
Emil Gustafsson

Captured with a Canon PowerShot A80.

thumbnail
Maarten Sneep

Tamron SP Di AF 90mm, 1/60 of a second, f/4, with indirect flash.

thumbnail
Jeramy Phillips

I was struggling a little with this assignment, trying to be a little creative and not do the "norm," since I do have cats and dogs around. While attending the Nebraska Winter Photography Workshop, we had a photo opportunity/lesson with a rodeo cowboy and his wife, and of course their horses.
Olympus C750UZ, 1/200, f/3.2, ISO100, 33mm focal length.

thumbnail
Jim Stocking

I had been trying to find something furry in my house, and finally found the answer under my feet, so to speak. Took the picture in my living room with morning light streaming in the window. I like the way the light played off the furry top of the slippers.
Canon PowerShot S45, flash turned off.

thumbnail
Mike Doel

When you suggested "fur" as the theme for the assignment, I knew right away that our dog would play a part. She sheds. ALOT. This picture shows her with one week's worth of her shedded fur -- from just one room in our house.
This was taken with my Digital Rebel XT in Program mode, and an external flash bounced off the ceiling to help soften the light.

thumbnail
Louise Thompson

Fur... most folks probably don't often first think of seals as 'furry,' but they do have beautiful, luxuriant fur, covering all that blubber!
Nikon D200, 1/60, f/6.3, 200mm, ISO160, lens 18-200mm VR

thumbnail
Lou Ann Madden

This is Bubba... Shot with a Nikon D100, Nikon AF Nikkor 50mm 1:1.8 D, f/2.20, 1/20 sec

The Photo Assignment for March. 2006 is "friends." If you'd like your shot considered for publication, send it in by March 31. For more information, see our Submissions page. Thanks again to all who participated.

Technorati Tags: ,

Grab Shot 18 - "On Duty"

Guard on Duty

Jennifer Tofani spotted this guard one morning while traveling in India. " I was fascinated by his pose and the relaxed stance of his slender form," said Jen. "He moved a second latter so I didn't get a chance to work the scene further."

This brings up a good shooting tip. When you spot an interesting subject, take the shot immediately, even if it isn't the perfect composition. Then, once you get the first shot, you can work the scene more if the subject allows you to. Often, everything will change before you get the opportunity to take another frame, as in this case with Jen's shot. Fortunately for her, the first shot is terrific!

Camera data: Nikon D70, File Format Shot: RAW (I am really hooked on RAW,so many great options!), 1/80s at f/8, Shutter Priority, ISO: 200, Focal Length -- 70mm, Lens -- 18.0 - 70.0 mm f/3.5-4.5.

If you have an interesting candid you'd like to share, take a look at our Submissions page, then send us your Grab Shot. If we publish it, you'll receive an ultra cool custom carabineer keychain.

Technorati Tags: ,

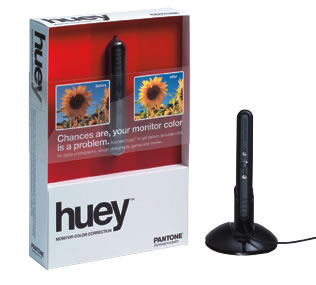
huey screen calibrator

Calibrating your computer monitor is a lot like carrying a tripod. You know you should do it, but it's often such a hassle, you don't. I've been using the Spyder 2 to keep my monitor in check. It's a nice device, and the software is decent, but the Spyder isn't portable or simple enough for me justify taking it on the road. While at the PMA show in Orlando, I was able to test the new huey by gretagmacbeth ($79 on Amazon). It's about the diameter of a thick writing pen and a bit shorter. So, there's really no excuse to leave this device at home.

The huey is both a screen calibrator (LCD and CRT) and a room light monitor. The first part we all know about. It calibrates your computer monitor so the colors you're viewing on screen (in theory) are the same as on other calibrated monitors. Plus you can sync your monitor to your output devices so you have accurate color all the way through your workflow -- or at least that's the hope. The huey makes this process easy. Its bundled software works with Mac OS X 10.2 (or later), Windows 2000 and XP. The Mac version, which I tested, installs an application, system preference pane, and menu bar shortcut. It's well designed and fun to use.

But the truly ambitious aspect of this device is that it endeavors to monitor the room lighting and adjust your monitor on the fly if the lighting changes. This is particularly helpful when you're working on long image editing sessions in rooms with natural light. And since the huey is so portable, laptop users can stash it in their travel bag and enjoy accurate color on the road.

This all sounds great, but the real test is will the huey help me make better prints? Since I'm on the road right now, I'm not able to verify yea or nay as to its effectiveness. So I looked up the huey on Amazon and read its reviews. Both reviewers (as of March 1, 2006) said that the device did not help them make better prints. You can also read a fairly in depth review on Northlight Images, although that review wasn't definitive on the huey's ability to help us make better prints.

So, is the huey worth 80 bucks? Well, for gaming calibration and for quickly adjusting the way your monitor looks, it's pretty slick. I really like using it. But I think there's some question concerning its ability to improve your color workflow. For that, I'm going to have to test it with my printers and post a comment below. If you've had a chance to test the huey, please share your comments for others.

Technorati Tags: , ,